
In this tutorial, we will explore how to transfer a domain from Hostinger to another provider and how to obtain the necessary auth code for the transfer.
If you’re considering switching providers, there are a few key points you should know about the transfer process.
- To transfer a domain, you must first request the auth code from your current provider.
- In some cases, you’ll also need to unlock the domain; otherwise, the transfer won’t be possible. Specifically, Hostinger automatically locks domains, so you’ll need to complete this additional step.
- In some cases, you’ll also need to unlock the domain; otherwise, the transfer won’t be possible. Specifically, Hostinger automatically locks domains, so you’ll need to complete this additional step.
Now, let’s walk through the complete procedure to prepare your domain for transfer from Hostinger to a new provider.
How to Transfer a Domain from Hostinger
Transferring an internet domain from Hostinger requires two essential steps:
- You must unlock the domain; otherwise, you won’t be able to proceed with the transfer.
- You need the auth code to initiate the transfer.
After unlocking the domain from the Hostinger private area (I’ll explain how in the following steps), you can provide your auth code to the new provider.
If you’ve chosen SupportHost as your new domain provider, the transfer process is straightforward.
- Open the domain registration and click on “Transfer“.
- Enter your domain and then click “Check.”
- In the next step, enter the auth code in the highlighted field and click “Add to Cart.”
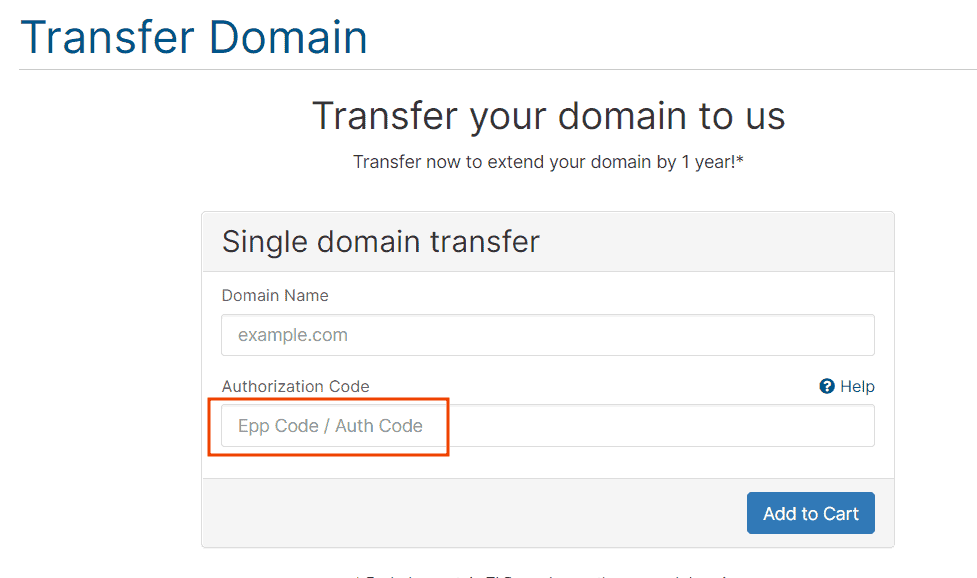
Now, all you need to do is finalize the order. Remember that the transfer includes a one-year domain extension.
To transfer your site, simply order the plan you prefer and select the “Transfer your domain from another registrar” option. If you switch to SupportHost, you can outsource your site migration to us for free.
How to Request the Auth Code on Hostinger and Unlock the Domain
If you want to transfer your domain from Hostinger to another registrar, you must first prepare your domain for transfer by following these two steps:
- Unlock your domain.
- Retrieve the transfer code (listed as the Secret Key on Hostinger).
You can complete the entire procedure from your Hostinger account.
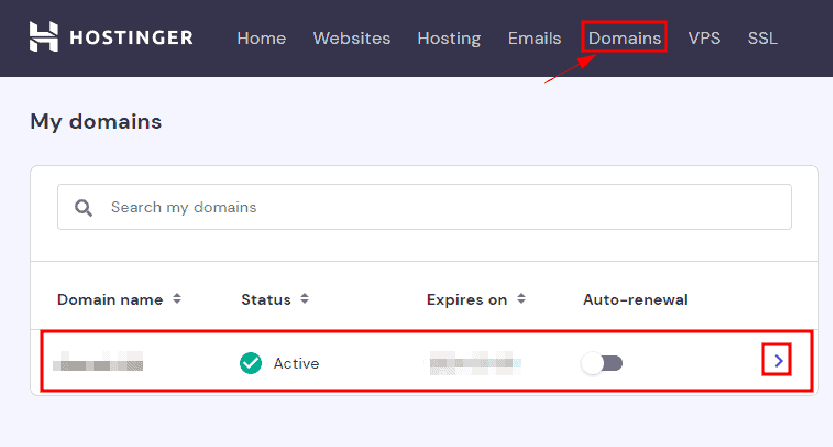
First, log in to your private area on Hostinger, and click on the “Domains” tab in the top menu.
This will display a list of all the domains associated with your account. Locate the one you want to transfer, and click on the arrow (>) as shown in the screenshot.
The management window for the selected domain will open, showing basic information such as domain status, expiration date, and nameservers. From this “Domain Information” section, you can view your domain’s auth code on Hostinger by clicking the eye icon next to Secret Key.

To proceed with transferring the domain from Hostinger to another provider, you need to unlock the domain from this same section. Simply click on the slider in the “Transfer Lock” section to disable the lock. If the lock is on, the slider is purple; when you turn it off, it turns gray.

Note: If you cannot transfer the domain, for example, because less than 60 days have passed since registration, the lock will automatically re-enable when you try to deactivate it.
If you do not see the option to remove the lock, you will need to contact Hostinger support.
Once you’ve retrieved the auth code and unlocked your domain on Hostinger, you can provide the code to your new provider and proceed with the transfer.
Ready to build your WordPress site?
Try our service free for 14 days. No obligation, no credit card required.

