
We’ve been posting on our blog about Google Chrome and how it will behave in the future regarding sites that don’t use a secure https connection.
In this article we are going to see how to switch from http to https using WordPress in a few simple steps.
Whether you’re using a CMS like WordPress or Joomla or you’ve created a static HTML site you’ll need to make changes in order to offer the HTTPS secure connection to all visitors to your website.
Google has put a lot of effort into trying to make the web more secure. Using a secure connection has SEO benefits and more accurate referral data.
Basically if you want to switch from http to https now is the right time to do it.
Table of Contents
Many of our customers are asking us, after activating the encrypted connection for their website, how they can view their website through https and not through http anymore.
But first let’s see what HTTPS is and why it’s important for your website to perform this step.
What is HTTPS?
HTTPS is an acronym that stands for Hyper Text Transfer Protocol Secure, which is a protocol for securing communications between browsers and servers.
In the image below we show the difference between a secure and a non-secure communication.

As you can see, the communication between the browser and the server is encrypted. This prevents hackers from reading and modifying data while communication is happening between the server and the browser.
So, even if a hacker is able to intercept your communication, they wouldn’t be able to read it thanks to the encryption.
This is why using a secure connection is necessary when there is an exchange of sensitive personal information. Any website that uses login credentials should use a secure connection.
How HTTPS works
HTTPS encrypts all communication between the browser and the server using an encryption protocol. This protocol is called Transport Layer Security (TLS), formerly known as Secure Sockets Layer (SSL).
This protocol protects communications using a system called asymmetric public key infrastructure.
This system uses two different keys to encrypt communication between the parties:
- Private key: this key is stored by the site operator and is kept private. It is used to decrypt the information encrypted by the browser with the public key.
- Public key: this key is available to all those who want to interact with the website. Information encrypted with this key can only be decrypted using the private key.
Technically, HTTPS is nothing more than an HTTP connection that uses TSL/SSL encryption.
When a user connects to a web page, the page sends its SSL certificate that contains the public key, which is necessary to start the secure session.
At this point, the browser and the server perform a process called SSL/TSL handshake, which is a series of communications aimed at establishing a secure connection.
Adoption of HTTPS
Over time, more and more websites are using an HTTPS secure connection. On Builtwith we see the adoption rates.
90.99% of the top 10,000 sites globally are using SSL.

87.05% of the top 100,000 websites worldwide use SSL.

70.47% of the world’s first million websites use SSL.

In these graphs we also see how over the years more and more websites are using this secure connection.
Moszcast shows us that 97.5% of queries are in https, a significant increase from 26% in January 2016 and 77% in February 2018.

Google is also moving in that direction, trying to achieve 100% encryption on their products:

According to data from Firefox and Let’s Encrypt over 80% of websites currently load using a secure connection. A significant increase from 27% in 2014.

Of course, we don’t recommend using HTTPS just because everyone does. There are benefits to using HTTPS, let’s see what they are.
What advantages do we have by using HTTPS?
As I mentioned earlier, there are several advantages to using an HTTPS secure connection, so let’s see why we should decide to use it on our website.
In my opinion, this is one of those cases where it’s actually better to ask yourself why not. Nowadays most hosting services offer SSL certificate included in the price and we are obviously among them. By following this guide in a few simple steps you can set up WordPress to properly use HTTPS, so why wouldn’t you want to use the secure solution? But let’s see what benefits it brings us anyway.
Security
There is no need for too many explanations. The main reason why you want to use encrypted connection is for security matters.
As I explained above, using an encrypted solution provides security when transferring users’ personal data. For this reason, proper use of a secure connection is absolutely recommended (though not required by law) on all websites that handle sensitive user data, such as e-commerce sites.
Even if your website doesn’t handle users’ personal data, perhaps it’s a simple blog, you will surely have to log in from time to time to add or edit content. In that case your password would be sent in clear text if you use HTTP instead of HTTPS with the result that you could be the victim of a man-in-the-middle attack and a hacker could gain access to your website.
Performance
When using HTTPS you can use HTTP/2 which allows parallel downloading of files.
Besides HTTP/2 you can use HPACK compression with Huffman encryption, push server and ALPN extension.
In the past using an encrypted connection added load to the server, but now this phenomenon is much reduced.
SEO
Since 2014, Google has stated that HTTPS is a ranking factor. Although it’s a factor that carries less weight than others, it is worth using to try to beat the competition, or at least not fall behind in a world where the vast majority of websites use an encrypted connection.
An analysis of 1 million urls done by Matthew Barby points out a correlation between top positions and HTTP adoption.

Referral
If you use Google analytics you can see the referrals, meaning which pages your users come from.
If a user goes from a website with an HTTPS connection to your site in HTTP the referral is lost, and that user will be seen as direct traffic.
However if the user goes from a page with HTTP to a page with HTTPS the referral is transmitted.
So if you want to have more accurate information within Google Analytics make sure you are using HTTPS correctly.
Trust
A Globalsign survey shows that 28.9% of visitors look for the green padlock in the browser address bar. Additionally, 77% are concerned that their data could be intercepted and used.
You can use this to your advantage by giving your users more confidence by displaying the green padlock in the browser.
Browser Alerts
As of today virtually all browsers show a warning if the connection is not secure. As I mentioned in the previous paragraph many users are concerned about their data and a non-secure site alert shown in the browser is certainly not the way to gain their trust.

Which certificate to choose
Let me start by saying that on all SupportHost hosting accounts you have the free SSL certificate from Let’s Encrypt available. This is automatically activated by the server at 1 am. Note that the domain must point correctly to the server in order to generate the SSL certificate.
If you have specific needs you can choose one of our paid SSL certificates. In another article I discuss in detail how to choose an SSL certificate. Let’s see what the differences are between the various paid certificates.
Domain Validation: these are the cheapest SSL certificates that validate the domain via email or dns. They allow you to generate an SSL certificate in a few minutes without having to send any kind of documentation.
Organization validation: this type of certificate validates your organization/company. Usually it takes 2-3 days for validation and documentation is required.
Extended validation: This certificate requires an extended validation from your company and release times are 2-7 days. This type of certificate allows you to have the Green bar as seen on some major websites and banking sites.
How to install the SSL certificate
If your website is hosted with us, you don’t have to do anything. The certificate is installed automatically on our servers.
Every night at one o’clock the system checks and if your domain points to the server the certificate is generated automatically.
In some cases it is necessary to generate the certificate manually, like if your website is already online and you cannot wait until the next day because your site shows an error.
In this case you can generate the free certificate manually but you still have to make sure that the domain points correctly to the server.
If you have decided to use a paid SSL certificate you can follow the tutorial that explains how to install an SSL certificate.

Switching from http to https with WordPress
Let’s start by saying that if your website is reachable via http and https at the same address, it’s possible that Google will penalize it as duplicate content. This is obviously a situation to be avoided, so let’s see now how to do it. The operation will be done in two simple steps:
- We need to make WordPress load all the content using the https connection;
- We need to set a 301 redirect from the http version to the https version in order to avoid duplicate content;
First of all we need to do a full backup of the site in case something goes wrong during the process.
If you need it I published a video tutorial that explains how to perform these operations.
The first step is to change the WordPress url from http to https. WordPress saves this information in the database, and in some cases these settings are serialized, meaning that if we do a simple “find and replace” on the database we can create display problems to the website because we are going to corrupt the serialized data.
But in addition to the settings it is also important to change all the resource calls. To be able to see the green padlock in the address bar of our browser it is necessary that all resources are loaded with a secure connection. We are talking about images, style sheets (CSS) and JavaScript.
In most cases (unless it is an old or poorly designed theme) stylesheets and CSS load using the same protocol as indicated in the website settings. In this case since we modified everything using WP Migrate DB these files should correctly use the https protocol.
The url of the images contained in the post are instead “written” in the text of the post with HTML code. This “find and replace” operation will allow us to correctly modify all the image urls as well as the rest.
Let’s install the WP Migrate DB plugin by Delicious Brains through the WordPress interface and activate it. This plugin will allow us to perform a “find and replace” on the database and will take care of changing the setting even where the data is serialized without corrupting it. That’s why this plugin is useful both in this case to switch from http to https and also when we decide to change WordPress domain.
Alternatively you can use WP-CLI’s function for searching and replacing in the database. Again, changes to the database are made without corrupting the data.

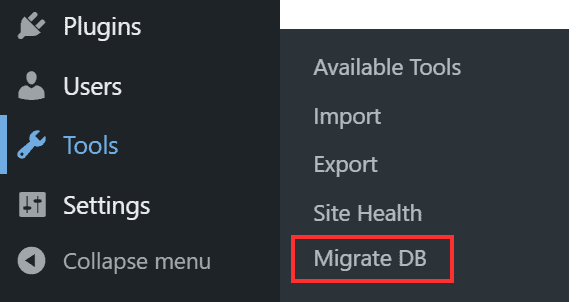
So, let’s access the plugin page from Tools -> Migrate DB.
In the next screen click on find and replace (since we are not interested in exporting the database but in changing the url of our WordPress installation).
In the text boxes below set the new url preceded by https://. For example in the “New URL” field type https://domain.com.
IMPORTANT: the field you see circled in the image below by default begins with //. We need to modify it and change it to https:// adding “http:” before the two slashes.
If you don’t do this you will create an error. The field will then have to be https://domain.com. The “File Path” field will remain unchanged since we are not moving the WordPress installation but only changing the url, so you’ll just have to copy-paste in the second line. You can delete the path field since we won’t be making any changes.
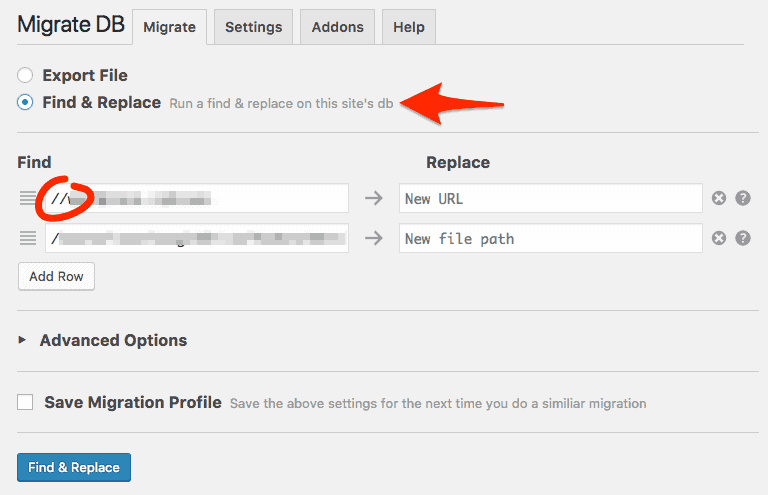
Now just click on “Find & Replace” and you’re done. Using this plugin all references to https:// will be changed to https:// thus setting up WordPress to properly use the secure connection.
Setting up http to https redirect with WordPress
Now that our WordPress site is working properly with the secure https connection we need to set up a 301 redirect (permanent, search engine friendly redirect) from the http version of your website to the https version.
This way all visitors will be redirected to the secure version of your website.
This step is very important to make Google understand that the site has been moved permanently from http to https. Moreover links pointing to the http version will be redirected to the https version of the website without link juice.
To do this you can add two lines of code in the .htaccess file inside the public_html folder:
RewriteCond %{HTTPS} off
RewriteRule (.*)$ https://www.dominio.it/$1 [L,R=301].
Obviously you will need to replace “www.miodominio.it” with your domain name. If your domain does not include the “www” then you should not use it.
Keep in mind that depending on where you put the code it may not work. For example it is possible that if you put it at the end of the file your directive might not be considered. We recommend to insert these two lines at the beginning of the file, right after “RewriteEngine on” if there is one.
Alternatively you can use a plugin that does everything for you like Really Simple SSL. From a performance and maintenance standpoint it is advisable to minimize the number of plugins we use in our WordPress installation, for this reason we recommend using the code shown above to be inserted inside the .htaccess file.
In order to check that you have set up the redirect correctly you can use an online redirect checker. Enter the name of your domain preceded by https:// and check if it is redirected correctly to the protected version.
Check that it is really secure

Once you have performed these steps you can visit your website. First you should be redirected to the https version and you should see a green padlock on the left of the address (it may vary depending on the browser).
In some cases you may have a different icon, indicating that it’s an unsecure site, as you see in the image above with a yellow danger triangle. This means that some resources are being loaded with an unencrypted connection and this error could be caused by some images or other resources being loaded via an http connection.
This kind of problem does not depend on the hosting but on the fact that WordPress is loading some resources using an unsecure connection. To figure out what these resources are we recommend using the free online tool whynopadlock, then figure out what resources are being uploaded via an insecure connection and fix it case by case.
Ready to build your WordPress site?
Try our service free for 14 days. No obligation, no credit card required.


