In this article, let’s explore how website migration is done on SupportHost. If you decide to change hosting, you can entrust us with the entire procedure for free of charge.
The migration will occur without any downtime, which means your site will remain accessible throughout the entire process.
Let’s take a look at the steps used for migrating your website to SupportHost.
Table of Contents
Website Migration: Steps to Follow
Firstly, let’s take a look at the steps that one needs to follow for a site migration, including the domain transfer to the new hosting:
- Request the auth code from the previous provider.
- Place an order for the new hosting plan.
- Decide whether to transfer the emails as well.
- Provide the migration details.
- Wait for confirmation.
If you’re aiming to switch from one provider to another seamlessly, the best solution is to let a team of professionals do the migration. In this way, you won’t won’t have anything to worry about. You’ll also be updated when your site is moved to the new server.
Let’s dive into the specifics of how website migration works.
Requesting the auth code
In order to transfer the domain you’ve registered with another provider, the first step is to retrieve the auth code. This is an identifying code associated with the domain, designed to prevent unauthorized transfers.
As the domain owner, you can request the auth code from your current provider. This code will be necessary to initiate the domain transfer to SupportHost.
You can check the step-by-step procedure in our tutorials to apply for auth code at SiteGround.
Unlocking the Domain
In some cases, in addition to requesting the auth code from your previous provider, you’ll also need to unlock the domain. Many providers, as in our case, implement an extra security measure to prevent accidental initiation of domain transfers.
Simply follow the domain unlocking procedure, which varies depending on your provider. In the tutorials linked above, you can see how to do it exactly.
Not all domain extensions have the locking option. Generally, only generic extensions such as (com, net, org, info, etc.) offer this feature. Domains with extensions like it and eu cannot be locked, so there’s no need to unlock them to transfer them.
Ordering your plan from SupportHost
The second step is to order a plan from SupportHost.
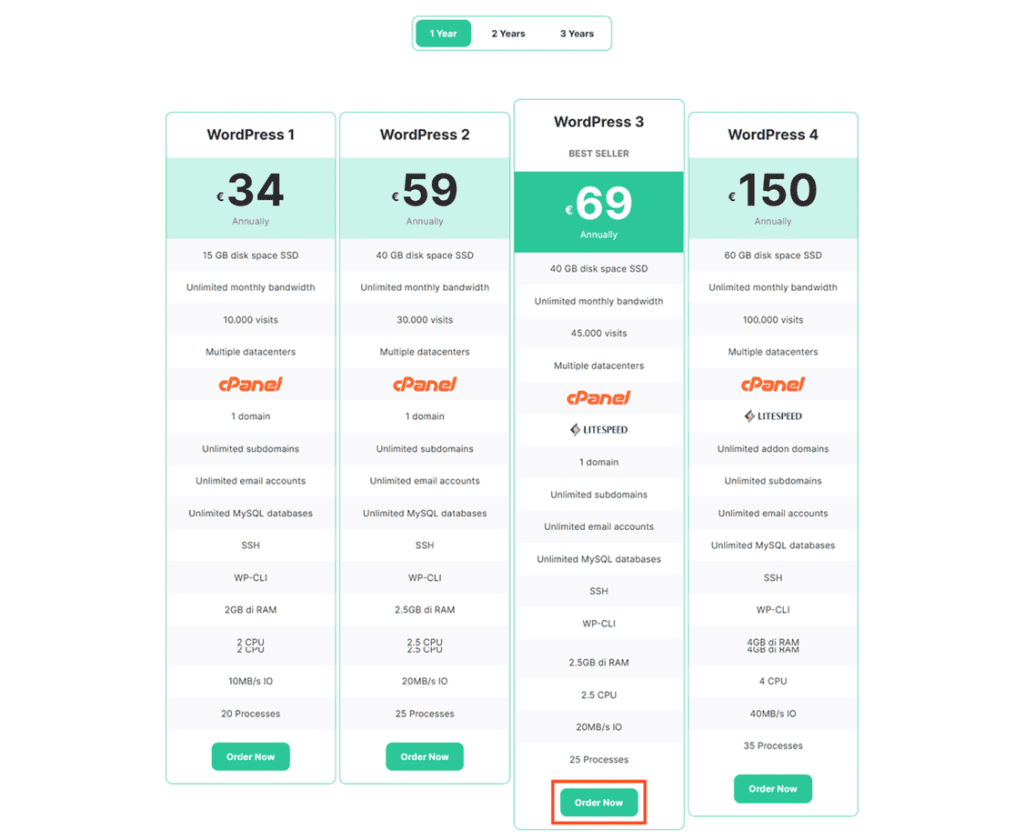
If you’re not sure on which plan is right for you, check out our guide on how to choose a hosting or get in touch with us.
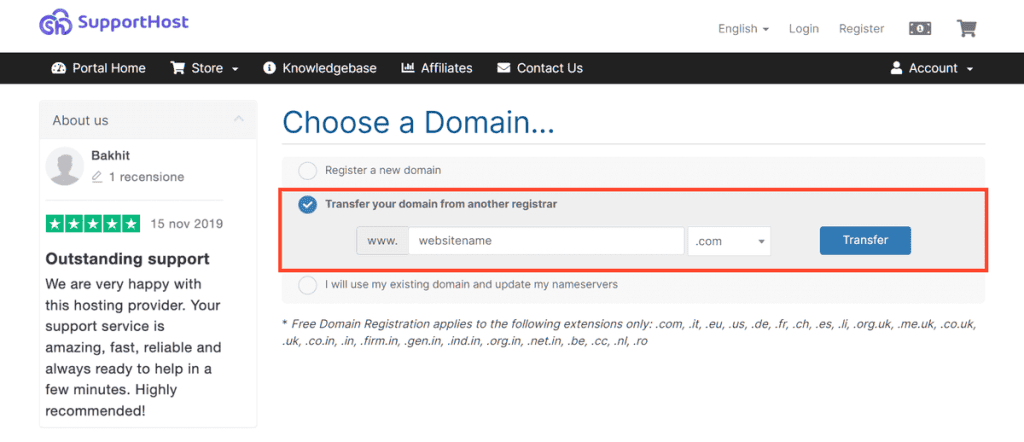
If you’re transferring your domain, select the option Transfer your domain from another registrar. Enter your domain name and choose the extension from the drop-down menu, then click on “Transfer”.
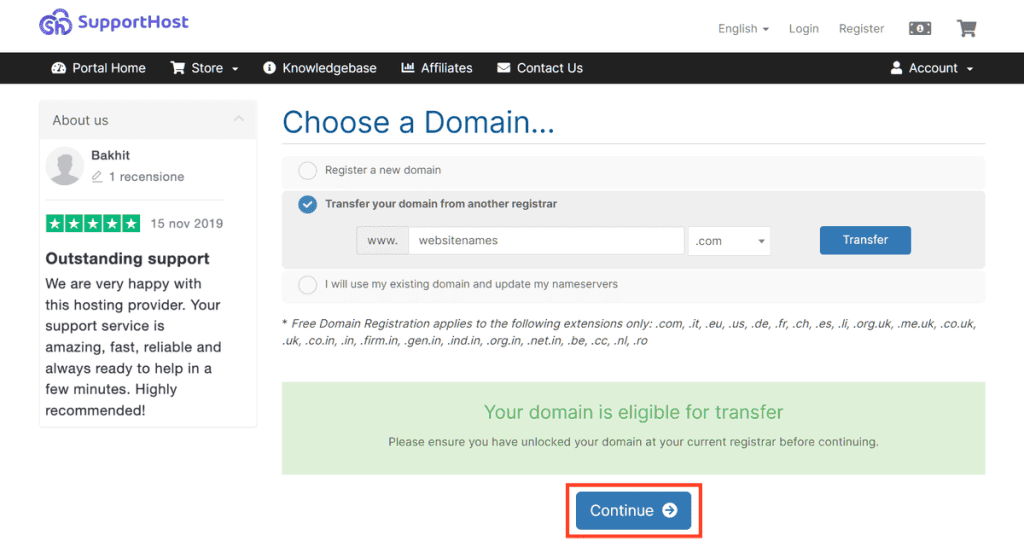
The message you will see is a reminder to unlock the domain before proceeding. Click, on “Continue.”
Plan configuration
On the next page you will see the summary of your order and you will be able to choose the options you prefer and establish the billing period.
Choose the billing period
Depending on the plan, you will see different billing options. Remember that if you had chosen a billing period in the pricing table, this choice will be saved.
For example, you can order VPS Cloud hosting plans for a minimum period of one month by choosing the monthly billing period.
CMS hosting plans such as WordPress hosting have a minimum billing period of one year. You can also choose the two-year and three-year options that have advantageous prices.
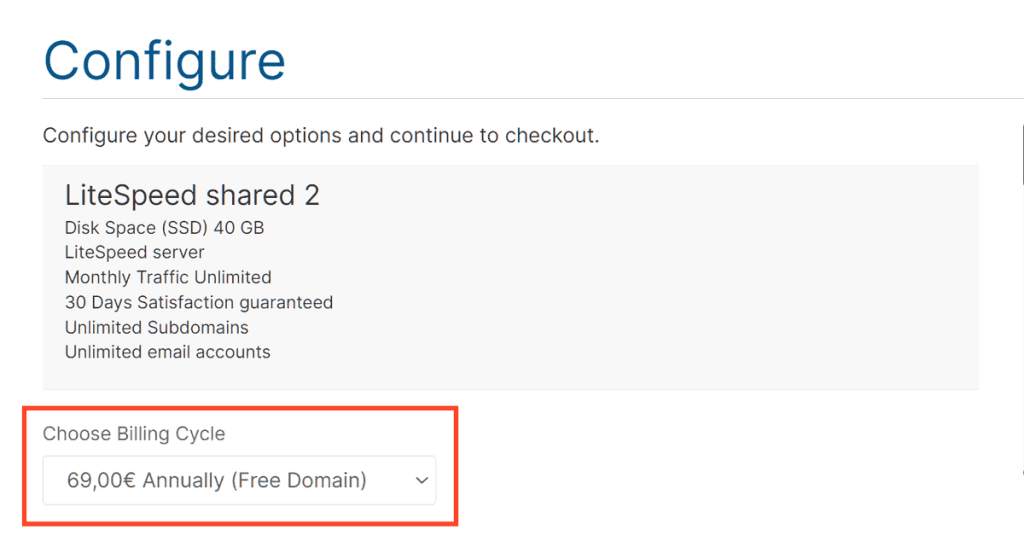
From here you can check the cost based on the period you choose and the installation cost (provided only on cloud VPS and dedicated servers).
Additional options
Additional options vary by plan. Next to the options section, you will see the available plans.
Location (all plans)
From here, you can choose the location of the servers. Choose the location based on your site visitors: If your users are mostly in Italy, you’ll want to choose “Europe”.
You can choose between Europe or the USA.

For cloud VPS plans, you can also choose the specific data center.

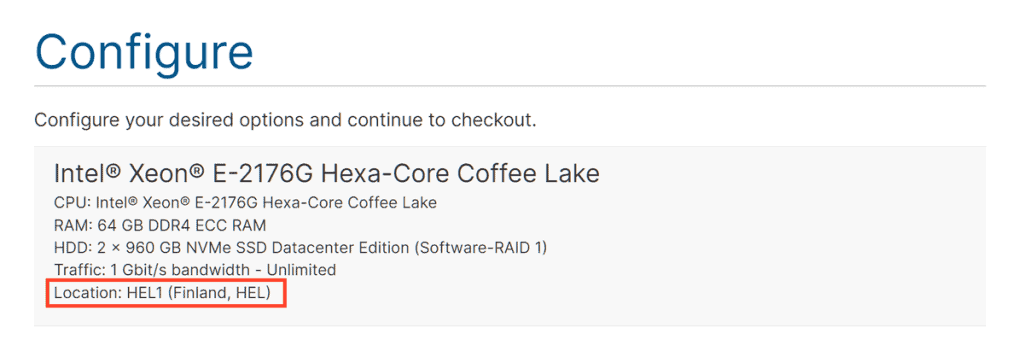
When you choose a dedicated server, you will see the location listed in the server information, in a box as shown here:
Available addons (shared, semi-dedicated and CMS hosting)
For shared, semi-dedicated and CMS hosting plans you can select these additional options:
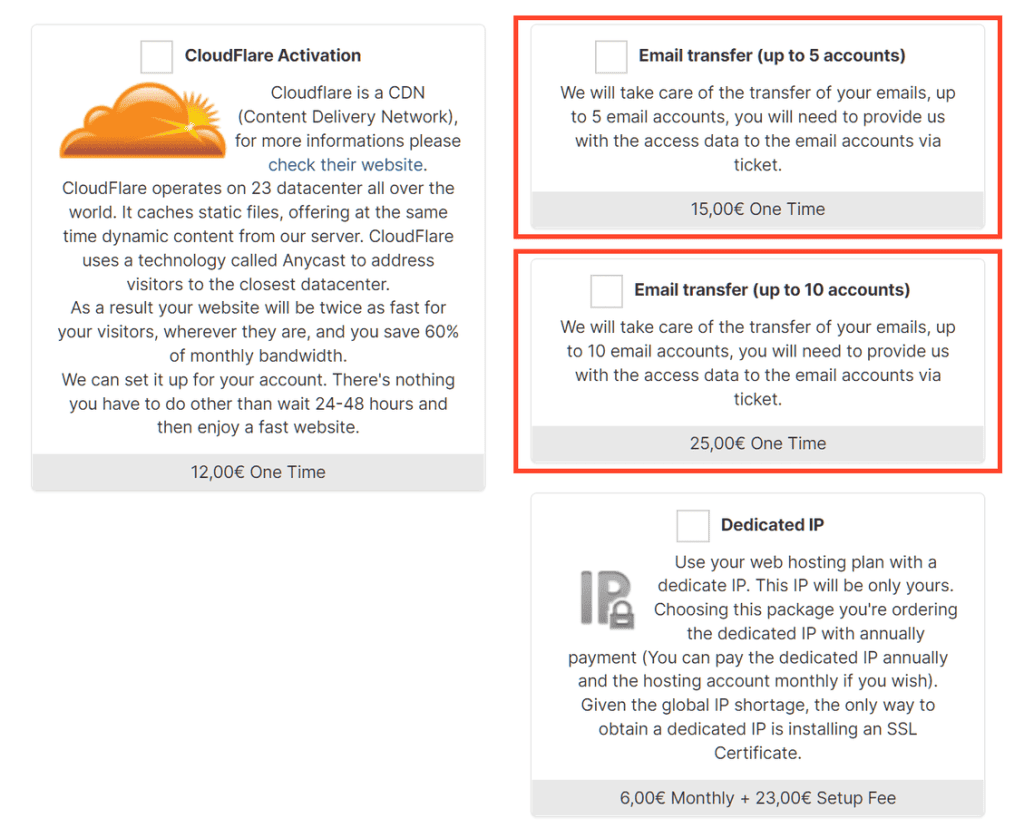
- CloudFlare activation
- Email transfer
- Dedicated IP
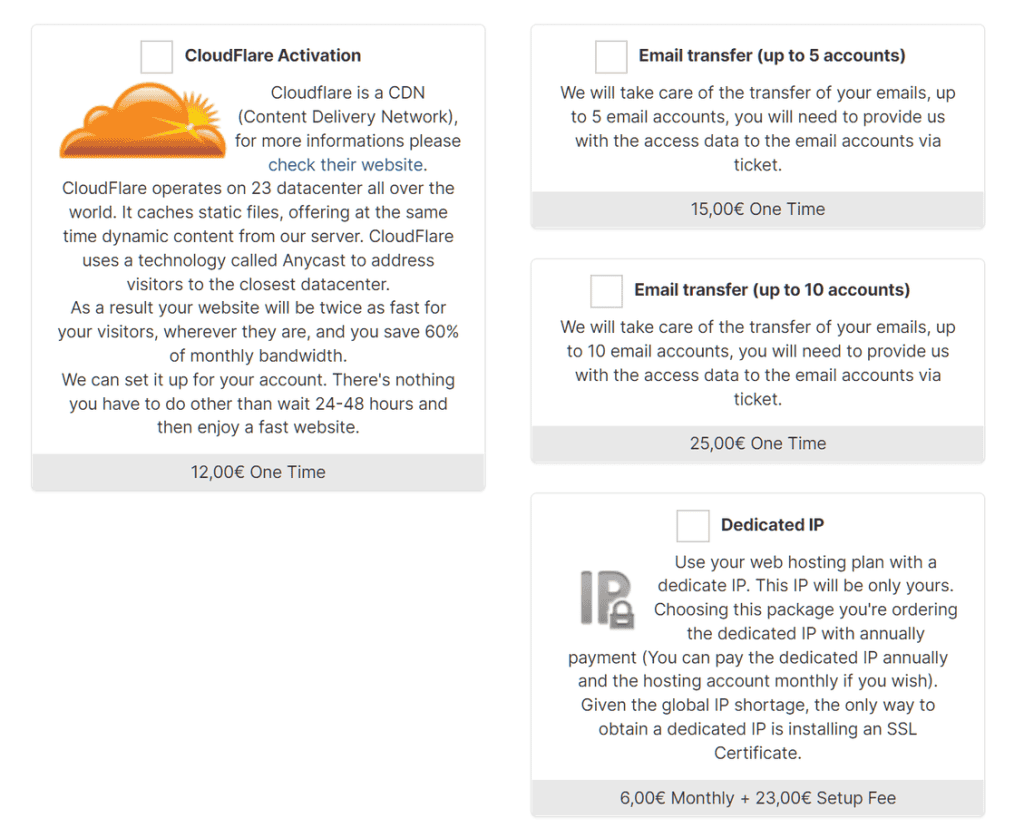
For reseller hosting plans you can only select email transfer.
Remember that you can purchase an additional package even after you have purchased the hosting plan.
Let’s take a look at what they are used for.
CloudFlare Activation
CloudFlare is a CDN that allows you to get faster site loading times.
It is quite beneficial if you have site visitors coming from different geographic areas, for example, if you receive many visits from multiple countries around the world.
If, on the other hand, your visitors come almost entirely from Europe, it is not that useful to adopt a CDN, and in some cases it could be counterproductive.
Email transfer
You can add email transfer to your order with one of two options:
- up to 5 email accounts;
- up to 10 email accounts.
This service is only necessary if you want to transfer old emails to our service. Alternatively, you can run the email transfer yourself, or save important emails on your computer and start with a blank email account.
Please note that if you do not order this service, you will have to log in to cPanel and create the email accounts you need.
Dedicated IP
By selecting this option, you can add a dedicated IP to your plan.
Additional options for cloud VPS plans and dedicated servers
These options are only available if you are ordering a VPS cloud hosting plan or one of our dedicated servers.
Control panel (VPS cloud & Dedicated servers)
If you are ordering a cloud VPS plan or a dedicated server, you can choose the control panel to use.
With VPS cloud managed plans, a cPanel license is included (for one account). You can also choose to order additional cPanel or Plesk licenses at competitive prices.
In the case of dedicated servers, a control panel is necessary if you decide to use a managed service.
Auto Installer / Softaculous (VPS cloud & Dedicated servers)
With cloud VPS and dedicated server plans, you can add Softaculous, an auto-installer that allows you to install hundreds of scripts with just one click and create a staging website easily.
LiteSpeed (VPS cloud & Dedicated servers)
On cloud VPS and dedicated server plans, you have the option to add LiteSpeed at competitive prices. You can choose to either add a “site owner” or a “web host lite” license.
Secondary MX (VPS cloud & Dedicated servers)
You can add a secondary MX to cloud VPS and dedicated server plans.
Disaster Recovery (VPS cloud & Dedicated servers)
You can pair additional disaster recovery options with dedicated solutions, including VPS and dedicated servers, in addition to those already included in the plan. We offer various options with R1Soft starting from 100GB.
Operating System (unmanaged cloud VPS and unmanaged dedicated servers)
If you order an unmanaged plan (VPS cloud or dedicated server), you can select the operating system you want to install from the available options during the ordering process.
Floating IPs / IP addresses (unmanaged cloud VPS & dedicated servers)
Set the number of IP addresses you want to add to your plan.
Volume (Extra Space) (unmanaged VPS cloud)
You can add additional storage space to your plan by selecting it from the dropdown menu.
Fully Managed (Dedicated servers)
If you have chosen an unmanaged dedicated server, you can activate the fully managed option during the ordering process to select a managed server service. To enable this option, you need a control panel.
JetBackup (Dedicated servers)
When ordering a dedicated server, you can select the additional option of adding JetBackup to manage backups for your machine.
Imunify 360 (Dedicated servers)
By ordering a dedicated server, you can add the Imunify 360 security suite.
CloudLinux (Dedicated servers)
On dedicated servers, you can request the activation of CloudLinux as an additional service.
KernelCare (Dedicated servers)
When ordering a dedicated server, you can add KernelCare to ensure you receive updates and patches for the kernel you are using.
Additional Information
When ordering a shared, semi-dedicated, or CMS hosting plan, you can choose to directly install a script.
In this case, you will be required to enter extra information in the “Additional Information” section on the order summary page.
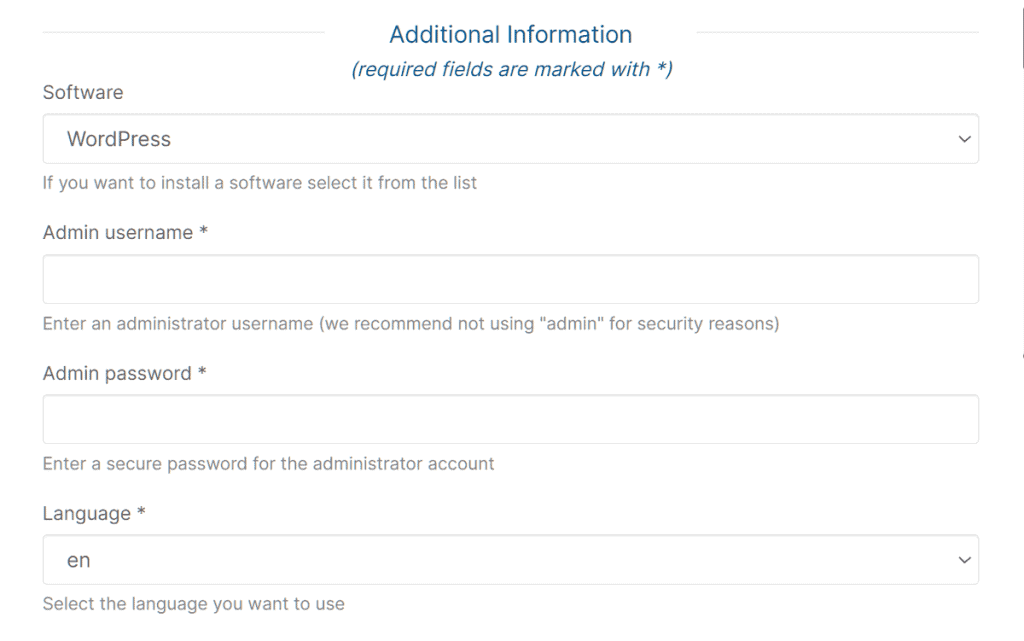
This information will be used to configure the installation of the CMS you have chosen.
- Software: Select the CMS you want to pre-installed from the list, for example, “WordPress”.
- Username Administrator: Enter the username you will use to access the CMS.
- Administrator Password: Enter the password.
- Language: Choose the CMS language.
Domain Configuration
After selecting the options for your plan, you can enter the information needed for the domain transfer. In this way, you can proceed with migrating the website to SupportHost.
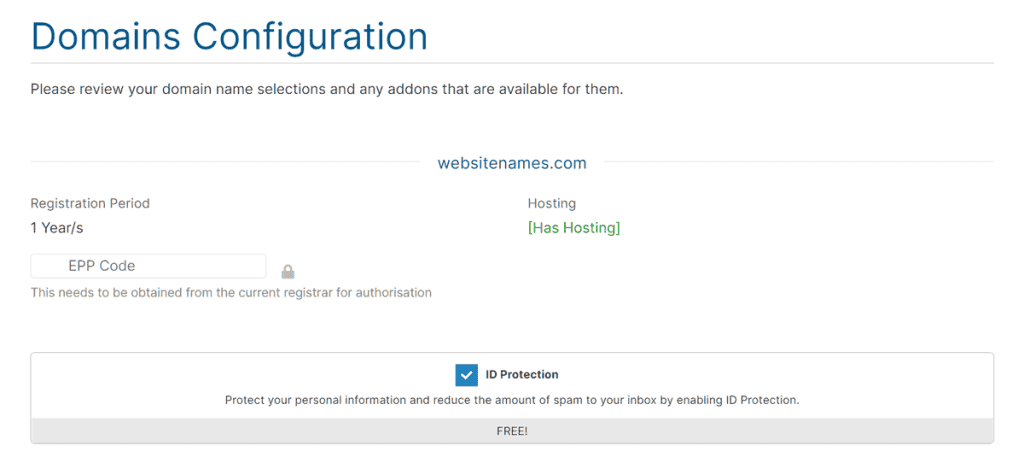
Enter the Auth Code
In this section, you are asked to enter the Auth Code for your domain. However, there are cases where you don’t need to enter it at this stage but can communicate it later via a support ticket.
Do you have an .it or .eu domain?
In this case, if you want our support team to handle the website migration, we recommend entering an incorrect Auth Code, as shown here:

.it and .eu domains have very short transfer times. If you input the correct Auth Code during the order process, the domain transfer will commence immediately, and there may not be enough time to move the site’s files.
To prevent the site from going offline, you should complete the website migration to the new server first.
What about other domains?
If your domain has an extension other than .it or .eu, you can enter the Auth Code in the corresponding field and proceed with the order.
From this section, you can activate Whois Protection by checking the “ID Protection” box, as shown here:
Domain Information (for .it domains)
In this section, you will need to provide registration details for the domain.
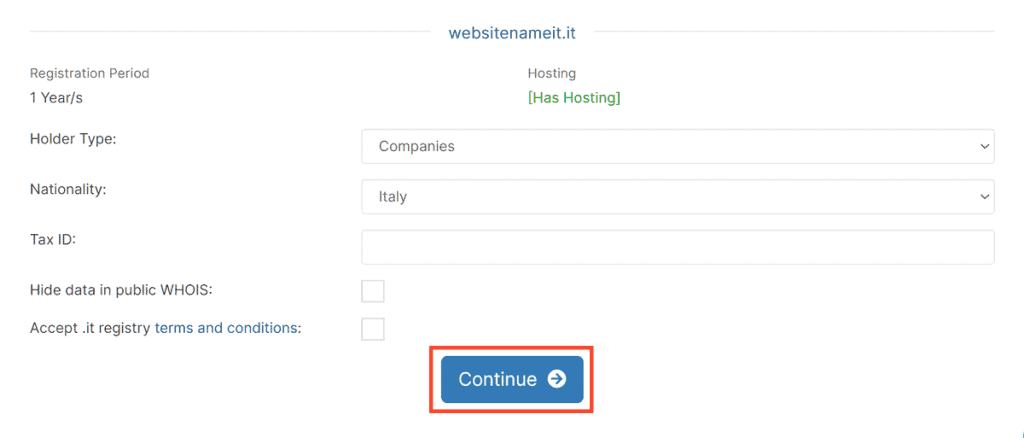
Legal Entity Type: You can choose to register the domain as a private entity or under your company’s name.
Nationality: Select your country from the dropdown menu.
Tax Code – VAT Number: Enter the tax code for individuals or the VAT number for businesses.
Hide Data in WHOIS: Activate this option if you don’t want your personal data to be displayed in WHOIS. Keep in mind that you can also activate Whois Protection later.
At this point, simply check the box to accept the terms and conditions and click Continue to finalize the payment on the next page.
Transfer Emails
When transferring a website from one provider to another, you can choose to transfer your emails as well. This procedure allows you to retain your previous emails without losing them during the website migration.
Email transfer allows you to create a copy of the emails from the previous server to the new one.
If you don’t want to transfer emails, you can simply use cPanel to create new email accounts associated with the domain, such as [email protected]. In this case, the newly created accounts will be empty since you wouldn’t have transferred the old emails from the previous provider.
You can proceed with the manual transfer by following our email transfer guide or request the transfer by ordering one of the additional packages:
Requesting Website Migration
If you have ordered domain transfer, you will receive a communication via a support ticket as soon as we receive the payment.
Please note that if you selected the option “I will use my existing domain and update the nameservers” you will need to open a support ticket if you want us to handle the website migration.
If you have chosen to change hosting but wish to manage the migration independently, simply inform us via a support ticket.
If you would like us to take care of the migration for you, simply fill in this form to request the transfer of your website and your email.
Please note that if you are moving your website from SiteGround, you will receive detailed instructions on how to proceed.
How a Site Migration Works
After receiving the necessary data, our team will transfer the website by copying files, databases (and emails if requested) from the old to the new server.
You will be updated via the support ticket as the migration progresses. We will handle the entire moving process to ensure there is no site downtime.
During the procedure, it’s important not to make any changes to the site. To move the site to the new server, we need to create a copy of the files and the database, so any changes made during this time may be lost.
After the website transfer, if and when possible, we will update the domain pointing to the new server. This minimizes downtime.
DNS propagation takes a few hours depending on the domain extension. It typically occurs within an hour for .com domains, while it may take a few hours more for .it domains. After these few hours, the domain will point to the new server.
After changing the pointing, we will initiate the domain transfer. The required time depends on the extension:
- Within 24 hours for .it domains;
- 5 days for .com domains;
- Instantly for .eu domains.
Conclusion
Migrating your website with SupportHost has never been easier. You can entrust our staff with the entire procedure and you’ll have access to fast and secure hosting services in no time.
Still not convinced? Try our free hosting at no cost!

