
In this article, we will see how to restore files from automatic backups and how to download the files from a backup to your computer.
If you have a hosting plan with SupportHost, you have free backups. We offer an external server backup service and maintain 30 daily full backups for each account. This way, your data is safe. In case of any website’s problem, you can check directly from the control panel among the available backup copies and restore your website in just a few clicks.
Our automated backup system performs incremental daily backups every day and keeps the last 30 backups, allowing you to go back up to 30 days, shall your website have a problem.
Having 30 days of backup makes you sleep peacefully. If your site has a problem, even if you don’t notice it in time, you are safe since you can go back up to 30 days and restore a previous situation. Keep in mind that we always recommend that you perform a manual backup before performing vital operations, such as an upgrade of your website, for two reasons:
- You have a recent backup of your website
- You can be sure that the backup is working. Although 99.9% of our backups have no problems, the automatic system may make mistakes.
In this article, we will see how to backup and restore files. If, on the other hand, if you need to restore the MySQL database or e-mail accounts, we have special tutorials for them both.
Jetbackup lets you make separate backups of files, emails, and databases. The full account recovery feature has been eliminated on purpose to prevent accidental errors and data loss.
A complete restore, in fact, irreversibly overwrites all data, while it is often necessary to restore only single files (or a single mailbox). In such cases, not only does full recovery make no sense, but it also may create bigger problems.
After this introduction, let’s see how to restore your website files from an automatic backup.
The first step is to log into cPanel to determine which version of JetBackup is installed on your server. If you see “JetBackup 5” in the “Files” list, follow the steps outlined in the “Restoring Files with JetBackup 5” section. If not, continue reading.
Table of Contents
Restore files with JetBackup
First, run the login to cPanel . After logging into the control panel, scroll down to the “JETBACKUP” section and click on “File Backups“.

At this point, we will see a list of backups sorted by date. We can sort them in ascending or descending order by clicking on “Creation Date”. Once you have chosen the date of the files we want to restore, click on “file manager”. Before proceeding, make sure that, on that date, the files you want to restore were not corrupted.

Choose the files to restore
At this point, we see a list of our files in the file manager. First, click on “Show Hidden Files” at the top to show the hidden files. This function is useful if, for example, we want to restore a previous version of the .htaccess file.
The folders have the name colored in clickable blue, while the files are in black. Both are clickable. In our example below, we have clicked on public_html to view the files inside our public folder and then select the files we want to restore.

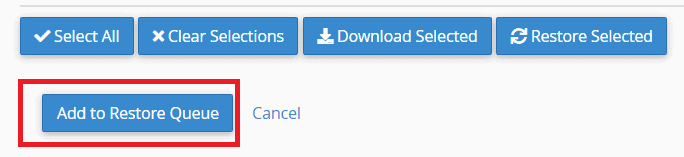
Once you have chosen the files and folders for recovery we have two options. We can decide to download the files by clicking on the “Download Selected” button or perform a restore directly by clicking on “Restore Selected”.
The Clear Selection button is used to uncheck all the selected boxes without having to do it manually if you have selected folders or files by mistake.
Restore the files
If we just want to restore the files, once selected, click on “Restore Selected”. The system will show us a button asking for our confirmation, which you will have to click on to add the files to the restore queue.
We can check the progress of the restore from the cPanel. Let’s go back to the “JETBACKUP” section and click on “Queue”.

Once queued, we will see the process in the “Pending” state.

As soon as possible, the system will start restoring, and you will see the process in the “Processing” state.

Once completed, you will see it on “Completed”.

This way, the system uploads the files you want to restore automatically from our backup server to your account with no effort. You will receive a confirmation email once the reset is complete, so there is no need to check that the process is completed via this screen.
Download the files from backup
If, on the other hand, you prefer to download the files to your computer, once you have selected the files and folders you are interested in, you will need to click on “Download Selected”. Again, you will need to click on the confirmation to queue the process.

Once we have entered the process in the queue, go to “Queue” in the cPanel in the “JETBACKUPS” section to verify the completion of the operation and download the files.

From here, we can download the files once the process is complete and, once downloaded, we can delete them to free up disk space. As soon as the files are ready for download you will receive an email. This way, you don’t have to check in the “Queue” tool that the process is completed.
Sometimes on hacked WordPress sites, it can be that code is added to normal WordPress files (such as the wp config.php file). In this case, you may want to download and check it before uploading it back to the server.
Restoring files with JetBackup 5
Log in to cPanel and, from the “Files” section, click on “JetBackup 5.”

You will be directed to the JetBackup 5 dashboard, where you can view the list of downloads and proceed with the restore process.
To restore files, the first step is to click on “Home Directory” under the “Restore & Download” section.

This will display a list of file backups, sorted by date with the most recent backup first. From here, you can select the backup date you wish to restore.
Keep in mind that if you make changes to your site, you can add notes to each backup to help you remember when the changes were made.
When you click on a backup, the “Change Files Selection” button will appear.

By clicking this button, you can choose which specific files to restore. This allows for a selective restore, such as restoring only a single file or folder. Below is an example where only the “public_html” folder is selected. After selecting the files, click on “Select Files.”

Alternatively, if you want to restore all files, there is no need to change the selection, as all files and folders in your account are automatically selected.
At this point, click on the “Restore” button to proceed.

A summary window will appear, showing the files that will be restored. If you wish to remove any items, click on “Remove Items.” To proceed, click on the “Restore Selected Items” button.

You will be redirected to the Queue, where you can monitor the progress of the restore. Once the process is complete, the status will change to “Completed.”

Ready to build your WordPress site?
Try our service free for 14 days. No obligation, no credit card required.