Spam is a phenomenon that has existed since the dawn of the internet. Who is that person that has never received an email containing an annoying promotional message? Fortunately, however, technologies have evolved and can now identify and block unwanted emails.
Nowadays, all email services rely on antispam software that can analyze the content of the emails to detect the presence of unwanted messages.
Table of Contents
How does antispam work?
There are many programs on the market developed to protect users’ email accounts, one of the most known is SpamAssassin.
Apache SpamAssassin is an antispam software with features that allow you to protect your email inbox by blocking all messages that have a certain spam score.
Antispam programs can check all elements that characterize an email, such as the subject, the recipient, and its content.
The spam score is determined by the presence of potentially dangerous elements. Based on the number of items found, a score is assigned.
The higher the spam score of an email, the more likely it is that the message will fail the antispam filter.
A spam score is not only determined by the spam indicators contained within an email, but is established by considering many other elements.
Antispam not only checks the elements present in an email, but also analyzes the records of the domain, verifying that the domain associated with the email is valid.
Other elements that can be considered dangerous by an antispam program are all those elements that negatively affect the user experience, such as the presence of short links or a lack of adequate contrast between the text of the email and its background.
How to use Spam Assassin
SpamAssassin features are already active on all email accounts.
With SpamAssassin, it is possible to set a value that represents the maximum Spam Score threshold allowed.
As explained in the previous paragraph, each email has a spam score, and the higher this value, the safer the chance for it to be spam.
If you set a value of “10“, you will allow entry to any e-mail, even unwanted ones.
If you set a value to “1“, you will also delete important e-mails, which will accidentally be considered spam even if they are not.
We have configured the program for all of our users by giving the spam Score a value of “5“, to block spam without generating false positives, thus preventing any important emails from being deleted.
To set up SpamAssassin, you will first need to login to cPanel.
Then you will have to select, in the Email tab, the item “Spam Filters“.

Here you will be able to choose how to handle spam. You can move all new spam emails into a specific folder, or you can decide to delete them directly.
Move spam to a folder
If the “Move New Spam to a Separate Folder” setting is enabled, the system will redirect to a specific folder all emails that have a spam score higher than the spam score we indicated.

By clicking on “Spam Threshold Score” you will be redirected to a page where you can manually change the spam score.

From the drop-down menu, you can choose preset values or add a custom value by selecting the “Custom” box and entering a value of your choice.

Once the changes are complete, click on “Update Scoring Options” to save the changes.

Through the “Configure Spam Box Settings” option, it is possible to manage some features relating to spam folders management.

Empty the Spam Box folder for “your email account name”: by clicking on this button, you will be able to empty the spam box of your email account.
Empty all Spam Box folders: this button instead, allows you to empty all the spam boxes of all email accounts.
Manage Email Disk Usage: it will redirect you to a page that will provide you with information regarding the space that the mailbox occupies on the disk.
Eliminate spam
To automatically delete spam, you must verify that the “Automatically Delete New Spam” item is enabled.

To adjust the spam score, you need to click on the “Configure Auto-Delete Settings” link and enter a number from 1 to 10.

Once the changes have been made, click on “Update Auto-Delete Score“.

Add a whitelisted email address
With SpamAssassin, you can manage whitelisted addresses. All addresses entered in the whitelist will not be subject to any spam filter.
To be able to add a new address in the whitelist, click on “Show Additional Configurations” to be able to view the advanced settings of SpamAssassin.

Then, click on “Edit Spam Whitelist Settings“.
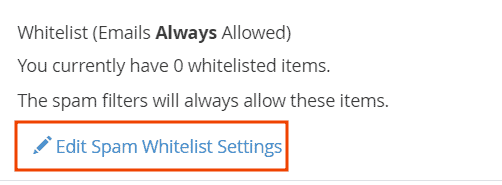
By clicking on “Add A New whitelist_from Item” it will be possible to add a new address to the whitelist.
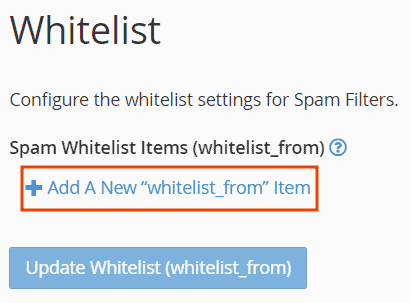
In the field that will appear, you can enter both a specific email address and a domain name. By entering a domain name, you will allow any email belonging to the domain you indicate to contact you.
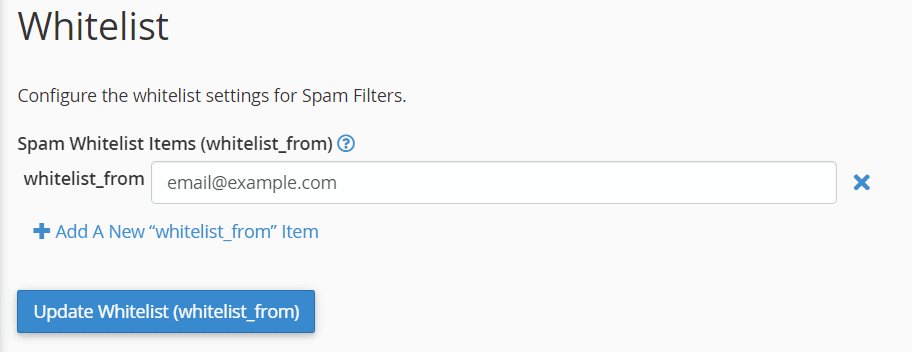
Once the changes are complete, click on “Update Whitelist (whitelist_from)” to update the whitelist content.

Add a blacklisted email address
SpamAssassin includes the capacity to add email addresses to a blacklist. The items in this list will automatically be marked as “Spam”.
To add a new address to the blacklist, click on “Show Additional Configurations” and you will see the advanced settings of SpamAssassin.

Then, click on “Edit Spam Blacklist Settings”.
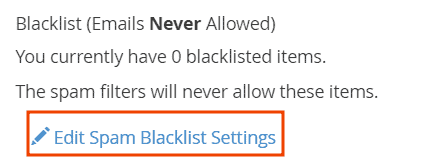
By clicking on “Add A New“ blacklist_from ”Item” it will be possible to add a new address to the blacklist.
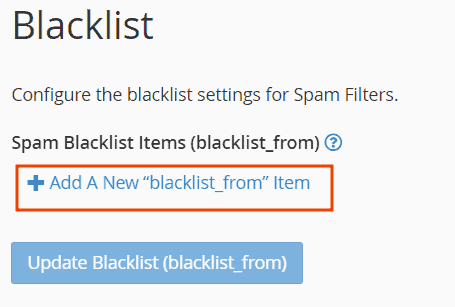
In the field that will appear, you can type both a specific email address and a domain name. By entering a domain name, you will prevent any email belonging to a certain domain from contacting you.
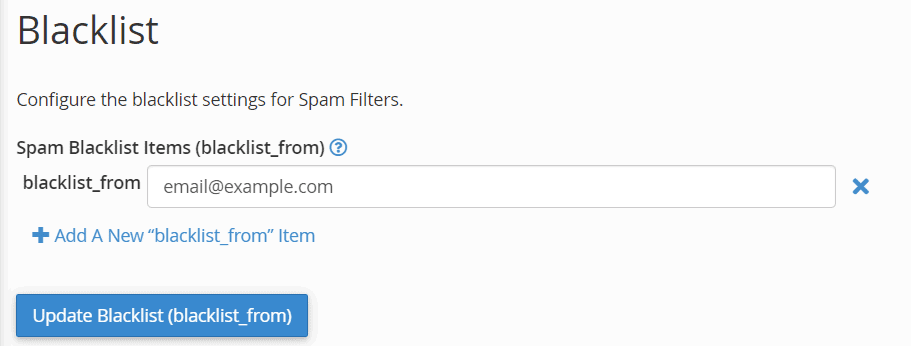
Once the changes are complete, click on “Update Blacklist (blacklist_from)” to update the contents of the blacklist.

Create a specific email filter
In addition to using SpamAssassin, you can set up email filters to manage spam.
With email filters, you can create additional and customized instructions. For example, you can delete all emails containing a certain word.
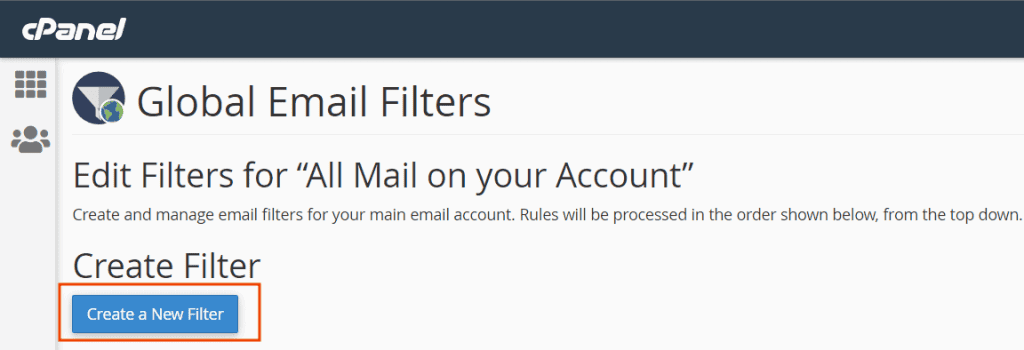
To set up a spam filter, you need to login to cPanel and select the “Email Filters” item if you want to apply the rule only to a specific email account or “Global Email Filters” if you want to apply the changes to all email accounts on your domain.

Next, click on the button “Create a new filter”.
The unique name of the filter we want to create must be entered in the “Filter Name” field.

In the Rules section, you have to set the instructions that the server will have to follow. In this specific case, I will demonstrate how to block all emails based on the email subject.
Let’s say you want to delete all emails that have the term “Subscribe” in the subject. What I should do is select the “subject” option and the “contains” option, and type the name of the object you want to block, in this case, “Subscribe“.
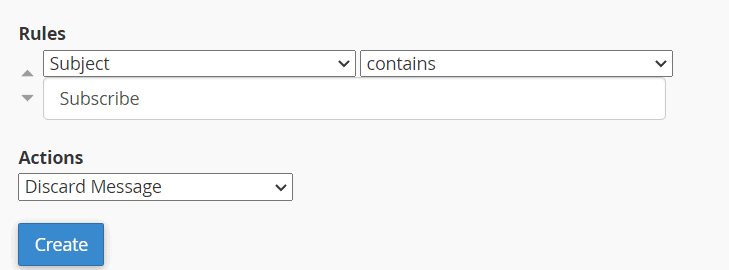
Once you have filled in all the fields, you will need to click on the “Create” button.
If the operation is successful, a warning message will appear.

If you are unsure how to proceed or need more information, visit our guide dedicated to creating an email filter.

