
If you have purchased a plan WordPress hosting, PrestaShop hosting, semidedicated hosting, or a dedicated server, you can add additional domains to your account.
From cPanel, you can manage your account by adding addon domains, and you can also create domain aliases (or parked domains). Let’s see what differences there are between these two functions and how to create them.
Table of Contents
Addon domains and aliases: differences
An addon domain is a separate domain that you can use to create another website. The difference between having two separate domains with two hosting plans and having an addon domain is that by creating one (or more than one), you can manage it from the same cPanel account, the same you use to manage the main domain.
By creating an alias, however, you allow those who visit your site by typing another address. For example, if your site is www.mysite.com you can create an alias like this www.myothersite.com.
This way, those who visit the address www.myothersite.com will see your main website (www.mysite.com).
To create an alias you must have registered a second domain that you want to use as an alias. Creating an alias can be useful if you want your website tobe visible from more than one domain, or if you use a CMS that can map multiple domains (for example WordPress multisite with the domain mapping plugin) and show different content for different domains, while managing it with the same CMS.
The alias domain is also called parked domain precisely because it has no content, but its purpose is to point to the same folder as the main domain.
Creating Addon domains and aliases
With cPanel’s jupiter theme, in the “Domains” box you will not see the Addon Domains and Aliases sections, but a single interface named “Domains” as shown here:

This “Domains” interface allows us to create:
- domains;
- subdomains;
- addon domains;
- Domain aliases.
Depending on the plan you have activated, you may have a maximum number of addon domains that you can create. After logging to cPanel, you will see a statistics section on the main page on the right sidebar. In this section, you can check the number of additional domains you can create on your account.
Create an addon domain
Let’s see how to create an addon domain from cPanel.
Firstly go to Domains > Domains as indicated here:

You will then need to click on Create a new domain to proceed:
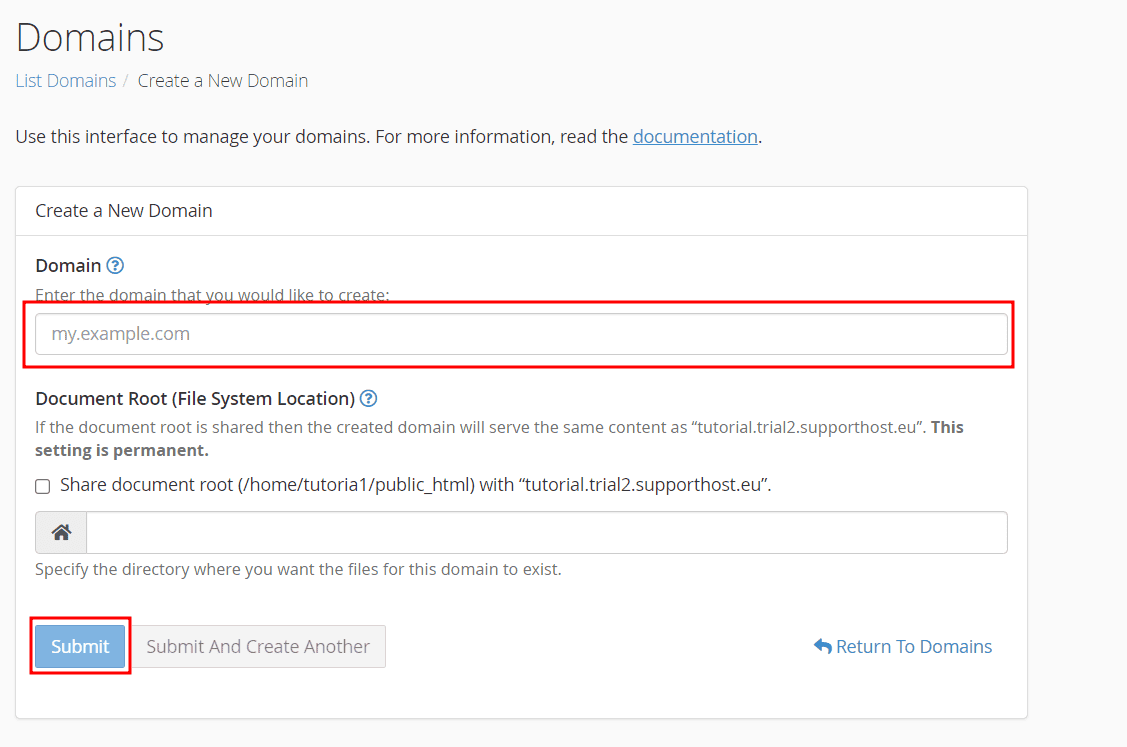
You will then see the interface that allows you to create an addon domain. In order to do that you’ll just need to follow these steps:
- In the “Domain” field, enter the domain name.
- Remove the check next to “Share document root (/home/user name/public_html” with …)
- Enter the directory you want to use or leave the default one.
- You can also change the subdomain that is always created automatically.
- When done, click “Submit” to confirm the creation.
Below you see the screenshot with the fields that need to be filled in:

Create a domain alias (parked domain)
After logging in to cPanel click on Domains to access the interface, as shown here:
On the screen that opens, you will see the list of domains associated with your account.
Click on Create a new domain as shown here:

To create an alias, simply follow these steps:
- Enter the domain name to be used as an alias in the “Domain” field.
- Make sure the “Share document root (/home/user name/public_html” with …) option is checked.
- Click on “Submit” to confirm the creation.
The steps we have just gone over are shown here below:

After creating the alias, you will need to configure the domain nameservers to point to the server. You can follow our tutorial to modify the name servers.
Ready to build your WordPress site?
Try our service free for 14 days. No obligation, no credit card required.