

In this article, WP-CLI: the definitive guide, we’ll see what WP-CLI, the tool that allows us to manage WordPress directly from the command line can offer us. We’ll see how to install WP-CLI and how to use the commands to perform different operations: from installing WordPress to updating plugins and themes, up to user management and database operations.
Table of Contents
How to install WP-CLI
If you’re a SupportHost customer, you should know that WP-CLI is already installed on WordPress hosting and semidedicated hosting plans. All you need to do is to log in via SSH to your server. If you don’t know how to do that you can follow our article on the SSH connection.
To install WP-CLI just use the following three commands, sending them one at a time:
curl -O https://raw.githubusercontent.com/wp-cli/builds/gh-pages/phar/wp-cli.phar
chmod +x wp-cli.phar
sudo mv wp-cli.phar /usr/local/bin/wp
The first command allows us to download WP-CLI, the second makes the file executable, and finally, the third one moves it to the executables folder.
What is WP-CLI?

WP-CLI allows you to access WordPress from the command line. CLI, in fact, means Command Line Interface, just as opposed to graphical interfaces (GUI).
In addition to allowing us to install WordPress, update it, install new plugins and themes, but also export or import the database, WP-CLI also has another advantage.
With WP-CLI, in fact, it is possible to insert a series of commands in a script and initiate a sequence of commands by calling a single script.
One of the cases in which this feature could be useful is the creation of a testing (staging) environment. With a single script we can for example install WordPress, install a theme and the plugins we need.
If we need to repeat this operation more than once, using a script instead of executing individual commands saves us a lot of time.
Get to know the WP-CLI version
To know the version of WP-CLI installed you just need to give the following command:
wp cli versionYou’ll get a result like this that tells you which version you’re using.

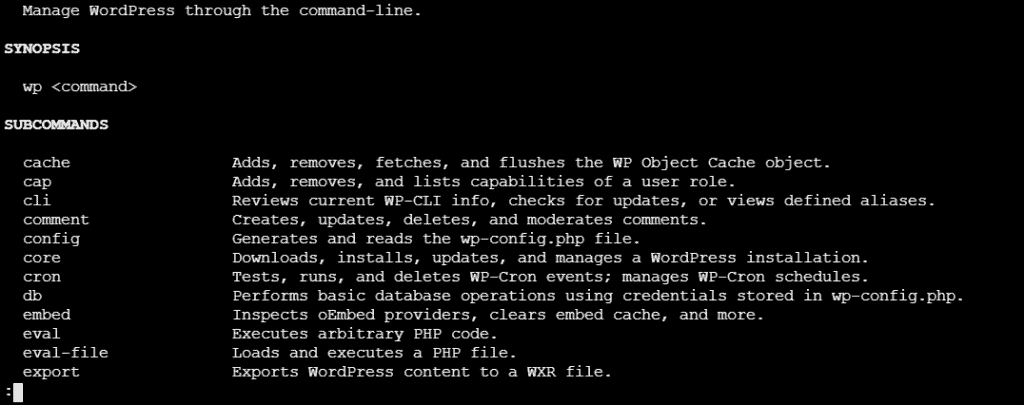
WP-CLI Commands
In this article, WP-CLI: the definitive guide, we’ll look at some of the most common commands we can use to manage a multitude of aspects of our WordPress site. Remember that you can learn about all the WP-CLI commands by consulting the official documentation (in English).
Each command must be preceded by “wp” and is followed by topics and any attributes.
WP-CLI only works in the directory where WordPress is installed. If you are trying to run a command in the wrong directory you will see an error like this:

If you have more than one installation, make sure you are in the right directory. To move into the directory you simply type “cd” followed by the directory path.
Using WP-CLI commands
To know the list of commands just write:
wp helpYou will get a list of commands and a short description of each of them.
After having consulted the list it will be possible to close it by typing “q”.
If we want more detailed information on a single command we can just write:
wp help commandReplace command with the name of the command.
For example, wp help db will give us information about the available functions like creating a new database, executing a query and so on.
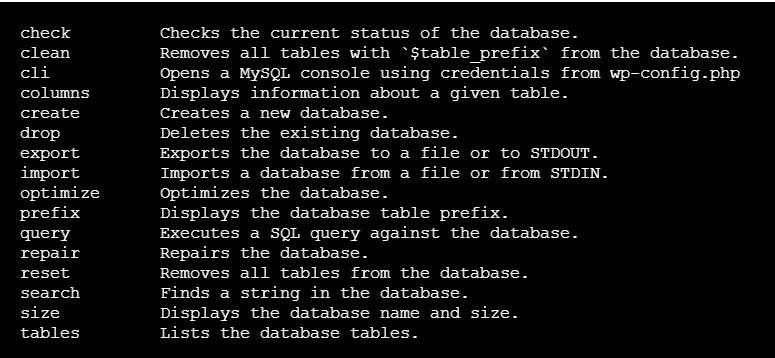
Scrolling on you can also see some examples. In this screenshot below you can see examples on how to use subcommands of the command wp db, but of course, there will be examples for the other commands too.

Manage themes and plugins with WP-CLI
WP-CLI allows us to get information about installed plugins and themes, but also to install new themes or plugins, update those already present, deactivate or delete them. Let’s see which commands allow us to do these operations.
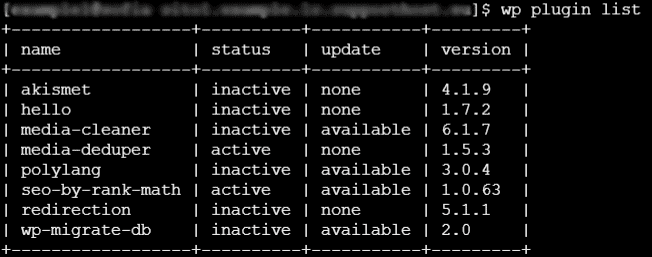
Plugins list
First, we can get a list of all installed WordPress plugins know their status (active or deactivated), the current version and know if updates are available. To do this just use the following command:
wp plugin listWe’ll get the following result:
Install and activate a plugin
Before installing a plugin we have to be sure of the name to use. If the name we use is not exact we won’t be able to install it and we will be warned with an error like this:

We can use the following command to do a search and find the exact name of the plugin we are interested in:
wp plugin search contact-formIn our case, we made this search to know the name to use to install Contact Form 7.
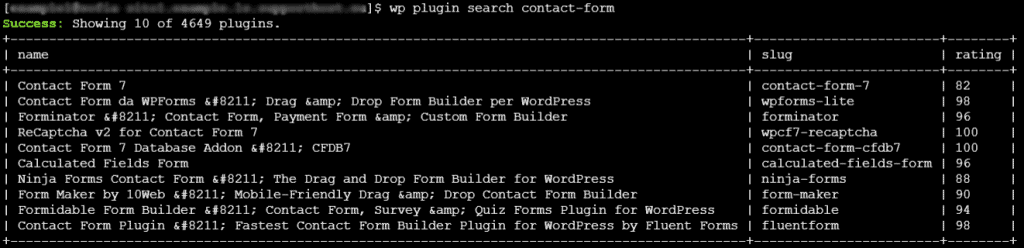
Whichever plugin you want to search, just replace in the command above contact-form with the term or terms to search (separated by a hyphen).
Note that the name will be the same used in the WordPress plugins directory so alternatively you can search directly from the site and refer to the name in the URL.
To install and activate a plugin we’ll just use a command like this one:
wp plugin install contact-form-7 --activate
Instead, if you want to install a plugin and then activate it later, or reactivate a deactivated plugin you can use the activate command, like this:
wp plugin activate akismet
Be sure to enter the name of the plugin you want to activate, in our case Akismet.
You can also use attributes to install a specific version of a plugin. For example in the case of Contact Form 7 we can use the version attribute in this way:
wp plugin install contact-form-7 --version=5.3.2 --activateUnlike the previous command in this way, we’ll install and activate version 5.3.2.
To uninstall one or more plugins we can use the unistall command:
wp plugin unistall akismetUpdate one or more plugins
To update a plugin we can use this command:
wp plugin update seo-by-rank-math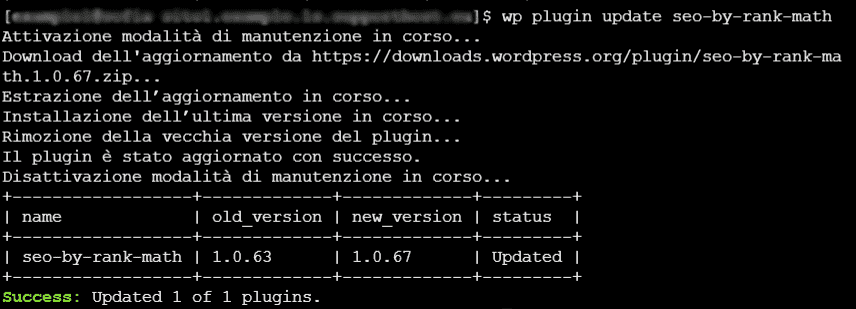
In our case we have updated Rank Math SEO, to update any plugin just enter the plugin name instead of seo-by-rank-math.
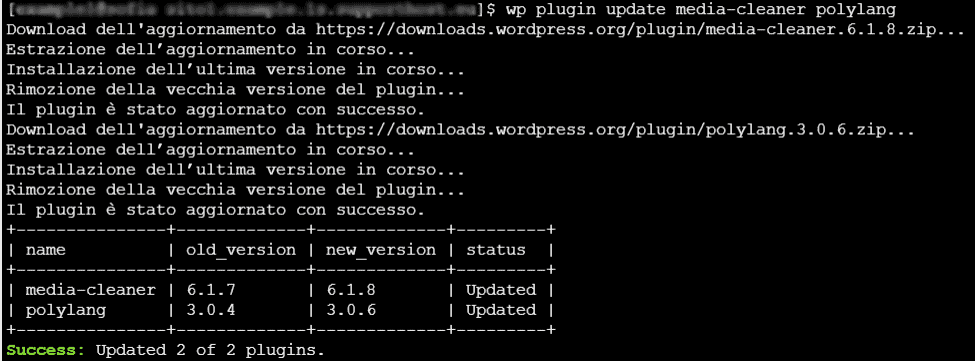
We can also update more than one plugin at the same time using the same function. Like in this case where we updated two plugins by running the command once:
wp plugin update media-cleaner polylangAll you have to do is to use the plugin update command followed by the names of the plugins you want to update, separating the names with a space. In the case of our example, we have updated Media Cleaner which allows us to delete unused images and Polylang which helps us to create a multilingual WordPress site.
Another possibility we have is to update all plugins for which an update is available:
wp plugin update --allDeactivate one or more plugins
With the deactivate command you can deactivate one or more plugins from the command line with WP-CLI.
To deactivate a single plugin you can use the following command, replacing akismet with the name of the plugin:
wp plugin deactivate akismet
If you want to deactivate more plugins at the same time you just have to specify their names, like this:
wp plugin deactivate akismet seo-by-rank-mathIf you want to deactivate all plugins you have to use this command:
wp plugin deactivate --allList of themes
With WP-CLI you can also manage WordPress themes. First, we can get the list of themes installed on WordPress with the list command like this:
wp theme list
We will then have the list of installed themes, information about their status (active or disabled) and their version. In the list, in the update column, we will also see if there is an update or not.
As we have seen for plugins also for themes we have the possibility to install new themes, activate and update them. Let’s see which commands we can use to do that.
Install and activate a theme
To install and activate a new theme we can use this command:
wp theme install oceanwp --activate
We can check if a theme is installed with the command you see here:
wp theme is-installed oceanwp
echo $?
If the output is 0 the theme is installed, if, instead, it is 1 it is not installed. In this example the Twenty Twenty-One theme was installed, while Astra was not.

Update one or more themes
We can update a theme with this command:
wp theme update twentytwentyoneTo update more than one theme we just enter the names one after the other, like this:
wp theme update twentytwentyone twentytwentyIf instead, we want to update all installed themes we can execute the command:
wp theme update --allWe have also the possibility to insert exceptions that allow us to update all the themes excluding one. To do this we will just add the attribute -exclude, here is an example:
wp theme update --all --exclude=oceanwpIn this case, we have updated all themes except OceanWP.
To enable or disable a theme on a multisite installation
With WP-CLI in addition to being able to disable individual themes, it is also possible to disable them at the network level in WordPress multisite installations.
To do this we just use the disable command and the -network attribute, as in this example:
wp theme disable oceanwp --networkIn multisite installations, the network administrator can enable the theme (or plugin) on individual sites in the network, or enable them to allow individual administrators to activate them independently.
We have seen how to disable one or more themes, let’s see, instead, how to enable them. In this case, it will be enough to use the enable command as in the example below:
wp theme enable astra --networkBy doing so we’ll enable the theme on all sites of the multisite installation. If, however, we also wanted to activate it we must also use the activate attribute in this way:
wp theme enable astra --network --activateInstall and update WordPress with WP-CLI
WP-CLI allows us to install WordPress from scratch with a series of commands that will allow us to perform all the steps:
- download WordPress
- generate the configuration file (wp-config.php)
- create a new database
- complete the installation.
wp core download
wp core config --dbname=nomedatabase --dbuser=utente --dbpass=password --dbhost=localhost --dbprefix=wp_
wp db create
wp core install --url=https://ilmiosito.it --title=nomedelsito --admin_user=utente --admin_password=password [email protected]
Let’s review the commands one by one to understand what they are for.
wp core download allows us to download the latest version of WordPress.
wp core config is used to generate the file wp-config.php, you will have to enter the access data to the database. This is the information that will allow you to connect your WordPress installation to the database. In dbhost you will have to specify the address at which the database can be reached. When the database is on the same server as the site files, you can enter localhost, otherwise, you’ll have to specify the IP address.
wp db create allows us to create a database using the data specified in the wp-config.php file, i.e. the data we entered in the previous step.
wp core install starts the WordPress installation process, we’ll have to enter the address, site name and administrator data.
Updating WordPress
Before any major update, it is always advisable to create a backup of your site and database.
You can check for updates with this command:
wp core check-update
In this case, we are notified that WordPress is updated to the latest released version. If not, we can update WordPress to the latest available version through the command:
wp core updateIf, however, we want to install a specific version we will just use the attribute version as in this example:
wp core update --version=5.6.4Remember that keeping the core, but also themes and plugins up to date is important to keep WordPress security under control. If you can’t handle the day-to-day maintenance of your site, you could rely on a managed WordPress solution that takes care of updates and every technical aspect of management.
Search and replace within the WordPress database.
When you switch from http to https with WordPress or have decided to change domains you need to go in and replace old URLs with new ones in the database.
Some data, however, is stored in the WordPress database as serialized data. In order not to corrupt this data we have several possibilities:
- use the WP Migrate DB plugin, as we saw in the guide on how to change WordPress domains
- use WP-CLI.
With WP-CLI we just need to use the search-replace command in this way:
wp search-replace https://sitovecchio.it https://sitonuovo.itAdding the option -dry-run allows us to show the result of the operation of search and replacement, but without making effective changes to the database.
wp search-replace https://sitovecchio.it https://sitonuovo.it --dry-runIt is also possible to export an SQL file after performing a search and replace it in the database. In this way, the database of the site is not modified, but the changes are made only in the file. The command to use is as follows:
wp search-replace https://sitovecchio.it https://sitonuovo.it --export=database.sqlThe result will be the export of the database where all the URLs of the old site will be replaced by those of the new one.
Importing and exporting the database
There are several methods to export and import a database, for example, you can use phpMyAdmin, the tool that allows us to manage MySQL databases.
For import and export, we can also use WP-CLI.
We can export the database with the command:
wp db exportThis will generate a sql file.
In the same way, you can import a database with this command:
wp db import wp_database.sqlIn order for the database to be imported, we will first need to load it in the home of the site or specify the path where the file is saved.
User management with WP-CLI
We can access the list of all users in our WordPress installation with a simple command:
wp user listTo create a new user we just use the command user create and enter the necessary data, as in this example:
wp user create mario_rossi [email protected] --role=editor --first_name=Mario --last name=Rossi --user_pass=passwordIn this case, we have used the user create command to create a new user. The necessary parameters to use are the first two: “mario_rossi” which is the user’s username and his email address.
We have also specified the role to be assigned to the user, name, surname and password.
If we don’t specify the password, a random one will be generated automatically and will be shown in the output, as in this example:

We can also update the information later for existing users, for example by changing the password for a specific user like this:
wp user update 2 --user_pass=newpasswordNote that in this case, you must enter the ID of the user you are updating right after the user update command, in our example ID=2.
To delete an already created user we can use the command user delete. In this case, if we want to keep the posts created by the user we are going to delete, we will have to reassign them to another user (whose ID we know). Let’s see how it is possible to do this with an example.
In our case we want to delete the user mario_rossi with ID=2 and reassign the posts to the user pasquale_bianchi whose ID is 1, to do this we use this command:
wp user delete 2 --reassign=1Going to check through the WordPress dashboard the posts that were previously of the user that we have deleted have been assigned to the one we have chosen.
Manage user roles
As you know on WordPress you can assign each user a specific role (administrator, editor, author and so on).
Each role ensures the user certain capabilities such as editing posts, deleting them or moderating comments.
In addition to allowing us to assign roles from the dashboard (check out our WordPress tutorial to see how), we can also manage users directly from the database. You can check out our article on how to use phpMyAdmin for WordPress to see how. Or, of course, we can use WP-CLI as we will see here.
There’s something to add here that besides being able to assign default roles to users, WP-CLI also allows us to create new user roles and assign specific capabilities. Just use the following command:
wp role create emanager "Event Manager" --clone editor
In this example above we have created a new role, Event Manager, to which we have assigned the same capabilities as the editor role.
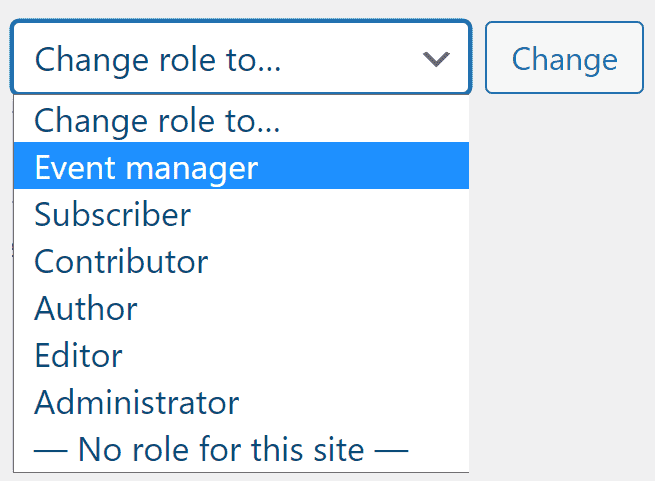
Once you have created a new role with WP-CLI you will then also be able to assign the role to a user directly from the dashboard. You’ll be able to do this from the Users section, as you can see in this example of ours:
You can add a new role to an already created user by using the command user add-role followed by the username (or user ID, or even the email address), and the role we want to assign to him.
Here is an example where we assign the role of editor to user user1:
wp user add-role user1 editorWe can also add one or more capabilities to an existing user:
wp user add-cap user1 moderate_commentsIn this example, we have assigned user user1 the ability to moderate comments.
To get a list of all roles just use the following command:
wp role listThe result will be a list like the one you see below with all the roles you can assign to users of the site:
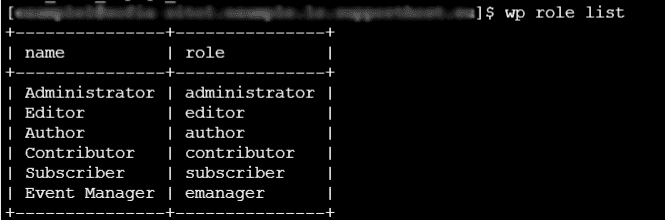
As you can see in this example the 5 predefined roles are added to the custom one that we created in one of the previous examples.
To know all the capabilities attributed to a specific role we just need to use this command:
wp cap list editor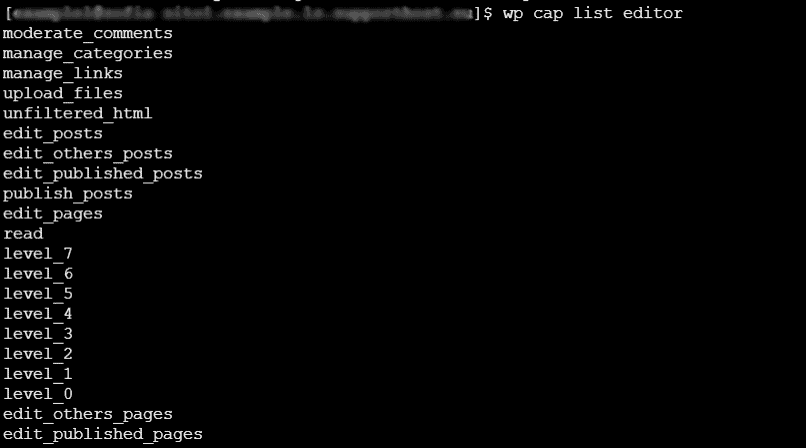
Just replace editor with the name of any role to get the list of skills assigned to it.
If, however, we wanted to get the list of capabilities of a single user we can use the command user list-caps in this way:
wp user list-caps user1To remove one of the capabilities assigned to the user we can use the remove-cap command as in this example:
wp user remove-cap user1 delete_postsIn this example, the user will no longer have permission to delete posts on the site.
Manage Super Admin users in WordPress Multisite
If you have a WordPress Multisite installation, with WP-CLI you can have manage network Super Admins. In fact, the five default WordPress roles we were talking about earlier (administrator, editor, author, contributor and subscriber) are joined by a sixth role, that of the Super Admin, reserved only for multisite installations.
To get the list of users with this role you can use the following command:
wp super-admin list
You can also assign the Super Admin role to an existing user like this:
wp super-admin add user1If you want to revoke a user’s privileges you just use the remove command, like this:
wp super-admin remove user1
In both cases, you will have to enter the name of the user you want to grant permissions to or revoke them for. In our example the user name is user1.
Manage WordPress posts with WP-CLI
Another useful feature of WP-CLI is to allow us to delete posts in the trash and delete post revisions.
To delete all the posts present in the trash bin we just need to use this command:
wp post delete $(wp post list --post_status=trash --format=ids)
If we want to delete a single post without moving it to the trash we can use the following command:
wp post delete 57 --forceWe will have to replace “57” with the ID of the post we want to permanently delete.
If instead, we want to delete all revisions we can use this command:
wp post delete $(wp post list --post_type='revision' --format=ids)Maintenance mode
With WP-CLI you can also enable maintenance mode on WordPress. To do so you need to run this command:
wp maintenance-mode activate
A notice like the one you see below will appear on the site informing visitors of the current maintenance.

To disable the maintenance mode just use the following command:
wp maintenance-mode deactivate
If you want to know if the maintenance mode is active or not, you just need to use this command:
wp maintenance-mode status
In the example you see above, the mode was not active.
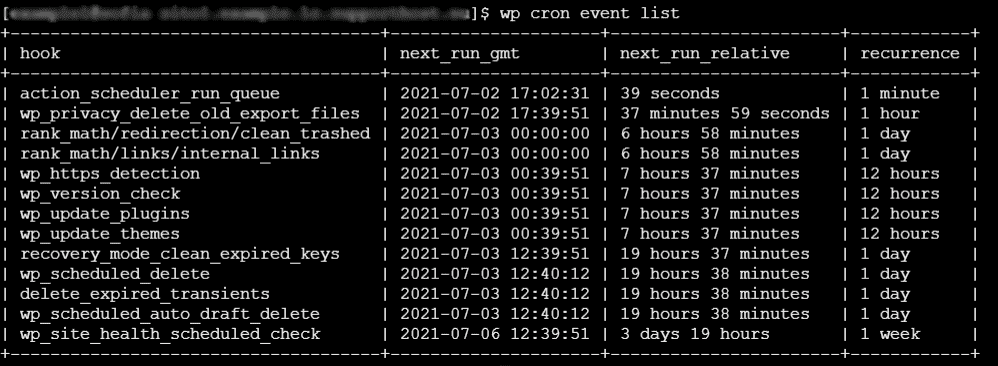
Cron Management
WP-CLI allows us to see the list of WordPress Cron jobs and manage them. To do it directly from the dashboard, however, you need a plugin like WP Control.
For example, to see the list of cron jobs we just need to use the command:
wp cron event listWe will then get the cron list, as in this example:
Regenerate image thumbnails
When changing a theme you may need to have WordPress regenerate the thumbnail images. By regenerating the thumbnails the images will be loaded correctly, that is, in the right size.
To do this with WP-CLI we just use the command:
wp media regenerate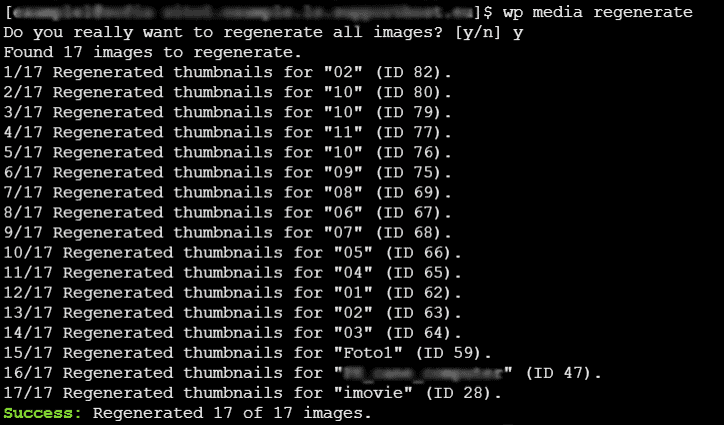
After that you’ll have to confirm by typing “y” (yes), so all images will be regenerated.
Alternatively, you can use the following command to avoid having to confirm again:
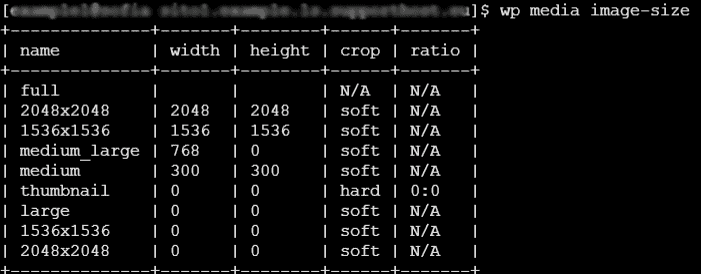
wp media regenerate --yesWP-CLI also allows us to get a list of all the dimensions used, we just need to use this command:
wp media image-sizeWe will have a table like the one you see below:
If you need to regenerate only some thumbnails you just need to insert the IDs of the corresponding images, as you see in this example:
wp media regenerate 82 69
You’ll just have to insert the individual IDs you see in the example with the ones corresponding to your images, each separated from the other by a space.
Conclusion
In this article, WP-CLI: the definitive guide, we have seen that WP-CLI allows us to manage every aspect of our WordPress installation directly from the command line. The same operations that can be done from the dashboard (and beyond) can be simplified with simple commands. Possible operations include installing from scratch, updating cores, plugins and themes, and even creating users and user roles.
With WP-CLI it is also possible to intervene in special cases, for example when it is necessary to reset the password of a certain user. Another common use case that we have examined concerns the search and replacement in the database. An indispensable operation when you need to change domains.
Whether you are a developer or a webmaster WP-CLI can prove to be a truly indispensable resource. Have you tried WP-CLI yet? Do you find it intuitive to use or did you have any difficulties? Let me know in the comments if you’d like to elaborate on anything we’ve left out.


Leave a Reply