
In this article, WordPress phpMyAdmin : manage the database, we will see how to use phpMyAdmin for WordPress. As we will see through the database management you can solve problems that prevent us from accessing the site or the dashboard, but also optimize the tables and the entire database.
Before we get into the heart of the guide and see how to manage the WordPress database with phpMyAdmin, a premise about how information is organized within the database is in order.
Table of Contents
How the WordPress database is organized
Using phpMyAdmin for WordPress can be useful in database management, if you already know what is WordPress you may also know that all information about articles, comments and so on are stored within a MySQL database.
Firstly, let’s look at how the data is organized in this database.
Every WordPress installation requires a database to function. When you choose to install WordPress manually you need to create a database, if instead you use an auto installer like Softaculous this process is done automatically. For example with Softaculous included in our plans shared hosting, vps cloud hosting and dedicated server you can install WordPress in just a few clicks.
In any case, the database will contain tables created by default, let’s see what they are one by one.
In the tables we’re going to examine, you’ll see a prefix followed by a hyphen and the name of the table that offers information about its contents. Typically the prefix used is wp but depending on the individual installation, it may vary.
wp_commentmeta: it contains the meta data associated with the comments on the site.
wp_comments: is the table that contains the actual comments along with information about the author, such as name, email and a possible site address.
wp_links: contains the data associated with the link management, a function that is no longer integrated in the dashboard, but can be used with the Link Manager plugin.
wp_options: contains general WordPress settings, as well as plugin and theme specific settings.
wp_postmeta: in this table you can find the meta data associated to all the posts created on the site.
wp_posts: contains not only blog posts, but also pages and menus of the site.
wp_terms: this table is dedicated to WordPress taxonomy so categories and tags.
wp_termmeta: the meta data associated with the various elements of the taxonomy.
wp_term_relationships: this is the table where the link of each post with the respective categories and tags is defined.
wp_term_taxonomy: if in the wp_terms table we find the single elements (tags and categories) in this table hierarchies between the various elements are established. For example, it is thanks to this table that WordPress is able to define categories and subcategories.
wp_usermeta: in the table you can find the meta data of the users registered to your site.
wp_user: contains all user information, such as username, email, and registration date. In installations of a WordPress multisite the network administrator can also block spam from users or delete some users, that’s why two new fields are generated: spam and delete in this table.
Now that we’ve seen how WordPress organizes and stores information, let’s see what operations you can do by accessing the database through phpMyAdmin.
Remember that changing the database may affect the operation of your site. Before doing so, make sure you have a copy of a backup so that you can restore the database in case of errors.
Manage WordPress with phpMyAdmin
We have seen how information is stored and divided in the different tables of the database. First we will focus on user management and in particular we will see how to change the user name and reset the password.

Two operations that we can’t do on our own simply from the dashboard, but that become extremely simple with the help of phpMyAdmin.
Before proceeding we need to understand how database browsing works, so that we can select the right one in case there is more than one on the server.
Find the right database
If you have created more than one WordPress installation on your server, or even in localhost, you have created more than one WordPress installation, when you access phpMyAdmin you will have a list of databases in front of you. How can you figure out which database is associated with the installation you are interested in?
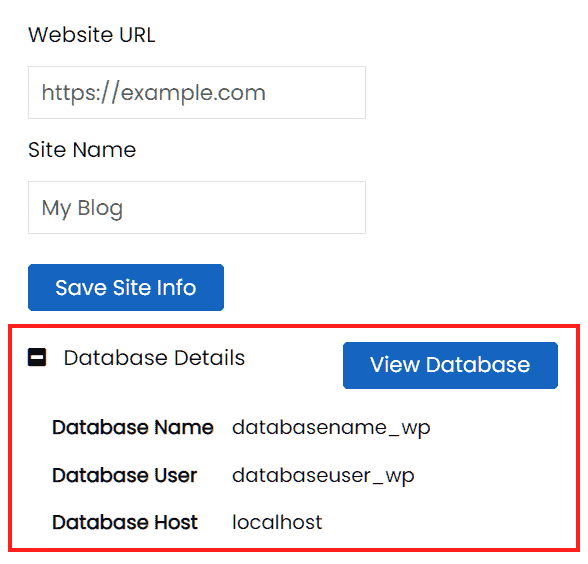
Simple, just open the wp-config.php file and you will find the database name next to DB_NAME.
If you have installed WordPress with Softaculous you can trace the database information from the WordPress Manager under Database Details.
Use phpMyAdmin to edit a username
If we try to change our username directly from the WordPress dashboard we realize that it is not possible to do so. Accessing the Profile from the Users section of WordPress we find ourselves, in fact, in front of a warning of this type.

As you can see, the Username field is blocked and cannot be edited.
From WordPress we can only change the data related to First Name, Last Name and Nickname. We can, however, overcome this problem by using phpMyAdmin for WordPress and changing the username directly from the database.
As I mentioned earlier WordPress stores information about all users in the wp_users table.
Let’s access phpMyAdmin, and click on the + icon next to the database to display its contents showing the list of all tables within it. Then, we click on the table to access it and be able to edit it.
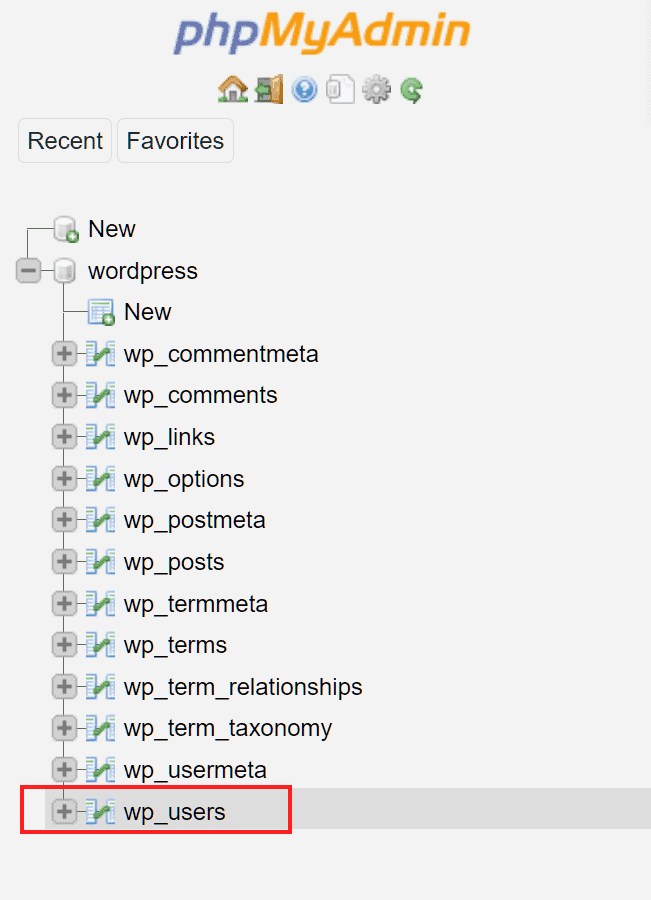
We will then have access to the list of all registered WordPress users, choose the one we want to edit and click the Edit button next to the username.

The field we are interested in modifying is user_login: we enter the new user name in the value field and then click on the Go button to save the changes.

phpMyAdmin WordPress: reset passwords
Among the different functions of phpMyAdmin for WordPress we can also reset user passwords. In this case, for example, we will see how to reset the password of a WordPress user. This method can come to our aid in the event that the email entered for the password reset was incorrect or no longer accessible.
Access phpMyAdmin and select the database that interests us, the table that we need to examine is wp_users. Inside the table you can find all the data of the users registered to the site, the username, the date of registration and also the passwords.
Since it’s sensitive data, passwords are not stored in clear text in the database, but are encrypted. For this reason we can’t find the password used, but we’ll have to set a new one.
Let’s locate the user we are interested in on the list and click on Edit.

The field we will need to change is the one shown in the user_pass column. What we need to do is enter the new password in the value field and choose MD5 from the Function menu.

Let’s click on Go to save the changes. The MD5 function allows us to encrypt the new password so that it is not readable within the database.
Create a user and manage roles
In addition to editing existing users and useful login information, we can also use phpMyAdmin for WordPress to create new users directly from the database.
To create a new user we need to open the wp_users table. As soon as you click on the table name you will be redirected to the Show tab which allows you to see the records stored in the table and make changes to the information already there.
In this case, however, we’re interested in the Insert tab, which you can select from the top menu as I show you in this screenshot:

In the screen that will open, you’ll have to fill in the fields with the information needed to create the new WordPress user. Let’s see what you need to enter in the different fields.

ID: you can leave the field blank since WordPress uses the auto-increment feature to generate IDs.
user_login: this will be the username that will be used during login.
user_pass: in this field you should enter the user’s password. In addition, you will have to select MD5 from the dropdown menu under Function. This way the password will not be stored in clear text in the table, but will be encrypted.
user_nicename: assigns a nickname to the user, it can be the same or different from the one used for login. Remember that this nickname can be modified later also from the dashboard, while the user name entered in user_login can be modified only by accessing the database again.
user_email: enter a valid email of the user.
user_url: this field is optional, you can enter the address of a site or blog associated with the user.
user_registered: enter the current date to keep track of when the registration took place.
user_activation_key: you can leave it blank. This field is used by WordPress when a password reset is requested.
user_status: again, you can leave the default option (0). This is a value that is no longer used in the current version of WordPress and was previously used to flag users for spam.
display_name: in this field you can enter the name that will be shown on the site.
Assign administrator role
We’ve seen how to create a WordPress user using the database, but what if we want to assign administrator permissions to a user? You can always do it directly from the database using phpMyAdmin with WordPress.
In this case after creating the user in the wp_users table, we will have to go and edit the wp_usermeta table.
Let’s open the table and then click on Insert. In this case we will be asked for different fields that will allow us to specify administrator permissions for the newly created user.

umeta_id: as we have seen for the id field associated with the user, also in this case it is populated automatically and can be left empty.
user_id: in this field we have to insert the same ID of the user we have just created. If you don’t remember it, open the wp_user table and check the value in the ID field.
meta_key: we insert wp_capabilities to be able to specify the role of the user.
meta_value: enter a:1:{s:13: “administrator”;b:1;} to give the user administrator permissions.
We will then have to repeat the operation by adding a record for wp_user_level. You can fill in the two records in the table directly by unchecking the ignore box and also filling in the box at the bottom.
In this case here is the data we are going to enter:

umeta_id: leave blank
user_id: we always insert the user id
meta_key: insert wp_user_level
meta_value: type 10
After creating a new user from the database, it’s best to access the profile settings from WordPress and save the configurations. Doing so will also allow you to complete the profile with any missing information.
Assign users to other roles
If you are already familiar with WordPress you will know that each user can be assigned a defined role. As we have seen we can create an Administrator user directly from the database.
Of course, we can use phpMyAdmin for WordPress to do the same for other roles as well. All we need to do is add the values you see here at the meta_value field based on the role we want to assign.
Subscriber: a:1:{s:10: “subscriber”;b:1;}
Contributor: a:1:{s:11: “contributor”;b:1;}
Author: a:1:{s:6: “author”;b:1;}
Editor: a:1:{s:6: “editor”;b:1;}
You may need it either if you are creating new users or if you want to change the role of existing users.
phpMyAdmin for WordPress: disable plugins
There are cases when you need to disable the WordPress plugin but you cannot access the dashboard. In these circumstances one of the methods to deactivate all plugins is to do it from the database again using phpMyAdmin for WordPress.
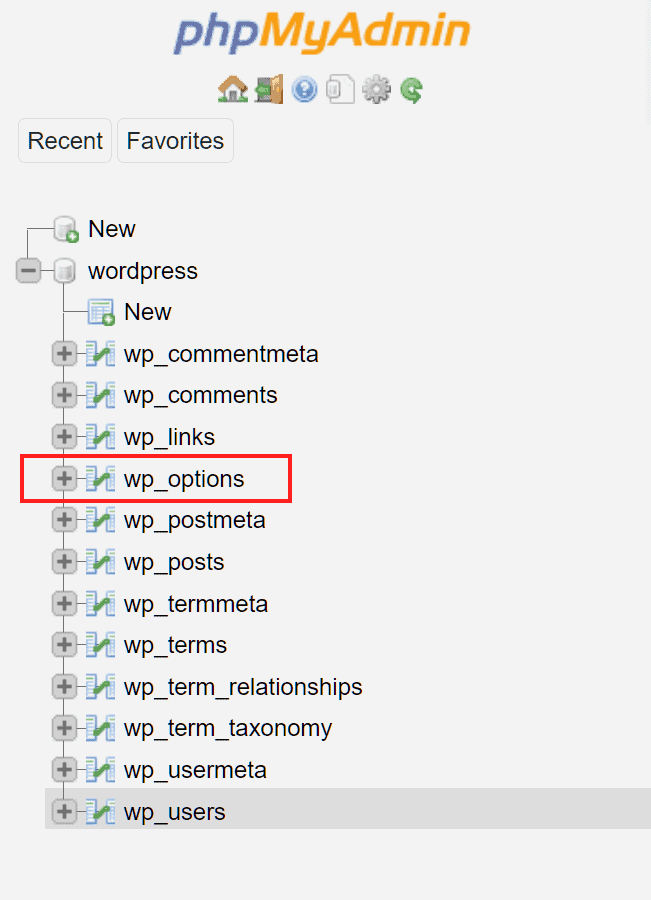
We access phpMyAdmin and open the wp_options table as seen here:
Within the table we need to search for the active_plugins record. We can use the Filter rows search function to locate it right away. We then click on the Edit button.
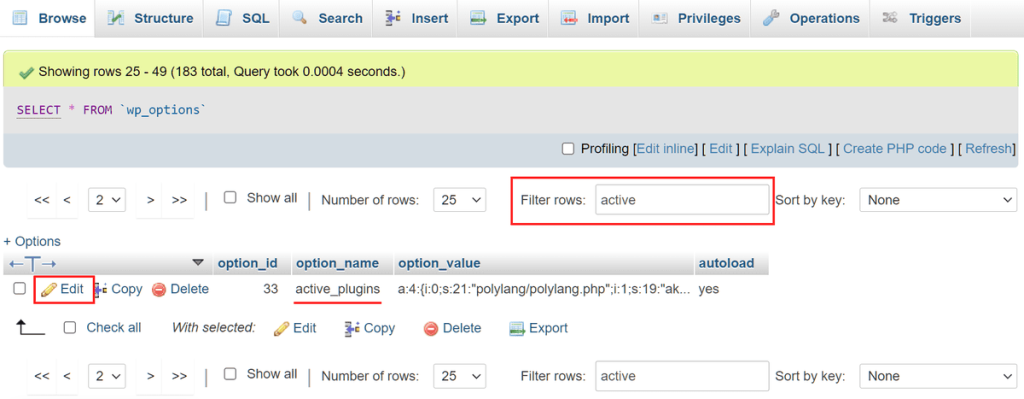
In the new screen we will have to go and modify the value of option_value by entering a:0:{} and then click on Go to save the changes.

This will deactivate the plugins, but not uninstall them. This means you’ll be able to reactivate them manually by accessing the WordPress Plugins area directly from your dashboard.
This can be useful in case you have a problem with your WordPress site and you think the cause could be a plugin. For example you may need it to fix errors such as the 504 gateway time-out, 502 bad gateway or the error 500.
phpMyAdmin for WordPress: change theme from database
If you can’t access the WordPress dashboard you may need to edit your site’s theme from the database.
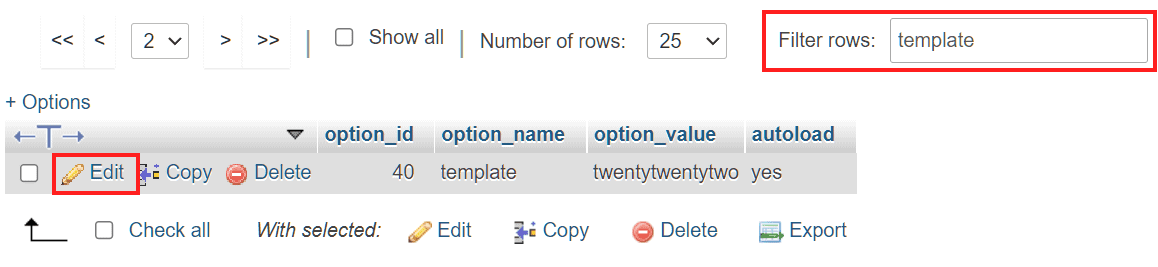
Login to phpMyAdmin and open the wp_options table:
The rows we are interested in editing are stylesheets and templates, you can use the search bar next to Filter rows to locate them right away.
Click the edit button next to the stylesheet row.

In the option_value field go to replace the content with the name of a default theme like twentytwentyone and click Go.
Repeat the same procedure with the template row as well.
phpMyAdmin for WordPress: optimizing the database
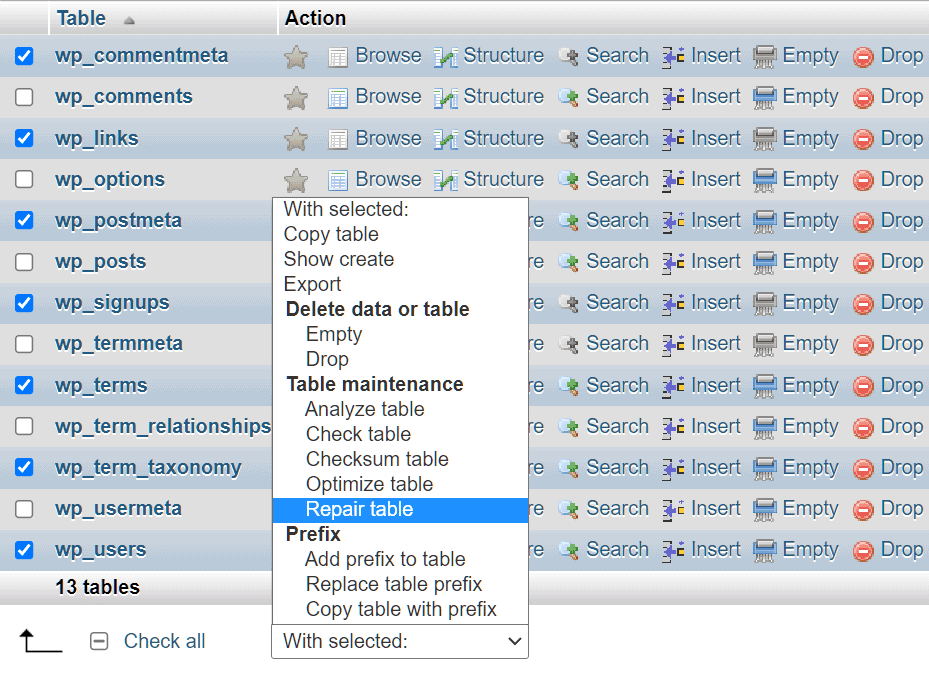
We can use phpMyAdmin for WordPress to optimize individual tables or the entire database. To do this we just click on the WordPress database. From here by checking the Select All box we can select all the tables in our database, and then choose from the drop down menu the optimize table option and click Go.

As soon as the operation is completed you will see a notice like this one confirming that all tables have been optimized.

In addition to optimization phpMyAdmin also allows us to repair tables. This option is useful to fix corrupted tables. In this case, we select the table we are interested in, or more than one, and choose Repair table from the drop-down menu.
Conclusion
In this article, WordPress phpMyAdmin : manage the database, we have seen how to leverage phpMyAdmin for WordPress with all the operations you can do directly from the database. First, we saw how information is stored within the WordPress database.
Then we focused on those operations that can be useful specifically in the case of a WordPress site. We saw the most common operations that allow us to solve some problems from resetting a user’s password to deactivating plugins. If, however, you want to fully understand the use of this tool (not only for WordPress sites) including the possibility to import and export the database I suggest you to check our guide dedicated to phpMyAdmin.
Have you ever solved an issue with WordPress using phpMyAdmin? Let me know in the comments below.
Ready to build your WordPress site?
Try our service free for 14 days. No obligation, no credit card required.


