
In this article, WordPress multisite: the complete guide, we’ll find out what WordPress Multisite is and what it’s used for. We’ll start by seeing where you’ll want to use it in order to save time and manage multiple sites as if they were one WordPress site.
After that I’ll walk you through installing WordPress Multisite on a new site and an existing site. We’ll see how to manage the network, add sites, create new users, and manage themes and plugins for the sites in the network.
Firstly, let’s start by understanding how WordPress Multisite works.
Table of Contents
What is WordPress Multisite?
WordPress Multisite is a feature that has already been integrated into the CMS that allows you to create and manage multiple sites with a single installation of WordPress. Practically, you create a real network that is easier to manage because it is accessible from a single administrative area.
The network of sites you will create will have some files in common and others, however, will be stored individually for each site. There will only be one WordPress installation, so when you go to update you will only have to do it once for all sites.
The same goes for themes and plugins that will only be installed once and will save you time when you need to update them.
The sites of the network will also share a single database, but as for the files uploaded to individual sites will be stored in separate folders from one site to another. Subfolders of the folder wp-uploads for each site on the network will be created.
If you need to manage multiple sites, creating a network will save you time, let’s see in which cases it can be beneficial to use WordPress Multisite.
Why use WordPress Multisite
If you use the same themes and plugins on multiple WordPress sites, using WordPress Multisite will make it easier for you to install, manage, and even update plugins and themes. In fact, you’ll only need to update themes and plugins once for all the sites on your network.
WordPress Multisite also comes to your aid if you need each site to be partly manageable independently. Each site on the network, may in fact have an administrator, but some functions will be available only to the network administrator.

The feature allows you to install themes and plugins only as a network administrator, but you can give the administrators of individual sites the ability to choose which ones to activate.
At the same time WordPress Multisite can be a great way to manage multiple sites of the same company, for example in case you want to create a site for each branch or sites in different languages by creating a WordPress multilingua site.
You could also use it to create a network where each user can have their own blog, you would then be able to manage all the sites using mostly the same plugins and thus saving time. The same applies in case you have multiple blogs with common elements.
With WordPress Multisite you also have the advantage of being able to allow users to access multiple sites on the network. This will come in handy if you have an author or editor who has to deal with articles on multiple blogs on the network.
Remember that each site in the network will use the same resources because it will be hosted on the same server. It all depending on the number of sites you want to put on the network and the traffic of each one, the resources of a shared hosting or a single WordPress hosting. In these cases you can evaluate whether to switch to a VPS cloud hosting or a dedicated server as your sites (or those of your clients) grow.
WordPress Multisite: when you shouldn’t use it
If you have to deal with the management of a single website, you don’t need to take advantage of this WordPress feature.
If you have to deal with several sites but want each administrator to have the ability to manage it themselves independently, including choosing which themes and plugins to install, you don’t want to use WordPress Multisite, because you won’t be able to.
The same applies if you want each site to be hosted on a separate server, have a standalone database, or in case you want to maintain a separate IP address for each individual site.
How to install WordPress Multisite on a new site
The moment you go to install WordPress on your site with Softaculous you can directly activate the multisite function.
To do so, simply check the box next to the Enable Multisite (WPMU) option as seen in the screenshot below:

How to install WordPress Multisite on an existing site
If you already have a site with WordPress and want to create your own network of sites with WordPress Multisite you will need to go through manual activation.
To do this we are going to edit two files on your site the .htaccess file and wp-config.php. You can access your files via FTP or from file manager of cPanel. Before proceeding with the changes it is best to do a backup of both files, so that you can restore them if there are any problems. It’s even better make sure you have a backup of your entire site to protect you against any mishaps.
Edit the wp-config file
Let’s start with the wp-config.php file, open it in the text editor to be able to edit it. Within the file we need to locate this line:
/* That's all, stop editing! Happy publishing. */
The code we are going to insert to activate the WordPress Multisite feature will need to be pasted before this line.
To enable the WordPress Multisite feature we will need to insert instructions before the line we just saw, like this:

I’ll report the two lines of code to be inserted for greater clarity:
/* Multisite */
define( 'WP_ALLOW_MULTISITE', true );
Note that the first line is just a comment to indicate that this is the multisite functionality, you can safely omit it. Let’s save the changes to the file and proceed.
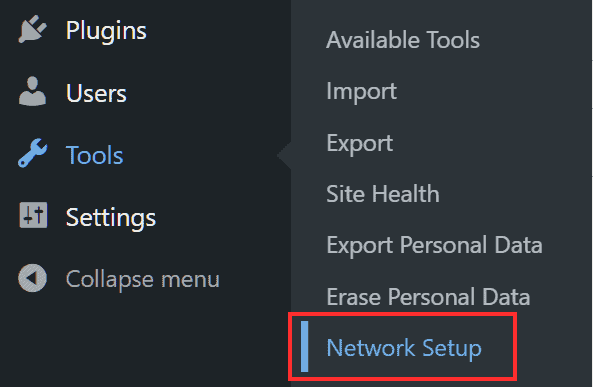
Access the WordPress message board
At this point by logging into the WordPress bulletin board we will be able to see a new entry in the tools panel: Network Setup.
The first thing that we will have to do in order to be able to proceed with the activation of the multisite network will be to temporarily deactivate the plugins, as it signals us to make WordPress with this warning:

Let’s click on Deactivate your plugins and we will be redirected to the plugins section. We can disable them all by clicking on the Group Actions menu, choosing the disable option and then clicking on Apply, as shown in this screenshot:

Now that we have deactivated the plugins we can go back to the Tools -> Network Installation section.
If your WordPress installation is recent, you can choose to use the subdomains or subfolders option for your multisite network. On the other hand, if your installation is not recent, i.e. it was created more than a month ago, you will only be able to use the network with subdomains.
The reason is due to the fact that you might create errors between already existing pages and new pages that you are going to create in the network sites. To avoid problems with existing urls, you are therefore allowed to use only subdomains.
Let’s see what are the differences between using subdomains or subfolders.
WordPress Multisite: subdomains and subfolders
Using subdomains the sites in your WordPress Multisite network will have addresses like this: site1.mynetweok.com. While using the subdirectory setting they will look like this: mynetwork.com/site1.
In case you want each site to be accessible from a separate domain, you can use domain mapping. In this way you will modify the site pointing so that visitors who want to access site1.mynetwork.com can do so from the site1.com domain. In this case you need to make sure add the domain to cPanel as a parked domain.
In doing so, each site within the network will appear as a standalone site, while retaining the benefit of being able to be managed with the WordPress Multisite functionality.
WordPress Multisite with Subdomains
If you choose to use subdomains as a structure for your site you will need to configure a wildcard subdomain. To do so, simply access Subdomains from the Domains section of cPanel.

You will then need to fill in the Subdomain field with an asterisk (*) like this:

In this way, if you allow WordPress Multisite network users to add new sites they will be able to do so without having to configure each subdomain individually from the control panel.
Make sure the folder listed in the document root is the one where WordPress is installed.
Create the network of sites
When you’ve decided which of the two options to use (subdomains or subfolders), choose the name you want to give your network and enter the administrator’s email to activate the WordPress Multisite network.

Click on Install and a new page will open where you will be shown the steps to take to proceed.

What you’ll have to do is copy and paste the code contained in the two boxes into the wp-config.php and .htaccess files respectively.
Consider that the code you see in our screenshot is for illustrative purposes only and will not be the same as the code you will need to enter. Do exactly copy and paste the code you see in your network configuration page.
You can access and edit the files from the cPanel file manager. If you have not already done so, make a backup of the two files before editing them.
This page also shows you the location of the two files you need to edit, if you can’t see the .htaccess file make sure you have enabled the show hidden files option in the file manager.

Remember that in the wp-config.php file you will have to insert the code before this line of text:
/* That's all, stop editing! Happy publishing. */
In some cases you may find it slightly different or in Italian:
/* That's it, finish your edits! Write with joy. */
In the .htaccess file instead you will have to paste the code replacing any other WordPress rules if present.
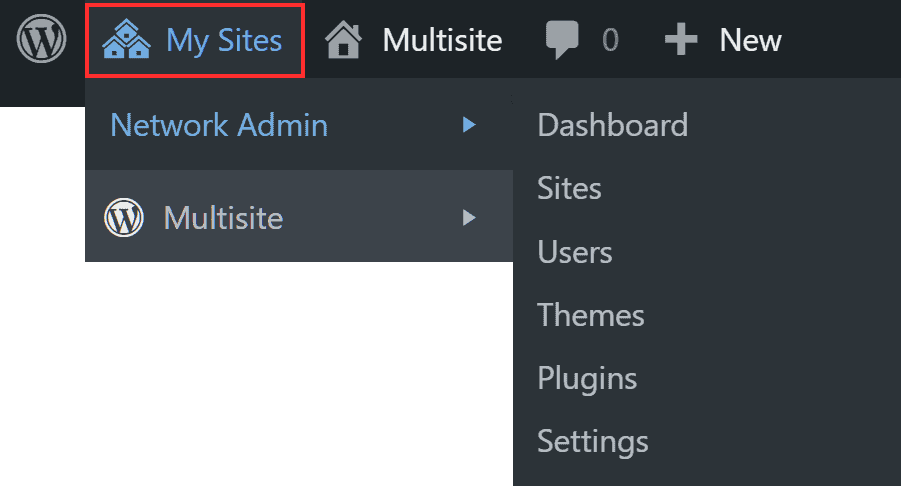
After you’ve entered the code in the two files, and saved them, you’ll need to access WordPress again, logging in with your same data.
As you may notice, now in the top bar of the bulletin board there is a new element: My Sites, from here you can access the management of the WordPress Multisite network and the sites that are part of it (at first you will see only one site).
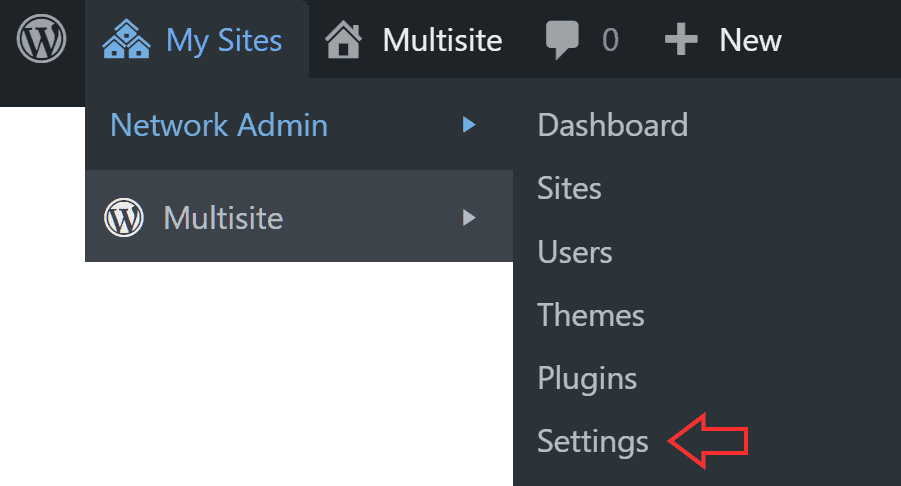
Manage the network of sites
Now that we have activated our network we can manage user registrations and set limits on file uploads, change the language and so on. To do this we can access the Settings section from Network Management as you see in this screenshot:
From the settings we can change the name of the network and choose whether to allow new registrations. Let’s see what options we have.
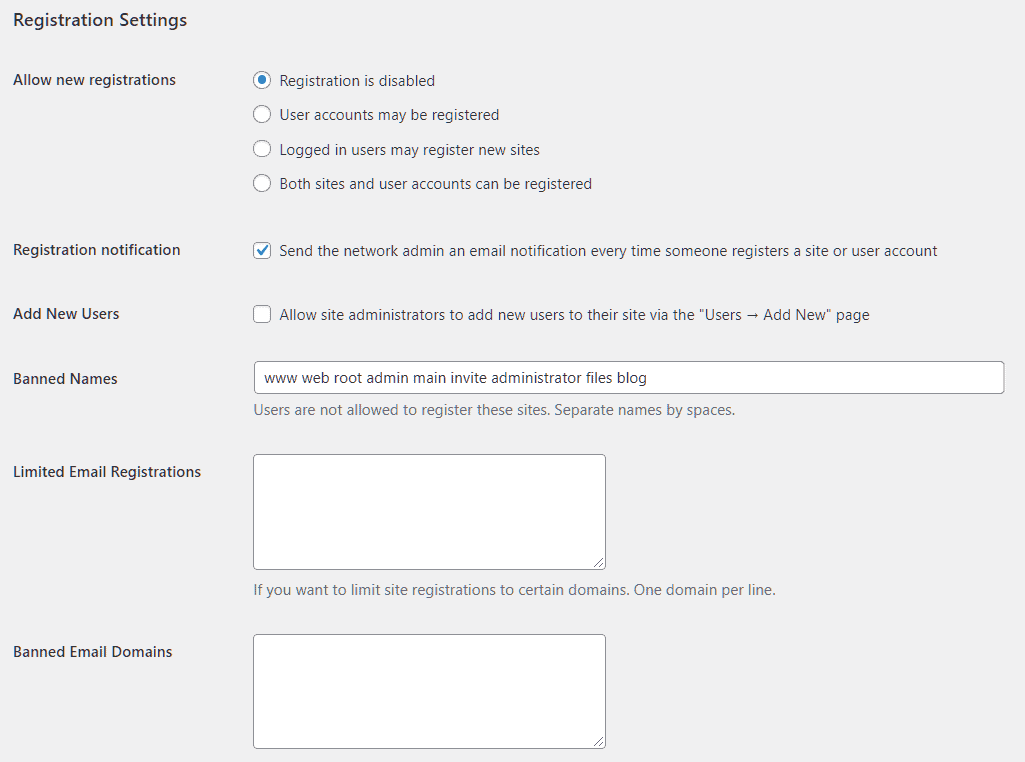
In the recording settings we can choose whether to allow new recordings by choosing whether to:
- deactivate registration (applies to both new users and new sites)
- allow the addition of new user accounts
- allow existing registered users to add other sites to the network
- allow new user registrations and the addition of new sites
As a network administrator we can choose whether or not to receive notifications every time a new registration takes place by ticking the box next to Notify registration.
Add new users: we can choose whether to allow network site administrators to add new users or not.
Banned Names: In this field you can add the sites that you are not allowed to add to the network.
Limited registrations by email: we can restrict registration to only certain email domains by adding them in this field.
Banned email domains: in this case you can choose which email domains to exclude, just enter them one per line in this field.
From the new site settings you can set a new default welcome email that will be sent to the site administrator and an email that will be sent to new users. You can also set the first article and the first default page to be created directly in the new site.
File upload settings allow you to manage the upload options for sites on the network.

In particular, you can limit the maximum total size of files that users can upload to the sites, the type of files accepted and the maximum upload size for individual files.
Adding a site to the network
The network administrator can add a site to the network from the network dashboard. Just click Sites → Add New.
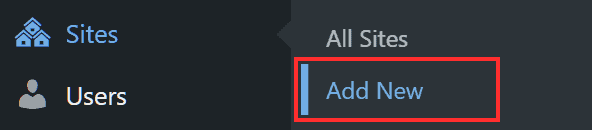
In the new page we will have to fill in the required fields, i.e. site address, title, language and enter the administrator’s email, which can be the same or different from the administrator of the main site.

If the email you enter is not already in the database and does not belong to an already registered user, a new user will be created. The login details (username and password) will be sent by email.
Add a user to the site
If you have enabled the registration of new sites by already authenticated users, users will be able to do so by logging in at mainsite/wp-signup.php and will have to fill in the following fields to add the site (domain, site title and language):

If you have not enabled registration, sites can only be added by the network administrator.
Manage network sites
To locate the sites and users on the network we can go to My Sites → Network Management → Message Board.

From here we can see the number of current sites and users, add a new site by clicking Create a new site and add a new user via Create a new user. We can also search through the users and sites on the network.
The sites we have added to the network can be managed from the sites section (My Sites → Network Management → Sites). From here we can access the bulletin board of each site, visit the site, deactivate it, delete it, archive it or change the settings.

Dashboard: this allows access to the site’s bulletin board.
Disabled: The site cannot be visited by external users, while registered users (e.g. administrators) can access it.
Archive: The site is archived and is not accessible to external users and administrators.
Spam: the site will be deleted and marked as spam (the user who created it will not be able to add it again).
Delete: The site will be deleted and with it the data will be deleted too.
By clicking on Edit we can access the site settings: from the tab Users we can check the registered users and change their role (administrator, editor, author, etc.).

These options will only be visible to the network administrator, i.e. the user with the Super Admin role. Users with the role of site administrator, however, will only be able to manage users of their site and not those of other sites in the network.
From this same page we can also add existing users to the site, or new users by specifying username, email and role.

Let’s see how to add new users to the network in detail.
Adding a user to the network
In addition to the site settings, as seen earlier, you can also add new users to the network from the side panel by clicking on Users → Add New.

After adding the users we can assign them the role and manage the access to the different sites in the network. Let’s see how to add the user who will be the administrator of the secondary site we added to the network.
Click on Sites → All Sites and then click on edit to access the settings for the site you are interested in.

Click on the Users tab and add the existing user by choosing the role, in our case Administrator, then click on Add User.

The same procedure can also be performed for users with other roles (Editor, Author, etc.).
By clicking on users from the side menu on the left we will have an overview of all users and in the Sites section we can see the sites to which each user has access:

Create Super Admin user
Let’s see how to assign the role of super admin to a user making him administrator of the network. Click on Users → All Users and then click on the Edit button that appears below the user’s name, as shown here:

On the page that opens, locate the Super Admin item and check the box next to it that says “Give this user super network administrator privileges”.

Then click the button at the end of the Update User page to save the changes.
Install themes and plugins
In this article, WordPress multisite: the complete guide, we’ll cover managing themes and plugins in multisite installation directly from the dashboard. If, instead, you want to deepen how to enable themes directly from command line, read our article on WP-CLI.
Let’s see how to install the WordPress themes so that they are available for all sites on the network and how to activate a theme for a single site.
After that, let’s see how to install the WordPress plugins and activate them on all the sites of the network or allow the administrators of each site to activate them independently.
Install a theme with WordPress Multisite
Using WordPress Multisite the installation of themes is only allowed to network administrators and not individual site administrators. To install a WordPress theme just click on Themes → Add New.
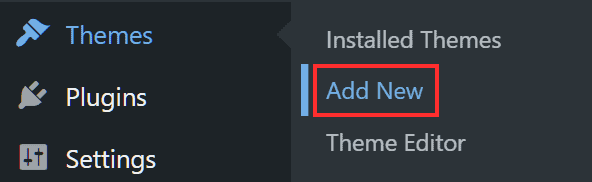
After installing the theme you are interested in, click on Installed Themes.
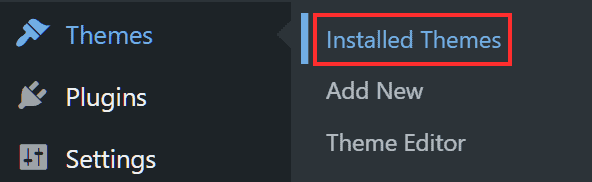
In the page that will open you will see all the themes that you have installed and you can decide which ones you can enable for the network by clicking on the enable network button. The enabled themes can be activated by site administrators.

If instead you want to activate a theme on a single site as a network administrator go to Sites and click the Edit button below the site you want to edit.
Click on the Themes tab and then click the Activate button below the name of the theme you want to activate.

Install a plugin with WordPress Multisite
Also, only for plugins the network administrator can install new plugins and can decide whether or not to allow site administrators to activate them themselves.
To do this we simply go to the network settings (My Sites → Network Management → Settings), scroll down to Menu Settings and check the Plugins box next to Enable Administration Menus.
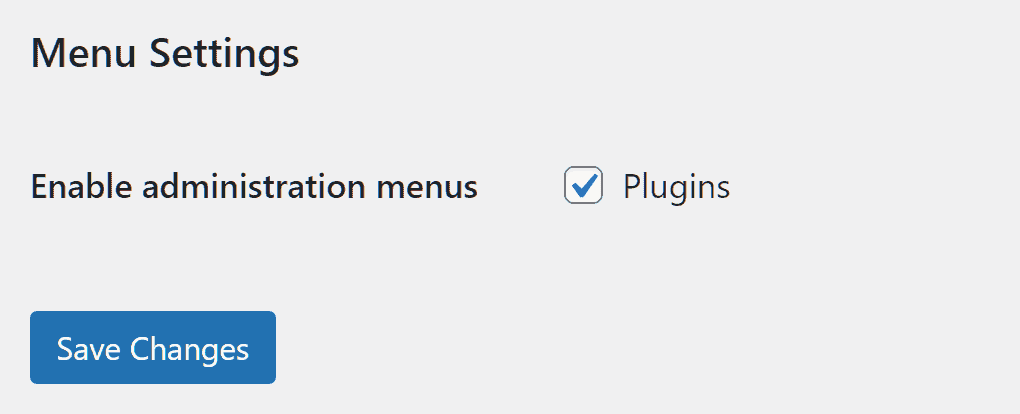
In this way, the site administrators will be able to activate the available plugins, i.e. the ones that have been installed but not activated on the whole network. If, on the other hand, the plugin has been activated on the whole network, it can only be deactivated by the network administrator and not by the individual site administrators.
As a network administrator to add a new plugin you just have to click on Plugin → Add New, just like in a standalone WordPress installation.

After adding it you can activate it on all the sites in the network by clicking the Activate on Network button you see just below the plugin name.

If you don’t activate it on the whole network, the administrators of each individual site will be able to choose for themselves whether or not to activate it on their site.
Conclusion
In this article, WordPress multisite: the complete guide, we saw how to create a WordPress Multisite installation on a new site and an existing site. We’ve seen in what cases the multisite feature can be useful, how to go about creating it and then managing it.
The network of sites can be managed by a single network administrator who can take care of adding new users, creating sites and installing themes and plugins. Some tasks can also be carried out by individual site administrators, who can also be given limited management as required.
Were you able to create your multisite network by following our guide? Let me know in the comment below, what advantages you got by managing multiple sites using this feature.
Ready to build your WordPress site?
Try our service free for 14 days. No obligation, no credit card required.


