
Comments can be a powerful tool for building community and discussion around your WordPress site, but there are times when turning them off makes more sense. Maybe you’re running a business website that doesn’t need feedback, dealing with too much spam, or simply want to keep certain pages focused without distractions.
Luckily, WordPress gives you complete control over your comment settings. You can disable them site-wide, on specific posts, or even remove old comments entirely. Let’s walk through exactly how to disable comments in WordPress.
Table of Contents
Why Disable WordPress Comments?
Before diving into the how-to, let’s talk about why you might want to disable WordPress comments in the first place.
Business websites often don’t need them. If you’re running a company site with service pages, an about section, and contact information, comments might not add any value. These static pages work better without a comment section cluttering them up.
Spam is a real problem. Even with solid antispam tools like Akismet, managing comment moderation takes time. Some site owners decide it’s easier to turn comments off entirely rather than constantly fight the spam battle.
Some content doesn’t need discussion. Think about announcement posts, legal pages, or time-sensitive content. You might publish certain articles where feedback isn’t necessary or appropriate.
You want to reduce maintenance. Every comment needs moderation. That means checking for spam, responding to legitimate questions, and managing inappropriate content. For busy site owners, that time might be better spent elsewhere.
And another common reason is, preventing negative comments. While constructive criticism can be valuable, some sites attract trolls or consistently negative feedback that doesn’t add value to the discussion.
Method 1: Disable All Future Comments Through Built-in Settings
The quickest way to disable comments in WordPress sitewide is through WordPress settings. This method works great if you’re just setting up your site or decide you want to turn off comments permanently.
Head to Settings > Discussion in your WordPress dashboard. You’ll see a checkbox that says Allow people to post comments on new posts. Uncheck this box.
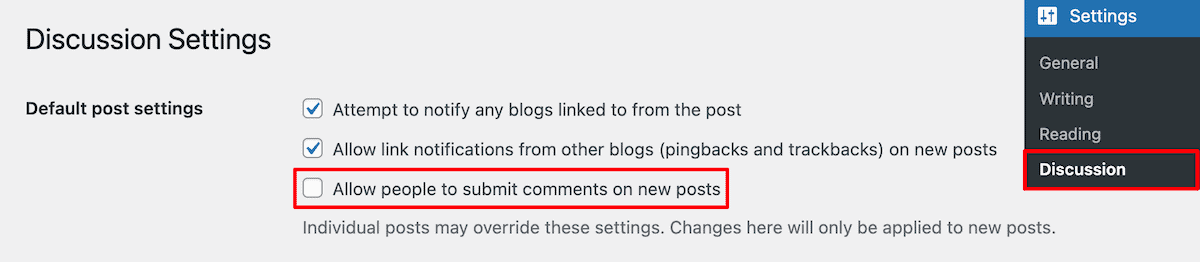
While you’re here, you might also want to uncheck Allow link notifications from other blogs (pingbacks and trackbacks) to prevent these types of notifications as well.
Scroll down and click Save Changes.
That’s it. WordPress will no longer allow comments on any new posts or pages you create.
Keep in mind, this only affects future content. Any posts you’ve already published will still have comments enabled if they were turned on before. We’ll cover how to handle existing content next.
Important Note About This Setting
This setting specifically uses the word “posts,” but it actually applies to all post types by default.
That means posts, pages, and any custom post types will have comments disabled going forward. However, some custom post types might have their own comment settings that override this global setting.
Method 2: Turn Off Comments on Individual Posts or Pages
Sometimes you want to keep comments open on most of your site but disable them on specific content. WordPress makes this easy through the post editor.
Using the Block Editor (Gutenberg)
Navigate to Posts > All Posts (or Pages > All Pages for pages). Then, click on the post you want to edit.

In the post editor, look for the post settings in the right sidebar. Click on the Post tab (or Page tab for pages) if it’s not already selected.
In the main post info tab you’ll see Discussion, followed by a link that says Open or Closed. If it says Open, then click on it and you can turn comments closed.

You’ll also see an option for Allow pingbacks & trackbacks that you can disable if you want to prevent those types of interactions as well.
Quick Edit Method
For a faster approach, you don’t even need to open the post editor. From your posts list, hover over any post title and click Quick Edit.
In the quick edit panel, look for the Allow Comments checkbox. Uncheck it and click Update.

This method is perfect when you need to quickly turn off comments on a single post without loading the full editor.
Setting Comment Status for Pages
By default, pages in WordPress have comments disabled. But if you’ve enabled them previously or your theme enables them automatically, you can disable them the same way as posts.
The process is identical. All you need to do is edit the page, find the Discussion section in the page settings, and switch Open to Closed.
Method 3: Bulk Disable WordPress Comments on Multiple Posts
Do you have dozens or hundreds of posts where you need to turn off comments? Doing them one by one would take forever. Here’s the bulk method that can save you hours of work.
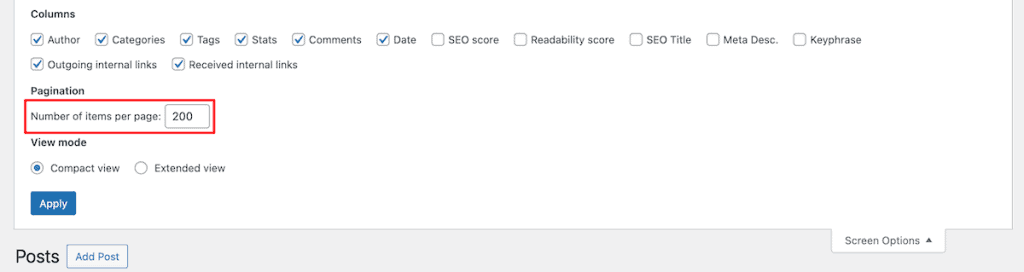
Go to Posts > All Posts. Check the boxes next to all the posts you want to modify. You can use the checkbox at the top to select everything on the current page.
If you need to select more posts than what’s shown on one page, click on Screen Options at the top of the page and increase the Number of items per page to show more posts at once. You can typically set it up to 200 items per page.
From the Bulk Actions dropdown, choose Edit and click Apply.

In the bulk edit options that appear, find the Comments dropdown and select Do not allow. You’ll also see a Pings dropdown where you can select Do not allow to disable trackbacks and pingbacks.

Click Update to apply the change to all selected posts.
This same process works for pages and custom post types. It’s the fastest way to disable comments across existing content without touching each item individually.
Pro Tip for Large Sites
If you have thousands of posts, even the bulk edit method might be tedious. You’ll need to process them in batches of 200. In this case, consider using the Disable Comments plugin we’ll discuss later, which can turn off comments on all existing content with a single click.
Method 4: Automatically Close Comments on Older Posts
Maybe you want to keep discussions going on fresh content, but close them on older posts. WordPress has a built-in feature for this that works automatically.
Navigate to Settings > Discussion. Look for the checkbox that says Automatically close comments on posts. Then, you can set the length of time in the box below. Here are some common settings:
- 14 days: Good for news sites or time-sensitive content
- 30 days: Standard for most blogs
- 60-90 days: Ideal for evergreen content that might still get engagement
- 180 days: Maximum engagement period while still preventing spam on very old posts.

Save your changes, and WordPress will automatically close comments on posts once they hit that age threshold. This keeps your recent content engaging while stopping spam comments on older posts that typically attract more unwanted comments.
How This Feature Works
WordPress calculates the age based on the post’s publication date, not when it was last updated. So if you update a year-old post, comments will remain closed if you’ve set the threshold to 30 days.
This setting also applies retroactively. If you set it to 30 days, any post older than 30 days will immediately have comments closed, even if they were open before.
Method 5: Remove the Comments Section with a Plugin
For complete control without messing with settings or touching code, the Disable Comments plugin is your best option. It’s free, reliable, has over a million active installations, and gives you options that the default WordPress settings don’t offer.
First, you need to install and activate the plugin from Plugins > Add New. Search for Disable Comments by WPDeveloper. Look for the one with the red logo and over 1 million installations.

Once activated, go to Settings > Disable Comments. You’ll see several options:
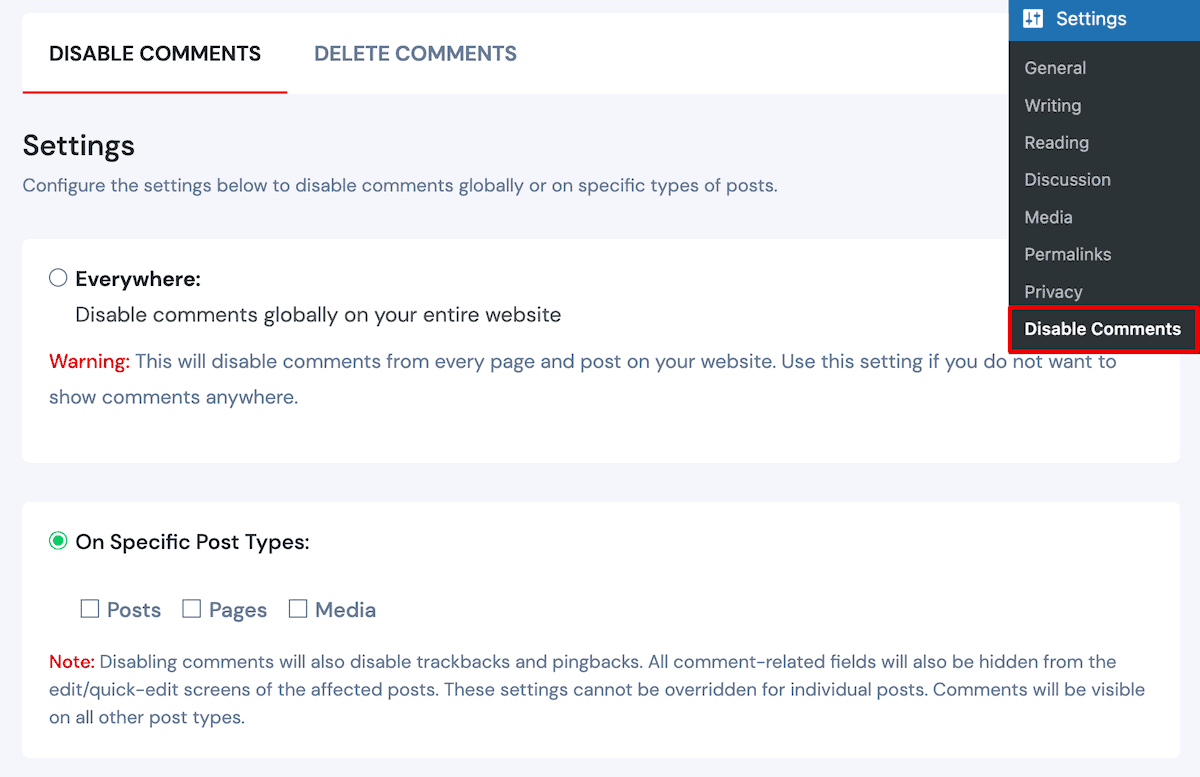
Choosing the Everywhere option completely removes comments from your entire site. It will do the following:
- Hides all comment forms
- Removes the Comments menu from your dashboard
- Prevents any new comments from being posted
- Hides existing comments from displaying
- Removes comment counts from posts
- Disables comment-related widgets
You can also choose where you want to disable comments on specific Post Types:
- Posts
- Pages
- Media attachments
- Any custom post types you have
Select your preference and save. The plugin handles everything else automatically.
The Disable Comments plugin offers additional features beyond comment disabling. For example, you can click the Delete Comments tab to permanently delete comments from your database. You can delete these comments site-wide or only across specific post types.
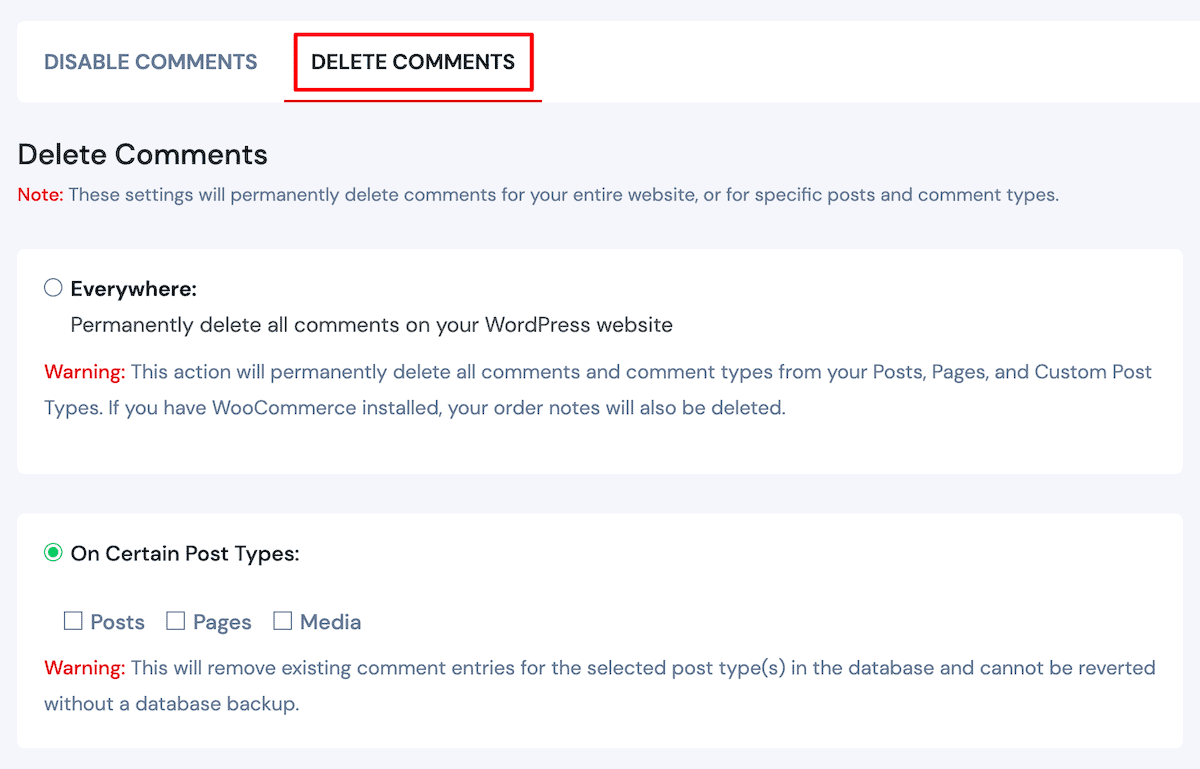
Remember to always back up your site before permanently deleting comments, as this action cannot be undone.
Note: If you’re running WordPress multisite, the plugin can be network-activated to apply settings across all sites. You can also enable per-site settings to let individual site administrators control their own comment settings.
Method 6: Disable Comments on Media Files
WordPress also allows comments on media attachment pages. Depending on how your WordPress site is setup, you might need to disable these comments too.
To disable comments on specific media files, head over to Media > Library and switch to the list view if you’re currently in grid view. Click on any image title to edit it.
Once you’re in the edit screen, look for Screen Options at the top and make sure Discussion is checked. This will make the Discussion metabox visible. Find that Discussion metabox (usually below the post content) and uncheck Allow comments, then update the media file. You’ll need to repeat this process for each media file where you want comments disabled.

Bulk Disable Comments for All Media
Unfortunately, WordPress doesn’t offer a built-in bulk edit option for media comments. You have three options:
Option 1: Use the Disable Comments plugin (highlighted above). Select On Specific Post Types and check only the Media/Attachment option. This instantly disables comments on all media files.
Option 2: Add code to your theme (shown below). If you’re comfortable with adding code, then add this to your theme’s functions.php file. You can add the code via file editor in your WordPress dashboard, connect to your site via FTP, use a child theme, or a plugin like WP Code.
function disable_media_comments( $open, $post_id ) {
    $post = get_post( $post_id );
    if( $post->post_type == 'attachment' ) {
        return false;
    }
    return $open;
}
add_filter( 'comments_open', 'disable_media_comments', 10, 2 );
Option 3: Disable media pages entirely. Many sites redirect media attachment pages to the parent post or homepage, eliminating the issue entirely. You can do this with WordPress SEO plugins like Yoast SEO.
Method 7: Disable Comments By Adding Code to WordPress
For developers or advanced users who prefer not to use plugins, you can disable comments with code. Below you’ll find several snippets you can add to your theme’s functions.php file.
You can edit this file directly, by navigating to Appearance > Theme File Editor in your WordPress dashboard. Alternatively, you can connect to your website via FTP or log in to cPanel and use File Manager to edit your website files.
Finally, you can create a child theme, which lets you modify an existing theme without directly editing the theme’s code. All of your changes here will stay saved after you update your theme.
With that said, here are the code snippets:
Disable Comments on Future Posts
This code will disable comments on all future posts you create. Note that it won’t affect posts you’ve already published that have comments enabled.
function disable_comments() {
    $post_types = get_post_types();
    foreach ($post_types as $post_type) {
        if (post_type_supports($post_type, 'comments')) {
            remove_post_type_support($post_type, 'comments');
            remove_post_type_support($post_type, 'trackbacks');
        }
    }
}
add_action('admin_init', 'disable_comments');
Close and Hide All Comments
If you want to close comments on all post types and hide any existing comments, use this filter instead:
// Close comments
add_filter('comments_open', '__return_false', 20, 2);
add_filter('pings_open', '__return_false', 20, 2);

// Hide existing comments
add_filter('comments_array', '__return_empty_array', 10, 2);
Method 8: Clean Up & Manage Existing Comments
Disabling comments doesn’t remove ones that already exist. They’re still in your database, just hidden. Here’s how to clean them up properly.
Manual Deletion Through WordPress Admin
Go to Comments in your WordPress dashboard. By default, you’ll see 20 comments per page, which can make deletion tedious if you have hundreds or thousands of comments.
To speed things up, click Screen Options at the top of the page and change the Number of items per page to a higher number. You can typically set this up to 200 items per page. Click Apply to update the view.
Now select all comments using the checkbox at the top of the list. From the Bulk Actions dropdown, choose Move to Trash and click Apply. This moves all selected comments to the trash.

Comments in the trash are automatically deleted after 30 days. If you want them gone immediately, you can click Empty Trash to delete them right away.
Delete Comments by Comment Status
WordPress makes it easy to filter comments by their status before deleting them. You’ll see tabs at the top of your comments page for Pending (comments awaiting moderation), Approved (published comments), Spam (comments marked as spam), and Trash (comments you’ve already trashed).

Click on any status tab to filter your comments, then use the bulk actions to delete just those specific comments. This is particularly useful if you want to keep some approved comments while clearing out all the spam and pending ones.
If you have thousands of comments, you’ll need to repeat this process multiple times since WordPress limits how many you can process at once.
Dealing with “Comments Are Closed” Messages
After disabling comments, some themes still show a Comments are closed message. This looks unprofessional and draws attention to something that doesn’t exist.
The easiest way to do this is to add a little CSS to your theme.
The CSS class varies by theme, but the code snippet below usually works. Go to Appearance > Customize > Additional CSS, then add your CSS code and save your changes.
.nocomments {
    display: none;
}
Closing Thoughts: How to Disable Comments in WordPress
Disabling WordPress comments doesn’t have to be complicated. Whether you’re turning them off site-wide, managing them post-by-post, or cleaning up old discussions, WordPress gives you the tools to control exactly how comments work on your site.
Start with the method that matches your needs. Here are the options again:
- Use WordPress settings for simple, site-wide changes
- Try bulk editing for existing content
- Install the Disable Comments plugin for complete control and easy cleanup
- Add custom code for permanent solutions (with proper backups first)
Remember that comments aren’t inherently good or bad. They’re a tool. Use them when they add value to your site and your audience. Turn them off when they don’t.
The key is finding what works for your specific situation. A business site might not need comments at all, while a community blog may thrive on discussion. There’s no one-size-fits-all answer.
Before making any major changes, especially database modifications or code additions, always back up your site. Test changes on a staging site when possible, and monitor your live site after implementing changes.
Have you disabled comments on your WordPress site? What method worked best for you? Let us know your experience in the comments below. (Yes, we keep ours enabled because they add value to our technical discussions!)
Ready to build your WordPress site?
Try our service free for 14 days. No obligation, no credit card required.


