
Have you ever wondered what is a child theme and how can one create it?
In this article, Child theme: the definitive guide, you will learn how to create a child theme for WordPress. We will see how to create it manually and with a plugin, and how to make a child theme for a block theme.
Firstly, let’s see what it is and how useful it is.
Table of Contents
What is a child theme
In the WordPress ecosystem when we talk about child themes, one tends to wonder what do they represent?
And why are they called that?
A child or child theme is simply a theme that inherits the appearance and functions of the parent theme.
So if we take the current default WordPress theme, namely Twenty-Two, we can consider it as a “parent” theme. A theme that inherits the properties of another is called a child theme.
A parent theme is a complete theme that contains all the files needed to function. Excluding child themes, all themes can be considered “parent” themes.
Why is it necessary to use a child theme?
If we want to make changes to a theme, for example by changing some properties or functions, it is better to use a child theme.
But why not edit the parent theme directly?
As you may know, even for the WordPress themes updates are regularly released.
When we go to update a theme, the present files are overwritten. This means that if we have made changes directly to the theme files, we will lose them with the update.
Since extension updates are important for WordPress security, it is good practice to to keep themes and plugins updated.
Therefore, using a child theme allows us to keep updating the parent theme and keep the changes we want to make to the theme.
Let’s see how to create it.
How to create a child theme
There are several ways to create a child theme:
- Use the child theme that is already present in some themes
- create it manually
- Use a plugin to create it.
Let’s take a step-by-step look at how to create our child theme, before moving on to how you can customize it and how to fix any problems.
Before you start
To create a child theme you will need to modify the theme files, and these changes will be reflected on the site.
It is advisable never to make the changes on the site in production. You can then do as much testing as you want by creating one staging of the site or work on a local environment.
Check out our dedicated guides on how to instal WordPress local or how to use MAMP.
Remember that modifying your theme requires basic knowledge of HTML and CSS, and, to add functions you need PHP as well. In this article, Child theme: the definitive guide, we will briefly look at some examples. For the purposes of this guide, to see how to create a child theme manually we will use Twenty Nineteen, one of the default WordPress themes.
In the following sections we will also see how to create a child theme from a block theme, taking Twenty Twenty-Two as an example.
Modify existing child theme
Some themes include a ready-made child theme among the files. Examples of themes that include a child are Avada and Neve.
To find out if the theme you are using already includes the child theme, you can consult the reference documentation.
If, on the other hand, you want to choose a theme with this feature you just need to search for “child theme” or “child theme ready” as a parameter, as shown in this example on Themeforest:

In this case, after downloading the theme zip file, you will find two folders inside.
One with the parent theme, which will have “themename.zipper” for example “Avada.zip“. The other with the child theme, which you can identify by the name “themename-child-theme.zip” for example “Avada-Child-Theme.zip“.

You just need to install the parent and child theme and then activate the latter.
Keep in mind that for the child theme to work, you must also install the parent theme. In the next sections we will see all the steps on how to activate it.
Create a child theme manually
Not all themes contain the files to create a child theme, so in most cases you will have to create the necessary files to create it.
The steps to follow are these:
- create a folder for the child theme
- create a css file
- Create the functions file.
After that we can edit the child theme and activate it.
Let’s look at these three steps one at a time.
Do you want to follow the step-by-step procedure in our guide but haven’t got WordPress yet? Activate our free trial for WordPress hosting and you can do all the testing you want, the free trial is valid for 14 days.
Create a folder for the child theme
First we need to create a new folder with an FTP client such as FileZilla, Cyberduck or with the file manager of cPanel access to the files on the server.
In this part of the guide we will see how to do it using the cPanel file manager, but the procedure is similar with any FTP client.
The folder where all the themes in your WordPress installation are located is in wp-content/themes.
Inside that, you will need to create the new folder which should have the same name as the parent theme folder with the addition of “-child”.
Let me will explain further with a practical example.
I am using the default WordPress theme, Twenty Nineteen, and I want to create a child theme of this theme.
Inside the themes folder I find the parent theme folder and I see that it has this name: twentytnineteen.

I then create a new folder and rename it: twentynineteen-child.
You just use the same system whatever the parent theme name is, remembering to put “-child” in the folder name.
Pay attention to the name of the existing folder and do not insert spaces.
Create the css file
Let’s open the child theme folder we just created.
Inside it we are going to create a new file called style.css.

We open the file and insert this text inside it:
/*
 Theme Name: Twenty Nineteen Child
 Theme URI: https://supporthost.com/
 Description: Twenty Nineteen Child Theme
 Author: SupportHost
 Author URI: https://supporthost.com/
 Template: twentynineteen
 Version: 1.0.0
 License: GNU General Public License v2 or later
 License URI: http://www.gnu.org/licenses/gpl-2.0.html
*/
The text above is a comment and is used to point WordPress information about the theme.
You must insert these lines at the beginning of the style.css file.
The main purpose is to communicate that it is a child theme and specify to which parent theme it refers to.
The necessary information and lines that must be entered are “Theme Name” and “Template.”
Let’s go over what to enter in the various fields.
Theme name: here you can enter the name of your theme, the name must be unique.
Theme URI: You can include a link to the theme’s documentation.
Description: here you can add a description of your theme.
Author: you can enter your name or company name.
Author URI: you can enter the site address of the author of the theme.
Template: this is the field next to which you should enter the name of the folder in which the parent theme is contained. In our example “twentynineteen”.
Version: the number of the current version of the theme.
License: the type of license, in this case GNU GPL.
License URI: the address where you can find all license information.
After editing the file, let’s save it.
The style sheet of our child theme will override that of the parent theme. However, in most cases we will want to keep the style of the parent theme.
To do this we are going to create a functions.php file in the child theme folder.
Note: Starting with WordPress 5.9, it is no longer necessary to create the functions.php file. In fact, the child theme will inherit the style of the parent theme thanks to the theme.json file. In the section on block themes we will see how to make a child theme in this case.
Create the functions file
Inside the child theme folder let’s create a new file and rename it: functions.php.
Then, we are going to insert the following php code inside it:
<?php
add_action( 'wp_enqueue_scripts', 'enqueue_parent_theme_style' );
function enqueue_parent_theme_style() {
    wp_enqueue_style( 'parent-style', get_template_directory_uri().'/style.css' );
}
After that we save the file.
Keep in mind that to include the style sheet it is better to use the wp_enqueue_style() function instead of using @import. In fact, using @import in the style sheet (style.css) can cause the parent theme style sheet to be loaded twice.
For more details on the wp_enqueue_style() function and exceptions by the theme, you can check out the WordPress documentation.
Activate child theme
At this point we can activate the child theme as if it were any other theme.
From the WordPress dashboard, click on Appearance -> Themes.
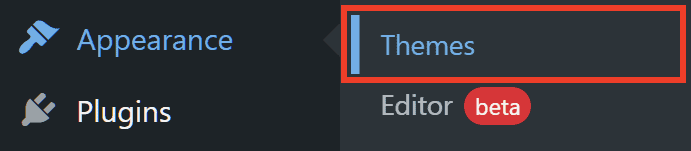
Then, we locate the theme we created and click on activate.

As you may have noticed when looking at this screenshot, WordPress shows us the theme details based on the information we entered in the style.css file comment.
In this case, however, it does not show us any preview of the theme.
To display a preview image we simply go to upload a screen to the child theme folder and rename it: screenshot.png.

You can also use the screenshot of the parent theme and copy it to the folder of the child theme you created.
Create a child theme with a plugin
We have seen the step-by-step procedure for creating a child theme “manually.” Alternatively, you may want to use a plugin to create your child theme more quickly.
There are several plugins that allow us to do this. Let’s see how to do it with one of the most popular plugins: Child Theme Configurator.
There is also another widely used plugin, Child Theme Creator by Orbisius, but consider that it has not been updated for two years and is not compatible with the latest versions of WordPress.
Create a child theme with Child Theme Configurator
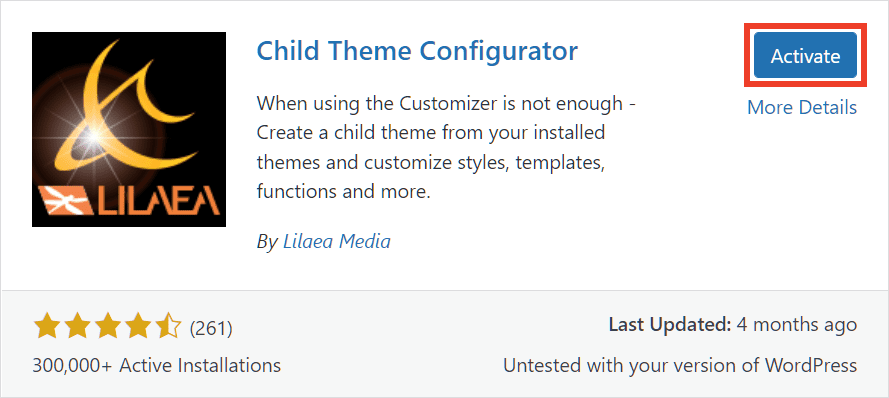
First, let’s install the Child Theme Configurator plugin.
From the WordPress dashboard we can click on Plugins -> Add New, search for the plugin with the search bar and click on Install Now.

After that we can activate the plugin by clicking on “Activate”.
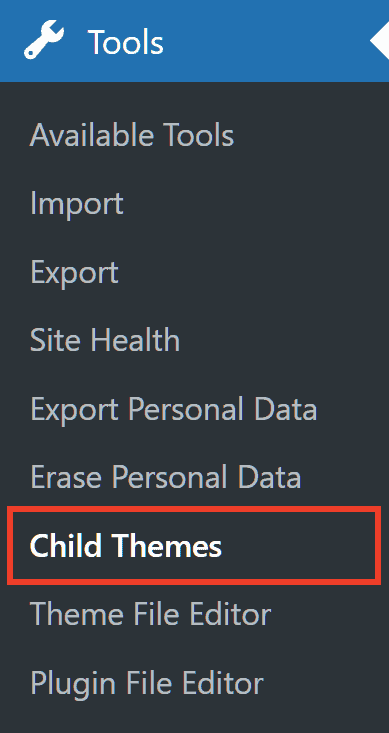
After activating the plugin, we will see the “Child themes” item in the Tools section.
From the “Parent/Child” tab we must first choose an action.
In our case, since we want to create a child theme, we select CREATE a new Child Theme.

We then need to select the theme we want to use as a parent theme. From the drop-down menu we choose the one we are interested in, in our case “Twenty Twenty.”
After that we click on the Analyze button.

The plugin will analyze the parent theme and tell us if it can be used to create a child theme, as you see in this screenshot.

In the next step we need to choose the name of the child theme folder. We can leave the default option which will be “nameparenttheme-child”, as you see here:

The next section allows us to choose whether to save the style to a separate stylesheet or to the primary stylesheet. Again, we can leave the default option (Primary stylesheet).

In section 6 we can leave the default option “use the WordPress style queue”.

Section 7 allows us to edit the details of the child theme. We click on the arrow to expand the section and then we can fill in the following fields:
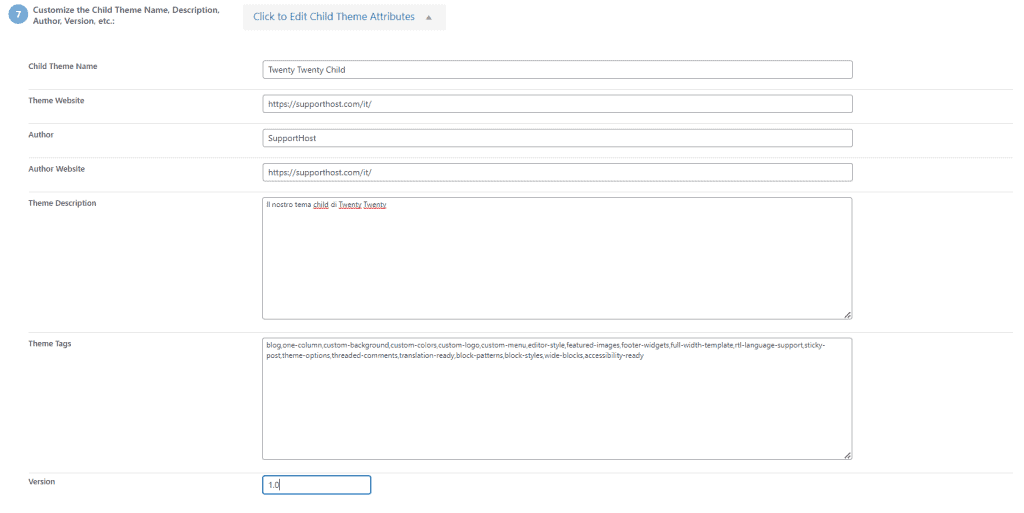
Child Theme Name: enter the name of the theme.
Theme Website: you can enter the theme website.
Author: the name of the author of the paper.
Author Website: the author’s website.
Theme Description: here you can enter a brief description of the theme.
Theme Tags: you can indicate the theme tags.
Version: the version number of the theme.
Step 8 allows us to choose whether we want to import menus and widgets from the parent theme to the child theme. To do this we simply check the option given in this section.

Finally in section 9 we find the “Create New Child Theme” button. After checking all the previous settings, you can click the button and the plugin will create your new child theme.

If the procedure was successful, you will see a notice like this one telling you that the child theme has been created.

By clicking on “Preview your child theme” from this notice, we can open a preview of the theme.
After that we can click on “Activate and publish” to activate the child theme.

If we go to the Appearance -> Themes section, we will see in the list of installed themes, our child theme:

Keep in mind that in this way you have only created the child theme, which will look identical to the parent theme. The next step is to modify the theme, as we will see in the section on how to customize the child theme.
How to customize the child theme
To customize the theme we can go and add rules in the CSS file we created.
In addition, we can also create new template files that will be used instead of the corresponding parent theme files.
To finish we can also add custom functions to the child theme with the functions.php file.
Let’s look at some examples.
Edit style file
We can change the CSS style of the parent theme file by going to add new rules in the style.css file of the child theme.
In fact, WordPress will replace the styles in the parent theme, using those in the child theme.
It may be convenient to copy the parent theme style and edit it in the child theme file.
Let’s see how to do it with an example.
In the parent theme we have this style:
.button:hover,
button:hover,
input[type="button"]:hover,
input[type="reset"]:hover,
input[type="submit"]:hover {
  background: #111;
  cursor: pointer;
}
We need the “background” rule to determine the color of a button when we interact with it by hovering the mouse over it.
To change the style in our child theme we simply copy the same text and change the background color of the button, as in this example:
.button:hover,
button:hover,
input[type="button"]:hover,
input[type="reset"]:hover,
input[type="submit"]:hover {
  background: #ffd700;
  cursor: pointer;
}
Edit template files
The files we are going to add to the child theme folder will be used instead of the corresponding parent theme files.
If we want to make changes to a template file, we simply copy the file from the parent theme folder to the child theme folder and then edit it. Or create it directly in the child theme folder.
This way, the parent theme files will remain unchanged and we can work on the child theme files.
This system also allows us to create templates for some specific pages.
To learn more about how the template hierarchy works and thus how the template to be used is chosen, you can refer to the WordPress documentation on the template.
Keep in mind that WordPress uses the file that has priority in the hierarchy.
If the file has the same name in both the parent and child theme folders, the one in the child theme will be used with priority.
Edit the functions.php file
We can use the functions.php file of the child theme to create new functions.
Keep in mind, however, that the functions.php file of the child theme does not replace that of the parent theme. And in particular, the functions.php file of the child theme is loaded first and the functions.php file of the parent theme is loaded after it.
To replace a parent theme function by specifying it in the child theme you will have to declare the function conditionally.
Here is an example:
if ( ! function_exists( 'function_name' ) ) {
    function function_name() {
        //  function content
    }
}
You can learn more by checking out the WordPress documentation on theme functions.
How to create a child theme with a block theme
WordPress 5.9 supports block themes. With the block editor and themes that support this feature we can edit not only the content, as we used to do with posts and pages, but also all areas of the site including header and footer.
Let’s see how to create a child theme of a block theme. The procedure in this case is a little different from that for traditional themes that we saw earlier.
In this guide we will take the Twenty Twenty-Two theme as an example.
Create the necessary files for the child theme
To create a child theme for a block theme we need to:
- create a folder
- create the file style.css
- create the theme.json file.
Let’s see how to do it.
Create the folder for the child theme
First we need to create the folder within which we are going to place our child theme files.
We can use the file manager or an FTP client to access the files.
Inside the /wp-content/themes/ folder we are going to create a new folder that has a name like this:
nameparenttheme-child.
In our case it will be twentytwentytwo-child, because the parent theme is Twenty Twenty-Two.

Create the file style.css
After creating the folder we need to create a “style.css” file inside the folder.

We edit the file and insert these lines:
/*
 Theme Name: Twenty Twenty-Two Child
 Theme URI: https://supporthost.com/
 Description: Tema child per Twenty Twenty-Two
 Author: SupportHost
 Author URI: https://supporthost.com/
 Template: twentytwentytwo
 Version: 1.0.0
 License: GNU General Public License v2 or later
 License URI: http://www.gnu.org/licenses/gpl-2.0.html
*/
You simply edit the fields with the information you prefer.
The Theme Name field will be the one corresponding to the name of your theme, and it should be unique.
In the Template field you should enter the name corresponding to the parent theme folder. In our case: twentytwentytwo.
After saving the style.css file we can go to theme management from the WordPress backend (Appearance -> Themes) and we will see our child theme.

Create the theme.json file
With WordPress 5.9 and later versions, child themes with a “theme.json” file inherit settings directly from the corresponding parent theme.
This file allows us to define the settings that we will see in the block editor. For example, we can choose what default colors will be available and what customization options will be present in the editor.
By creating a theme.json file inside the child theme folder, the settings we are going to define in this file will replace those in the parent theme.
Customize the child theme
With block themes, to customize the child theme we have to go and edit the theme.json file.
You can consult the documentation to see all the settings and styles.
In this example, we will see how to change the available colors and settings of block styles.
Create a color palette
For example, we create a new palette with colors of our choice by inserting these lines in the theme.json file of our child theme:
{
    "version": 1,
    "settings": {
        "color": {
            "palette": [
                {
                    "name": "Purple SupportHost",
                    "slug": "purple-sh",
                    "color": "#7b4efc"
                },
                {
                    "name": "Vivid G",
                    "slug": "vivid-g-cyan",
                    "color": "#50c399"
                }
            ]
        }
    }
}
In this way, we’ve created two colors “Purple SupportHost” and “Vivid G,” two colors used on our site.
After activating the child theme, when we go to open the site editor, we will see the new color palette we created.

Keep in mind that ours is just an example and that it is preferable to use conventional color names. You can check the directions on this github discussion thread.
Create new two-colored filters
In the theme.json file we can also create new two coloured filters. In this example we are going to create a filter with the colors green and purple:
{
    "version": 1,
    "settings": {
        "color":{
            "duotone": [
                {
                    "colors": [ "#7b4efc", "#50c399" ],
                    "slug": "purple-and-green",
                    "name": "Purple and Green"
                }
            ]
        }
    }
}
Edit block styles
Through the theme.json file we can also change the styles of the blocks.
For example, we can override the style of the “quote” block as in this example:
{
    "version": 1,
    "styles": {
		"blocks": {
            "core/quote": {
				    "border": {
					    "width": "3px"
				    }
			}
		}
    }
}
In this way we changed the size of the quote block border, which in the theme.json file of the parent theme was set to 1px.
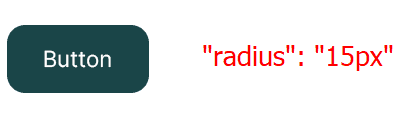
With the same system we can modify all the other blocks. For example, if we wanted to change the appearance of the button block, we could do something like this:
{
    "version": 1,
    "styles": {
		"blocks": {
                        "core/quote": {
				    "border": {
					    "width": "3px"
				    }
                        },
			"core/button": {
				"border": {
					"width": "0px",
					"radius": "15px"
				}
			}
		}
    }
}
In this way by going to modify the “radius” property we can round the corners of our button.

How to solve when the child theme doesn’t work
If you followed the steps to create the child theme, but it doesn’t work as you expect, there are checks you can do.
Keep in mind that some of these checks are for classic themes and not block themes. For block themes, as we have seen, it is not necessary to create the “functions.php” file.
Make sure you have activated the theme
Even though this is a no-brainer it’s quite essential to verify that you have activated the child theme.
For a child theme to work it must be activated and its parent theme installed.
Check the functions.php file and the style.css file
The first thing to do is to make sure you have created the functions.php file and saved it correctly.
Similarly, you need to verify that you have correctly created the “style.css” file and that there is a reference to the corresponding parent theme within it.
Clear the cache
If you have made changes to the theme, but you don’t see them, it could be a caching problem. You are viewing a cached copy and not seeing the actual changes.
In this case try visiting the site in incognito mode or clear cache.
Use the !important property
In some cases you may need to use the “!important” rule in the child theme’s stylesheet to override other parent theme style rules.
Activate debug mode
On WordPress you can enable debug mode through the wp-config.php file.
You just edit the file and add this line or change it so that the value is “true.”
define( 'WP_DEBUG', true);This allows you to view code errors and the file in which they occur.
After identifying the problem, remember to turn off debug mode:
define( 'WP_DEBUG', false);Conclusion
In this in-depth article, Child theme: the definitive guide, we have seen how to make a child theme. There are several ways to do it by using a plugin to creating the theme manually. In any case, after creating it, you can customize the theme and we have seen how to do it with some practical examples.
With the introduction of block themes, the procedure for creating a child theme is slightly different. And yet again we’ve seen how to make and customize our child theme for block themes.
If the theme you created is not working, there are several checks you can do to fix the problem, as we saw in the last section of this guide.
What about you, have you ever tried to create your own child theme? What method did you use? Do you have any other plugins that could help do this? Let us know in the comments below.
Ready to build your WordPress site?
Try our service free for 14 days. No obligation, no credit card required.


