
Do you want to know how to upgrade Drupal without creating problems on the site? Here is a step-by-step guide where we will show you how to update your site using two methods: manually or using composer from the terminal.
Let’s start by seeing how versions of Drupal are indicated and what to do before starting.
Table of Contents

Drupal update: how to interpret versions
Before moving on to the actual procedure and figuring out how to update our Drupal site, we need to make a small point about versions.
Each Drupal version is marked with 3 digits like this: XYZ. As you can see in this example:

The first digit, in our example 9, this is the major version.
The second, 4, which is the minor release: minors are released roughly every six months.
The third, 7, corresponds to the patch: a new patch is usually released every month.
When we talk about updating Drupal, we should actually differentiate between the two types of updates:
- the transition from one major to another, for example from Drupal 8 to Drupal 9 often requires a real migration;
- when we remain within the same major version, we speak of an update instead.
Note that there are two terms: upgrade and update. The former is generally used to refer to the transition from one major version to another. It is referred to as update in other cases.
In this guide we will focus on upgrading from one version to another, while staying in the same major.
Drupal update: before you start
As we have also seen in the guides on updating PrestaShop, Joomla and WordPress, that there are some checks to do before starting the CMS update procedure.
Before upgrading Drupal, you will need to:
- make sure you have a recent backup of your data and database;
- check modules and themes to be sure they will be compatible with the new version;
- verify that the server has the necessary requirements.
Make a backup
Before starting, make a complete backup of the site’s data and database. Remember that errors may occur during the update procedure.
Having a backup is, therefore, the only system that can allow you to go back to the previous version and restore the site if necessary.

SupportHost offers you free automatic backups of the last 30 days, you can also make a backup and restore it yourself from cPanel. In any case it is always advisable to make a manual backup before an important operation such as an update.
Creating a test environment
If the update goes wrong your site may not work.
To avoid errors, the best solution is to test the update in a test environment and only then apply the changes to the production site.
There are two ways to do this:
- you can create a local development environment, for example using MAMP;
- you can use the staging function if your provider offers it.
With SupportHost, creating site staging is a breeze and is a feature we have chosen to offer in all plans.
What are the methods to update Drupal?
There are mainly two alternatives to update Drupal:
- manual update;
- update via Composer.
Drupal recommends updating the CMS with Composer. Another method that we can use is the manual update that allows us to update Drupal even without having access to the terminal.

SupportHost offers SSH access included in all plans, so if for example you have Drupal hosting you can choose the method you prefer to update the CMS from the command line.
How to update Drupal manually
In this section of our Drupal update guide we will see how to do the manual update.
Introduction
The steps we will look at refer to upgrading from one minor version to another and are therefore valid for upgrading to a minor or a patch.
In our specific example we will be updating Drupal from version 9.3.13 to 9.4.7, the latest version released.
Note that if you installed some modules using Composer, you should always use Composer to update Drupal or you risk creating conflicting module dependencies.
How to update Drupal: the steps in a nutshell
In short, the steps to follow for the manual Drupal update are these:
- make a backup of the site and the database;
- activate maintenance mode;
- remove files and replace them with new ones;
- start the database update using the update.php script.
Now let’s see how to follow these steps in detail.
Putting the site in maintenance mode
First when upgrading Drupal we need to put the site into maintenance mode.
We log in as administrators to the Drupal back-end and we will open the “Manage” management menu.
So let’s go to Configuration > Development > Maintenance mode, as I show you here:

We tick the Put site into maintenance mode box, as you see here, and click on the Save configuration button:

You are now in maintenance mode and your site will not be visible to visitors. Remember to disable this option after the update is complete.
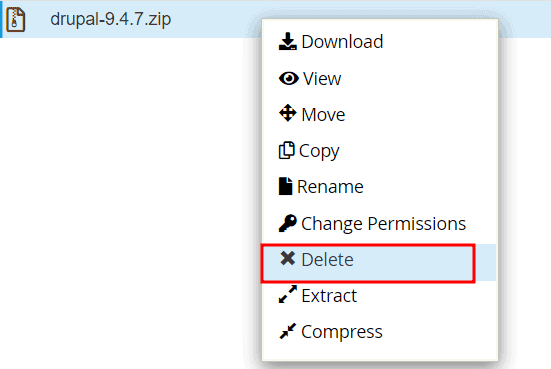
Deleting core folders and files
The second step is to delete some core folders and files from the server in order to then replace them with files from the updated Drupal version.
We can access files in different ways, for example by connecting with an FTP client. We have created two guides explaining how to connect using FileZilla and Cyberduck.
We can also use the cPanel file manager to manage files.
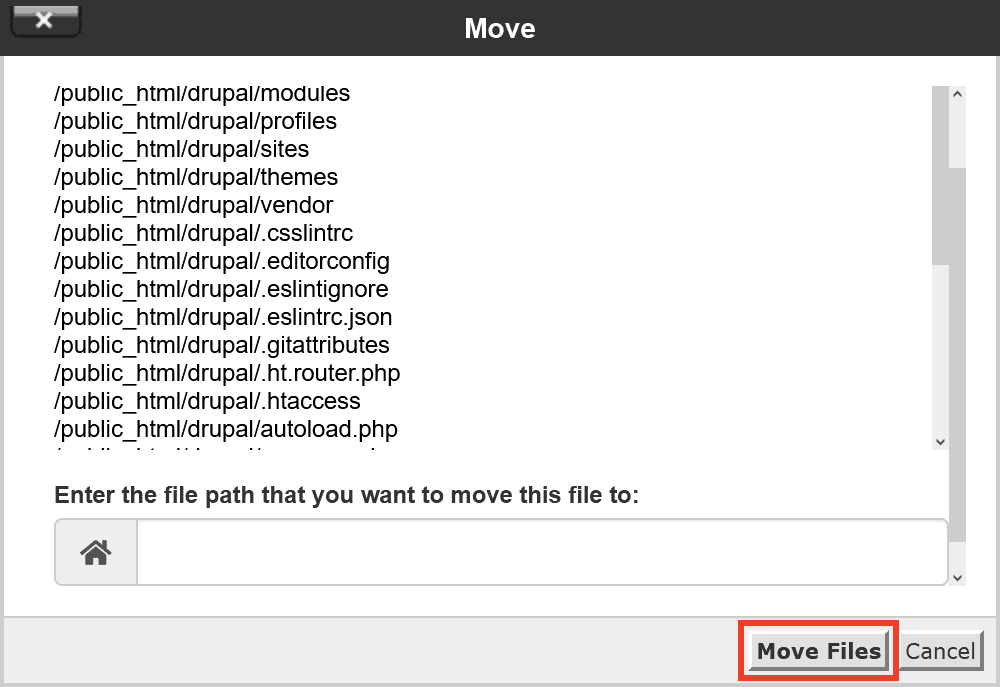
We need to delete all files and folders except the folders named modules, profiles, sites, and themes.
First, let’s delete the folders core and vendor.

Then we select all the other files that are in the site directory and delete them, like this:

Before deleting files, make sure you have turned on “showing hidden files.”
From the cPanel file manager, just click on the settings and then check that there is a check next to Show hidden files (dotfiles).

Replacing the settings.php file (optional)
You need to check if the new version of Drupal you are going to install has also made changes to the default.settings.php. This file is located in sites/default.
Check the notes accompanying the version of Drupal you are upgrading to.

If the notes say that the file has changed in the new version, then you will need to create a backup copy of the current one and replace the file with the one from the new Drupal version.
Otherwise, you can go on to the next step.
Download Drupal and upload the new files to the server
At this point we need to download the new version of Drupal and upload the files to the server.
First we download the Drupal version from the Download section of the site, like this:

As I’m writing this guide, the latest version available is Drupal 9.4.7. This is a security update that fixes some vulnerabilities and was released in September 2022.
After that we can:
- upload the archive to a folder other than the root and extract it directly on the server.
- Or extract the archive locally (on our computer).
The important thing is to upload the core and vendor folders, as well as the files contained in the archive in the main directory of our site. This is the same folder we deleted the files from in the previous step.
Make changes to files (optional)
If you have modified some files such as the robots.txt file or the .htaccess file, be sure to include the changes and directives on the new files.
If, on the other hand, you have never modified them, you can skip this step directly.
Start the Drupal update
After moving all the files we can start the script update.php that allows us to update the database.
To do this, just connect to the address:
https://yourdomain.com/update.phpJust replace “yourdomain.com” with the path that corresponds to your domain.
Don’t see the update page?
If you can’t log in by connecting to the address, it’s because you don’t have administrator permissions. In this case you will need to edit the file settings.php located in sites/default.
Find the following line:
$settings['update_free_access'] = FALSE;and change the value to true, like this:
$settings['update_free_access'] = TRUE;You can do this directly by editing the file with cPanel’s file manager, as we did here:
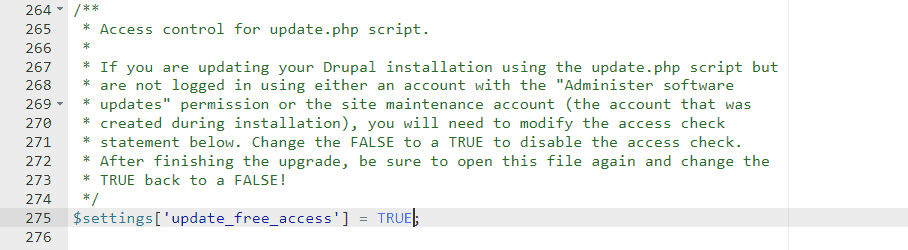
After you have completed the Drupal update procedure, you will need to reset the variable to “false“.
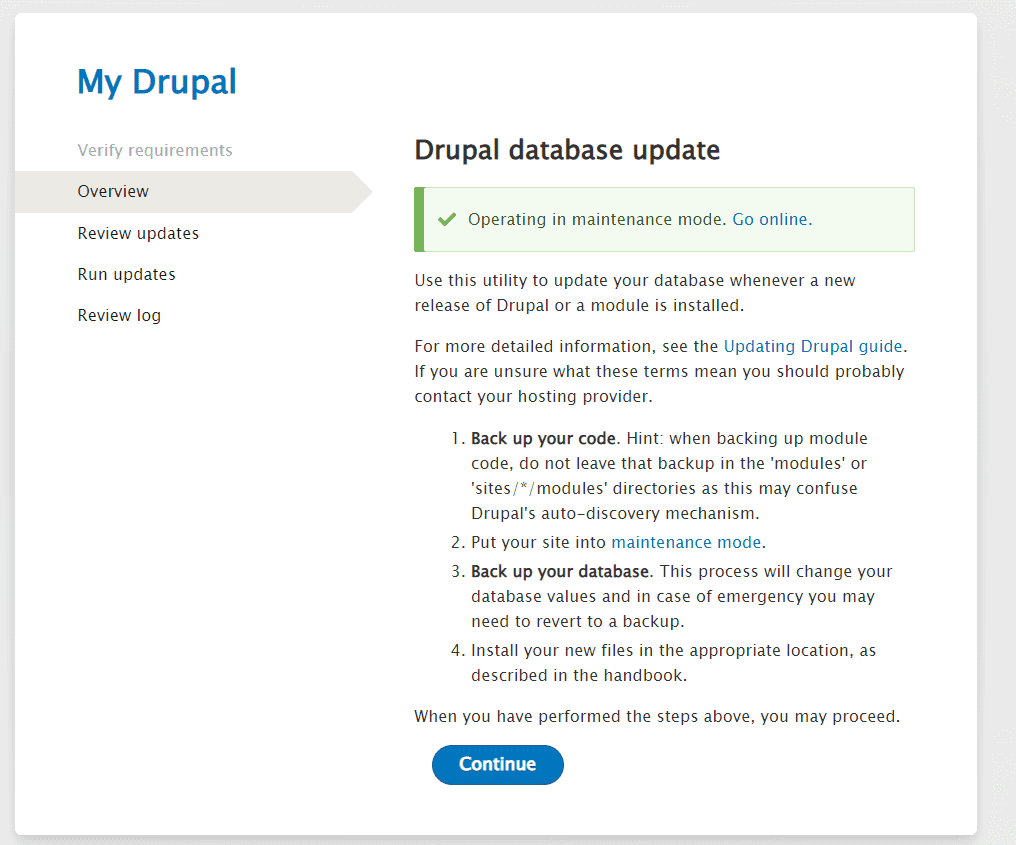
Follow the setup assistant
At this point, we are in front of the setup assistant to update the Drupal database. The procedure is similar to the one we followed to install Drupal. It is important to complete all the steps to effectively update the CMS.
In the first step we are summarized the steps we have seen before and we are then reminded to:
- back up your data and database;
- activate maintenance mode.
If you have already put the site under maintenance, you will see a green warning like in our case.
In the second step, the system detects our starting Drupal version and indicates which updates it will make.
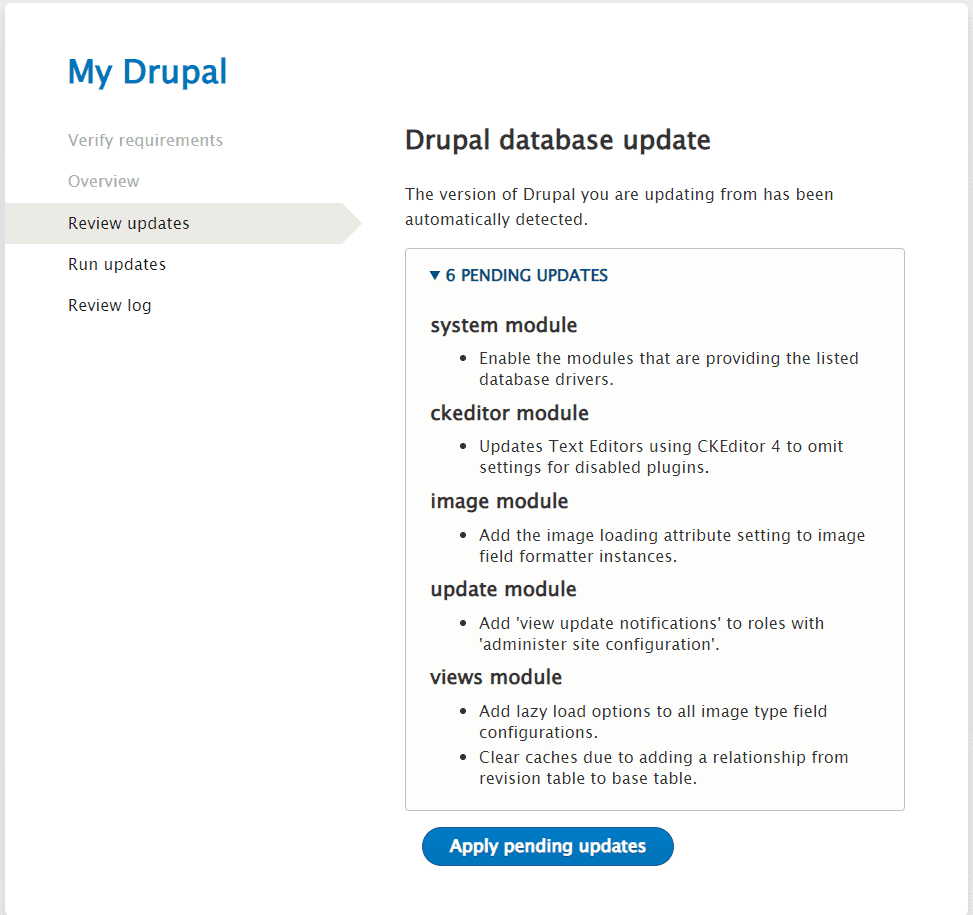
We wait for the process to complete and if there are no errors, we will see a page like this:

We can then use the links we see to redirect you to the administration page or home page of our site.
Check that there are no errors
First, let’s verify that the Drupal update process was successful.
We access the administration area and go to Reports > Status Report, as I show you here:

From this page, through the General System Information section we can see the Drupal version installed. The following sections allow us to understand if errors have been detected.

Disable Drupal maintenance mode
After making sure that the site is working properly (don’t forget to check the site from the front-end as well), we can turn off the maintenance mode. By doing so, visitors will be able to browse our website again.
To do this, go to Configuration > Development > Maintenance mode as we did before and uncheck Put site into maintenance mode, like this:

Click on Save configuration to apply the changes.
Drupal update: final steps
Now that we’ve completed the Drupal update, we can delete the files we don’t need.
If we had uploaded the archive with Drupal core files to the server, we just need to delete it.
If you uploaded only the folders you needed to the server and not the archive, you can skip this step.
Update Drupal with composer
In this section we see how to update Drupal using composer from the terminal.
Remember, also in this case, to make a complete backup before proceeding.
Before updating Drupal via composer, we need to check which packages we are using between: drupal/core-recommendedand drupal/core.
To do this we issue this command:
composer show drupal/core-recommendedIf the result looks like what I show you below, then you are using drupal/core-recommended:

Otherwise you will get this message in response:
Package drupal/core-recommended not found.In this second case you will therefore have to use slightly different commands, referring to the package drupal/core, as I will show you later.
As you can see in the screenshot above, the command we gave also lets us know the installed version: we just need to read what’s written after version.
Let’s check if there are any updates
To see if there are any updates available we use the command:
composer outdated "drupal/*"If there are updates we will see the list as in our case:

Let’s start the Drupal update
At this point, to start the update, issue the command:
composer update "drupal/core-*" --with-all-dependenciesOr this, if we’re using drupal/coreand not drupal/core-recommended:
composer update drupal/core –with-dependenciesAt the end, if the update process has been completed without errors, we issue the command again:
composer show drupal/core-recommendedIn this way we will be able to see which version is installed. In our case we will see this:

We have updated the core files from version 9.3.13 to 9.4.7. Now we need to update the database as well.
Updating the database
At this point the Drupal update is not completed as we still need to update the database. We can proceed as we have seen before in the manual update procedure and connect to:
yourdomain.com/update.phpIn this case refer to the manual Drupal update section of this guide for full details.
Otherwise, if you’re using Drush, you can use the commands:
drush updatedb
drush cache:rebuild
Now we just have to turn off the maintenance mode. You can follow the steps we saw in the manual update chapter, or do it via Drush, like this:
drush state:set system.maintenance_mode 0
drush cr
Upgrading Drupal from one major version to another
In the previous chapters of this guide we have seen how to proceed for minor and patch updates.
If you need to migrate from one major to another, for example from Drupal 8 to 9, you have to follow a specific procedure based on the version you’re starting from.
In this case refer to the Drupal documentation, for example:
- here you find how to switch from Drupal 6/7 to Drupal 8;
- and here, how to switch from Drupal 8 to other majors.
Conclusions
In this guide, we shed some light on Drupal update procedures. We started by understanding Drupal versions and saw that some preliminary considerations must be made before upgrading.
There are simpler updates, such as switching from one minor version to another, and more complex procedures when we have to switch from one major to the next. In the latter case it is necessary to resort to a real migration.
We have therefore seen two methods with the step-by-step procedure:
- how to do a manual update;
- how to update with Composer.
And you, which method do you prefer to use to keep your Drupal site up to date? Write us here in the comments.
Ready to build your WordPress site?
Try our service free for 14 days. No obligation, no credit card required.


