
Do you want to know what the robots.txt file is and if it might be useful to have one on your site?
In this article we will look at what exactly this file is, in what situations it can be useful to us, and how to create one.
We will look at specific examples to follow and find out how to avoid making the most common mistakes.
Let’s begin!
Table of Contents

What is robots.txt?
The robots.txt file, also sometimes referred to simply as the robots file, is a text file with instructions addressed to search engines. The rules used to give these instructions and included in the file are called the “robot exclusion protocol”.
Specifically, these instructions are read by search engine crawlers, for example by Google’s crawlers.
Let’s open a brief parenthesis on how search engines work to make the concept understandable to anyone. If you want to learn more, read our post on the meaning of the term SEO.
Crawlers are programs that Google, and other search engines use to scan website pages.
Search engines aim to collect and classify information in order to perform their function: to provide results relevant to users’ searches.
The process leading to this result is divided into three phases:
- crawling: is the phase in which the pages are identified;
- indexing: in this phase the content of the pages is “read” and the page is inserted in the index;
- positioning (ranking): the results are shown in order of relevance, the most valid search result will be shown in the first position and so on.
Note that we refer to pages for simplicity, but the same process also happens for images and all other types of content.
It is important to know that crawlers are also referred to by other terms:
- robot
- spider
- user agent.
In what cases is it useful to use the robots.txt file?
The robots.txt file is used to give instructions to crawlers. The most common case is when you tell the crawler not to crawl one or more pages.
One reason is to have the crawler skip the crawl of irrelevant pages and instead scan only the important ones.
On the site it may also happen that you have pages that must not be accessible to everyone. Think for example of pages intended only for registered users or even resources within the site that you do not want to be crawled.
Another good reason to leverage robots.txt is for the crawl budget.
Considering the sheer amount of websites and content, crawlers can’t crawl everything. For this reason it can be useful to limit the crawling of irrelevant pages, duplicate content and so on to prevent the pool of resources destined for our site from being wasted.
Now that we have seen what robots.txt is used for, there is an important consideration for its use.
Blocking a page from crawling through robots.txt does not prevent the page from showing in search results. In these cases, in fact, the page can be positioned, the only difference is that no description will be shown for that page, as in this example:

If your aim is to prevent a web page from showing up in search results, you can use the noindex tag.
Is it better to use the robots.txt file or the “noindex” tag?
As you may have already understood, the robots.txt file and the noindex tag have two different uses.
If you don’t want a page to show up in search results, you’ll need to use the noindex tag in the “head” section of the page, like so:
<meta name="robots" content="noindex">The noindex tag is used to communicate to Google and other search engines that that page must not be “read” and must not be shown in search results.
Always keep in mind that this does not completely protect the page. If you don’t want anyone to have access to a specific resource, the most effective way is to set a password via htaccess.
In case you use the noindex tag on the page, you need to make sure that that same page is not blocked by the robots.txt file.
In fact, if the page is blocked by the robots.txt file, the crawler will not be able to read the noindex tag. The result will be that the page you did not want to be shown in searches, will be able to continue to appear instead!
Robots.txt file: structure and syntax to use
A robots.txt file is a file with a structure like this:
User-agent: *
Disallow: /directory2/
Allow: /directory2/file.pdf
Sitemap: https://website.com/sitemap.xml
Example of a robots.txt file of a WordPress site:
User-agent: *
Disallow: /wp-admin/
Disallow: /wp-includes/
Disallow: /wp-contents/
Allow: /wp-admin/admin-ajax.php
The first line of the file specifies the user agent, that is, the crawler to which the instructions are directed.
The next lines, disallow, allow and sitemap, are called directives or instructions.
If present, lines starting with “#” are used to insert comments, as in this example:
# Block Bing crawling
User-agent: Bingbot
Disallow: /
Let’s see what there is to know about user agents and directives.
What is a user-agent?
As we anticipated, the user agent is the robot (or crawler) that scans the site.
With the robots.txt file we can, in fact, choose to issue specific instructions for each individual crawler.
Keep in mind that in the robots file you will always have to insert the statement “user-agent:”.
Each search engine uses different crawlers, one of the most used among Google’s robots is Googlebot.
In the robots.txt file we can indicate the crawler we want like this:
User-agent: GooglebotIn this case, the directives that will follow will be addressed only to Googlebot, that is to say one of the crawlers of the Mountain View giant. Google has several crawlers:
- Googlebot-Image for Google Images
- Googlebot-News for Google News
- and so on.
You can consult the list of all Google crawlers.
Other common user agents are listed in the table below.
Search engine | User-agent |
|---|---|
Google | Googlebot |
Google Immagini | Googlebot-Image |
Google News | Googlebot-News |
Bing | Bingbot |
Yahoo | Slurp |
Baidu | Baiduspider |
Baidu Immagini | Baiduspider-image |
Baidu News | Baiduspider-news |
Yandex | YandexBot |
DuckDuckGo | DuckDuckBot |
Ask | teoma |
AOL | aolbuild |
In our robots file, we can also use the wildcard “*” to indicate that the instructions are for all crawlers, like this:
User-agent: *
Disallow: /
In this example above the instruction is aimed at all crawlers (User-agent: *), and with the directive “Disallow: / ” we are indicating not to crawl the whole site.
What are directives?
We have seen that the line reporting the user agent is always followed by directives. There are three types:
- disallow
- allow
- sitemap.
Note that there is also the crawl-delay directive. As this is a non-standard instruction, we will not include it in this part of the guide.
Check out the FAQ at the bottom of the article to see how to set crawl frequency through the Google Search Console and Bing Webmaster Tools.
The same goes for other instructions that are outside Google’s documentation including:
- nofollow
- noindex.
In particular, these two directives are no longer supported since September 2019 as we learn in this note from Google.
Let’s now look at some examples of robots.txt files that help us understand how directives work.
Disallow
The disallow directive is used to tell the crawler not to crawl. It can be followed by a path that corresponds to a page or directory.
An alternative is the example we saw earlier, where the disallow directive allows us to block crawling of the entire site, like this:
User-agent: *
Disallow: /
Note that the directive is case sensitive, meaning it is case sensitive. If, for example, you write “discount”, the paths starting with “Discount” will not be excluded and vice versa.
To understand how it works, let’s see some specific applications.
Using the disallow directive for a directory
User-agent: *
Disallow: /wp-admin/
In this case we are instructing all crawlers not to crawl the “wp-admin” directory.
To ensure that the entire directory is not scanned, we need to make sure to insert “/” before and after the directory name.
This statement therefore includes all items within the directory.
Use the disallow directive for a path
User-agent: *
Disallow: /wp-admin/
In this case, all paths starting with “/ discount” will be excluded from the scan. Here are some examples:
- / discount2022
- / discount / christmas.pdf
- /discount.html
Allow
The allow directive is used to specify directories and pages that the crawler can access.
Since usually the whole site can be crawled, the allow directive allows us to create exceptions in paths that we have excluded with the disallow statement.
Let’s see how it works with an example robots.txt file.
User-agent: *
Disallow: /wp-admin/
Allow: /wp-admin/admin-ajax.php
In this case we are blocking access to the “wp-admin” directory, but we are allowing access to the “admin-ajax.php” file.
Sitemap
We can also use the robots.txt file to tell crawlers the location of the site’s sitemap.
In this case we just enter the instruction like this:
Sitemap: https://website.com/sitemap.xmlLet’s replace the address with the complete URL of the sitemap. Make sure the URL is correct (www or not www, http or https).
Note that the sitemap is optional, you can create a robots file even without entering the site’s sitemap path.
Rules for creating the right robots.txt file
When we go to create or modify the robots.txt file we need to make sure we write all the instructions correctly. This is to avoid that the instructions are not read or that the different directives (allow and disallow) conflict.
Always remember that pages and directories not blocked by a disallow statement can always be crawled.
Let’s see what you need to pay attention to.
Each line must only contain one directive
The correct syntax of a robots.txt file will therefore be this:
User-agent:*
Disallow: /
An example of an incorrect structure would be to put multiple directives on one line, for example like this:
User-agent:* Disallow: / Creating groups within the robots.txt file
Directives can be grouped within the robots.txt file. A group will consist of these elements:
- the first line contains “User-agent” and specifies the crawler to which it is addressed;
- the following lines contain one or more directives (disallow / allow).
Groups allow us to give different instructions to different crawlers.
Let’s see with an example:
User-agent:*
Disallow: /discount

User-agent: Googlebot
Disallow:/promo
The first part of the instructions prevents all user agents from scanning paths starting with “/ discount”. The second part, on the other hand, only prevents Googlebot from crawling paths starting with “/ promo”.
Always remember to pay attention to upper and lower cases when entering paths.
Here is an example from the Google documentation that explains this rule to us in practice:

Using wildcard characters
When we issue directives, it may be useful to use the wildcard characters: “*” and “$”. These characters can be used to exclude certain specific groups of URLs from crawling.
- The wildcard “*” is used to replace a variable number of characters (0 or more characters);
- the “$” symbol is used to indicate the end of the URL.
Let’s see how to do it with examples.
Let’s say we have a series of URLs within a path and want to exclude them from crawling. The URLs we want to exclude contain the word “book”.
In this case we can use this statement:
User-agent: *
Disallow: /books/*book
Some examples of URLs that will be blocked with this directive are as follows:
- https://nomedelsito.com/books/book/
- https://nomedelsito.com/books/book-1/
- https://nomedelsito.com/books/thisbook-1/
While URLs like these below will not be blocked:
- https://nomedelsito.com/book-2/
- https://nomedelsito.com/category/book-2/
To block all the resources that contain the word “book”, however, we can do this:
User-agent: *
Disallow: /*libro
With this same method we can exclude from the crawl the URLs that contain a single character, for example a “?”. One case where instructions like this can be helpful is to exclude URLs with a certain parameter from crawling.
We just have to do as in this example:
User-agent: *
Disallow: /*?
If, on the other hand, we wanted to exclude only the URLs ending with “?” we will have to use this directive:
User-agent: *
Disallow: /*?$
We can also prevent scanning of a specific type of file, like so:
User-agent: *
Disallow: /books/*.jpg$
In this case we are excluding all URLs ending with the “.jpg” extension present at that path.
Other times we may want to prevent crawling of pages on a WordPress site that use search parameters. We could then use a rule like this:
User-agent: *
Disallow: *?s=*
Precedence amongst the rules
When we insert a series of directives we must keep in mind that conflicts can arise between an allow rule and a disallow rule.
In case of two directives that contradict each other, which of the two will be followed?
The answer depends on each case.
The general rule in the case of Google is this: the most specific directive or the least restrictive one is followed.
As for Googlebot and Google crawlers, we can refer to the specific examples shown here.

How to create a robots.txt file
Now that we have seen what are the rules to use to issue instructions in the robots.txt file, let’s see how to create one.
There are several systems:
- create a text file manually;
- use a generator;
- use Rank Math;
- use Yoast SEO.
In practice, with the first two methods we will have to create the file and upload it to the site. Using a WordPress plugin such as Yoast or Rank Math the file will be generated automatically by the plugin.
Let’s see step by step how to proceed.
Manually create a robots.txt file
Creating a robots file is very simple. We just need to create text files with the extension .txt and insert the instructions for the crawlers into it.
You can use a text editor such as Notepad (for Windows) or TextEdit (for Mac).
Don’t forget that:
- the file must have this exact name “robots.txt”;
- the text file must have UTF-8 encoding;
- you only need to create one file for each site.
Our robots.txt file for example could look like this:
User-agent: *
Disallow: /wp-admin/
In this case we are preventing access to the “wp-admin” folder.

After creating the file we will have to upload it to the server.
Before seeing how to do it, however, let’s see what other alternative we have to further simplify the creation of the file.
Use a robots.txt file generator
If you want the easy life, you can also create your robots file directly with a generator, such as this one.
Generators like this allow you to do exactly the same thing, but choosing instructions in a simplified way.

The advantage is that this way you avoid making mistakes while writing the file.
Creating the robots file with Yoast SEO
If you have a WordPress site and use a content optimization plugin like Yoast SEO, you can use this same tool to edit the site’s robots.txt file.
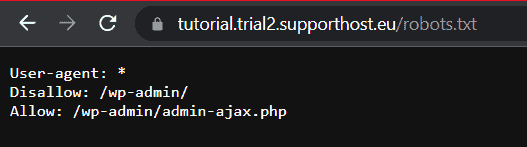
First you can check if the robots file is present by adding “/robots.txt” to your domain URL.
Then with Yoast SEO we can create or modify the robots.txt file of the site in a very simple way.
Click on Yoast SEO> Tools and then click on the File editor link.

In the robots.txt section we will see a warning that allows us to create a robots.txt file if one does not yet exist for our website.
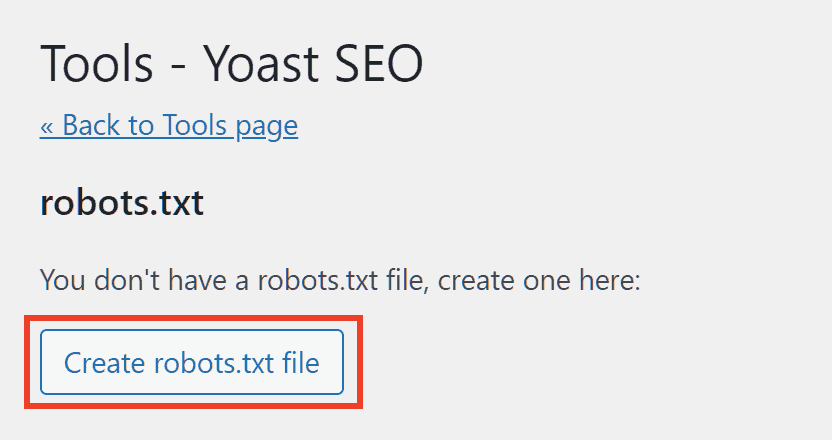
We will be able to view the contents of the file that is populated by default with these directives:
User-agent: *
Disallow: /wp-admin/
Allow: /wp-admin/admin-ajax.php
Then we can make the changes and add new directives and click the Save changes to robots.txt button to save.
Create robots.txt file with Rank Math SEO
There are several plugins that allow us to easily create robots.txt file, one of them is Rank Math SEO.
Click on Rank Math from the WordPress side menu and then on General Settings. From here, just click on the Edit robots.txt item to view the content of the robots.txt file and edit it.
Note that the file cannot be modified if it already exists in the site root, for example if it was created with one of the other methods.
The Rank Math plugin, in fact, does not create or modify the robots.txt file present on the root, but creates a virtual robots file.
If the file has not been created yet, we just need to add the directives as in this example and then save the changes.
Upload the robots.txt file
Unless you have used a plugin, after creating the robots.txt file you need to upload it to the server.
Remember that you can also create the text file directly on the server for example via the cPanel file manager.

If, on the other hand, you have created the file with a generator or with a text editor on your pc, you will have to upload it to the root. To upload a file to the server you have several alternatives, for example:
- use the file manager of cPanel or another hosting panel;
- use an FTP client such as FileZilla or Cyberduck.
You will need to upload the robots.txt file to the root of your website. This will allow crawlers to find the file and read the instructions.
If the site you want to robots for is:
https://website.comThe robots file must be at the root of the site and must therefore have this position:
https://website.com/robots.txtIf your site is accessible on a subdomain like:
https://blog.website.comThe file will need to be placed in the subdomain directory, like so:
https://blog.website.com/robots.txtHow to test robots.txt
After creating the robots file, it is a good idea to verify that crawlers can see it.
The file must be publicly accessible, that is, to everyone.
The quickest method is to visit the address where the file needs to be present and make sure it is readable.
At this point we can also check if the syntax of the file is correct.
To do this, Google provides us with its robots.txt file tester.
By opening the tester you will see the contents of the file and you can test the individual URLs through the box below, as you can see below.

This way you can be sure that you haven’t blocked important pages on your site.
Here is an example where the Google tool tells us that the resource is blocked and tells us which robots.txt file rule prevents it from being crawled.

How do I check if I have made a mistake?
Using the Google tester can help us understand the impact of directives and which pages are affected.
In addition to testing individual URLs individually, another good tool that can help us prevent robots.txt errors is the Search Console.
In the Index> Pages report, we can find an overview of page indexing and details on those that are not included in the index.
In this report we will see, if any, the resources blocked by the robots.txt file.

From this section we can see in detail the URLs blocked by the robots.txt file and have the whole list.
If in this list there are pages that should not have been blocked, we can use the tester we saw before, or simply consult the robots.txt file, in order to understand which rule is blocking access to crawlers and correct it.
Robots.txt FAQ
As you will have understood at this point, this file is useful for defining which pages should be crawled by search engines.
But there are other doubts that you may have remained.
Do I have to send the robots.txt file to Google after creating it?
No. The robots.txt file must be created and uploaded to the site.
Uploading the file to your site is enough for crawlers to find it.
After updating the robots.txt file, do I need to do something?
According to Google’s guidelines, if you make any changes to the robots file and want them to be updated quickly you can use the robots.txt file tester tool.
However, keep in mind that the robots.txt file is cached which is updated every 24 hours.
After opening the tester tool, click on Submit, this way Google will know that you have made changes.

Is it necessary to have a robots.txt file on all sites?
Now that we’ve seen the usefulness of robots.txt, you’re likely wondering if you need to create one on your site.
The answer is not necessarily.
In practice this file can help you prevent some pages from being scanned. If, however, you have no content to block and you have no other reason to block certain sections of the site from being crawled, then you don’t need a robots.txt file.
Don’t forget that creating a file with the wrong instruction can disrupt the crawl of your entire site.
So, we come to the next question concerning the impact on the positioning of the site.
Can robots.txt affect SEO?
When we perform an SEO analysis of the site, one of the checks to be done is to check the content of the robots.txt file.
As we have seen, errors in the directives can prevent crawlers from crawling search engines and going to affect important pages of the site.
The crawl budget considerations made at the beginning of this article always apply.
Another thing must be added. Links within pages blocked by robots will not be discovered by the crawler.
For example, imagine you have inserted an internal link to your blog post on a page blocked by robots. If the link to the blog post is present on that one page, crawlers will never reach the post.
Furthermore, as you know, one of the objectives of internal links and link building activity is to pass link juice between the pages of the site.
In short: link juice means the value that the link source page transmits to the landing page.
Let’s see what happens with an example when you use the robots.txt file to block a page:
- Page A contains the link to Page B;
- Page A is blocked via robots.txt;
- Consequently: Page B does not receive link juice from page A.
For all these reasons, you have to create the robots file with caution.
Can I change the crawl-delay (scan frequency)?
The crawl-delay instruction is used to define the crawl rate. Specifically, it indicates the number of requests that the crawler, for example Googlebot, can send.
The crawl delay is expressed in number of requests per second.
Changing the crawler frequency of Google’s crawlers
To change the scan frequency, you need to act through Search Console using the Scan Rate Settings tool reachable from here.
From these settings you can limit the scan frequency.

Keep in mind that Google recommends doing this only in case there is a valid reason such as a server overload due to the Google bot.
Changing the scanning frequency of Bing crawlers
To change the scan rate with Bing, you can use the Crawl Control tool from Bing Webmaster Tools.
Using the default setting, scans will be reduced when site traffic is greatest. However, we can also set a custom interval.

Conclusion
If you have come this far in reading this guide, you will have understood that the robots.txt file can be extremely useful. We have seen several ways to create it, how to write the directives correctly and which aspects to consider in order not to risk making mistakes.
In conclusion, we have drawn up a series of the most frequent doubts on the subject, but if you have any other questions or observations to make, I implore you to let us know with a comment.
Ready to build your WordPress site?
Try our service free for 14 days. No obligation, no credit card required.


