
Have you always wanted to update WordPress, but don’t know how to proceed? In this article, How to update WordPress: the complete guide, we will look at different methods to safely update WordPress and find out what to do if you make any mistakes.
Firstly, let’s see why it is important to keep the CMS up-to-date, and then let’s see how to upgrade WordPress to the latest version. We will see how to update the CMS with the One-Click update, how to update it manually and using WP-CLI.
Table of Contents

Why upgrade WordPress?
Before we look at how to update WordPress, let’s see why it is important to keep the CMS up-to-date.
Security is one of the main reasons: updates help us improve WordPress security, because new versions are often released to fix vulnerability issues.
Often updates are also a way to introduce new features, as was the case with the emblematic case of version 5.0, which integrated Gutenberg.
Finally, keeping WordPress up-to-date helps you to have a fast site and one that is compatible with new plugins and themes.
Having made this necessary premise, let’s go on to see what operations are required before the upgrade.
What to do before updating WordPress
Before updating WordPress, some preliminary steps are necessary to avoid making mistakes and therefore compromising the site.
Read the changelog
Before an update, it is recommended that you read the changelog, which is the document detailing the changes that have been introduced in the new version. This also allows you to understand whether you are facing an update that will make major or minor changes and whether it is a security update.
How can you tell what kind of update it is based on the version? In addition to looking at the changelog, you can also refer to the version number. Major versions are marked with numbers X.Y for example 5.8, 5.9 and so on. Whereas minor versions, i.e. less important updates, are marked by three numbers, for example 5.9.2.
You can find a list of WordPress versions in the Codex.
Before updating WordPress, you should also make sure that the themes and plugins you are using are compatible with the new version. You can do this by simply consulting the support forums of the themes and plugins you are using.

The plugin directory indicates compatibility with the latest version of WordPress.
You should also check whether the PHP version you are using will be compatible with the WordPress update or if you will need to update it.
Do a backup
The most important thing to do before updating WordPress is to do a full backup of your site. In this way, if something goes wrong during the upgrade you can restore the backup and recover the site.

Remember that even if you have automatic backups, it is always recommended to do a manual backup before an update.
Back up files and databases
Remember to do the backup of the site and the database, for the database you can do a backup directly with phpMyAdmin using the export function.

To get a backup of the site files you can access the site files with the file manager or an FTP client such as FileZilla or Cyberduck and copy all the files.
Check out our guide on WordPress backup for a detailed procedure or check our list of best WordPress backup plugins.
Verify backup
After doing the backup, make sure it is usable. In order to do this, try opening the folders and files and make sure they are not corrupted.
Disable plugins
One more step to take before you can safely update WordPress is to disable the WordPress plugins.
When updating WordPress, in fact, it is possible that some plugins are not compatible and prevent you from accessing the site after completing the update. Therefore, the best solution, is to disable the plugins and re-enable them after the upgrade.
You can do this directly from the dashboard or via FTP if you have trouble accessing WordPress.
To disable plugins from the dashboard you just need to follow these simple steps:
- click on Plugins → Installed Plugins
- select all plugins
- from the Bulk Actions menu choose the Deactivate
- Click Apply to disable all plugins.

To deactivate plugins via FTP or from the file manager of cPanel you just have to rename the plugins folder to, for example “deactivated-plugins”.

Note that disabling all plugins is not necessary, but can in some cases avoid problems.
Possible methods to update WordPress
After completing the above steps, remember that it is critical to do a backup before updating WordPress, only then are we ready for the actual update.
At this point it is time to choose which method to use to update the CMS. We can choose whether to:
- Update WordPress from the dashboard with the “one-click” update.
- Update WordPress manually by overwriting the files with those of the new version.
- update WordPress using WP-CLI.
Let’s see how to do it from case to case and how to set up automatic updates.
How to update WordPress from the dashboard
Starting with 2.7 version, you can use the one-click update feature of WordPress.
When there is an update you will see a notification on the bulletin board, or in the Updates section of WordPress.
By clicking on the version name we can go to the Codex page and get information about the new version. For the one-click update we only have to click on Update Now.

The WordPress Updates section will be opened from which we can click on the Update Now button.

After the update is completed, a notice like this will confirm that the operation was successful.

The bulletin board will now show us a message welcoming the new version, as shown below.

After you complete the upgrade, be sure to also upgrade themes and plugins to the latest version. Before doing so, check that they are compatible with the current version of WordPress.
How to update WordPress manually
Updating WordPress manually means uploading the files of the new version to the server and going to replace the old files of the WordPress core, that is, the files necessary for the CMS to function.
You may choose to use this route in several cases, for example, you cannot access the WordPress dashboard and cannot update the CMS using the method we saw earlier.
Or in case the automatic update has failed and you need to update the files manually.
To update WordPress via FTP follow these steps:
- download the latest version of WordPress
- replace files
- complete the update
Let’s see how to do it step by step.
Download the latest version of WordPress
The first thing to do is to log on to the site of WordPress.org and download the latest version. As shown in this screenshot, simply log on to the site and click on the blue Download WordPress button.

After that, extract the files from the zipper file you downloaded and a folder called “wordpress” will be created.
Replace files
After downloading the WordPress files, access the server files using an FTP client. In this guide we used FileZilla, but you can also use another FTP client and follow the same steps.
The first thing to do is to delete the wp-includes and wp-admin folders from the server and other files in the root or WordPress installation folder.

Be sure not to delete the wp-config.php and .htaccess files so you don’t lose configurations and the wp-content folder so you don’t lose plugins, themes, and uploaded images.
You can then delete or overwrite the other files, being careful not to delete the files just mentioned.
As recommended in the WordPress instructions, it is better to delete the indicated files and folders than to overwrite them directly.
At this point, we are going to upload the new files and folders, with the exception of the wp-content folder, which we will update at the end.

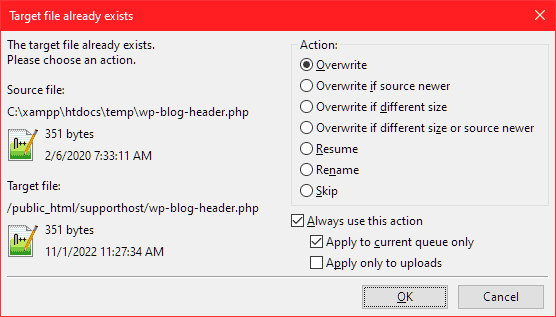
When an existing file is identified, we will be asked whether to overwrite it; we can confirm the same option for all subsequent files by selecting “Always use this action -> Apply to active queue only.”
After that we have to upload files inside the wp-content folder, for example index.php, and overwrite the old ones. Make sure you don’t delete folders inside wp-content so you don’t lose themes, plugins, and files you have uploaded to WordPress.
Operations optional
Depending on the version of WordPress, there might be new default themes, if you want to install them you just need to open the wp-content/themes/ folder and copy the folders inside it to the server, as you see in this example.

On the left we have the local files of the new version of WordPress, 5.9.2, with themes twentytwenty, twentytwentyone and twentytwentytwo. On the right we have the files on the server with the default themes twentyfifteen, twentyseventeen and twentysixteen.
Complete the update
After uploading all the files we need to connect to the WordPress dashboard (sitename.com/wp-admin/).
If it is necessary to upgrade the database we will be redirected to the page sitename.com/wp-admin/upgrade.php and be shown a warning message like the one below.

We are now waiting for the alert confirming that the database has been successfully updated.
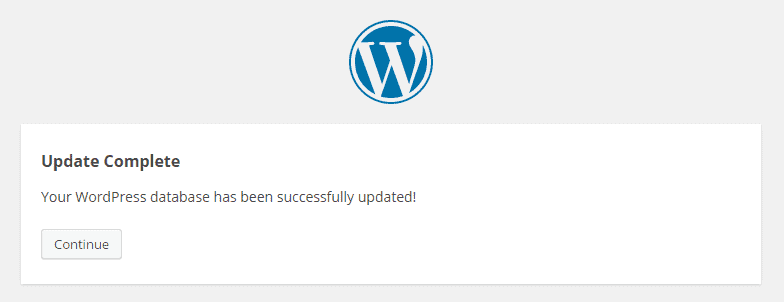
Clicking Continue will redirect us to the WordPress dashboard.
At this point we can update themes and plugins and reactivate the plugins we were using. If you are not sure about the compatibility of plugins with the new version of WordPress, it is better to reactivate one plugin at a time and check if it works properly.
Errors after update
After updating, it is possible to run into errors, the most common of which are as follows:
- WordPress gets stuck in maintenance mode
- CMS is still reported to be in the process of being updated.
Let’s see what to do when one of these two problems occurs.
WordPress stuck in maintenance mode
When updating the core, but also when updating themes and plugins, WordPress goes into maintenance mode automatically. As soon as the update is finished, the mode is automatically deactivated.
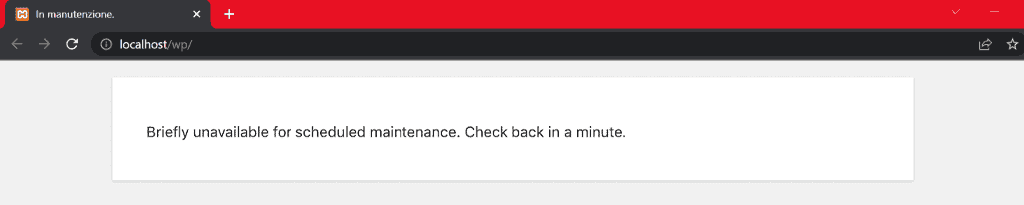
However, in some cases it may happen that the update stops and the site gets stuck in maintenance mode. In this case while trying to access the site you will see a warning message like the one below.
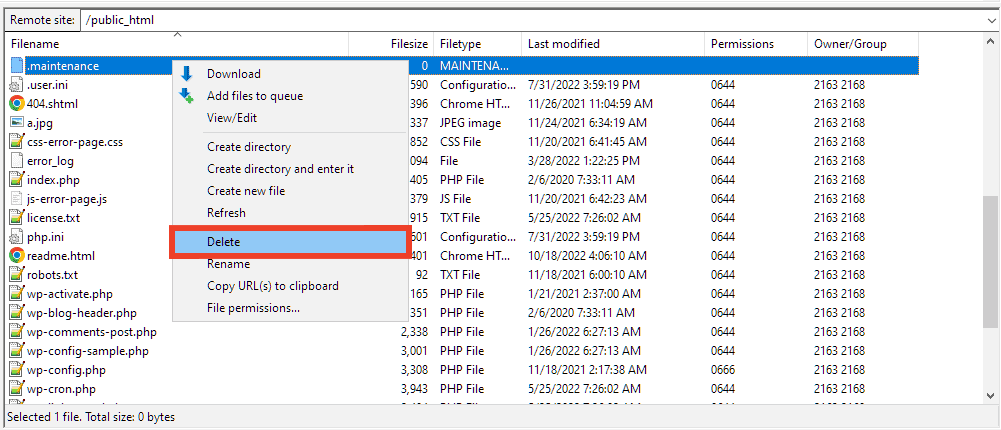
If WordPress gets stuck in maintenance mode, you need to make sure there is no .maintenance file left on the server.
For example, if you manually updated WordPress because the automatic update stopped without being completed, you will need to delete the .maintenance file located in the root folder of your WordPress installation.
Another update is currently underway
Another eventuality you might run into is when WordPress appears to still be updating. In this case, by accessing the Updates section from the bulletin board we will see a notice like the one shown below.
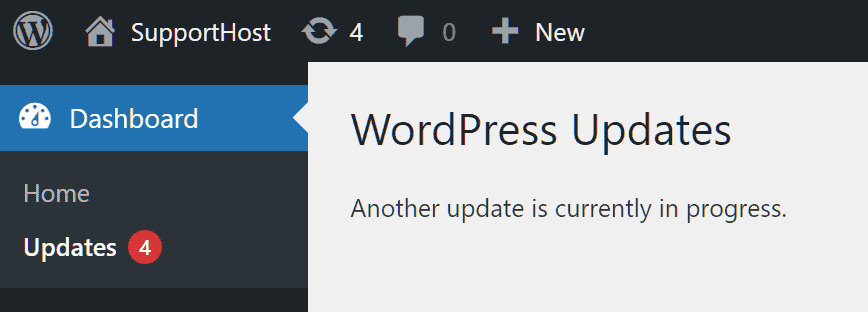
This alert tells us that “Another update is currently in progress.” WordPress uses a system to prevent multiple updates from happening at the same time. When an update starts, a row is created in the database to set a time out (typically 15 minutes) during which no new updates can be started.
If, however, even after the time for updating has elapsed, the warning continues to appear, you can go and remove the row that was created in the database.
Keep in mind that before making changes to the database, it is always recommended to make a backup.
We access the database with phpMyAdmin and open the wp_options table. Within this table we need to locate the row where “core_updater.lock” appears in the option_name column. Deleting this row will remove the lock and it will be possible to update WordPress again.

How to update WordPress: the complete guide – update with WP-CLI
WP-CLI is a command-line tool that allows us to manage WordPress. In addition to allowing us to install and update plugins, with WP-CLI we can also update WordPress to the latest version available.
To use WP-CLI you need to log in via SSH to the server, all of our plans such as shared hosting, semi-dedicated hosting, WordPress hosting, VPS cloud hosting and dedicated servers include SSH access.
First we can check what the current version is by using this command:
wp core versionAfter that we can check the availability of updates:
wp core check-updateIf WordPress is updated to the latest version we will see a message like this:

If, however, a new version is available, we can start the update with this command:
wp core updateThis command allows us to update WordPress to the latest available version. However, we can also use other options, for example, if we want to install only minor version updates we can use the “-minor” option, like this:
wp core update --minorWe can also upgrade to a specific version and not the latest one, we just use the “-version” option followed by the version number.
For example, if we wanted to upgrade to version 5.9.2, we would just use this command:
wp core update --version=5.9.2After the update, we can update the database again from WP-CLI with this command:
wp core update-dbAs we saw earlier, after a core update it is advisable to update themes and plugins. Again, we can do this directly from WP-CLI with these commands:
wp plugin update --allThis command allows us to update all plugins for which an update is available. While, the command to update all themes is as follows:
wp theme update --allHow to set automatic updates
WordPress also gives us the ability to set automatic updates in the background.
Keep in mind that automatic updates could give problems if there are conflicts with installed themes and plugins, so in most cases it is best to proceed with the update using one of the methods we saw earlier.
If you can’t deal with periodic updates, backups and troubleshooting, you can opt for a service Managed WordPress.
In any case, we can enable core updates to occur automatically, either for all updates or even just for minor versions.
To enable all automatic updates we simply add this in the wp-config.php file:
define('WP_AUTO_UPDATE_CORE', true);
If, on the other hand, we only want to get automatic updates to minor versions we just need to use this:
define('WP_AUTO_UPDATE_CORE', minor);To disable core updates from the wp-config.php file, we simply have to change the variable to false, as shown here:
define('WP_AUTO_UPDATE_CORE', false);Conclusion
Updating WordPress is an important task because new versions can not only offer more functionality, but are often released to fix security issues. In this article, How to update WordPress: the complete guide, we learnt that updating the CMS should not scare you, you just need to follow the directions and most importantly, never forget to do a backup first.
In this guide, we have seen how to upgrade WordPress by following different methods: one-click upgrade, how to upgrade WordPress via FTP and how to do it with WP-CLI.
Were you able to update WordPress? What method did you use? Let us know in the comments below.
Ready to build your WordPress site?
Try our service free for 14 days. No obligation, no credit card required.


