What is SEO with PrestaShop? What are the aspects you’d need to consider if you want to optimize your store and reach the top positions in Google?
Doing SEO isn’t just about content optimization, it’s also about focusing on technical aspects like performance and the security of the site itself.
In this article, PrestaShop SEO: a practical guide to shop optimization, I will take you through all aspects of SEO for PrestaShop.
Table of Contents
Does it make sense to talk about PrestaShop SEO?
When we talk about SEO we refer to all those actions and tricks that help us reach the top positions on search engines.
There are several aspects that influence the ranking of a website. Google takes over 200 factors into consideration when ranking sites.
Does it make sense, though, to talk about “PrestaShop SEO”?
Well, yes and no.

When it comes to SEO and PrestaShop, you should always start with the considerations that apply to all websites. Regardless of the platform, you use to create your site or online store, there are strategies you can follow to improve your site ranking.
In this article, PrestaShop SEO: a practical guide to shop optimization, we will see what to consider, starting from the choice of hosting up to technical and content optimizations.
The tips we will see in some cases apply to all sites, for example creating a sitemap of the site and reporting it to search engines.
Since this is a guide to SEO optimization for PrestaShop, however, we will see how to apply these tips in practice with this CMS. Depending on the CMS used, in fact, there are specific tools that can help us and today we will see how to optimize a site.
Choosing the hosting and domain: How much do they matter for PrestaShop SEO optimization?
When creating a new project on the web, the first choice you face is the infrastructure.
Just like when you build a house you start with building the foundation, when you open an eCommerce you choose the hosting and the domain.
Just as the foundation affects the stability and therefore the future of a building, so does hosting affect the performance and success of our project.
Choosing hosting: the importance of speed, security and uptime
What aspects should you focus on when choosing hosting?
Speed: a fast site makes a difference both by increasing the conversion rate and improving the ranking. Site loading speed is precisely one of the factors taken into consideration by Google.
Security: using an SSL certificate and using the https protocol means offering guarantees and security to users who visit your site. These aspects are even more important in an eCommerce.
Uptime: when it comes to eCommerce sites, the uptime of the site, i.e. the time during which the site is reachable, must always be optimal. The consequences of non-guaranteed uptime results in the loss of clients and credibility.

As a hosting service provider, SupportHost can help you optimize your PrestaShop site by always offering the best.
Our PrestaShop hosting plans include LiteSpeed – PrestaShop LiteSpeed, a high-performance web server to give your online store a boost and ensure your site is always fast.
Your eCommerce should not only be fast, but always up and running. That’s why we offer uptime guarantees: our PrestaShop hosting plans have a 99.9% uptime guarantee.
We include a free SSL certificate from Let’s Encrypt with all plans. For eCommerce sites, you can use one of our paid SSL Certificates to validate your domain and company. These certificates give you greater assurance and are recommended specifically for sites where transactions take place. But you don’t have to just take our word for it. Try it yourself with our free hosting!
Can choosing a domain affect SEO?
If you want to do SEO with PrestaShop, you may be wondering how to choose the right domain.
The choice of the internet domain name is complex. It’s a bit like choosing a new name for your baby: in both cases, there will always be those who will have conflicting opinions.
There are two major schools of thought when choosing a name:
- use the brand name in the domain name (e.g. Amazon, eBay, etc.)
- use keywords that recall the sector (e.g. bestsofa, furniture, etc.).
However, you can also combine keywords and brands, as in these examples:
- lubekitchens
- stosakitchens
- venetakitchens
Tip: Using a combination of keywords and brand in some cases is the best choice, but be careful.
The choice of domain should not be made lightly after the abuse of exact match domains, the so-called exact match domains that have been the focus of the algorithm update called EMD (Exact Match Domain update).
Remember, therefore, that putting the keyword in the domain is not a magic trick that will make you rank high for that key.
Site structure: how do I create an SEO friendly site with PrestaShop?
At Google’s guidelines for webmasters, you will often come across tips like this:
Create pages and content with users in mind, not search engines.
Why did I decide to start with this first piece of advice?
When you approach creating a site and you want it to rank on search engines because you care about attracting visitors and customers with organic traffic, the first thought is “what do search engines want from my site?“.
Instead, the question you should be asking yourself is “what do users want?”.
By this I mean that you should design your eCommerce with the users’ needs in mind.
This golden rule should accompany you in all the steps that you will follow to create an ecommerce site from the definition of the site structure to the creation of content.
Let’s see, therefore, how you can apply this principle starting from the architecture of our PrestaShop site.
Structure of an eCommerce site: the importance of categories
The structure of a website allows users (and search engines) to easily reach the different sections present.
In a blog we’ll have the home page where perhaps we decide to show the last articles, and then other main pages like “about me” and “contacts”. The structure of a blog is generally very simple.
However, when we move to eCommerce, the structure of the site becomes more complex. In this case categories come into play by helping us to direct future buyers to the product they are looking for.
If you want to improve your PrestaShop SEO, remember to use categories, subcategories, and search filters to make the user experience in your online store a pleasant one.
Remember that the structure of the site will also be reflected in the navigation menus. These should also be ordered in a logical manner so that the site is easy to navigate.
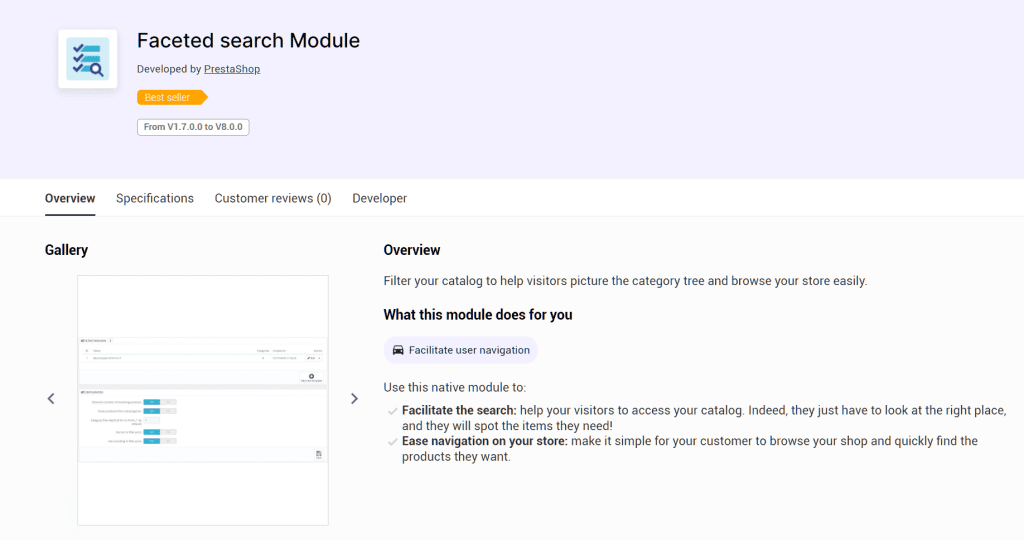
Handy Tip: PrestaShop’s built-in modules like Faceted Search allow you to create filters to make it easier for visitors to find the products they are looking for in your store.
Don’t just think about defining categories based on keyword analysis, make sure the structure makes sense.
Also consider the depth of the site: how many levels do you need to create? The answer depends on the project, but in principle these rules apply:
- make sure that the most important categories are accessible from the home page;
- use subcategories to narrow the search field;
- the most common cases use at most three levels: category, subcategory, product page.
Keeping your eCommerce structure lean helps you in many ways.
- If product pages are just a few clicks away from the home page, you’re shortening the user journey and reducing the effort of search engines in locating pages.
- If you need to make changes and you’ve created a simple structure, you won’t have to go through all the categories and revolutionize the entire architecture each time.
PrestaShop SEO optimization: how to take advantage of breadcrumbs
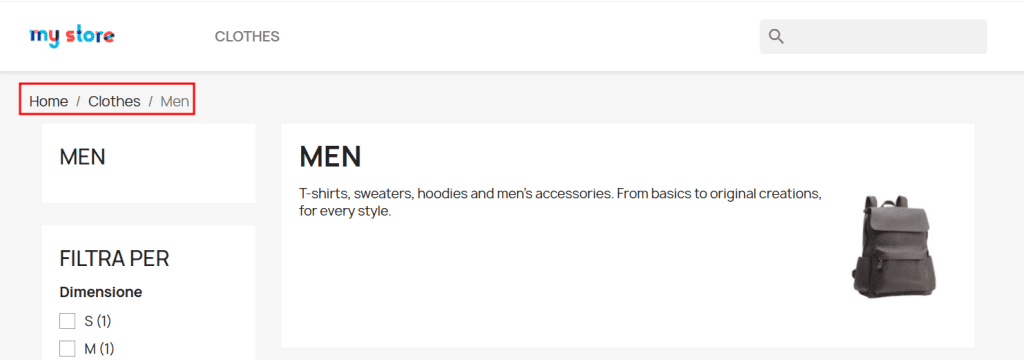
To improve the user experience on your website you can use breadcrumbs. In addition to the classic menu on the home page, breadcrumbs are a navigation system within the site that makes life easy for users.
The top of the page will show the path to that page, as such:
- category > subcategory > product
- shoes > sneakers > product.
Each breadcrumb element is a link and the user can use this menu to quickly return to the previous level, for example the parent category.
Since they are links, search engine crawlers can also exploit them to continue browsing the site and discover new pages.
With PrestaShop some themes, such as the default theme Classic, directly provides the presence of breadcrumbs as seen in this example:
SEO PrestaShop: What structure do I use for URLs?
When you create your eCommerce structure, you also need to think about what your category and product page URLs will look like.
Generally, an SEO-friendly URL has these characteristics:
1. It’s readable:
- Yes to URLs like “mysite.com/category/product“.
- no to URLs like “mysite.com/category/product.php?id_product=54564897_xs2“
In the first case the user who clicks on the link expects to end up on the product page, in the second case he sees only a string which means nothing to him.
Google, in fact, recommends to use words that describe the resources, instead of identification codes.
For the same reason, it is important to use hyphens (-) instead of underscores (_) to separate words within URLs. By doing so, URLs are more understandable to both live users and search engines.
2. It’s short:
The ideal length is less than 50 characters. Always keep in mind, though, that an eCommerce will be more likely to exceed this limit than other websites. A product page URL will look like this in most cases:
myshop.com/category/subcategory/product-pageIn a blog, however, we might expect something similar:
myblog.com/category/articleOr even a simplified structure:
myblog.com/articleLet’s see how to set SEO-friendly URLs with PrestaShop.
Setting URLs on PrestaShop
First you need to check your store settings on PrestaShop. Login to the backend and go to Shop Parameters > Traffic & SEO. Scroll down to the Set up URLs section and make sure the Friendly URL option is enabled, like this:
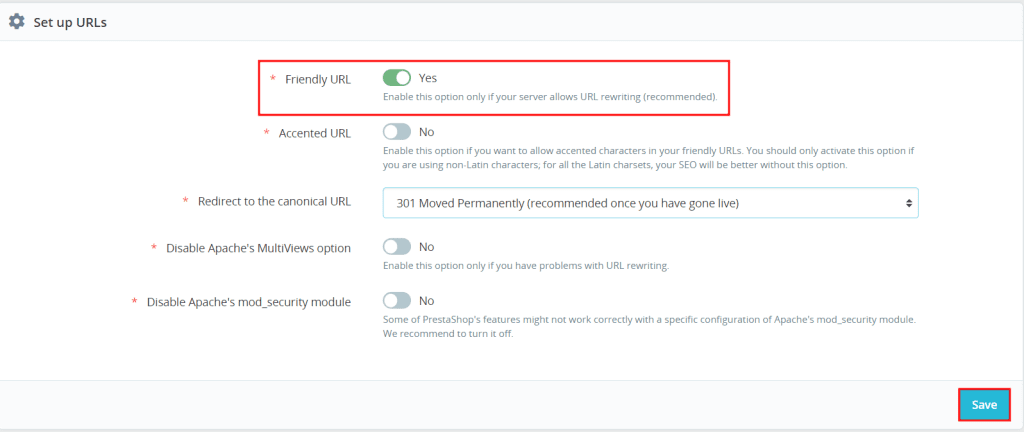
From this section you can also edit the URLs of the main pages that are automatically generated when you create a PrestaShop site.
You will find, in fact, a list of pages such as “contacts”, “page not found” and “shopping cart”. By clicking on the edit button, represented by a pencil icon, you can change the last part of the URL.

From here you can also edit the page name and title, add description and keywords.
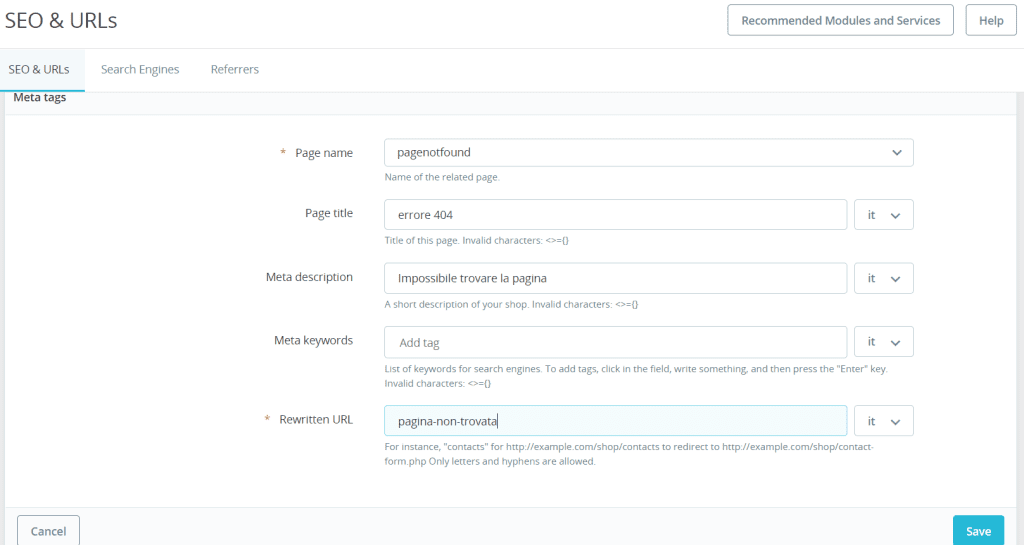
What about the new pages?
When you add a new page, e.g. create a product page, you can enter this information and set the final part of the URL (called the slug) directly in the Rewritten URL section. Here is an example of creating a fictitious product page.
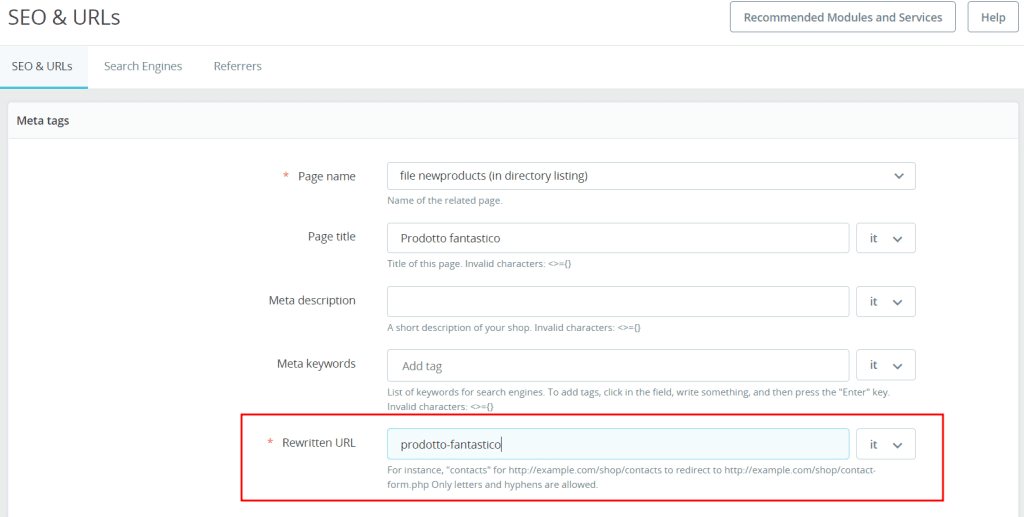
Edit PrestaShop URL structure
By going to Traffic & SEO > SEO & URLs, from the “Schema of URLs” section we can edit the URL structure.
By default, the product pages will have this structure:
{category:/}{id}{-:id_product_attribute}-{rewrite}{-:ean13}.htmlFrom these settings we can also decide to change the URL structure. For example by choosing not to show the category in the URLs of the product pages.
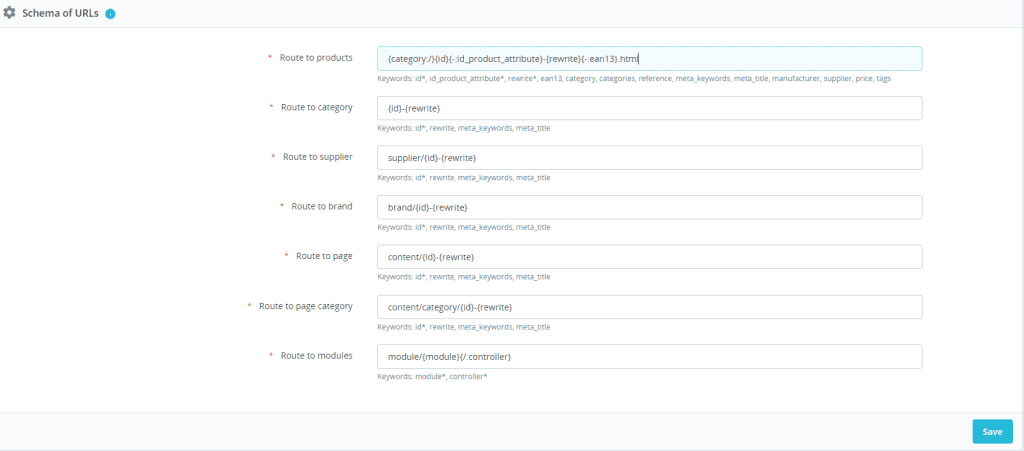
Keep in mind that each of the fields must contain mandatory elements, for example, the product path must always have the id present.
Search parameters and canonical URLs
In the case of an ecommerce site, you need to make an additional consideration regarding URL search parameters. These parameters serve to show multiple versions of the same product, think for example of the colors or sizes of a dress.
When you determine the structure of your ecommerce, you can decide whether to use different URLs for each product variant or a search parameter that shows the two variants.
In the first case you will have a situation like this:
.../dress/red
.../dress/blue
In the second:
.../dressed?color=red
.../dressed?color=blue
In cases like these, Google doesn’t know which variant to show as “preferred” and may not understand that the two URLs refer to the same product.
To help the search engine, all you need to do is indicate the canonical URL, i.e. the URL you want shown in the search results.
In the situation we saw earlier, you might want to preferentially show the version with no search parameter.
Instead of showing “…/dress?color=red” in the results, the URL “…/dress” will be shown.
Setting canonical URLs allows us to avoid Google considering different versions of URLs as duplicate content. You can learn more about this topic by checking out our post on the canonical rel tags.
Let’s see how to enable canonical URLs with PrestaShop and choose the type of redirection to use.
Set up canonical URLs with PrestaShop and manage redirects
Through the CMS settings we can choose the type of redirection to use for the canonical URLs.
By activating this option, when there are multiple parameters (e.g. different colors of a product), only one URL will be taken into account.
To do this we need to access the backend and go to Shop Parameters > Traffic & SEO. Here from the “Set up URLs” section we can set the type of redirect to use, like this:
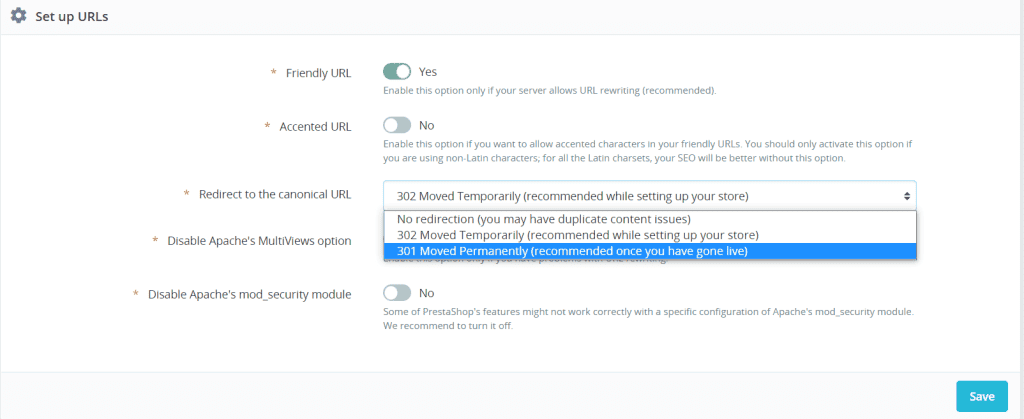
We have three options:
- If you choose “No redirection“, there will be no redirection. This option could lead, as we said before, to duplicate content issues.
- “301 moved permanently” is a 301 redirect, this way we are telling the search engines that the content to consider is only the content set as a canonical.
- “302 moved temporarily“, a 302 redirect is used for temporary moves, it is only needed if you have not yet defined the canonical URL or will need to make changes later.
Before putting the site into production it is suggested to set the redirects as permanent: redirect 301.
Technical aspects of SEO for PrestaShop
If you want your eCommerce to be found by users with a Google search, you first need to make sure Google can find it.

What does it mean?
Google and other search engines, scan the resources on the web every day for new resources. Their goal is to show results in response to user searches.
If Mario searches Google for “sports shoes”, Google will try to show relevant results and respond to Mario’s intent which may be for example to buy a new pair of shoes.
When your website is new or when you run an SEO analysis of the site, you need to check the technical aspects and understand how the site is seen and if it is found by search engines.
One of the first things you can do is register the site to Search Console so you can submit the sitemap and check for crawling and/or indexing errors on the site.
Identify indexing problems using Search Console
Google’s Search Console is a very useful tool that can help us solve problems that impact PrestaShop’s SEO.
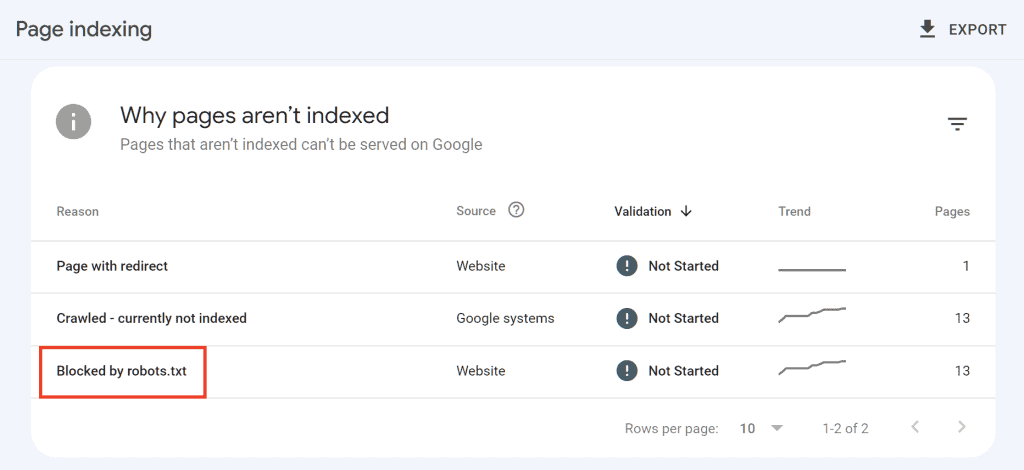
Through the Search Console we can make sure that the important pages of our site have been indexed and are not blocked for example by an incorrect directive in the robots file. In this case, we can access Google’s tool to identify errors in the robots.txt file and correct them.
From the Search Console we can also check for broken links pointing to 404 errors or the presence of other HTTP error codes and we have the ability to submit the sitemap of the site.
So one of the first steps to improve the technical aspects of a PrestaShop site’s SEO is to start by verifying domain ownership through Google’s console.
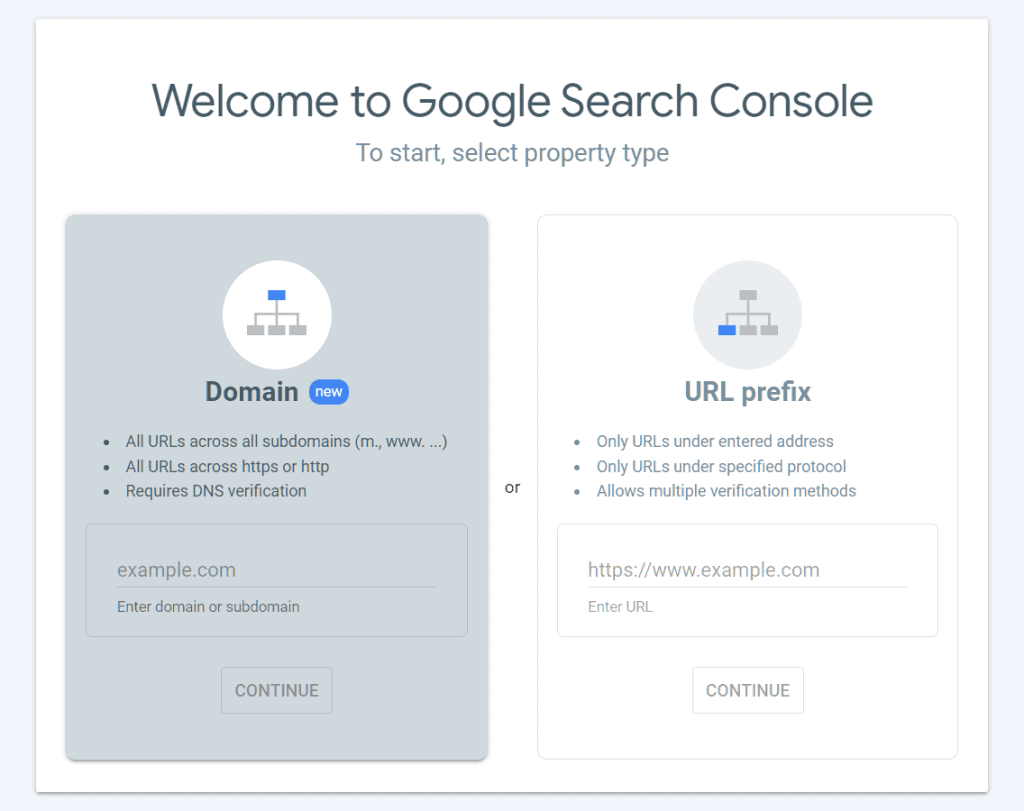
The procedure is quite simple, but for more details check out our guide on the Search Console.
After you have checked your site’s properties on Search Console, you can use the Index > Pages report to see what the indexing status is and see if there are any errors such as excluded pages via robots.txt file.
Use robots.txt file
We have created an in-depth guide on how to use the robots.txt file. In short, this file allows us to exclude certain sections of the site or URL categories so that they are not crawled by crawlers.
How can we use this file in our PrestaShop SEO optimization?
Simple: it can allow us to tell Google not to crawl on irrelevant pages. In this way, the budget allocated to crawling our site will be used for content that really matters.
Besides creating the robots.txt file manually, we can use PrestaShop’s built-in feature.
Let’s see how to do it.
Create a robots.txt file with PrestaShop
PrestaShop allows us to create a robots.txt file directly from the backend.
After logging into the admin area, click on Shop Parameters from the Configure section. Then click on Traffic & SEO. At this point we scroll to the bottom of the page until we find the “Robots file generation” section.
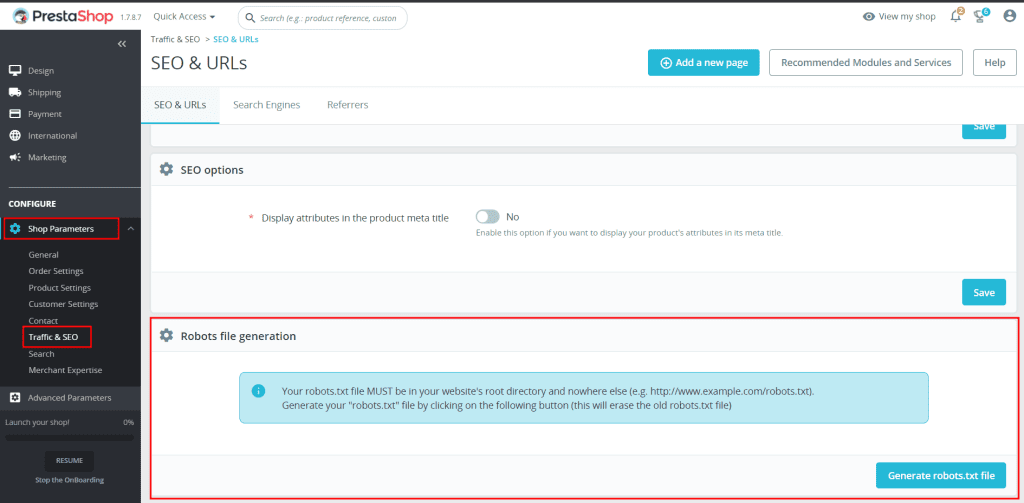
Here we will find a warning message, informing us that continuing with the creation of the robots.txt file will result in the deletion of the robots.txt file present in the root of the site.
If you have already created the robots.txt file manually or by another method, edit the robots.txt file directly by accessing the file. Otherwise, click the Generate robots.txt file button.

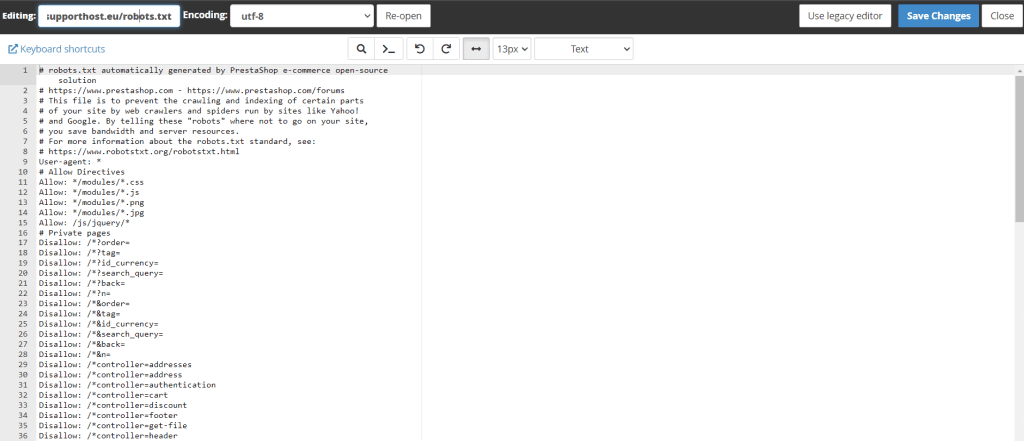
Then access the site’s files via file manager or with an FTP client like FileZilla we can see the generated robot file, as shown in this example:
Create the sitemap of the site
The sitemap, as the name suggests, is the map of all the contents of our site. A sitemap is nothing more than an XML file that contains the list of pages and resources of our site.
Generating a sitemap and submitting it to search engines helps us ensure that important pages are not missed by crawlers scanning the content on the web.
There are several ways to create a sitemap, we can also do it manually, but with PrestaShop there are modules that allow us to simplify its creation.
Let’s find out right now.
Create the sitemap with PrestaShop
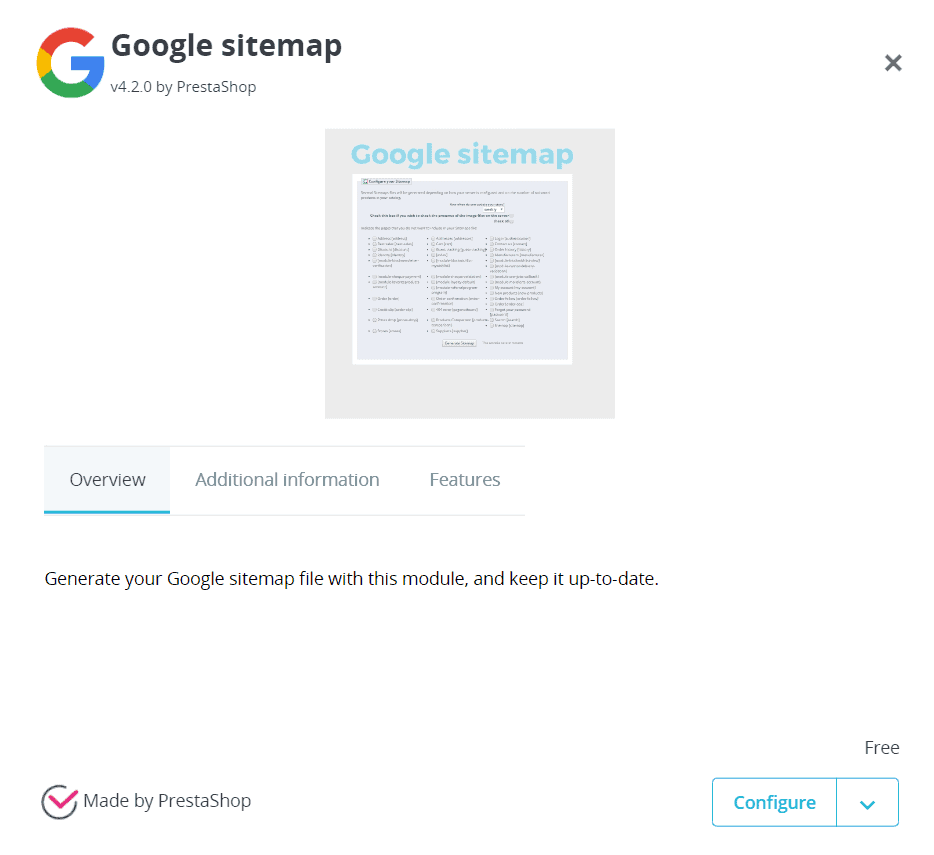
With PrestaShop we can create the sitemap of the site using a form like Google sitemap.
From the Module Manager section we can search for the module and click on Configure to proceed with the settings.
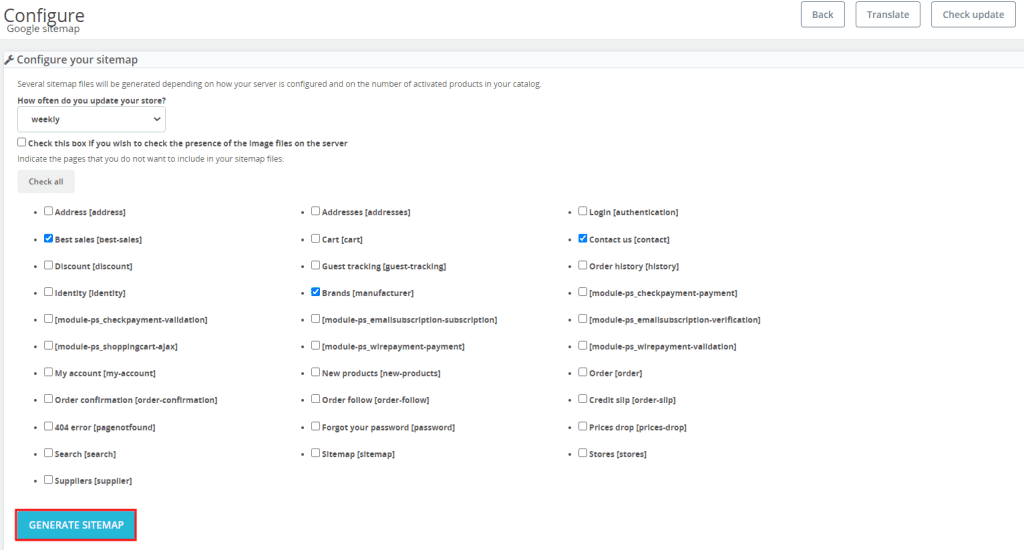
In this screen, we will see the sitemap present, if we have already created it, then we can set the frequency of updates, by default it is set to weekly.
After selecting the pages we want to include in the sitemap click on the Generate Sitemap button to proceed.
An alert like the one shown in the screenshot below will tell us that the sitemap has been created and will notify us of the address.

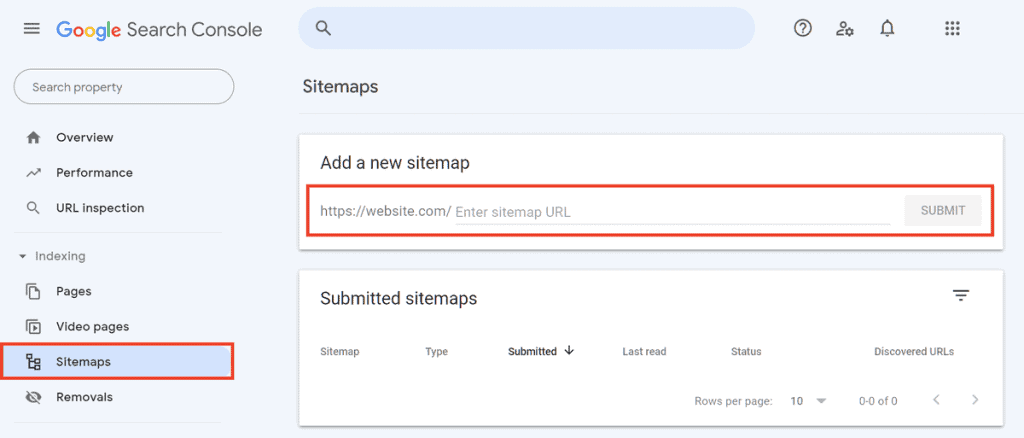
At this point, via search console from the section Index > Sitemap, we can enter the URL of the sitemap to submit it.
Improving PrestaShop SEO: how to use structured data
Search engines like Google use structured data, if present on web pages, to derive information about their content.
It is precisely with this system that Google search results are enriched with more and more detailed information, showing what are called rich snippets.
For example when we search for a recipe, we may find a result like this:

In this case, Google shows us the preparation time of the dish and to do this, it gets the information from the web page.
Currently Google uses the schema.org markup to derive this data. This means that to insert structured data into your PrestaShop site pages, you will need to use this structure as a reference.
Adding structured data increases the chances that your site will show up in rich snippets, but like any optimization technique it doesn’t offer you any guarantees that this will happen.
How to add structured data with PrestaShop
To add structured data to our ecommerce product pages with PrestaShop we can use an addon or use the Structured Data Markup Assistant Google Markup Assistant.
In the latter case we simply enter the URL of the page or paste the HTML code and select the type of page, for example a product, as such:
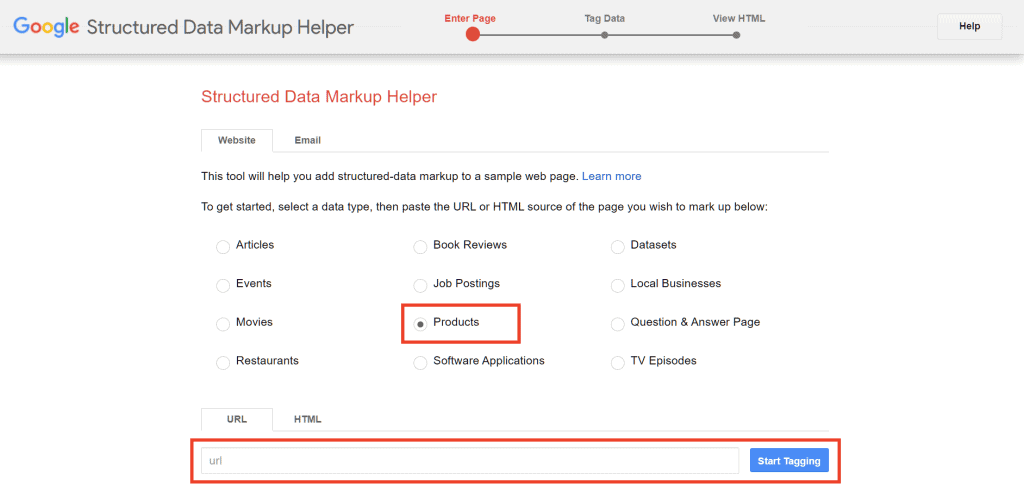
After clicking Start Tagging the page will be scanned. When finished, we can then select from the page the data to take for example name, price, ratings and reviews.
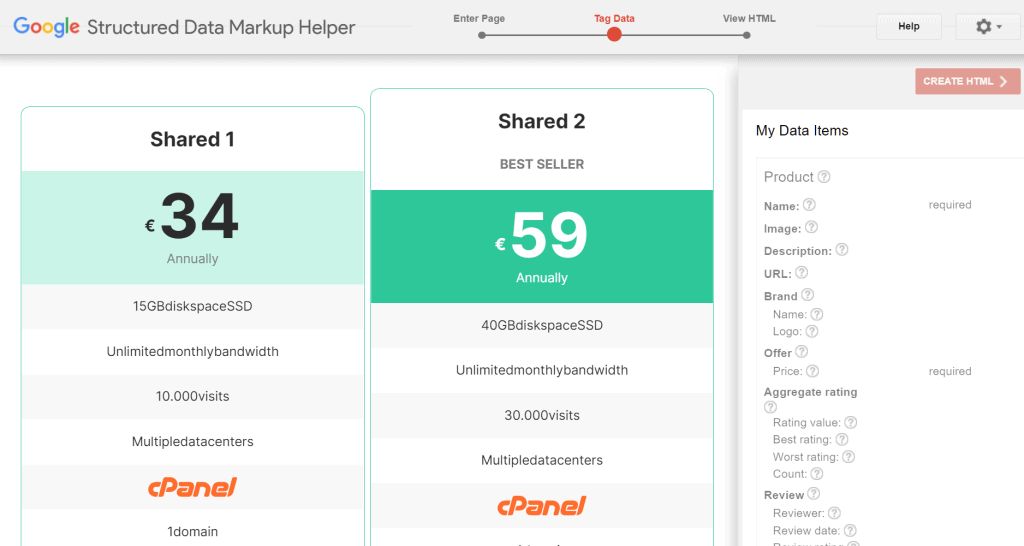
After we are done, we just need to click on the button at the top right “Create HTML” to generate and also be able to download the code needed to integrate this data.
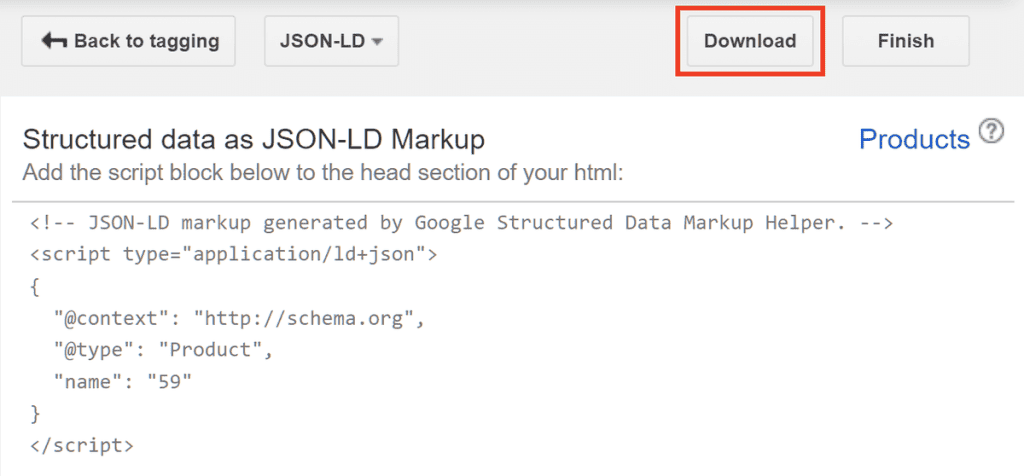
With the option JSON-LD we will just add this code to the page of our site.
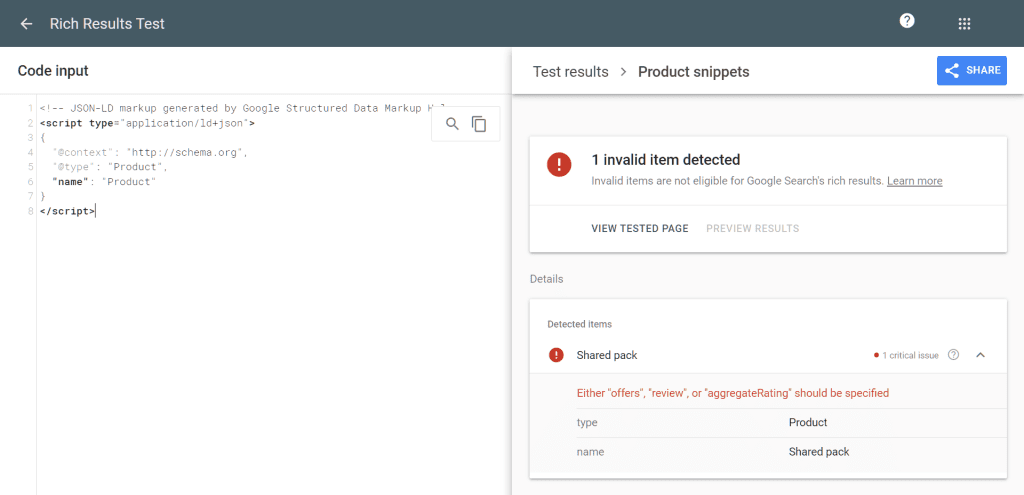
We can perform further verification using Google’s rich results testing tool.
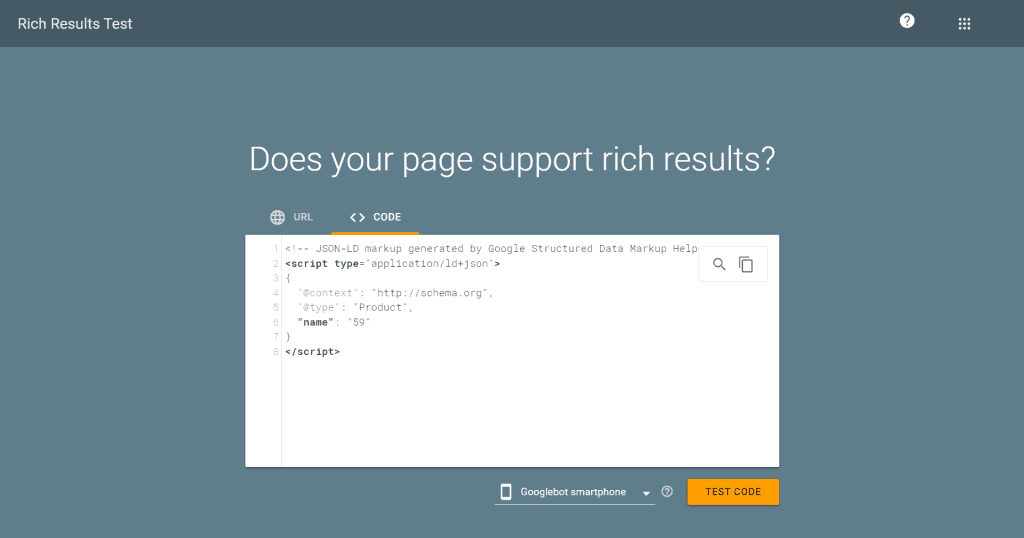
This helps us see if there are any problems or missing fields, as in our example.
Check for broken links and implement redirects
What happens if a potential customer follows a link to a page on your PrestaShop site and gets a 404 error?
At best they will try to do a new search on your site.
But what if, instead, you went back to the search engine results page and opened a competitor’s online store?
On all sites, it is important to check for status codes that return errors such as pages not found in the case of 404.

When you make changes to your site structure, you may decide to move resources and product pages. If these changes affect the page path, you should make sure to redirect the old URLs to the new ones.
To do this you should use 301 redirects: a type of redirection that tells search engines that a resource has been moved permanently.
By doing so, visitors following an old link will end up on the new page. Search engines will also be able to reach the new resources.
PrestaShop SEO: managing redirects
In addition to being able to implement redirects with the .htaccess file, as we’ve seen in the 301 redirects guide, there are also other methods.
Please note that PrestaShop versions after 1.5, automatically generate the .htaccess file, so you do not need to create it manually.
As for manual redirect management, PrestaShop allows us to choose a redirect page for each page of our shop. Let’s see an example with a product page.
To do this we need to access the backend and then go to Catalog > Products select the product and then open the “SEO” tab, then scroll down to the Redirection page section.
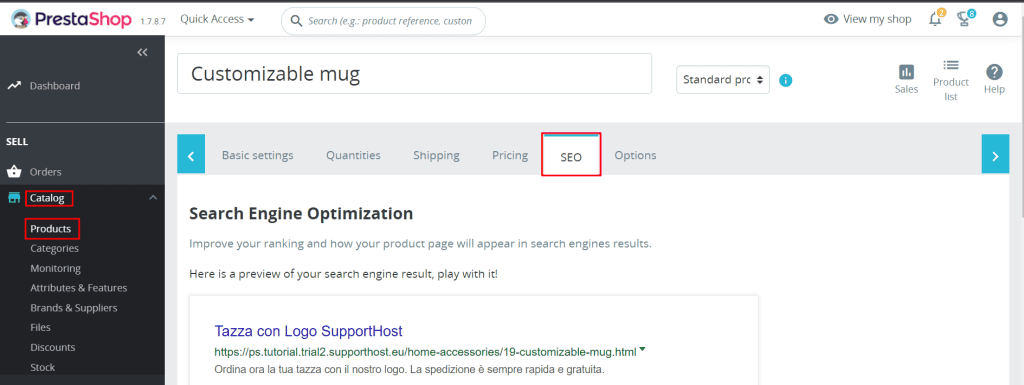
From here we can set a redirect by choosing from these options:
- 301 redirect to a category;
- 301 redirect to another product;
- 302 redirect to a category;
- 302 redirect to another product;
- no redirection: 404 error page.
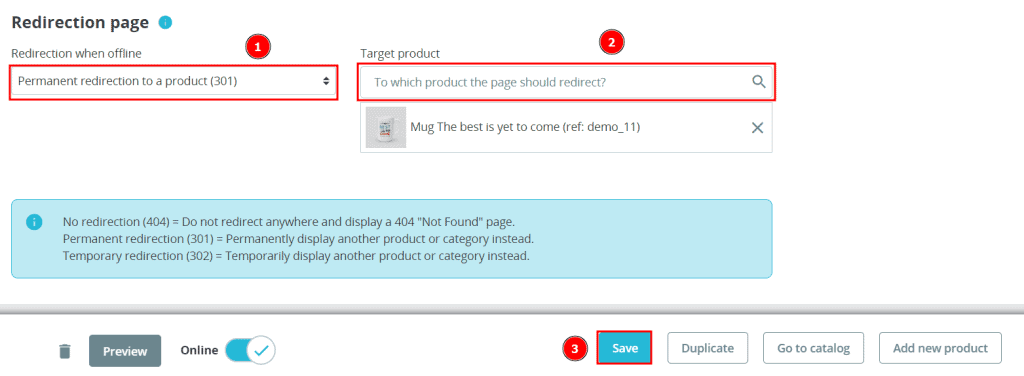
After choosing the type of redirect, we must choose the destination page by searching it through the search bar. To finish click on Save to make the changes. This screen shows the steps we have just described.
Content SEO optimization for PrestaShop
When it comes to optimizing PrestaShop or ecommerce in general, you need to pay a lot of attention to content such as category pages, product pages and images.
Upstream of the actual optimization of the site requires a work of analysis. In this phase you are going to study the competitors and do a keyword research.
This phase is the foundation of any ecommerce site creation and deserves to be treated in its own right. In this section we will look at how to optimize content for SEO on PrestaShop.
Let’s start with the product pages.
SEO PrestaShop: Product Pages
When you create product pages with PrestaShop, in addition to being able to enter basic information (image, description, quantity, prices, etc.), you can manage important fields for SEO.
Add a new product or edit an existing one and then click on the “SEO” tab.
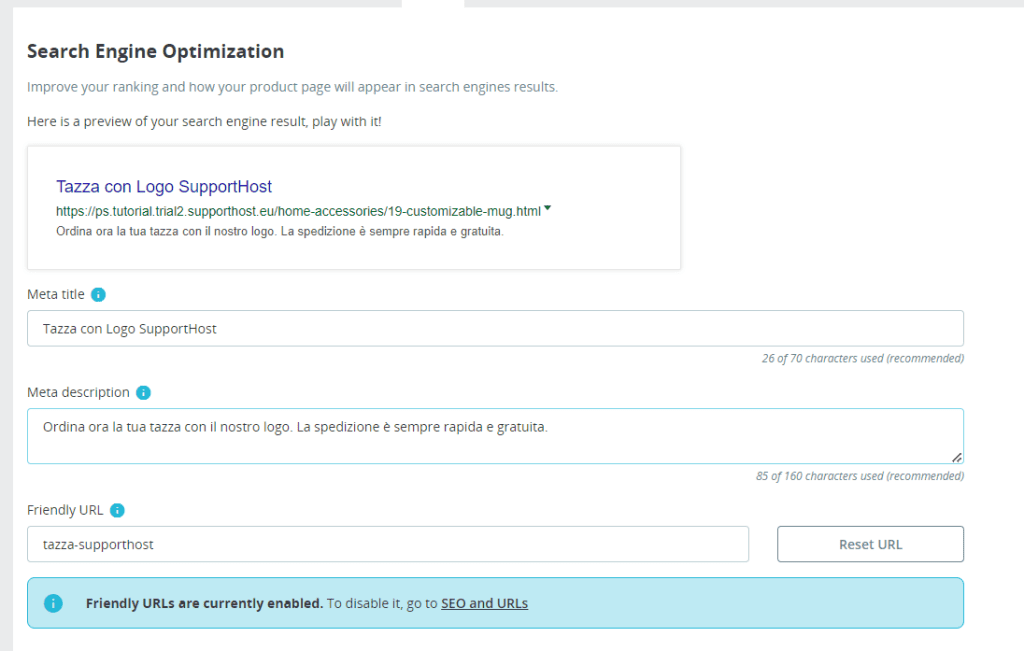
First in this section we are shown a preview of how the page will appear on the search results. From here we can edit the different fields: title, meta description, slug and redirect page.
Meta title
PrestaShop refers to it as the “meta title”, it is actually the “title” tag, i.e. the title of the page. It is what will be shown in search engine results and in the browser tab, as seen here:
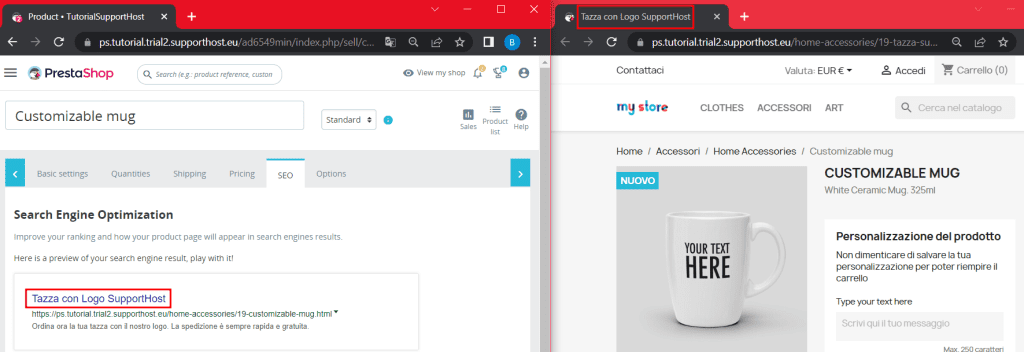
By default this field is empty and will be taken directly from the product name. From here you can decide whether to edit it.
Always make sure the product name is understandable and do not use identification codes such as Product #3654.
Meta description
The meta page description, in the case of products, is the product description. Pay attention to the number of characters because longer descriptions will be truncated when shown on search engine results pages.
Describe the product so that the description is specific to that product. You can use keywords, but don’t force their use. Always think in the perspective of the user who will see the link and decide whether to open it or not.
Friendly URL
Here you will see a warning telling you if the Friendly URL option is enabled or not. From this section you can change the URL slug (the end part) of this product page.
Redirection page
As we have seen talking about redirects, from this section we can manage the redirection of the page when it is not available.
For example we could redirect the product page to the category it belongs to. By doing so, visitors will see the category page instead of being faced with an error page.
SEO PrestaShop: Categories
We have talked before about the importance of categories in an eCommerce. Specifically with regards to search engine optimization with PrestaShop we can go and put important information on category pages.
When we create a new category or edit an existing one we will see the SEO preview, a preview that shows us how our category will appear in search results.
Again, as we have just seen for product pages, we can customize the different fields.
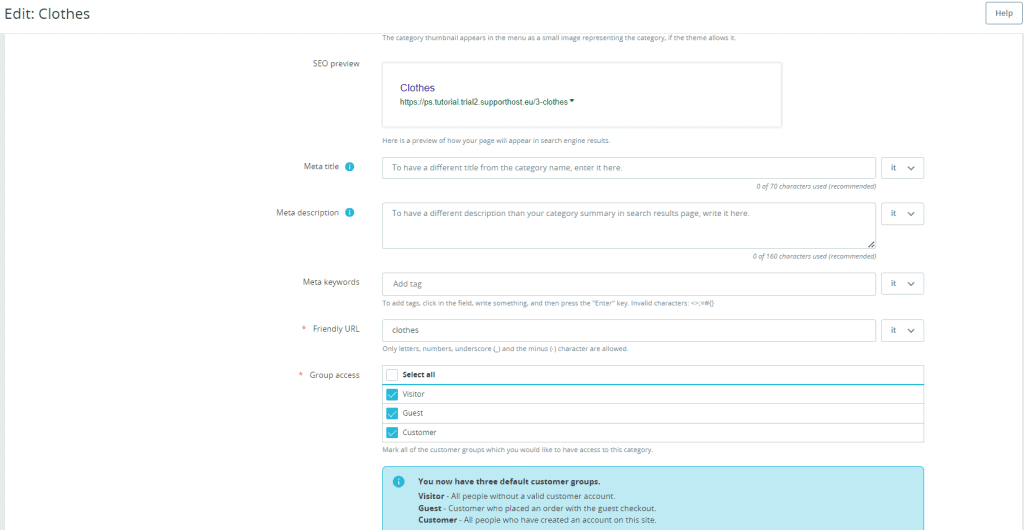
Meta title: we enter the title of the page. Don’t worry about using keywords, always make sure it’s consistent. In short: write for humans, not robots.
Meta description: this will be shown as a description in search results. As with products, it is important that each category has a unique description. Always respect the character limit for length.
Meta keywords: here we can insert the keywords associated with the category.
Friendly URL: from here we can edit the URL slug for the category.
Group access: this option allows us to choose whether to make the page visible to anyone who visits the site (visitor), only to those who access as a guest (guest), or only to registered users (customer).
Image SEO optimization
We’ve created a pretty comprehensive guide on how to optimize images for SEO. You can check it out to understand how to rename images and what to write in the alt text, but also how to optimize images so that it doesn’t affect your site’s performance.
Let’s see how to edit photo attributes on PrestaShop.
Insert image attributes: title and ALT tags with PrestaShop
On PrestaShop we can insert image attributes directly into the settings of the page we are creating.
Let’s look at the example with a product.
Let’s edit a product page and open the Basic Settings tab. From here, in the first section, we can insert the images that will be shown on the page.
Click on one of them to display the box on the right where the Caption field will be shown. The text that we enter in this field will be shown as alternative text or ALT tag and as the title of the image.
We just have to click on Save image settings to make the changes.
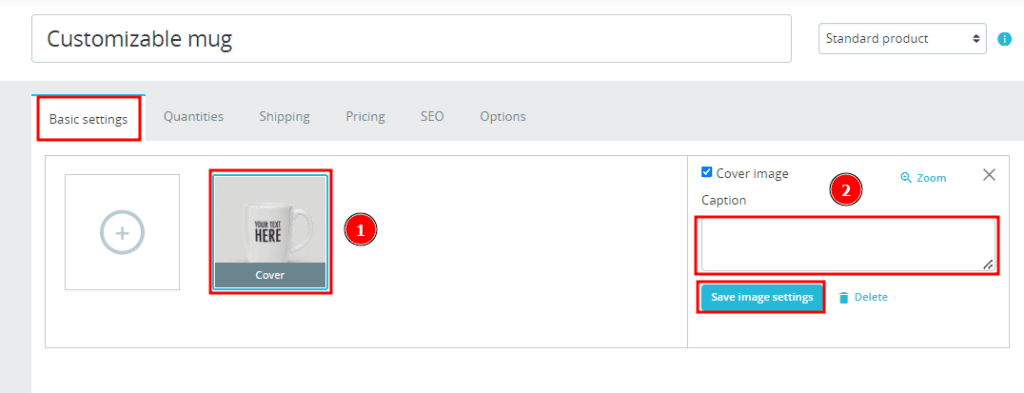
If, however, we want to automate the insertion of a title and alternative tags we can use a PrestaShop module that adds this function.
Conclusion
In this article, PrestaShop SEO: a practical guide to shop optimization, we have tried to cover every important aspect concerning the matter.
When it comes to SEO for an ecommerce business, it’s not enough to just put a keyword here and there and wait for results. With more than 200 ranking factors, plus the recent Core Web Vitals, there is a lot of work to be done especially on the technical side and not just on the actual content.
You now have the basics to understand how to go about designing or redesigning your site so that users and search engines would “like” it.
Is there anything that’s not clear to you or do you have any suggestions? Write them here in the comments.


Leave a Reply