In a search engine optimization strategy for your site, you must also consider the importance of optimizing images for SEO.
Incorporating relevant images improves the experience of users visiting your site. Within an article, images serve to divide the text, but also to visually explain certain concepts making them more comprehensive.
Besides being appreciated by users, images are also taken into account by search engines. In this case, however, in addition to the relevance of the images, other factors come into play that helps the positioning.
In this article, Image optimization SEO: the definitive guide, we will see that optimizing images for SEO by compressing them and reducing their size helps you increase the speed of your site and improves your ranking.
We will then see how to optimize image attributes. This allows you to improve the user experience and make search engines understand your image content, positively affecting your ranking.
Table of Contents
Image optimization SEO: the definitive guide – what to consider

Optimizing images for SEO means improving your website’s ranking on search engines. The best-positioned results are those that are displayed first and receive, therefore, the greatest number of visits.
A better ranking translates, therefore, into greater visibility for your site and potentially more earnings.
When talking about optimizing a website and the best practices to put in place to improve On Page SEO we often focus on content and especially text.
In reality, however, search engines take into consideration not only text but also images. This is why image optimization for SEO should not be underestimated.
You also have to consider that Google likes fast sites and that on a page the content that tends to increase loading time is often due to images.
If you want to improve the speed of your site and therefore your ranking on search engines you have to make sure that images are loaded quickly. Let me explain how to do it.
Image size and weight
The size of the photos you show on your site has a major impact on the loading time of your site. At the same time, however, none of your users will appreciate seeing images of excessively low quality.
As far as the size is concerned, you have to take into consideration the fact that the images will almost never be displayed on full screen. For this reason, it would not make sense to insert larger images that would be scaled to fit within the limits of the section in which you insert them.
At the same time, you have to take into account that your site will be viewed on displays of different sizes. The content of your site must, therefore, be responsive so that it adapts to navigation from any device. This means that your images must also look equally good on computers, tablets and phones.
In addition to the size, you must take into account the weight of the image. That’s why it’s not enough for an image to be scaled, it must also be compressed.
Image compression benefits the loading time of the entire page of your site. Faster loads are important for your site’s search engine ranking. If you want to explore this topic further you can check out our article on why it’s important to have a fast site.
How to Compress Images
When you compress an image it will take up less space, lighter images will take less time to load. But how do you compress images without losing quality?
There are several programs that allow you to compress images losslessly (loseless compression). For example, ImageOptim which you can use on PC if you use Mac, or from any operating system in the online version.
Another tool for image compression that you can use directly from your browser is Optimizilla which we have covered in another guide.
If you use WordPress, you can also use plugin created to optimize images, such as ShortPixel. We talked about it in detail in the guide on how to optimize WordPress images.
Check the results
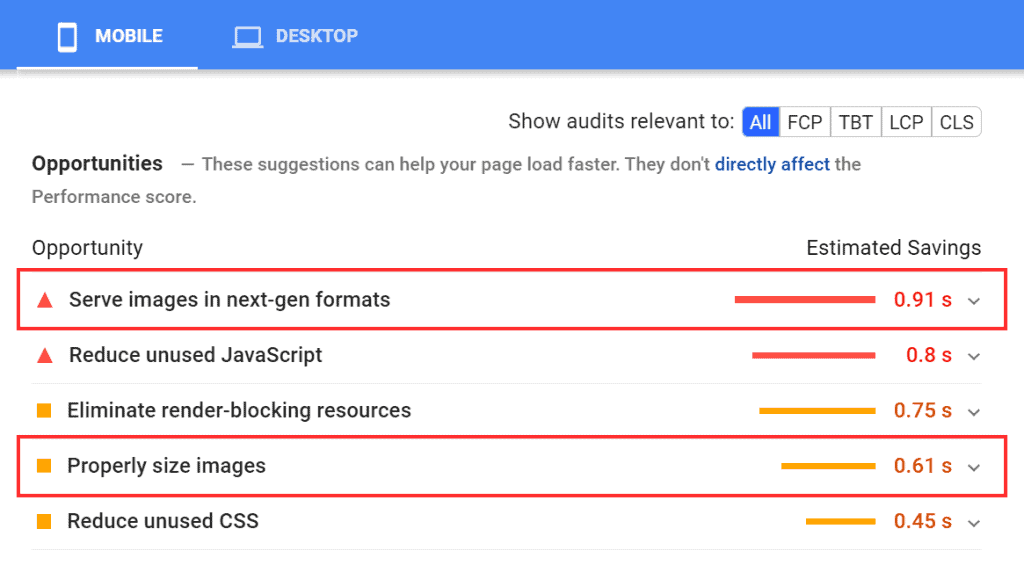
After resizing and compressing the images you can run a check to make sure you have done everything correctly. You can use PageSpeed Insights a tool provided by Google that performs content analysis of web pages.
Just enter the URL of the page you want to analyze and the analysis will give you an optimization score. In addition, this tool highlights all the steps you can take to improve page optimization.
Here’s an example:

In this case, the tool warns you that the images are not the right size and that the format used is not the recommended one. In this example, in fact, the images of the site were in JPEG and PNG, instead of the suggested formats WebP, JPEG 2000 or JPEG XR.
Images seen by search engines
The images on your site are not only viewed by the users who visit it, but also by search engines. However, if users can actually see the image, search engines cannot do so in the same way.
This is exactly why you need to help Google and other search engines understand the content of your images. How can you do that?
To understand the content of images, search engines read the text in image-related attributes.
The most important of these is the ALT attribute, which is also referred to as alternative text or alt tag.
Along with this, however, it is advisable to take care of the title attribute of the image (title) and if necessary the caption. These two attributes are not directly useful for search engines, but they are useful for users viewing the images.
Remember that images must be consistent with the content in the text. So in the text sections next to the image, the same topic as the image should be covered. On the other hand, it wouldn’t make sense to insert images that are not relevant to what you are talking about.
Moreover, if you decide to create a WordPress multilingual site and republish your content in different languages, don’t forget to also translate the title and alt attributes of the images into the various languages.
Let’s see what you need to do to optimize your images for SEO through attributes.
Optimize images for SEO: image attributes
Rename files
If we want to optimize an image for SEO, the first step is to rename the image file. If we are dealing with photos taken by us, or found from resources on the net, it is very likely that the file name is something like this “IMG_3920.jpg”.
The name of the file serves to suggest to search engines the possible content. Therefore, since a generic name will not be able to provide any information, you should change it.
For the file name, you can choose a short phrase that indicates what is represented in the image. Let’s take a practical example with this picture from unsplash:

The name of the image file was clay-banks-_wkd7XBRfU4-unsplash and it becomes coffee-cup as you see, we needed two words to describe the image. You can use more than two, but always try to use fairly concise names and remember to separate words with a hyphen.
Alternative Text
You should know that the alternative text is used to describe the image in such a way that someone who cannot see the image can still understand its content. This text is useful for users in several cases.
The first one is when the image is not loading because of a slow connection or other problems with the browser. Alternate text is also useful for blind or visually impaired people and is read by screen readers to tell these users about the description of the image.
For this reason, the alternative text of the image must be consistent with the content. To write it, just ask yourself: how would I describe this image in words?
Here is an example:

This image features a woman in a striped shirt holding a cup of coffee. The alternative text for this picture should then describe its content, you could write: a woman holding a coffee cup or a woman holding a coffee cup.
Try to describe the image, you can also do this by using keywords. In this case, the keyword can be “coffee” or “coffee cup”.
What you need to avoid is to list a series of words, even if they are keywords. So for this image, you don’t have to use an alternative text like this: girl woman coffee, a cup of coffee.
Excessive keywords in image attributes could have a negative impact on your site’s ranking.
The presence of image alt attributes also causes your site’s images to appear in image search results, such as Google’s Images section. Therefore, use the image alt tag correctly by describing the image and don’t just fill it in with your article’s keyword.
Image Title
The image title will be displayed by placing the cursor above the image. This attribute, therefore, is more useful for users visiting your site than for search engines.
You can always describe the image, and if you want to give some additional information to help better understand the meaning of the image.
Caption
You can use this field to provide users with additional information about the image. The caption will appear below the image and will always be displayed, not like the title which will appear only when you hover the mouse over it.
If the image shows a procedure to follow, such as a recipe, you can use the caption to better explain the steps to follow. In other cases, you can use this field to cite the sources and thus attribute the authorship of the images.
Automated optimization of title and alt text
There are a few actions we can automate to optimize images for SEO. As I mentioned the first step is to rename the file using a name that describes the image.
For example, if you’re writing an article about dog food and you upload an image of a can of “oops” branded food you can use:
canned dog food oplà.jpg
Instead of:
img2739.jpg
At this point, we use two functions. The first one is used to fix the filename, the second one is used to set the image metadata.
You can copy and paste these functions in the functions.php file of your theme, or use a plugin like code snippets to add these two functions.
The first one is used to change the filename, remove other special characters and set the name all in lowercase to have a “clean” filename. You can read the comments in the code to understand what is done exactly.
function wpartisan_sanitize_file_name( $filename ) {
 $sanitized_filename = remove_accents( $filename );
// Convert to ASCII // Standard replacements
$invalid = array(     ' '   => '-',     '%20' => '-',     '_'   => '-', );
$sanitized_filename = str_replace( array_keys( $invalid ), array_values( $invalid ), $sanitized_filename );
$sanitized_filename = preg_replace('/[^A-Za-z0-9-\. ]/', '', $sanitized_filename); // Remove all non-alphanumeric except .
$sanitized_filename = preg_replace('/\.(?=.*\.)/', '', $sanitized_filename); // Remove all but last .
$sanitized_filename = preg_replace('/-+/', '-', $sanitized_filename); // Replace any more than one - in a row
$sanitized_filename = str_replace('-.', '.', $sanitized_filename); // Remove last - if at the end
$sanitized_filename = strtolower( $sanitized_filename ); // Lowercase
return $sanitized_filename;
 }
add_filter( 'sanitize_file_name', 'wpartisan_sanitize_file_name', 10, 1 );
The second function takes the filename, removes any special characters and sets all words to capitalized (all words will start with a capital letter) and uses this string as the “title” and “alt” of the image.
In this way the above values are set automatically, which you can change manually if necessary before inserting the image into the page.
add_action( 'add_attachment', 'my_set_image_meta_upon_image_upload' );

function my_set_image_meta_upon_image_upload( $post_ID ) {
 // Check if uploaded file is an image, else do nothing
if ( wp_attachment_is_image( $post_ID ) ) {
    $my_image_title = get_post( $post_ID )->post_title;     // Sanitize the title:  remove hyphens, underscores & extra spaces:
    $my_image_title = preg_replace( '%\s*[-_\s]+\s*%', ' ',  $my_image_title );     // Sanitize the title:  capitalize first letter of every word (other letters lower case):
    $my_image_title = ucwords( strtolower( $my_image_title ) );     // Create an array with the image meta (Title, Caption, Description) to be updated
// Note:  comment out the Excerpt/Caption or Content/Description lines if not needed
$my_image_meta = array(
         'ID'        => $post_ID, // Specify the image (ID) to be updated
         'post_title'    => $my_image_title, // Set image Title to sanitized title         //
         'post_excerpt'   => $my_image_title,        // Set image Caption (Excerpt) to sanitized title         //
         'post_content'   => $my_image_title,        // Set image Description (Content) to sanitized title
);
// Set the image Alt-Text
update_post_meta( $post_ID, '_wp_attachment_image_alt', $my_image_title );     // Set the image meta (e.g. Title, Excerpt, Content)
wp_update_post( $my_image_meta ); }
 }
Create a Sitemap for images
To get your images indexed faster you can add images to the Sitemap. This will make it easier for search engines to find the images on your site.
You can add images if you already have a sitemap or create an image sitemap in XML.
Image loading
As you may know, image loading affects the loading time of web pages. To reduce the impact of images and improve performance you can opt for what is called lazy loading of images.
This way, when you open a page, instead of loading all the content, only the images in the visible portion of the screen are loaded. Images that are in hidden areas of the screen are only loaded as you scroll the page.
There are several ways to do this, for example, you could use a plugin like a3 Lazy Load that allows you to speed up WordPress.
The slow (lazy) loading of images must be set up properly otherwise you risk search engines not being able to index that content.
Social sharing
If you want the images on your site to be easily shared on social media, you can use Open Graph tags.
Instead of letting Facebook’s crawler select the images and information on the page, you can decide for yourself how the shared content should appear. Just specify the meta tags you want in the <head> portion of the site.
The meta-tag for images is og:image and is part of the basic meta-tags along with the URL, title, description and type.
The meta-tags for images are inserted in this way:
<meta property="og:image" content="https://sito.it/wp-content/uploads/2021/01/image.png"
In this way, you can choose with which image an article of your blog will be shared on social networks. If you don’t use Open Graph tags, instead, the image will be chosen automatically.
The same applies to the title of the article and the description, which you can modify as you like with the relative meta tags: og:title for the title and og:description for the description that will appear below the title.
Image metadata
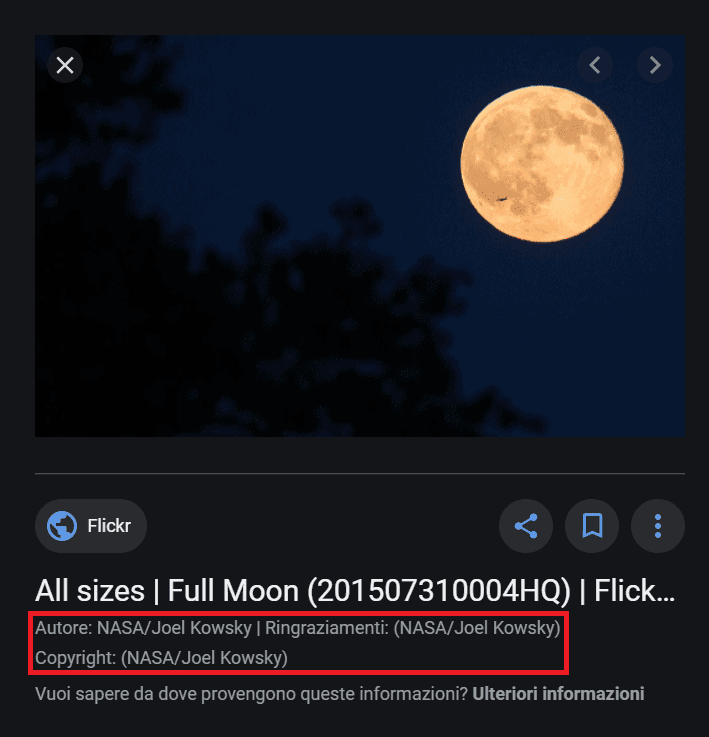
When searching for images on Google, the metadata entered in the photos is also shown. In this way, it is possible to insert IPTC metadata, i.e. information about authors, eventual awards and copyrights on the image.
When present the metadata will appear below the image preview, like this:

Search engines can also read the Exif data of photos, i.e. information about date and time of the shooting, focal aperture, exposure, shooting time, etc. The information from this metadata could be used by search engines to improve searches and provide more relevant results.
In the future, therefore, optimizing images for SEO may also require you to pay attention to maintaining the EXIF data of your images.
Conclusion
In this article,Image optimization SEO: the definitive guide we have seen why it is important to optimize images for SEO. The size and weight of images affect the speed of your site and it is important that they are optimized.
Search engines also favor content where there are relevant images, so it is important to make the content of the images clear. As we have seen, we can do this by optimizing image attributes.
However, it takes time to do this, but luckily we can speed up these operations by following the method I’ve explained. If you have any doubts on how to do this or if there is something that is not clear to you, let me know in the comments below.


Leave a Reply