In this article, we’re going to see what LiteSpeed is, how it’s used and what kind of performance we can expect from it.
We will see in detail a LSC plugin, how to install it and how to configure it to get the most out of your website. LiteSpeed and LSCache: the definite guide will show you how to activate the plugin for your site.
Table of Contents
What is LiteSpeed
LiteSpeed is a high-performance web server that is used instead of Apache. It is very popular due to the fact that it performs better than NGINX but it has the same compatibility as Apache. LiteSpeed offers good performance without having to do any special configuration.
To offer maximum performance we offer LiteSpeed + LSCache on our semi-dedicated hosting, WordPress hosting, PrestaShop hosting and Magento hosting plans.
LiteSpeed is the 4th most used web server at the moment, right after Apache, NGINX and Microsoft IIS. Apache compatibility allows you to use Apache software (such as cPanel/WHM) and also Apache configurations (such as .htaccess file directives).
This web server is popular both for use on personal projects hosted on VPS and on dedicated servers of hosting companies (which is the case when hosting with LiteSpeed).
In addition to this, LiteSpeed offers protection against brute-force attacks and DDoS protection.
But the real strength of LiteSpeed is the cache plugins it offers for the main CMSs, including WordPress, Joomla, Drupal and Magento.
LiteSpeed’s cache plugins
As mentioned one of the strengths of this web server is the cache plugins (LSC). These are great free cache plugins and their only requirement is that they should be used on a server that uses LiteSpeed.
We will specifically talk about the WordPress, plugin further on, the information in this post also applies to plugins for other CMSes. We recommend using this plugin for all sites, given the performance boost we can get.
These plugins are updated frequently. The developers are constantly fixing any bugs and problems rapidly. Their business model is to maintain an efficient server-client environment so that they are never late when it comes to fixing problems.
When a bug is found it is fixed in a matter of hours, not days or weeks.
Features of LSC plugin
- Server-side caching (use server to generate cached pages instead of PHP like a normal caching plugin)
- Object caching
- It can create a cached version for private pages, such as pages reserved for logged in users and administrator pages.
- Granular settings for developers to set private content caching
- Image optimization for free
- CDN compatible
- Database optimization
- QUIC.CLOUD – a new feature to serve cached pages if you don’t use a server with LiteSpeed
- Advanced settings for CSS and JavaScript optimization
Using this plugin not only improves performance, but also reduces the load on the server, allowing you to save money, since using fewer resources you just need a cheaper plan.
Quick activation guide
How to install WordPress plugin Litespeed cache. If you use another CMS you can install the plugin for the CMS you are using.
Go into the plugin settings and change the default settings and change the following values:
- General > General > Request Domain Key – You need this if you want to use QUIC.cloud or if you want to use LiteSpeed’s cache but the server you’re on doesn’t use LiteSpeed. If your plan is among the options listed above use LiteSpeed and you can skip this step.
- Cache > Cache > Enable Cache – Set it to ON. If your server does not use LS sign up for it at QUIC.cloud.
- Cache > Cache Logged-in Users – OFF.
- Cache > Drop Query String – Type in these three commands on three separate lines: fbclid, gclid, utm*
- Cache > Browser > Browser Cache – ON.
- Cache > WooCommerce > Privately Cache Cart – OFF
- CDN > CDN Settings > QUIC.cloud CDN – Set it to ON if you want to use QC CDN.
- CDN > CDN Settings > Cloudflare API (Only if you use CloudFlare) – Enter your email, API key and domain.
- Page optimization > CSS Settings > Generate Critical CSS – OFF.
- Page optimization > CSS Settings > Inline CSS Async Lib – OFF.
- Page optimization > Optimization Settings > Remove WordPress Emoji – ON. (Modern browsers support emoji by default).
At this point you can click save and you’re done. You don’t have to do anything else.
Install the LSC plugin
Installing LiteSpeed is very easy. Depending on the CMS you use you just have to search for the plugin and install it like a normal plugin.
In the case of WordPress, you can decide to do it directly from cPanel. Go to cPanel and scroll down to the “Advanced” section and click on the icon.

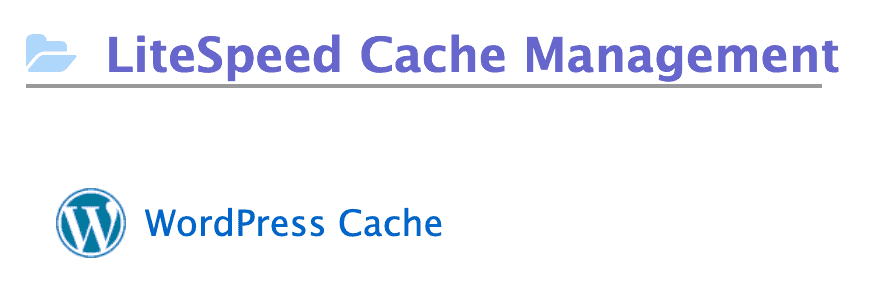
Scroll down and click on WordPress cache:
You will see a list of domains and subdomains on which WordPress is installed. Click enable to install the plugin and activate it directly from cPanel.
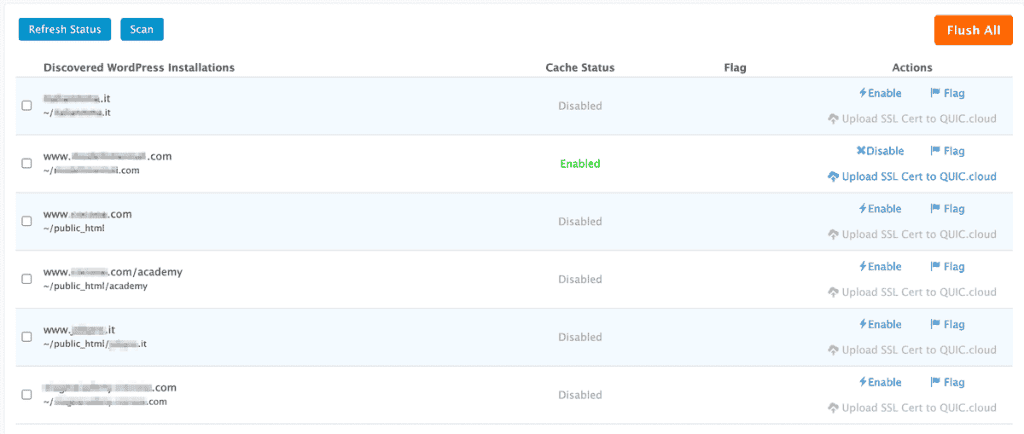
Clicking enable will ask you for confirmation.
Note that if you have another caching plugin you may get an error, before installing LSCache make sure to disable any caching plugin you are using:

Once the plugin is installed, let’s see what the various configurations mean in detail.
A detailed guide to LiteSpeed
Once we have correctly installed the LSC plugin let’s see what configurations we have available and what they mean.
As for all plugins, we can find the configurations in the sidebar on the left:
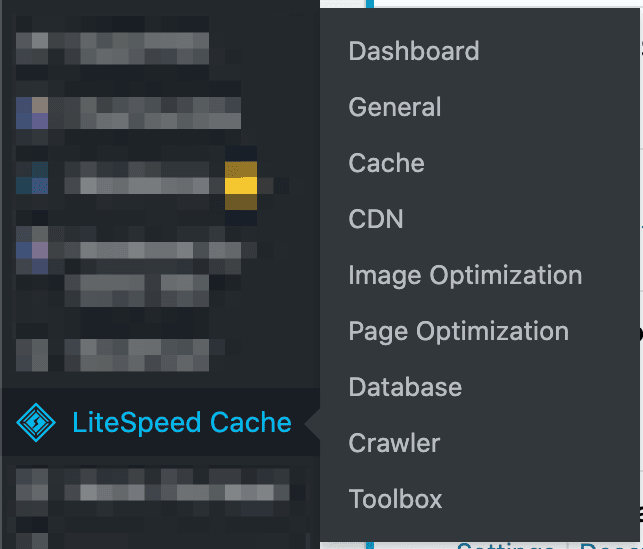
Below I will insert the comments to the various LiteSpeed settings. If I’ve skipped some settings it’s because I left them at the default value. If you have doubts feel free to check the official guide.
General
General -> General Settings
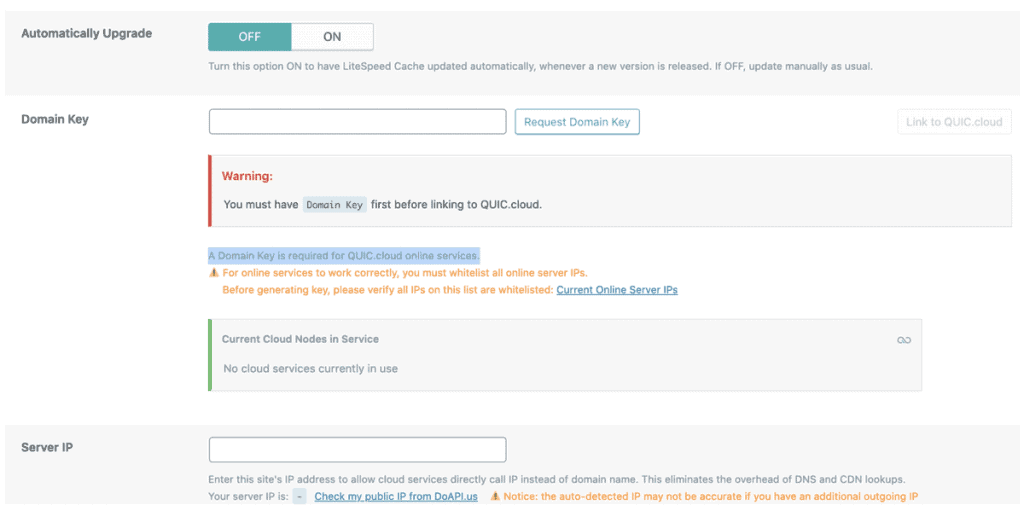
Automatically Upgrade
In the general settings, you have the option to enable automatic upgrades. By default the updates are disabled, i.e. set to Off.
When you enable automatic updates, every time a new plugin version is released, it will be downloaded automatically within a few hours.
Therefore, activating them avoids having to update the plugin manually every time.
Domain Key
You need to generate the key in order to use QUIC.cloud services. If your server doesn’t use LiteSpeed you need to use QUIC.cloud, which among other functions allows you to optimize images.
In order to use QUIC.cloud services you must first generate the key by clicking on Request Domain Key and then click on Link to QUIC.cloud.
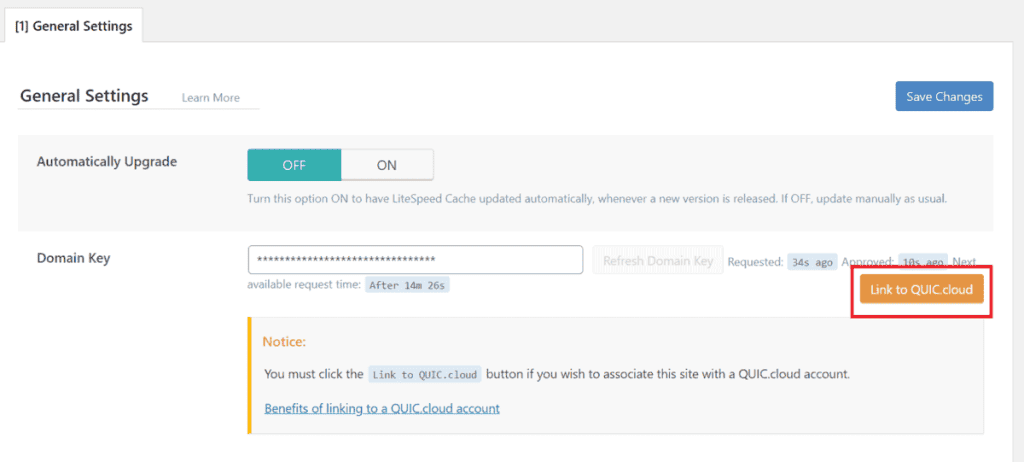
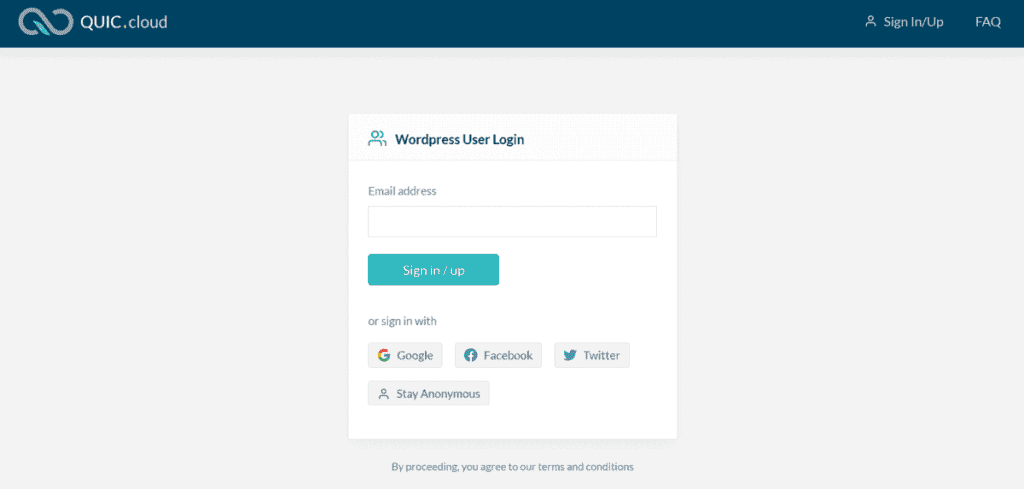
You will then be directed to the QUIC.cloud dashboard and will need to proceed with the registration to continue.
Server IP
By entering the IP address of your site in this field you enable the crawlers to directly know the IP instead of just the domain name. In this way, the DNS and CDN overload is reduced.
Notifications
By default, notifications are deactivated. By activating them you will receive notifications about the release of new plugin versions, hotfixes or offers.
Cache
Cache -> Cache
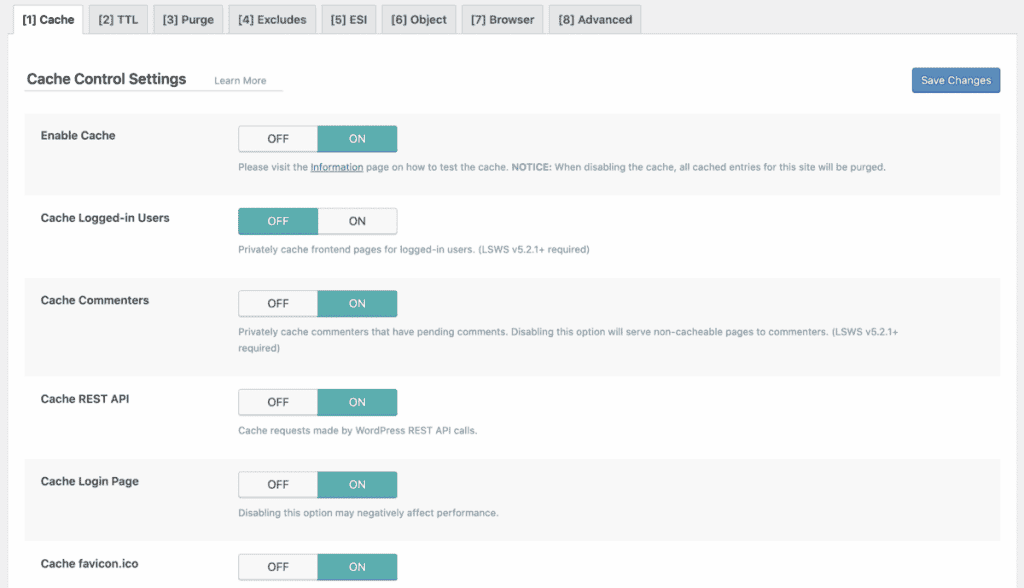
Enable Cache
To enable the caching function of the plugin this setting must be set to ON.
When this option is disabled, i.e. set to OFF, the plugin will not generate page cache anymore and will delete cache copies created until that moment.
Cache Logged-in Users
This setting creates cache copies of pages viewed by logged-in users. If you have a lot of users who log in quite frequently, the best option is to set it to OFF.
Mobile Cache
By default, this option is off. If enabled it allows you to have a different copy of the site on desktop and mobile. By enabling it you can also edit the list of user agents in the field below: List of Mobile User Agents.
Private Cached URIs
This option allows you to create cached copies of pages visited individually by each user. This applies, therefore, to custom pages for each user.
Force Cache URIs
You can enter in this list, the pages of which you want to create a cache copy. By placing pages in this list, other settings that prevented them from being cached are no longer taken into account.
Drop Query String
In this field, you can specify which query strings the caching plugin can ignore. This allows you to make sure that strings related to profiling and marketing cookies are excluded from the cache copies because you don’t need to store them.
Cache -> TTL
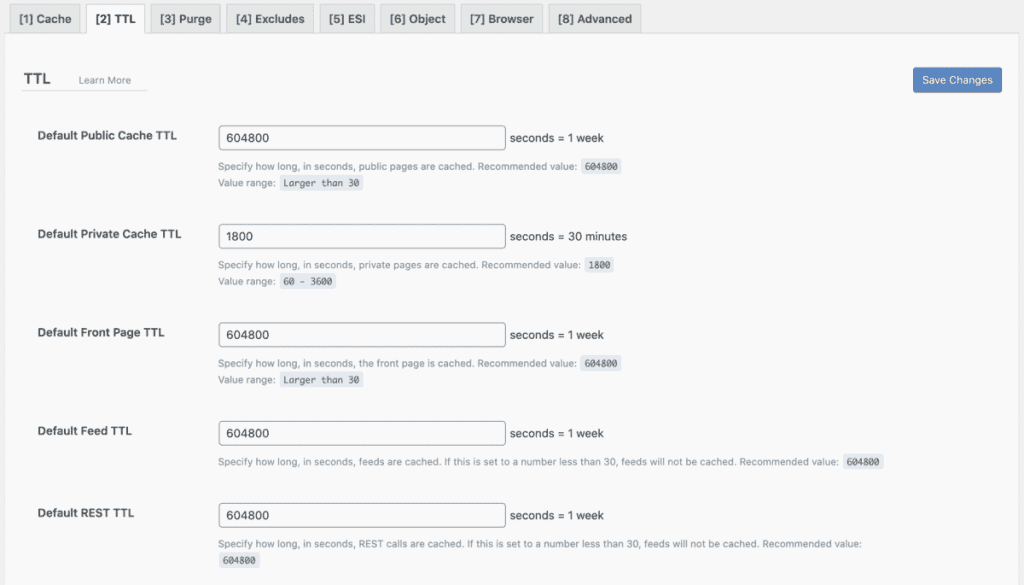
In this tab you can decide to vary the length of time the cache copies remain on the server. The best solution is to keep the default settings.
Cache -> Purge
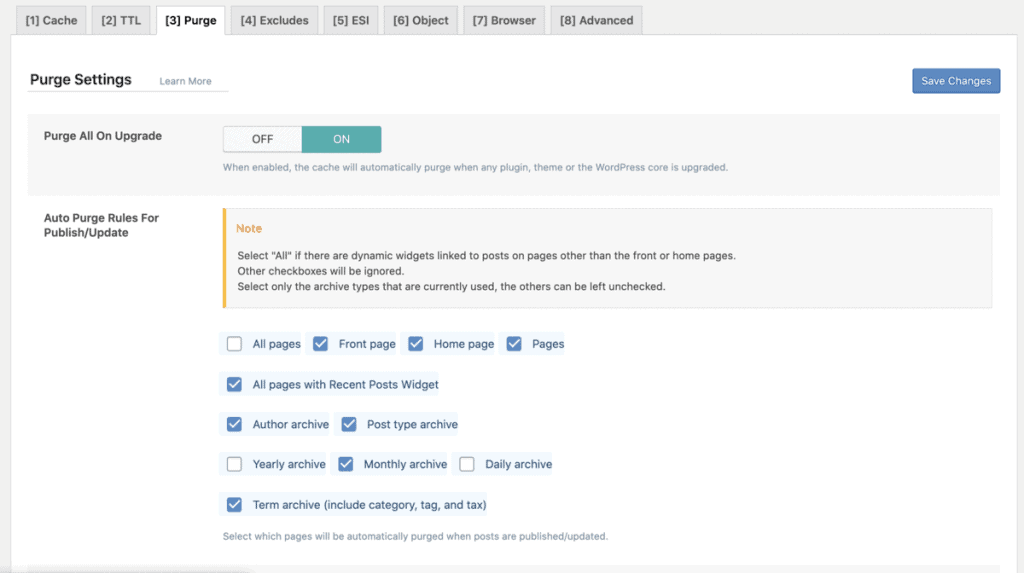
Purge All on Upgrade
By default, this option is enabled. So every time a plugin, theme or WordPress itself is updated the saved cache copies are automatically deleted.
Auto Purge Rules For Publish/Update
Whenever a new post is added, or one of the posts is updated its changes also involve other sections of the site. Just think about the categories or tags contained in articles, but also about archives.
From these options, you can choose the cache copy of which sections of your site should be updated every time these changes occur. The All pages option is disabled by default, but you might need to enable it in some specific cases. For example, if you use widgets that automatically pick up related posts, but in most cases, it is better not to select it.
Scheduled Purge URLs
In this section, you can schedule the automatic cache clearing of a list of specific URLs.
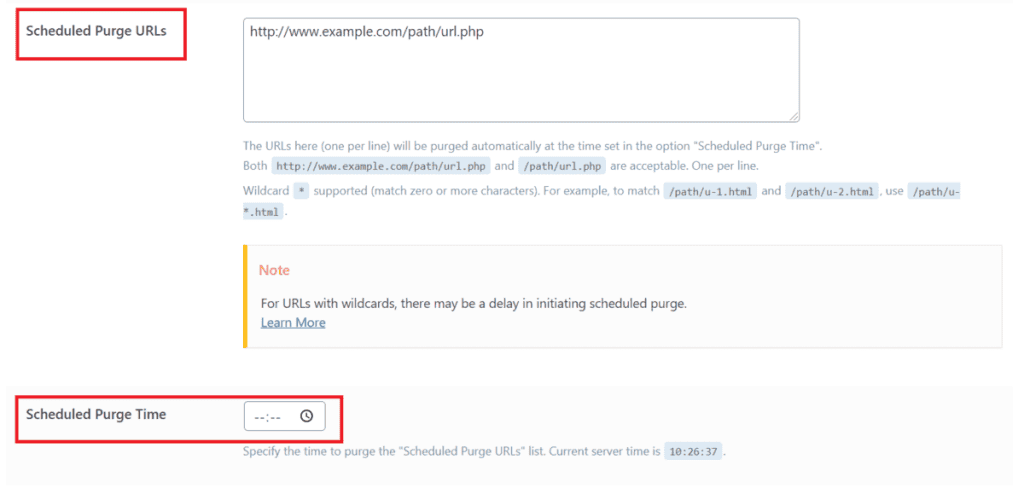
You can also set a specific time when the procedure will take place in the section below, i.e.: Scheduled Purge Time.
Purge All Hooks
When one of the WordPress hooks (i.e. actions and filters) included in this list is executed, the plugin will purge the cache.
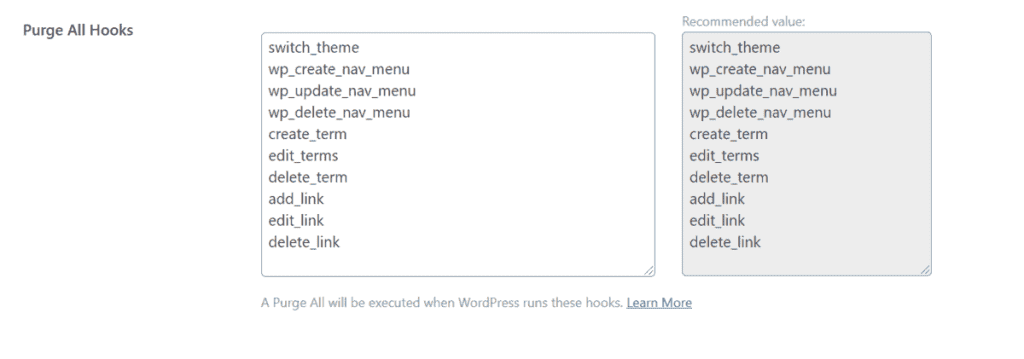
This feature is useful if you want to update the cache copy every time a certain action changes the appearance of your site, or for example, every time a new category is created or a new comment is posted by a user.
You can edit the list by removing some of the actions you’ve already inserted, or inserting others. You will find a list of all hooks here.
Cache -> Excludes
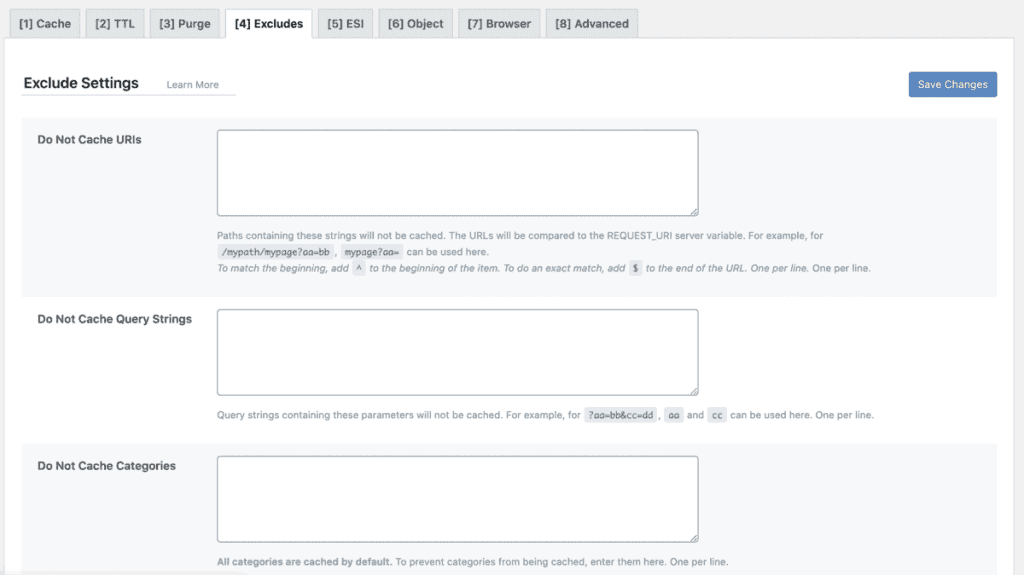
In this section you can choose any pages, categories, cookies, search strings, etc. that should not be cached.
Do Not Cache Roles
From this section, you can choose if some of the WordPress users, for example, the administrator, should be excluded from the cache. This feature may be necessary only if you have set private caching or for logged in users.
Cache -> ESI
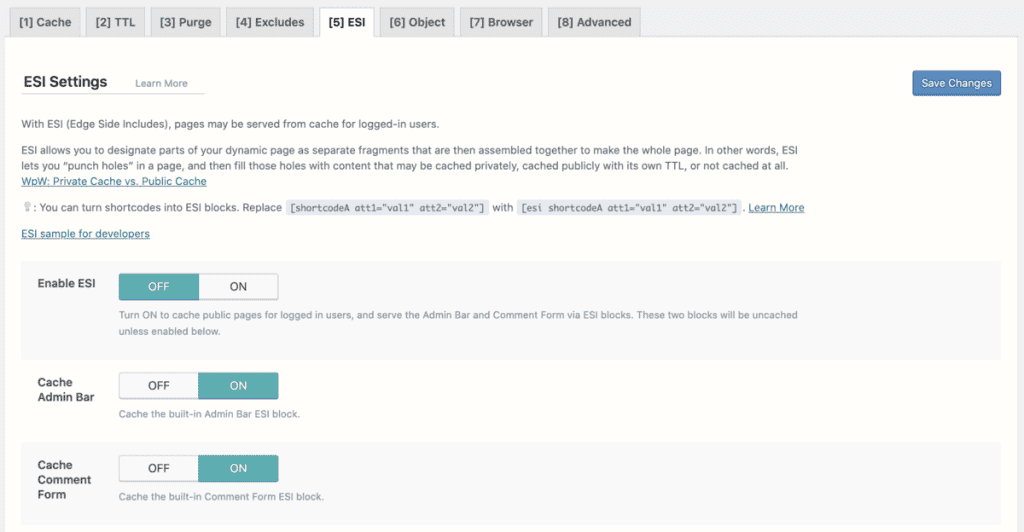
In this section, you can access the functions of ESI (Edge Side Includes). ESI allows you to have dynamic page cache management.
It means that each element of the page can be treated separately and you can choose to store it in the public cache, private cache or not in the cache at all.
By default, ESI is not active, if you want to use it you have to set the button beside Enable ESI to ON. To use it you can consult the detailed guide for developers here.
Cache -> Object
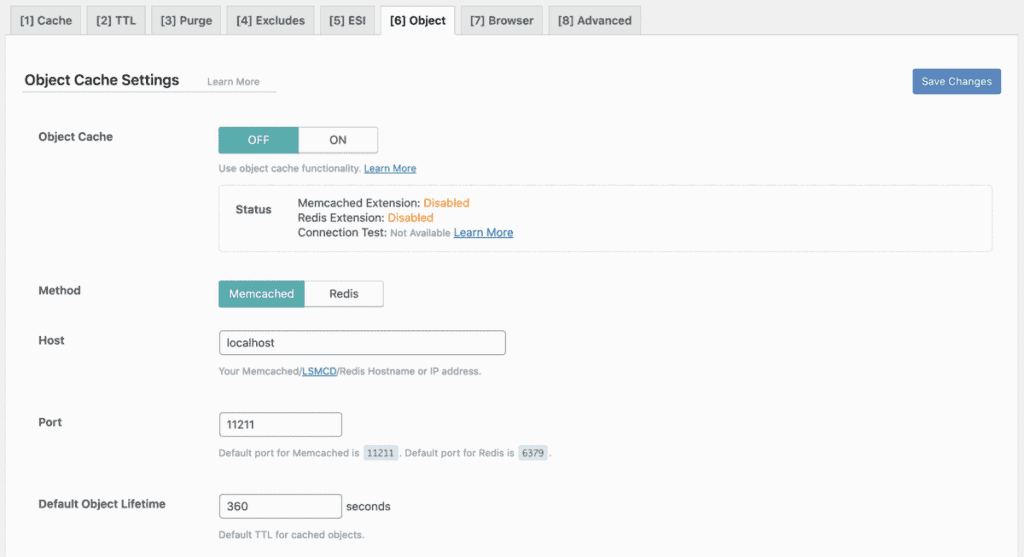
In the Object tab, you can activate object caching. Note that you can do this only if Memcached or Redis is active on your server.
Object Cache
Object caching is disabled by default, to enable it just select ON.
Below the OFF/ON choice you’ll find a panel with the status that tells you if Memcached or Redis is enabled. On our servers for example Memcached is active, in this case then next to the Memcached Extension you will see the word enabled as shown in this screenshot:

Method
In this section, you can choose one of the two options, either Memcached or Redis.
Host
Here you have to enter the host name or IP address used by the cache system. Usually, the default option should work, which is localhost unless you are using a UNIX socket.
Port
As you can guess, you have to enter the port used, usually, you can leave the default option. If, however, you are using a UNIX socket you must enter 0 as the value.
Default Object Lifetime
This allows you to define a time interval to refresh the cache, the default option is 360 seconds. You can change it, but the best choice is always to set a narrow interval.
Username e Password
These options are only available if you are using the Memcached caching method and SASL is active.
Redis Database ID
Here you have to enter the database to be used. It applies only if you are using Redis.
Global Groups
A number of groups are already entered into this list, but you can enter more (one for each row). Groups in this list will be cached.
Do Not Cache Groups
In this list, you can insert the groups you want to exclude from the cache.
Persistent Connection
When it is ON it allows to speed up the caching operations.
Cache Wp-Admin
Normally you can leave it OFF. By enabling it you have a greater speed, but you also risk seeing information that is not updated, by retrieving them from the cache.
Store Transients
The default option is ON. In any case, it is necessary to enable them when Cache WP Admin is disabled.
Cache -> Browser
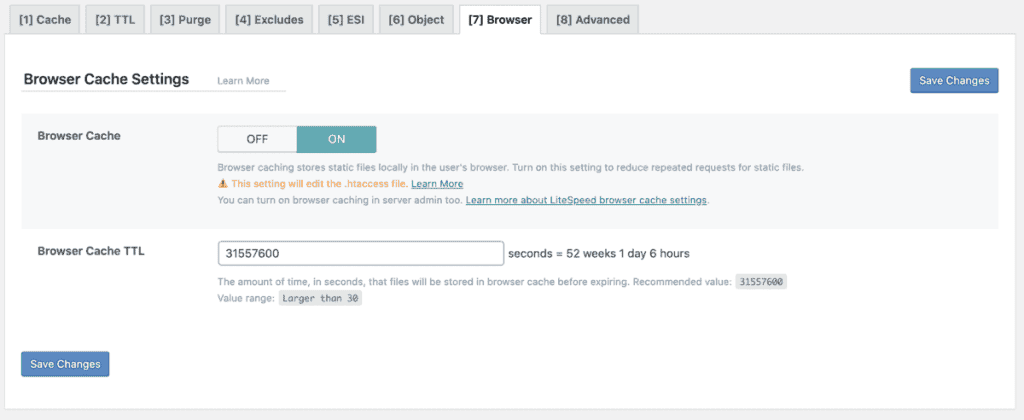
This tab allows you to activate the browser cache.
Browser Cache
By enabling browser caching (ON), files will be stored locally on the device used by the user.
Browser Cache TTL
You can set the time interval for cache storage. The default option is 31557600 seconds or 1 year, but you can set the interval you want, for example, 30 days (2592000 seconds).
Cache -> Advanced
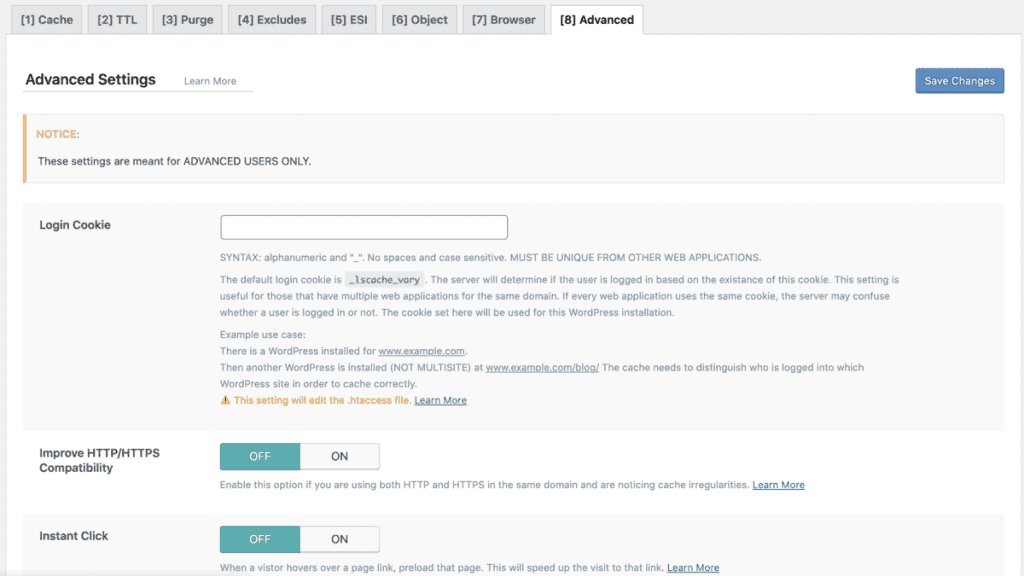
Cookie Login
This option is useful if there are multiple web applications (as well as more than one WordPress installation) on the same domain. Configuring this option allows the cache plugin to distinguish which of the applications each user is logged in.
Improve HTTP/HTTPS Compatibility
If both HTTP and HTTPS protocols are used on a single website, conflicts in caching may occur. Enabling this option solves this kind of problem.
Instant Click
Before clicking on a link, users tend to hover over it with the cursor. Enabling this option allows pages to be preloaded before the link is clicked.
This way, when the link is actually clicked, it will load faster. Keep in mind, however, that when this does not happen (and the link is not clicked) the server resources are used unnecessarily.
Cache -> WooCommerce
After the Advanced tab, another tab related to WooCommerce is shown. This happens only if you have installed and activated this plugin.
This tab allows you to manage cache options related to the plugin for your eCommerce. For example, by enabling the Privately Cache Cart you can activate the private cache to cache products placed in the shopping cart.
CDN -> CDN Settings
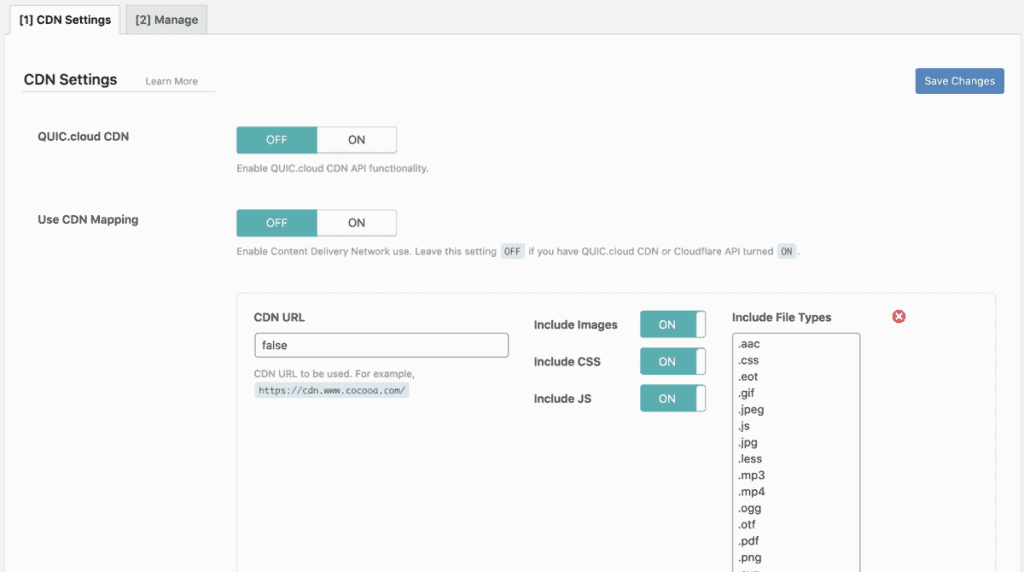
This tab allows you to access the CDN settings.
QUIC.cloud CDN
If your server doesn’t use LiteSpeed you need to use QUIC.cloud, in this case, you need to enable this option.
Use CDN Mapping
Usually, you can leave this option OFF. This section is useful for setting up and using multiple CDNs.
Original URLs
You can leave this field as it is. You may need to enter more URLs only in case your site uses multiple URLs. In this case, you just need to enter them one by one, separated by a comma like this:

Included Directories
In this list, you can add other directories that you want the CDN to serve. Usually, it’s enough to leave the default ones.
Exclude Path
If you need to exclude some paths of the folders included in the Included directories list we just saw you can enter them in this field.
Cloudflare API
This option is valid only for Cloudflare users. In this case, you can enable the Cloudflare API and enter the required data. You’ll have to enter the email address of your Cloudflare account, the API key that was provided to you and the domain.
CDN -> Manage
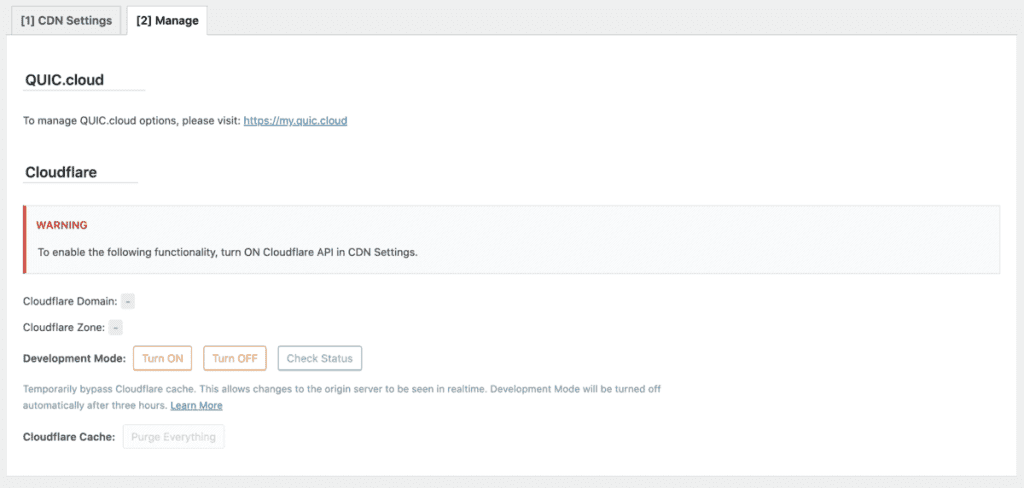
Cloudflare
This section of the management panel will only be active after you’ve activated the Cloudflare API from the settings we’ve just seen.
From here, you’ll be able to activate the Development Mode.
Also, the Purge Everything button next to the Cloudflare Cache entry will allow you to empty only Cloudflare’s cache.
Image Optimization
Image Optimization -> Image Optimization Summary
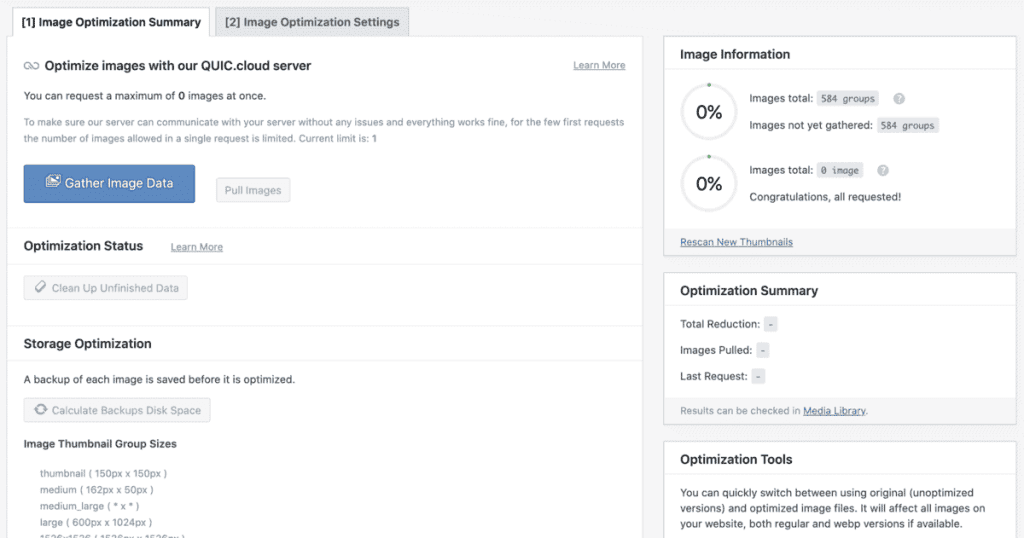
Another feature of the LiteSpeed Cache plugin is the ability to optimize your site’s images. Optimizing images is important because it allows you to load faster.
By clicking on Gather Image Data the plugin will collect the necessary information based on the images in your media library.
Eventually, this same button will become the Send Optimization Request and by clicking on it you can start the optimization process.
Note that images will be optimized in groups, so you will need to repeat this operation several times to optimize all images.
Pull Images
After optimization, the compressed images must replace those already on the site. The process is automatic, but if you need to activate it manually, just click on the Pull Images button.
Storage Optimization
The original compressed images are stored as a backup. From this section, you can see how much space they occupy. Just click on: Calculate Backup Disk Space.
If, on the other hand, you want to delete the original image backups you can do so by clicking on Remove Original Image Backups.
Image Optimization -> Image Optimization Settings
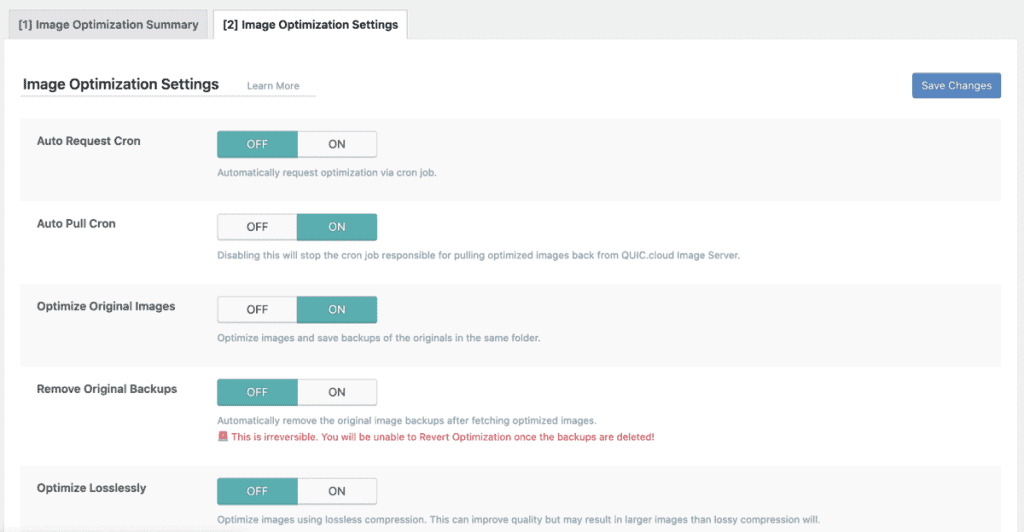
Auto Request Cron
By activating this option, the image optimization will take place automatically for every new image loaded.
Auto Pull Cron
By activating this option, the optimized images will be loaded automatically. That means you won’t need to click on Pull Images every time after the new images have been compressed.
Optimize Original Images
By activating this option, the images will be optimized and a backup copy of the original images will be created.
Remove Original Backups
The default option for this feature is OFF. If you enable it, every time the optimized images are uploaded to the site, the original images will be deleted (also the backups).
By activating this option, therefore, you will no longer have the possibility to restore the original images.
Optimize Losslessly
The option allows you to use lossless compression. This means that the image quality is higher, but the image size is also larger.
Preserve EXIF/XMP data
You can choose whether to keep EXIF data of your images, such as shooting time, GPS coordinates or other similar information, by setting this function to ON.
Remember that keeping this additional data during the optimization process will increase the file size.
Image WebP Replacement
Enabling this option will replace JPG and PNG images with the WebP format with some gain in compression.
WordPress Image Quality Control
In this field, you can manage the quality of compressed images. The default value is 82, but you can also set a different value as long as it’s less than 100.
Page Optimization
Page Optimization -> CSS Settings
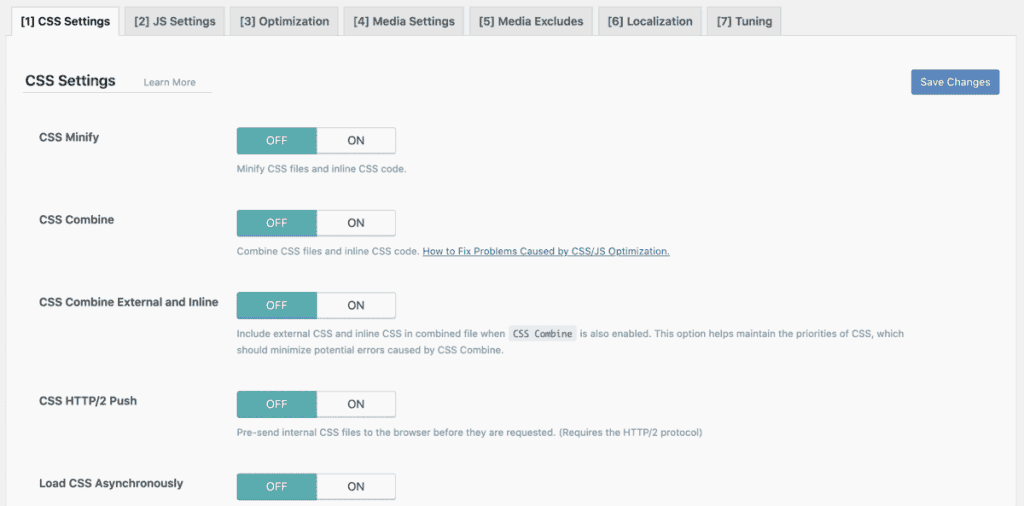
With LiteSpeed Cache, you can optimize the CSS sheets on your site. Before enabling the options in these settings for all intents and purposes, test them to make sure everything is working properly.
CSS Minify
If enabled it cleans up the CSS from comments, blanks and unnecessary submissions.
CSS Combine
If you enable this option, multiple CSS files are combined into one file.
CSS Combine External and Inline
Compared to the previous function, by activating this option the created CSS file will combine not only the internal CSS but also the external ones.
CSS HTTP/2 Push
Activating this option sends the internal CSS files to the browser before they are actually requested.
Load CSS Asynchronously
This option is disabled by default, which means that during the loading of the page the CSS is loaded first. Only after that, the content of the page is actually shown to the user.
By enabling this feature, however, the loading of HTML and CSS occurs simultaneously. As a result, the content is displayed faster, but at first, it is devoid of formatting.
Generate Critical CSS
By activating the previous function, Load CSS Asynchronously, you can also activate this option. This solves the problem of the lack of page formatting in the early stages of loading.
Generate Critical CSS in the Background
Leaving this option activated allows the loading of critical CSS in the background. Alternatively, i.e. disabling the option, critical CSS is generated in the foreground and may result in longer page loading times.
Separate CCSS Cache Post Types
In this field, you have the possibility to insert content (posts, pages, products, etc) that use different formatting. In this way, a critical CSS is generated for each of these contents.
Separate CCSS Cache URIs
If you have individual pages on your site that have different formatting than the others, you can enter them in this field.
Page Optimization -> JS Settings
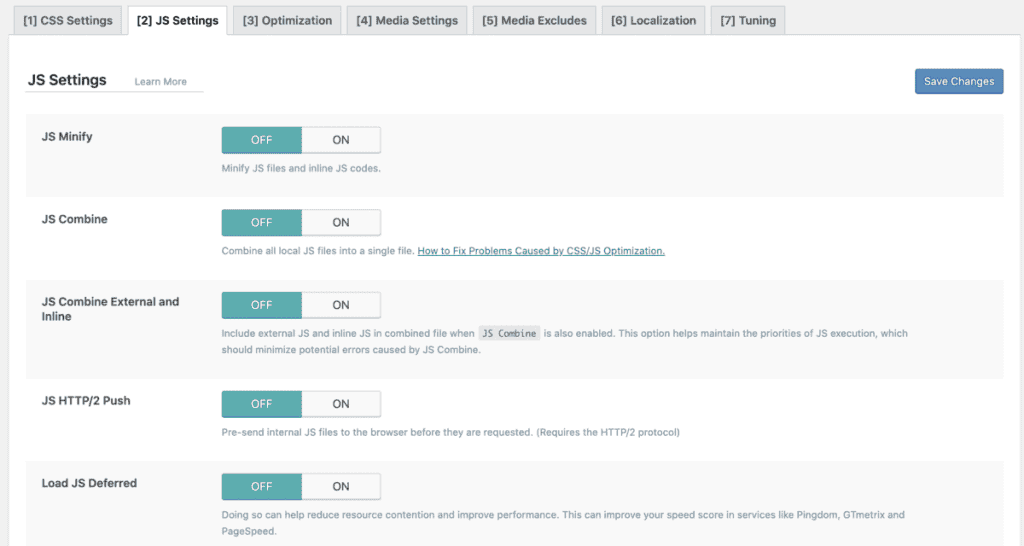
From this section, you can activate the functions we have just seen. They will affect JavaScript in this case.
Load JS Deferred
If activated, this option allows you to load the scripts only after the loading of the HTML code is completed.
Load Inline JS
This feature allows you to choose when to load JavaScripts. If you choose the After DOM Ready option the scripts will be loaded only after the DOM loading is completed and you will have fewer problems with script compatibility.
In the absence of special conditions, it is better to use the default option.
Page Optimization -> Optimization
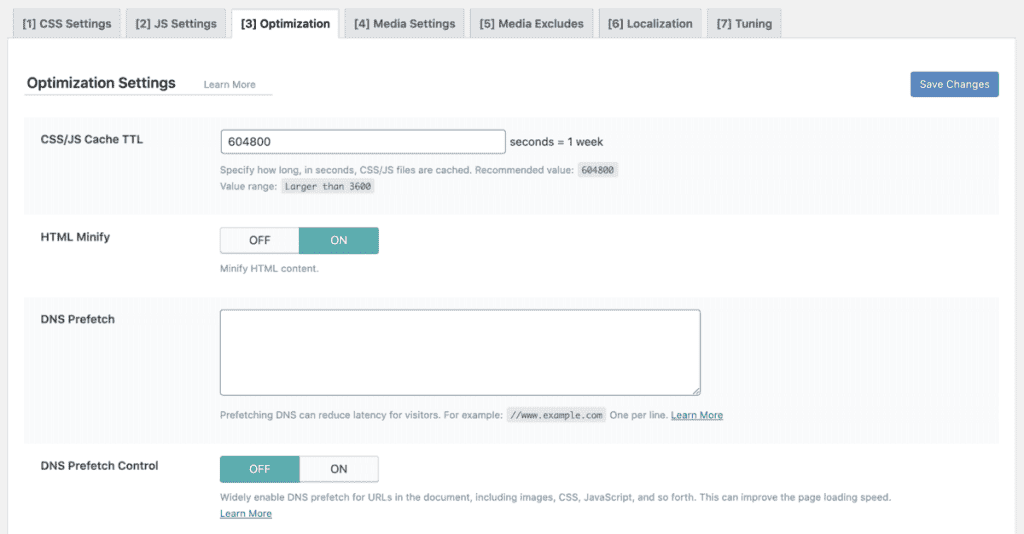
CSS/JS Cache TTL
The minified or combined CSS and JS files are saved for a certain period of time. In this section, you can choose the time interval you want. The recommended one is 604800 seconds, which is one week.
HTML Minify
The function allows you to minify HTML code.
DNS Prefetch
This option allows you to improve the DNS resolution for the domains entered in this field. This will make the loading of the entered sites faster.
DNS Prefetch Control
Activating this function will automatically prefetch all URLs on the page. Be careful because doing this could affect considerably the loading time of your pages. Better to use the previous function and choose the domains individually.
Remove Query Strings
If you enable this option, resources containing query strings will not be cached.
Load Google Fonts Asynchronously
In case you don’t want to activate this function for the whole CSS, you can activate it only for loading Google fonts. When you enable this option fonts will be downloaded faster.
Remove Google Fonts
This option allows you to remove Google fonts from your website. Before activating it, it’s always better to test its effects.
Remove WordPress Emoji
This allows you to remove the JavaScript that manages emoticons. This way, the default browser emoticons will be displayed instead.
Remove Noscript Tag
The option allows you to remove the <noscript> tags. This reduces the size of the pages, but there is less compatibility with browsers that do not support JavaScript.
Page Optimization -> Media Settings
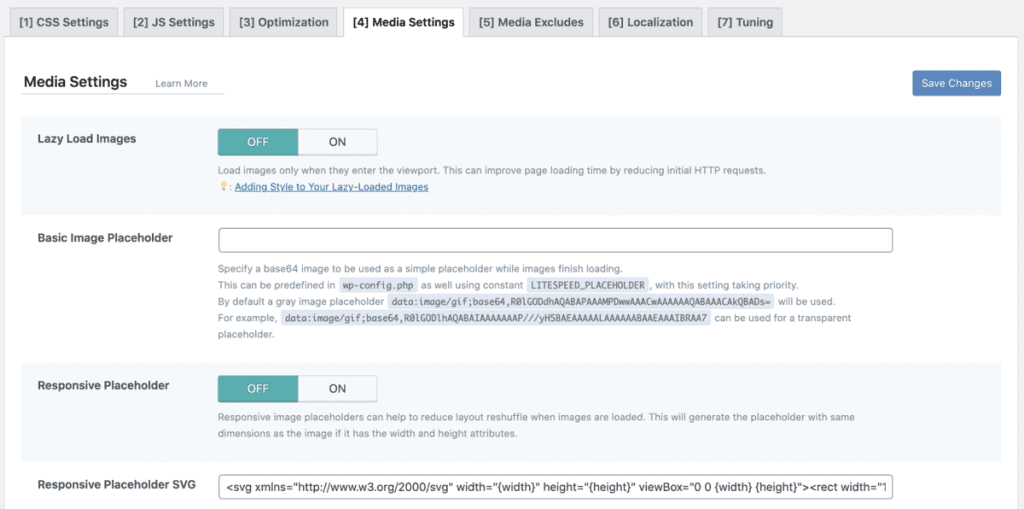
Lazy Load Images
When enabled, this feature allows images to be loaded only when they are in the browser’s field of view. This means that images are only loaded when you scroll down the page to where the image is.
Basic Image Placeholder
If you enable the Lazy Load Images feature, images that have not yet been loaded are replaced by a gray box. You can replace this placeholder with an image of your choice.
If for example you enter this string you can have a transparent placeholder:
data:image/gif;base64,R0lGODlhAQABAIAAAAAAAP///yH5BAEAAAAALAAAAAABAAEAAAIBRAA7
Responsive Placeholder
This function creates placeholders with the same dimensions (width and height) as the image that will be loaded later. In this way, the page layout does not change when the actual image is loaded.
Responsive Placeholder SVG
From this section, you can choose the SVG file that will be used as a responsive placeholder.
Responsive Placeholder Color
This option lets you choose the color of your placeholder. You can enter the RGB notation of the color you want or choose it directly with the selector.
LQIP Cloud Generator
This option uses the QUIC.cloud feature to generate a placeholder (Low-Quality Image Placeholder).
LQIP Quality
Sets the quality that the placeholder created with QUIC.cloud should have. Higher quality increases page size and vice versa.
Generate LQIP In Background
This option allows you to manage the way placeholder images are generated. If it is enabled, it allows the generation of placeholders in the background, otherwise, it works in the foreground.
Lazy Load iframes
This feature is similar to Lazy Load Images but refers to iframes instead of images.
Inline Lazy Load Images Library
When this feature is disabled, access to the JavaScript library needed for lazy load images is done through a separate request. By enabling this option the library is included in the HTML.
Page Optimization -> Media Excludes
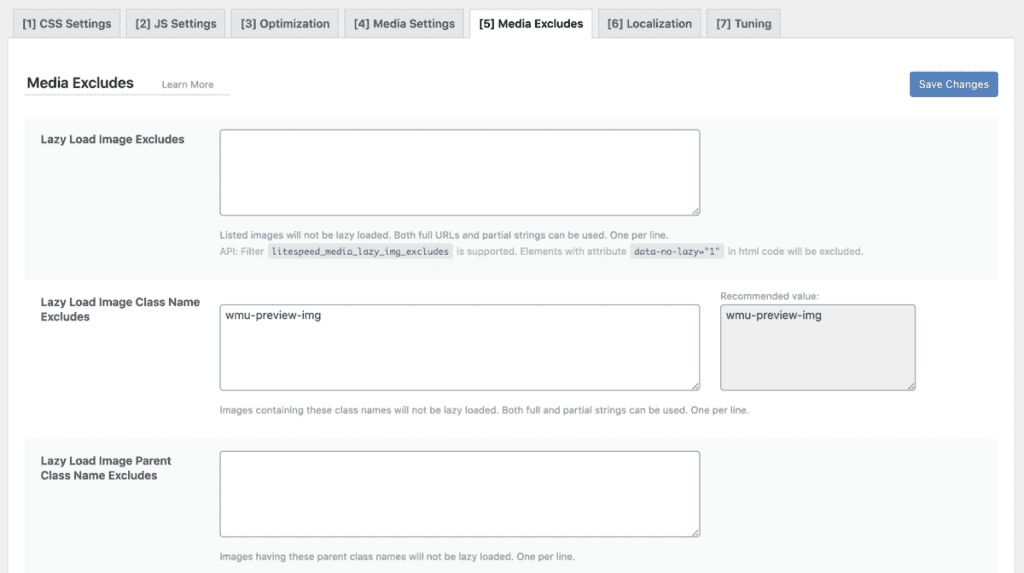
Lazy Load Image Excludes
In this section, you can insert images that you want to be uploaded instantly. In this way, you bypass the lazy load image function if you have activated it.
The next sections allow you to manage the exclusion of images. In this case, however, instead of entering the URI of the images, you can exclude them from the lazy load function by indicating other parameters that identify them.
Lazy Load URI Excludes
In this section, you can insert both images and iframe that you want to exclude from the lazy load function.
LQIP Excludes
This field allows you to decide which images should not be included in the placeholder generation. It refers to the Low-Quality Image Placeholders (LQIP) feature we saw earlier.
Page Optimization -> Localization
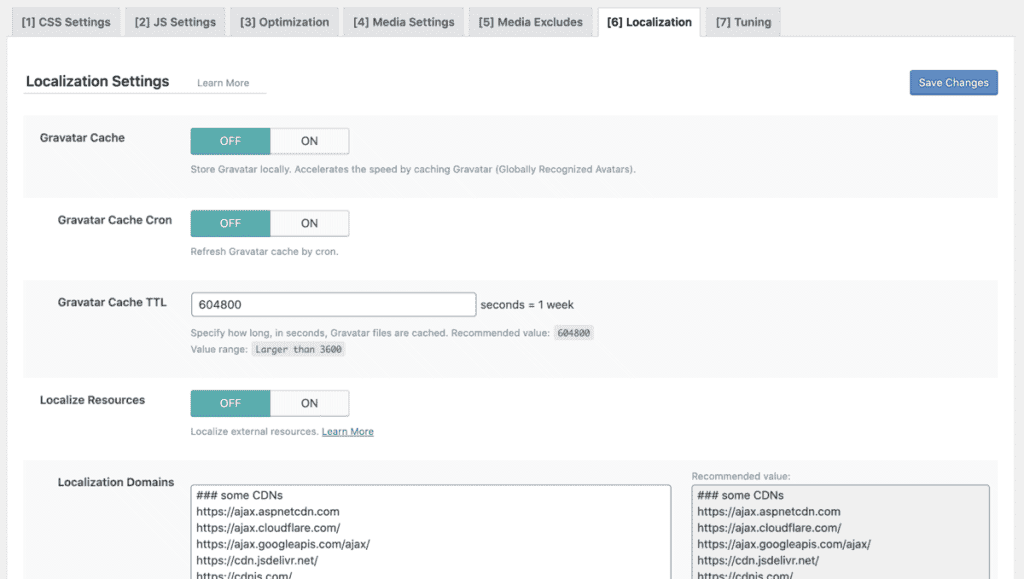
Gravatar Cache
Enabling this feature allows you to cache gravatars locally.
Gravatar Cache Cron
If you activate the cache you should also activate this function and renew the cache that stores the gravatars.
Gravatar Cache TTL
From here you can set the cache retention time, which by default is set to 604800 seconds or one week.
Localize Resources
If your site uses resources hosted in other domains, such as Google reCAPTCHA (one of the most used CAPTCHA)you can choose to copy these external resources on your domain. In this case, in the next section Localization Domains you can enter the domains where the resources you are interested in are hosted.
Page Optimization -> Tuning
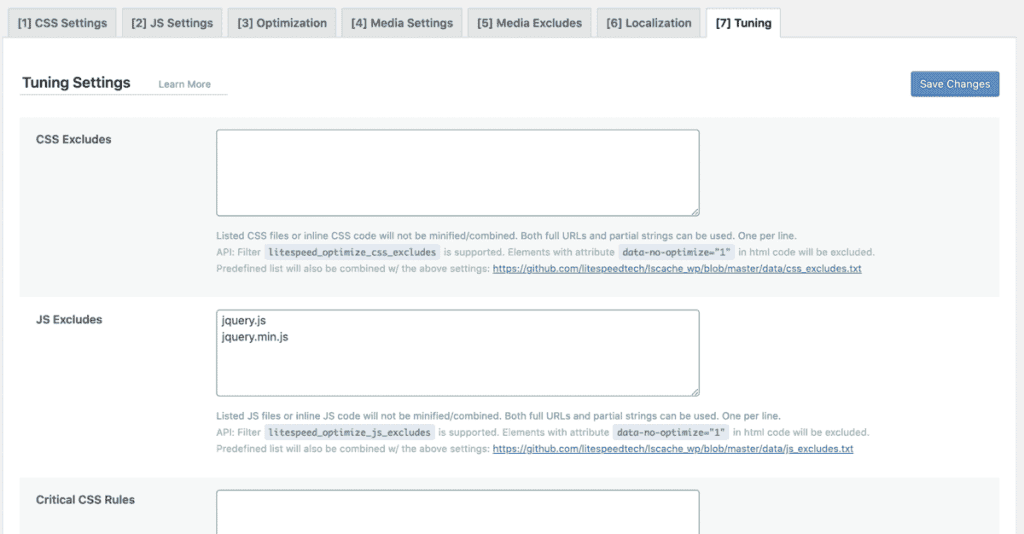
CSS Excludes
If you have activated the minify or combine functions for CSS, you can enter the CSS files to be excluded in this field.
JS Excludes
Here you can enter the JavaScripts to which you do not want to apply the combine and minify functions.
Critical CSS Rules
If you have activated the Load CSS Asynchronously function in the CSS settings, the critical CSS will be generated automatically. In this field, you can enter other rules that will be added.
JS Deferred Excludes
If you use the Load JS Deferred function you might not want to apply it to some JavaScript. In this case, you can enter them in this field, one for each line.
URI Excludes
In this section you can insert eventual pages you want to exclude from optimizations made by the plugin.
Role Excludes
You can choose whether to exclude some users, for example, administrators, from optimization.

Database
Database -> Manage
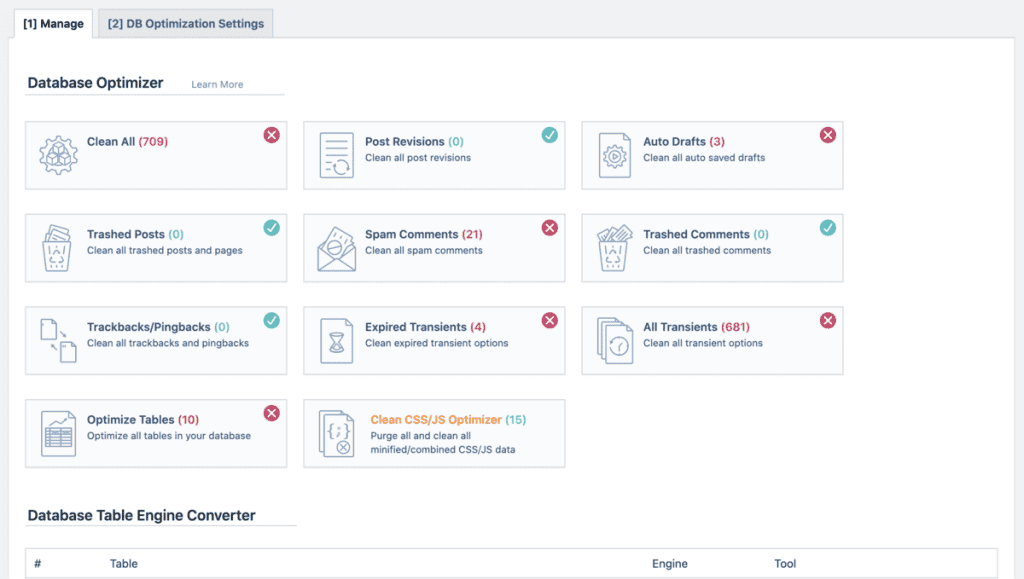
Next to each entry in this menu, you will see one of two symbols. The sections of the database with the green checkmark next to them have already been deleted, while those with the red x have not.
Clean All
Allows you to clean up everything with a single click. The last two items in the list are excluded though: Optimize Tables and Clean CSS/JS Optimizer.
Post Revisions
Allows you to delete post revisions stored in the database. Be careful because once deleted you can not recover the previous versions of your articles, but rather only the latest version will be left.
Auto Drafts
When you create and edit a post on WordPress, a series of drafts are created automatically. This way, even if you haven’t clicked Save Draft, you don’t risk losing all your progress. Click here to delete drafts. Just make sure you’ve saved or published all articles correctly before doing so, or you’ll lose the work you’ve done.
Trashed Posts
From here you can choose to permanently delete posts or pages you’ve deleted that are still in the Trash.
Spam Comments
Allows you to permanently delete comments that you have marked as spam.
Trashed Comments
Completely deletes comments that you have deleted (and were in the Trash).
Trackbacks & Pingbacks
Trackbacks that notify you if you have been quoted by another blogger and automatic pingbacks can be removed from the database with this button.
Expired Transients
A set of data called transients is stored in the WordPress database. With this option, you can delete all those that are expired.
All Transients
Similar to the previous option, but in this case, it removes all transients from the database.
Optimize Tables
It allows you to optimize the database tables. Remember that clicking on Clean All does not execute the option. It is, therefore, necessary to click on this button if you want to proceed with the optimization.
Clean CSS/JS Optimizer
It is useful to do this if you use the CSS and JavaScript functions that allow you to minify and combine files.
Database -> DB Optimization Settings
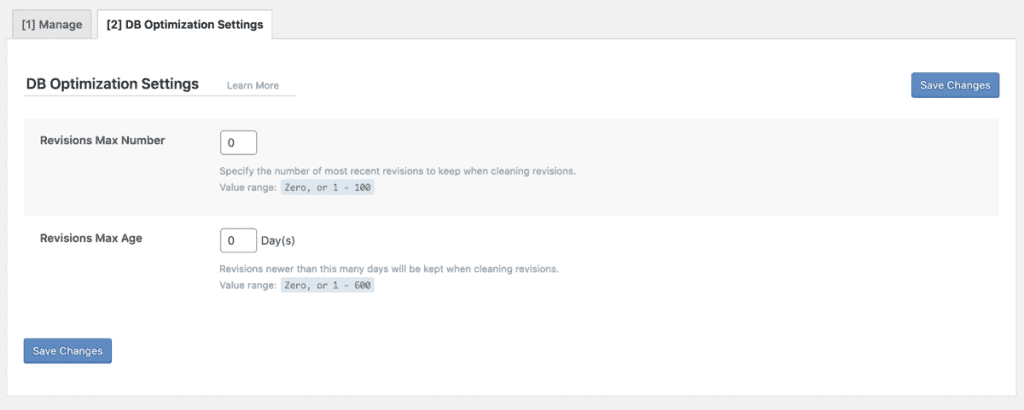
Revisions Max Number
You can choose to change the number of revisions you want to keep. The default value is zero, but if you want to keep at least one revision you can set it to 1.
Revisions Max Age
From here you can decide how many days the revisions should be kept.
Crawler
Summary
From this tab, you can check the status of the Crawler. If you don’t have the crawler feature enabled you will see a warning at the top that refers you to LiteSpeed’s guide on how to enable it.
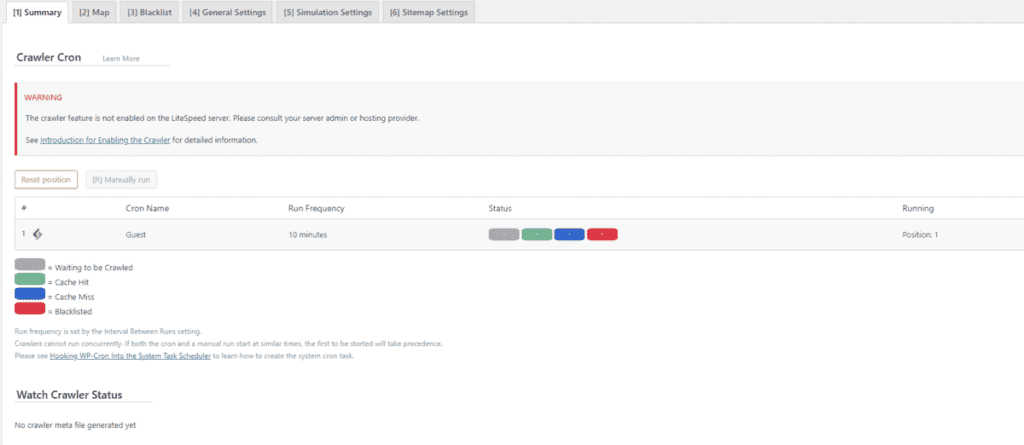
Map
After enabling the crawler, in this section you will see the URLs crawled by the crawler. If you don’t see any, click on Refresh Crawler Map to refresh the list.
Blacklist
Blacklisted addresses will appear in this tab. You can remove them one by one, or all of them by clicking on Empty Blacklist in the upper right corner.
General Settings
From this tab, you can change the settings of the crawler. Among them, you can set the number of processes allowed at the same time, the crawler activity interval and so on. It only makes sense to change these settings if you activate the crawler and your hosting allows it.
Simulation Settings
By default, the crawler simulates the behavior of a visitor not logged into your site (guest). From these options, however, you can also simulate users who are logged in, by entering one or more ids that identify them.
Sitemap Settings
LiteSpeed Cache plugin creates its map automatically, but if you want from this section you can modify the sitemap that the crawler must use.
Toolbox
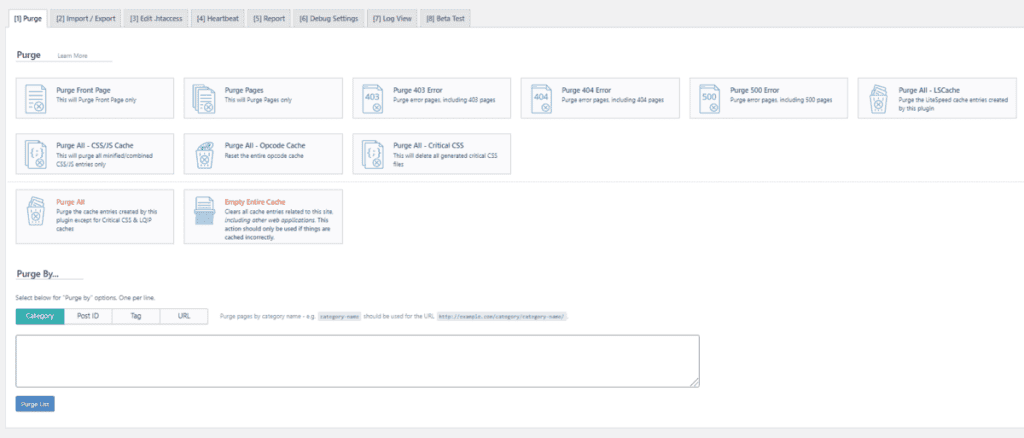
After LiteSpeed Cache configuration the operations will be done automatically by the plugin. However, if you need to empty some cache elements manually you can do it from the Purge tab of the Toolbox menu.
Purge
In this tab, you will find several buttons that allow you to clear the cache of individual sections of your site, let’s see what they are.
Purge Front Page
Purge the cache of the front page only.
Purge Pages
The button allows you to purge the cache of all pages, but not all pages of your site, only WordPress pages.
Purge Error Pages
Allows you to purge the cache of error pages such as error 403, error 404 or error 500.
Purge All – LSCache
Empties the cache, but only of the elements managed by the plugin. It has no effect on the cache of pages managed by other applications (like a second WordPress installation).
Purge All – CSS/JS
Clears the cache of CSS and JavaScript files, it is useful if you are using optimization options for these files.
Purge All – Opcode Cache
Allows you to purge the opcode cache, which is the PHP script cache.
Purge All – Critical CSS
Clears the cache of critical CSS.
Purge All
It’s as if you clicked on all Purge All buttons seen so far. It excludes the cache of critical CSS and the cache of LQIP placeholders.
Empty Entire Cache
This is used to clear the cache completely, in this case even the data saved by other applications. It should be used only if there are errors that cannot be solved otherwise.
Purge By…
This section allows you to empty the cache of a list of pages by type: categories, post IDs, tags or URLs.
Import/Export
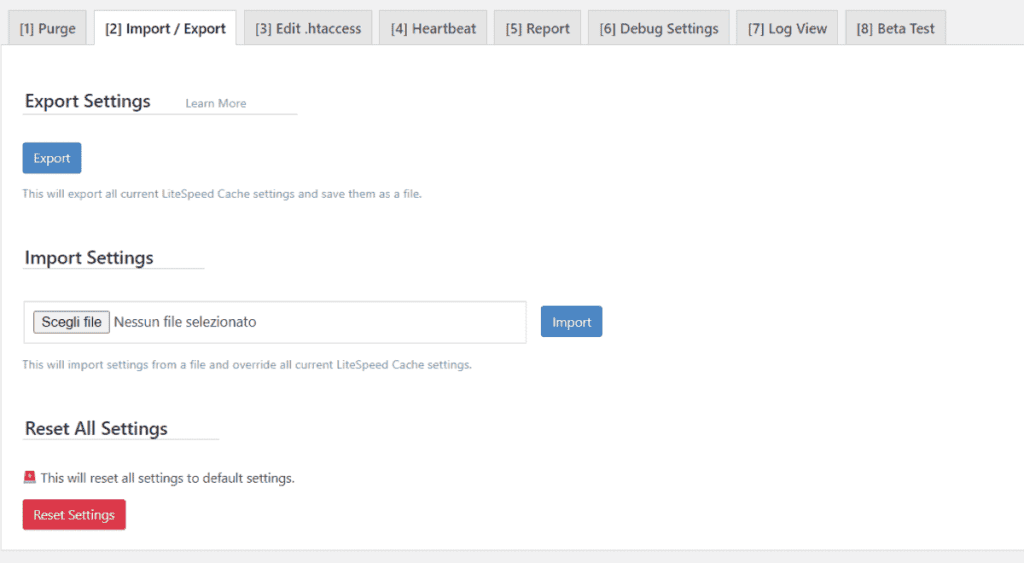
From this tab, you can save and export a backup of your LiteSpeed plugin cache settings. It can be useful if for example if you have to transfer a WordPress site.
By exporting the file you will then have to re-import it to the new site, again from this same tab.
If you are not satisfied with the way you have changed the settings and want to revert to the default options you can do so by clicking on Reset Settings. Be aware that the settings will be permanently deleted.
Edit .htaccess
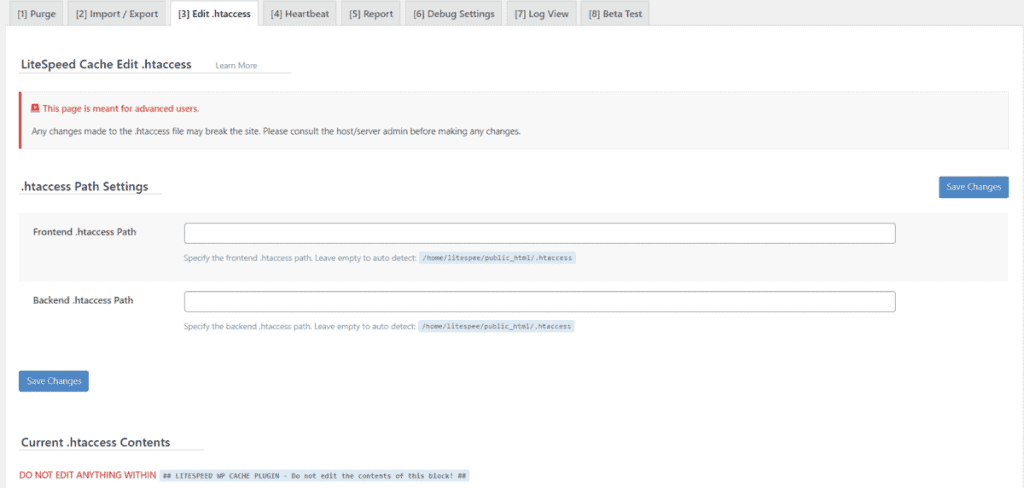
The plugin automatically identifies the .htaccess file, if not, just specify its location in this tab.
From Current .htaccess Contents section, you can make changes directly to .htaccess file
Don’t edit this section if you are not sure, because errors could affect the whole site.
Heartbeat
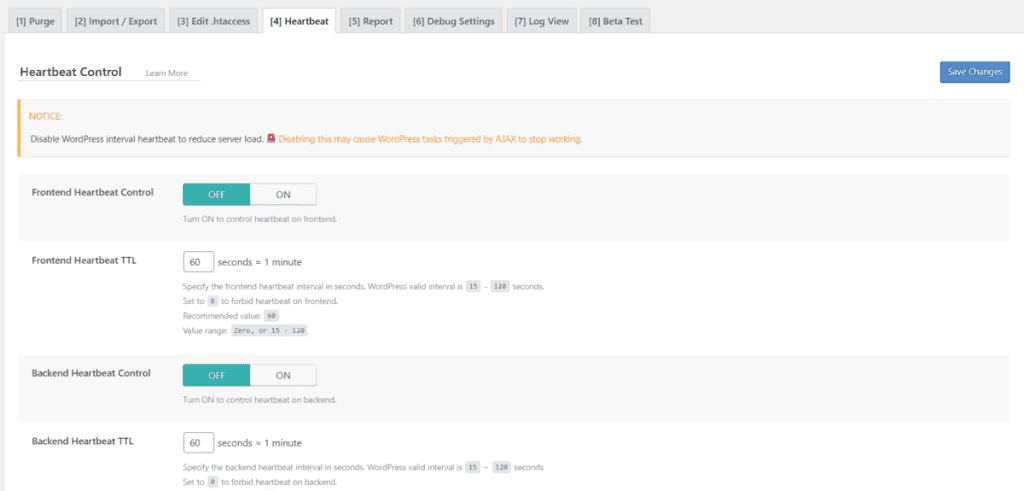
From this section, you can change or disable the WordPress heartbeat. Change these settings carefully and only do so if you know how to proceed.
Report
If you find errors that you want to report to LiteSpeed’s support service you can send a report directly from this section by clicking on the Send to LiteSpeed button.
Debug Settings
From this tab, you can temporarily disable all functions of the plugin. You only need to set to ON the Disable All Features option.
From here you can also create a debug log which you can access from the next tab Log View. You can also set a size limit for this file, the default value is 3 MB.
Log View
If you have enabled debug logs you will find the list here. From this section, you can also delete the oldest logs and keep only the recent ones by clicking on Clear Log.
Beta Test
From this tab, you can test the latest versions of LiteSpeed Cache for WordPress while they are still in development (beta).
How to check if LiteSpeed is installed correctly
If you want to check if LiteSpeed is installed correctly, you need to check the code of your website pages.
Open an incognito tab in your browser and visit a few pages on the site. Right-click on the page to view the source code.
Scroll to the bottom, if the page is cached by LiteSpeed you will see the following code:
<!-- Page generated by LiteSpeed Cache 3.6.1 on 2020-12-28 20:10:44 -->
Troubleshooting common problems
If you are experiencing errors the first thing to do is to figure out if they are actually related to LiteSpeed Cache.
Click on the plugin from the WordPress bulletin board and then click on Toolbox. Open the Debug Settings tab and next to Disable All Features click ON.
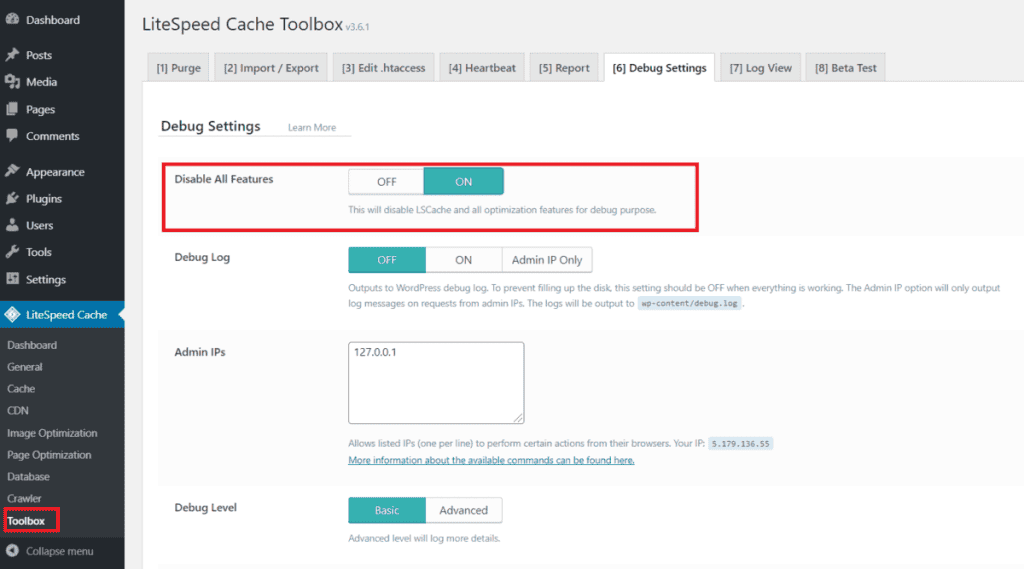
This way you will have disabled the plugin’s functions. If after completing this step, the problem you were experiencing has been resolved, it is most likely related to LiteSpeed Cache and hence the settings you used.
Compatibility with other plugins or themes
If you are experiencing problems with your WordPress site after installing LiteSpeed Cache, it may be because it is not compatible with other themes or plugins you had installed previously.LiteSpeed Cache is compatible with many plugins and themes including WooCommerce, ShortPixel and Avada. You can find a list of all compatible applications here.
In some cases to allow LScache to work properly with other plugins, you will have to change some settings. You can find specific steps to follow for each plugin in the Action Required column of the guide above.
For example, to make a Contact Form 7 work correctly you must clear the cache after creating a new form or modifying an existing one. In this case, you must also set the cache refresh time (TTL) to a value less than or equal to 24 hours.
Problems related to CSS and JavaScript optimization
It may happen that after activating some functions of LiteSpeed Cache plugin your site is not displayed correctly. In some cases, the problem may be due to a CSS or JavaScript conflict.
This tends to happen especially if you activate the minify or combine functions to merge and lighten CSS or JS files. You can identify the cause of the problem by disabling the CSS and JavaScript optimization options.
If after deactivating them the appearance of the site returns to normal you should review the settings you used or deactivate them completely.
Our tests on a real site
We used this plugin on a client’s site and measured the results with gtmetrix, we deliberately chose a heavy site.
The results were as follows:
| Fully loaded time | TTFB | Dimensions | Risources | |
|---|---|---|---|---|
| Before activating the plugin (with wprocket) | 4.2 s | 126 ms | 1.27 MB | 87 |
| Before activating the plugin (without wprocket) | 6.4 s | 1,5 s | 2.05 MB | 111 |
| With LiteSpeed with default settings | 4.1 s | 105 ms | 2.05 MB | 109 |
You can see how LiteSpeed improves performance compared to what it was before being activated. The results are clearly impressive. Obviously, the performance is similar to another caching plugin since the final result is the same, that is to create a static HTML file and provide it to the user.
The difference is in the way these static files are created, creating them server-side the load on the server is lower than creating them using PHP.
On this particular site, it’s the admin-ajax calls, that are many and take up to a second. Specific work to speed up WordPress would be appropriate.
Conclusion
In this LiteSpeed and LSCache: the definitive guide, we’ve seen how to best activate and set up the LSCache plugin to get the most out of your site hosted on a hosting plan with LiteSpeed.
We then saw what the various settings signify and how to best set up the plugin.
Finally, we saw what kind of improvement we can expect in a real case.
Have you activated the plugin for your site? What kind of improvement did you get? Let me know in the comments below.


Leave a Reply