
Have you hit the dreaded maximum file upload size in WordPress? It’s very difficult when you can’t upload the image, theme, plugin, or other media file you need. If your website is very media heavy, then this can be a big obstacle standing in your way.
Luckily, there are a variety of approaches you can take to increase this limit. No matter the level of site/server access and existing tech skills, you can find an approach below that’ll help you increase your WordPress upload size.
Below, you’ll learn how to increase file size upload in WordPress, step by step. Plus, we’ll offer some alternatives just in case your situation doesn’t let you use any of the methods we highlight.
Table of Contents
Understanding the WordPress Maximum File Size Limit
Usually, you can upload whatever you’d like to your WordPress site. But occasionally, you’ll run into an error that says the file you’re trying to upload “exceeds the maximum upload size for this site”.

Sometimes, you can get a similar error when uploading plugins and themes (but it’s more rare). If your plugin or theme exceeds the upload limit, you’ll get a warning saying, “The uploaded file exceeds the upload_max_filesize directive in php.ini”.
When these errors occur, you can reduce the file size, but if you can’t, you’ll need to increase your site’s maximum allowed file size.
Why Increase the Maximum File Upload Size in WordPress?
Here are some of the most common reasons you’ll want to increase the maximum file upload size on your site:
- You run a photography or media site and need to upload large, high-quality images
- Your WordPress theme or plugin is too large, and you’re hitting the limit
- Your articles have a lot of images and other media that go over the file size limit.
Whatever your reason, let’s look at how you can see your current maximum file size limit, then get into a few ways you can solve this problem.
Checking Your WordPress Maximum File Upload Size
Before we increase your maximum upload file size, let’s look at a few ways you can see your current limit.
First, navigate to Media > Add Media File in your WordPress dashboard. At the bottom of the upload window, you’ll see your maximum file size listed.

You can also navigate to Tools > Site health and then click the Info tab at the top. Then, locate the Media Handling section. In the Maximum size of an uploaded file section, you’ll see your current upload limit.

6 Ways to Increase the Maximum File Upload Size
There are a lot of different ways to increase maximum upload file size in WordPress. You won’t be able to use every option below since some depend on which hosting provider you’re using. However, we’ll cover a few different methods, so hopefully, one of them works for you.
With that said, let’s show you how you can increase the maximum file upload size:
1. Contact Your Hosting Provider
If you don’t want to tinker around with your own hosting and website files, then the quickest and simplest approach is to get in touch with your hosting provider. Increasing the file upload size is a very common task for tech support, so most hosting companies will be able to resolve this issue quickly.
If you’re using SupportHost WordPress hosting, then simply submit a support ticket and our team will get to work increasing your upload limit.
2. Change Your File Upload Settings from Your Control Panel
If you’re using a web host that supports cPanel like shared hosting or WordPress hosting, then you can change your file upload settings from here.
First, log in to cPanel and then search for MultiPHP INI Editor. You’ll find it inside the Software section of your hosting tools.

There are two different modes we can use to edit the files, Basic and Editor mode. We’ll show you how to change the maximum file upload size using both methods.
Note: You only have to use one method to change the file size. Simply use whichever method you prefer.
This solution will also work if you encounter the ‘The Link You Followed Has Expired’ error.
Using Basic Mode
First, choose your website domain from the drop-down menu in the Select a location section.
Then, you’ll need to adjust three different sections:
- post_max_size
- upload_max_filesize
- memory_limit
Note, that post_max_size needs to be equal or greater to upload_max_filesize. Also, memory_limit need to be higher than or equal to post_max_size.
In the example below, we’ve set the memory limit to 1000M, the post max size to 512M, and the upload max size to 512M. Once you’re happy with your changes, make sure to click the Apply button.
Here’s how it looks inside cPanel:

Using Editor Mode
Inside editor mode the process will be relatively the same. First, select your domain name from the drop-down menu. Then, you need to adjust post_max_size and upload_max_filesize and make sure the memory_limit is sufficient. Once you’re satisfied with the changes, click the Save button.
3. Edit the php.ini File Settings to Increase Memory Limit
Another way you can increase the maximum file upload size is to change your php.ini file directly. We’ll be making the same changes to the file as we did above. But we’ll be making the changes directly instead of going through cPanel.
So, if your site doesn’t support cPanel, then you can still modify the files directly. If your host doesn’t let you change your core website files, then you’ll need to use a different method or even consider switching hosting if you want more website control.
Another important thing to mention is that before modifying any files, you’ll want to create a backup of the file so you can always restore it to a previous version if things go wrong.
To modify the php.ini file, you’ll need to connect to your server via a tool like FileZilla or Cyberduck and navigate to your public_html folder and locate the php.ini File.
Then, modify the following lines (replacing your preferred values), just like you did above.
upload_max_filesize = 64M
post_max_size = 64M
memory_limit = 1024M
4. Modify Your .htaccess file to Increase Maximum File Upload Size
Another way to change the maximum file upload size in WordPress is to add code to your .htaccess file.
Since you’ll be modifying core website files here, it’s always a good idea to make a backup of your configuration files, just in case you need to restore them to a previous version.
To make this file visible, you might need to enable a setting within your hosting backend. First, fire up cPanel, navigate to File Manager, click Settings, and then make sure the checkbox Show Hidden Files is checked.

After that, you need to either open the .htaccess file via File Manager, or use a tool like FileZilla (shown above). Then, you’ll need to adjust the following lines of code in the file, or if you don’t see them, you’ll need to add them to the file.
php_value upload_max_filesize 100M
php_value post_max_size 100M
php_value memory_limit 1024M
You’ll notice the values are the same across every other method mentioned above, so simply change the memory size so it’ll support the size of files you want to upload.
5. Use a WordPress Plugin to Increase Maximum File Upload Size
If you don’t feel like changing any of the existing configuration files on your website, then you can use a WordPress plugin to do the heavy lifting for you. If your hosting provider doesn’t let you change core website files, then this also might be your only option.
But keep in mind that this plugin needs to stay active on your site for the file upload increase to remain active. If you deactivate or uninstall the plugin, then your file upload size will default back to the original.
There are a variety of different plugins to choose from, and all basically accomplish the same feature.
However, we’ll be using the Big File Uploads plugin since it’s one of the highest-rated file size increase plugins and is being used by over 100,000 other WordPress sites.
The first thing you need to do is install and activate the plugin. Once it’s activated, navigate to Settings > Big File Uploads. After that, you can choose between setting a fixed upload for all users or setting a custom rule based on user type.
To change the maximum file upload size for the entire website, all you need to do is enter the new file size limit into the box and click Save.
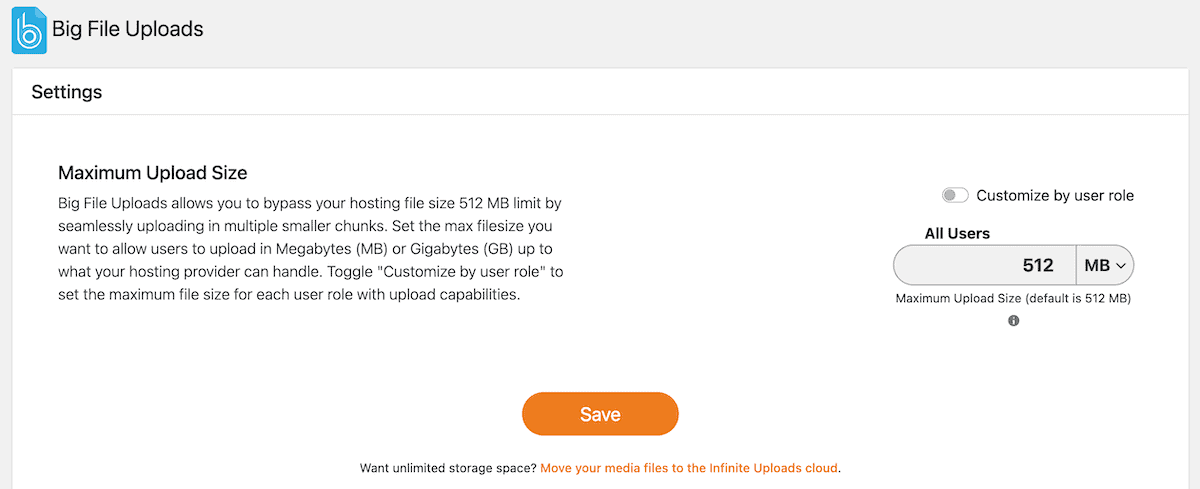
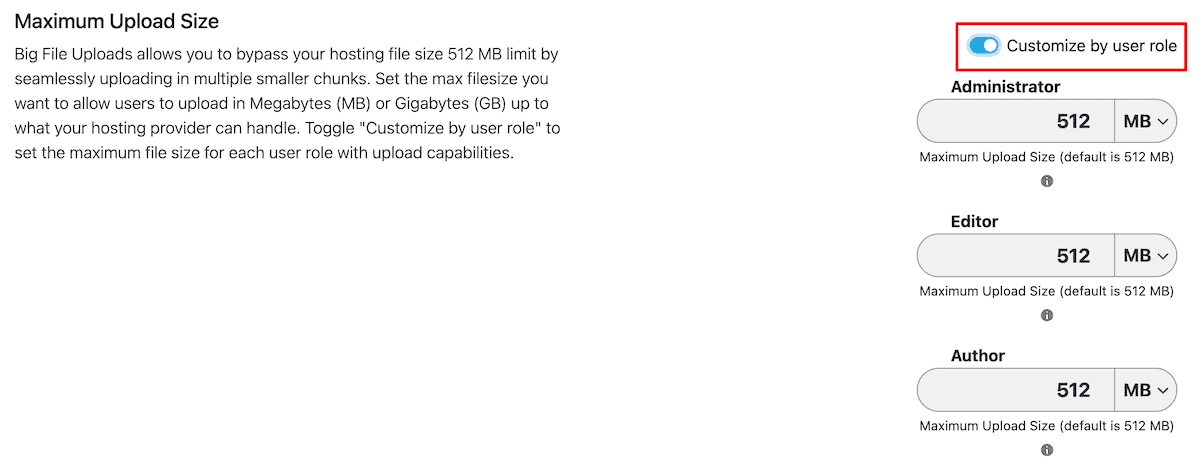
To change the maximum file size for specific users. Then, turn on the toggle that says, Customize by user role. Then, you can set the maximum file size for different user roles on your website. Once you’re finished, click the Save button.
Now, when you visit your media library, you’ll see the new maximum file size. Plus, there’s a link next to the file size limit called Change. clicking this will take you to the plugin settings page, where you can easily adjust the maximum file size.

6. Increase WordPress Storage Limit in WordPress Multisite
If you’re using WordPress multisite to manage a network of WordPress sites, then there’s one more step you need to take to be able to increase the upload size.
First, you will need to use one of the methods above to increase the upload limit. If you go directly to the steps below, then the server will ignore the changes you make.
After that, you’ll need to log in to your WordPress multisite dashboard. Then, go to Settings > Network Settings. Then, locate the Upload Settings section.
Here, you can adjust the Max upload file size to the value you just set above.

Alternatives Methods to WordPress Upload Size Increase
If you happen to be in a situation where you can’t increase the maximum file size, then you do have a few additional options. For example, maybe you’re a writer or developer working on a website, and you don’t have control over the file upload limit.
Here are two common workarounds:
1. Compress Images Before Uploading
Usually the main media items you’ll be uploading to WordPress are image files. You can optimize these images to hopefully get them under the file size limit and then upload them easily.
Knowing how to optimize your WordPress images not only gets you under the file size limits, but it can be good for SEO too.
There are a variety of tools to do this, but we recommend using a tool like Optimizilla. This tool automatically optimizes your images and reduces the file size while keeping the same quality.
You can also manually control the quality rate, which influences the file size. The higher the quality of the optimized image, the larger the file will be.

2. Upload Directly to the Server
The final method involves uploading the image files directly to your server and bypassing the WordPress upload limit. This isn’t the best approach if you need to regularly upload larger files.
But, if you only need to do it every once in a while, then it can be effective.
To do this, you’ll need to connect to your website via FTP using a tool like FileZilla. Then, simply upload the files directly to your WordPress uploads folder.
FAQs: How to Increase File Size Upload in WordPress
How do I increase the maximum upload size in WordPress?
You can increase the maximum upload size in WordPress by changing your upload limits from your control panel, editing your .htaccess or php.ini files, or by using a WordPress plugin.
How to fix exceeds the maximum upload size for this site?
To fix the exceeds maximum upload size for this site you’ll need to increase your total upload limit. You can do this by making changes to your .htaccess or php.ini files directly, modify them with cPanel, or use a WordPress plugin.
How do I upload large files on WordPress?
To upload large files to WordPress, you can upload them directly to your server by connecting to your website with an FTP client. Or, you can modify the total upload file size your site supports. You can do this with a WordPress plugin, by changing your settings inside cPanel, or modifying your .htaccess or php.ini files.
Closing Thoughts: How to Use WordPress Increase Upload Size
By now, you’ve seen several methods for increasing the maximum upload file size in WordPress. The method you use will depend upon your tech skills and the access you have to your server.
Here’s a quick overview of those methods again:
- Reach out to your hosting provider to see if they can increase the file size limit for you
- Change your file upload limits from your control panel
- Edit your php.ini file settings directly to increase your limit
- Modify your .htaccess file to increase your upload limit
- Use a WordPress plugin to increase your file upload limit
- Increase in WordPress multisite using the methods above, plus changing an internal setting.
Beyond that, you also have the option of optimizing your images to get under the file size limit and uploading images and files directly to your server.
Hopefully, one of the methods above has helped you learn how to increase file size upload in WordPress.
Now, over to you. Which of the solutions above did you use on your site? Please share in the comments below.
Ready to build your WordPress site?
Try our service free for 14 days. No obligation, no credit card required.


