On SupportHost we focus on the performance of your site, so after explaining how to speed up WordPress this article explains how to optimize images for the web with WordPress Image Pptimizer .
Images are an important part of your website. They add style to your site, but they can weigh down the page, and reducing their size too much makes the images blurry. That’s why we need to find a compromise between size, resolution and quality. Obviously after choosing the right format for the images.
In this article we will see how to optimize images from 1.6MB to 550KB without losing quality.
It explains how to optimize images to get the most out of them, both in terms of graphics and performance. If, on the other hand, you want to learn more about search engine optimization check out our article on how to optimize images for SEO.
Table of Contents
WordPress image optimizer: why do it?
Over the years I’ve had the opportunity to get involved with sites created by different people. One of the most common problems is having heavy images, i.e. images that are too large in size or too high in quality that unnecessarily weigh down the web page.
As I explained in a previous article, it is important that your website is fast if you want to be successful on the web. At the same time, it’s important that your images have high quality as they are an integral part of the graphics, which will allow you to make a good first impression.
Would you ever buy from a site that has a blurry logo? Probably not!
By checking the web statistics of httparchive we can observe that the average page on the web has the following numbers:
| Dimensions | Requests | |
|---|---|---|
| Total page size | 1999.9 Kb | 74 |
Notice that images weigh almost 50% when we talk about size and demands:
| Dimensions | Requests | |
|---|---|---|
| Total images size | 947.1 Kb | 29 |
A workflow to better optimize site images is super easy to implement, and it’s also easy to fix old images in terms of size and resolution automatically.
Optimizing images for the web has several benefits:
- Since site speed is one of the ranking factors, you may have an SEO advantage.
- You will save space and monthly traffic on your hosting/server.
- You will improve page loading times, especially on mobile, given the limitations of 3g connection.
Remember that in order to save space on the server, it can also be useful to delete unnecessary files like media uploaded to the library that you’re not using on the site. To find out how to do it quickly with the help of some plugins, you can check our guide on how to delete unused images on WordPress. Below, I ran a test on the same page, using GTmetrix, changing the connection as the only parameter.


Note the impact that page size has on loading time when using a slow connection.
Find the right compromise
Let’s take two borderline cases.
Let’s add a very high-quality photo to our page, with a 5000 px width and 4 MB weight.
Surely the quality will be optimal, but it will heavily affect the loading time of our web page, especially with slower connections.
Let’s take the same photo as before, but now let’s reduce its size and quality until it weighs 50Kb.
Surely the impact on the loading time will be minimal, at the expense of the image quality which will be grainy and blurry.
We must therefore find a meeting point to make these two borderline cases in order to find the best compromise.
So let’s see how to do it.
Choose the right format
Our goal is to find the right compromise between size, compression and format in order to have images that are both light and pleasing to the eye.
There are several formats for images, each suitable for one use rather than another.
- png: these are images of very good quality, obviously at the expense of size. They are usually used for images with few colors such as logos or illustrations.
- jpg: is mainly used for photos. This format allows us to find a good balance between the size and quality of the file.
- gif: this image format uses only 256 colors and is the best choice for animated images.
- svg: (Scalable Vector Graphics) is supported by all major browsers, including internet explorer. Since it is a vector format, images are never blurred and their size tends to be small. This format is an excellent choice for website graphics, all images that are part of the graphics of our website (such as the logo) are in svg.
- webp: is a new format developed by Google that allows you to reduce the size of images up to 34% while maintaining quality. It is still not fully supported but more and more browsers are supporting this new format. Among the latest to introduce it is Safari for OSX and IOS.
Types of compression
There are different types of compression, it’s up to us to choose which one to use. If you want to give it a try you can use this tool.
- Lossy: this is a type of filter that removes part of the data, reducing the image quality. Depending on the level the quality can be reduced a lot. Using ShortPixel will automatically reduce the quality without any noticeable difference to the naked eye.
- Lossless: This filter compresses the data but does not reduce the image quality.
- Glossy: ShortPixel uses this configuration as a middle ground between the two above, this configuration is recommended for photographers who do not want to reduce the quality of their photos for obvious reasons.
It is a filter that compresses data. It does not reduce the quality but requires the images to be decompressed before they can be rendered on screen.
You can perform lossless compression on your desktop using tools such as Photoshop, FileOptimizer or ImageOptim.Alternatively, you can also use tools like Optimizilla to compress your images directly online.
If, on the other hand, you already use LSCache as a caching plugin, you’ll be interested to know that this plugin also offers an image optimization feature. If you want, you can read our guide to Litespeed.
Image Sizes for the Web
A photograph taken with an SLR has a size of around 6000 x 4000 pixels and a resolution of 300 pixels per inch. Such a resolution is good for printing or enlarging, but not for a screen.
A full HD monitor has a maximum resolution of 96 dpi and a maximum size of 1920 x 1080 pixels.
The difference between the size of the photo and that of the monitor is the amount of superfluous data.
To this, we must add the fact that an image on your site will rarely take up the whole monitor. As a general rule, you will seldom need images larger than 1200 pixels or 1400 pixels, depending on the WordPress theme of course.
WordPress image optimizer already does a great job, it will automatically think to reduce the size of the images during upload and uses a srcset for each image, but we can do it better. Here’s how.
WordPress image optimizer – how it functions automatically
If you do a Google search you’ll find a series of posts that are nothing but a list of plugins that allow you to optimize images automatically.
These kind of articles are quick to write and easy to place on Google, but they hardly help the user, who has to choose a particular plugin and set it up properly.
We have been using ShortPixel for years and it offers a great service and a great plugin at an affordable price.
ShortPixel offers a free plan, monthly paid plans and pay-as-you-go plans. It will be up to you to decide which one to use based on your needs. Bear in mind that each image size is considered a different image. That is to say, if you optimize all sizes, the number of images to be optimized may increase.
Remember that for most sites the purchase of 10,000 “one-time” optimizations is more than enough, and the cost would be $9.99.
All in all a very reasonable cost considering the benefits this plugin offers us.
From time to time there are offers on appsumo at extremely low prices.
It is, of course, possible to optimize all images by hand, but this is a very time-consuming task that could potentially generate errors.That’s why we suggest WordPress image optimizer.
The use of a plugin allows us to perform a massive action in a short time and with excellent results. We can also change the format type, reduce the size of images that are too big and use the webp format.
Let’s have a look at the process.
A case study for image optimization
Before writing this article I created a new site using the free trial we offer with hosting WordPress. I took some images around the web, some with small dimensions, some 5000 pixels wide, and added a screenshot created with the mac, a png file 2880 pixels wide and more than 1MB in weight.
This is the result:
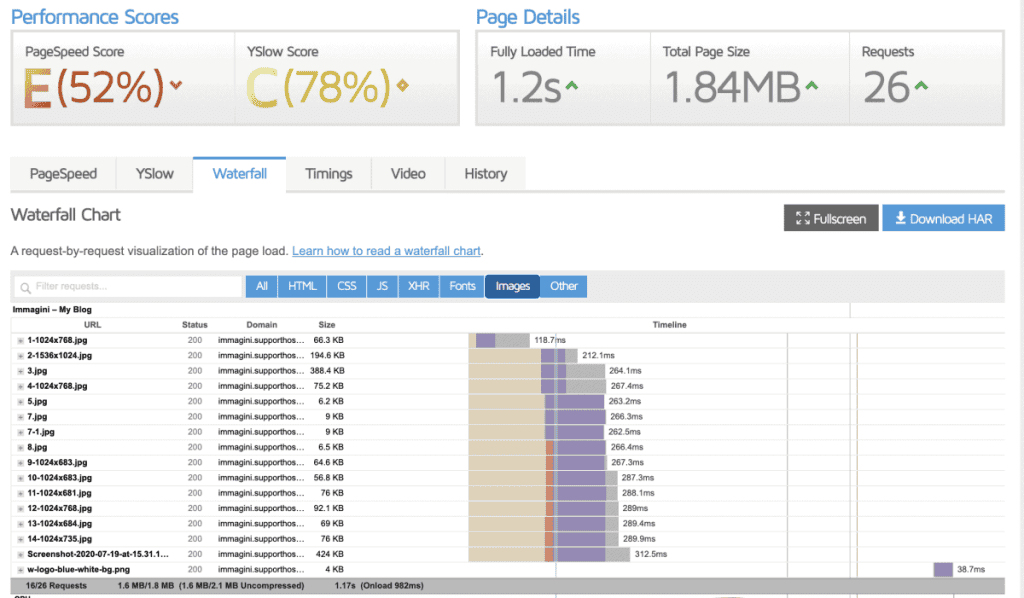
As first thing I would like to point out that WordPress performs a first “optimization” in the sense that it reduces the size of the file, if you check the waterfall in fact all the files that had large sizes have been resized to 1024 pixels wide or high.
Not what we are looking for but better than nothing.
Installation and configuration of ShortPixel
First we need to install ShortPixel, register on their site and request an API key to use the plugin.
Once we get the key we add it and set up in plugin like this, for now we’ll skip the advanced settings part, which we’ll check shortly.
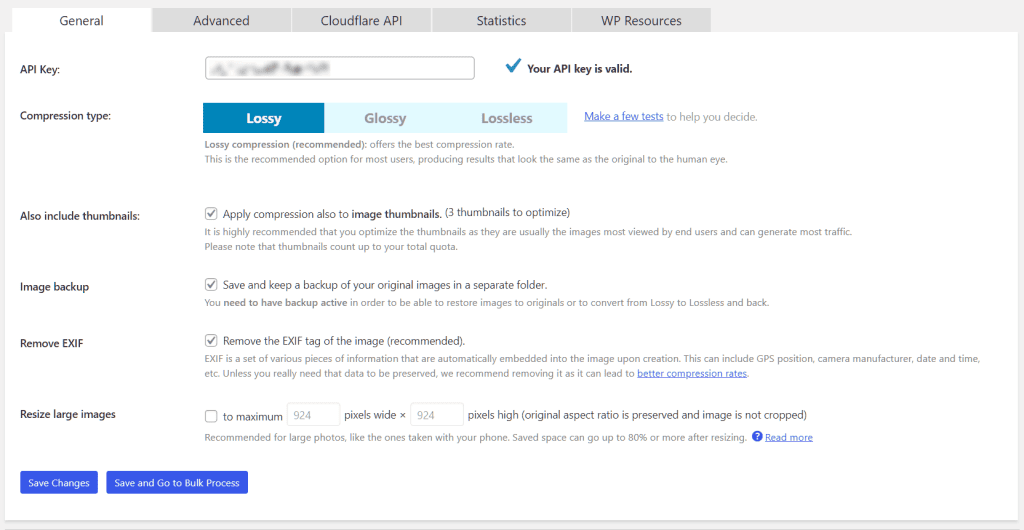
Now we can scroll down and click on “Save and Go to Batch Optimization” to start optimizing images.
NOTE: Before doing this check the rest of the guide and also set the “Advanced” section of the plugin correctly. Otherwise you’ll find yourself optimizing the same images twice and then using twice the credits unnecessarily. Here it is done in two steps to demonstrate how it works.
First optimization
Let’s launch the optimization process and see what we got.

After this first optimization the page size went from 1.84MB to 1.08MB. The total size of the images went from 1.6MB to 839.9KB. The total size of the images has almost halved.
Second optimization
At this point we are going to change the settings in the “Advanced” tab like this:
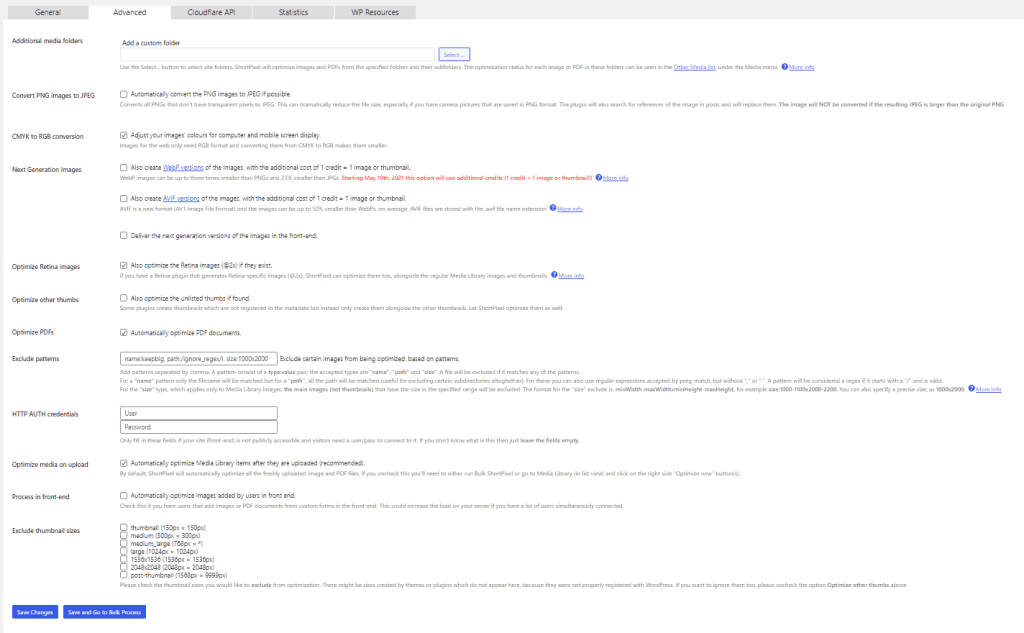
The settings I changed from the default are:
- I set the plugin to convert png images to jpg. For this option, you need to see what kind of images you have in png. In the case of SupportHost, all png are screenshots, so png format is more suitable than jpg format, that’s why we don’t use that option on our site.
- I set ShortPixel to create the webp images and to provide the webp images where compatible. After selecting this option shortpixel shows an alert telling you to check the site, so if you set the plugin the same way it checks that there are no errors of any kind.
Note that in no case the svg images we use (for example the logo) are touched by ShortPixel
At this point I deleted the metadata, this way ShortPixel no longer knows that it had already optimized the images and we can have them optimized again by creating the webp formats.
As I said before, you don’t have to do this step since you will launch ShortPixel’s bulk optimization only after everything is set up correctly.
Now the page size is down to 827KB and the total image size is 557.1KB. That’s a marked improvement over the starting position.
Conclusion
WordPress image optimizer is very important for performance. Let’s see the results we got from a “normal” site (I took images from another site, so images that you would normally find in a non-optimized site) after optimization work.
| Original | Optimized | WebP | |
|---|---|---|---|
| Total page size | 1.84MB | 1.08MB | 827KB |
| Total images size | 1.6MB | 839.9KB | 557.1KB |
In a few simple steps, we have reduced the weight of the images to almost a third, leaving their quality unchanged.
On slow connections, this translates into a substantial reduction in loading times.
Did you do a test before and after performing this type of WordPress image optimizer on your site?
Let me know the results in the comments below so I can add more statistics to this article.



Leave a Reply