
PrestaShop is among the most used e-commerce creation platforms and, to date, has over 286,000 active installations according to Builtwith data. We have prepared this PrestaShop tutorial to guide you in discovering the platform and its functions.
With this guide you will learn how to use PrestaShop: we will start with the basic configurations and the creation of the static pages of your shop. We will then move on to the creation and management of the catalog, payment methods, logistics, customers and orders.
In practice, a detailed tutorial that shows you step-by-step how to use PrestaShop to manage an e-commerce.
Let’s start with the installation and basic configurations.
Table of Contents

Install PrestaShop
To start creating your store with PrestaShop, the first thing you need to do is install the platform.
We have created a guide on how to install PrestaShop to guide you through the installation step by step.
In the guide you will find the different methods that you can follow, and you will also find out how to install the CMS locally (on your computer).
As for the installation on the server, the manual one can be difficult or at least tedious for those who are not familiar with the installation of the CMS and the transfer of data to the server.
For this we provide you with a ready-to-use solution:
you can choose one of our PrestaShop hosting plans with domain included forever, LiteSpeed and free automatic backups.
Want to put it to the test first? No problem, activate a no-obligation trial with our free hosting, from the drop-down menu choose to pre-install PrestaShop and you’re ready to go.

Initial shop configurations
During the installation process, thanks to the setup wizard, we defined the main information about the store. Among them were the name of the shop, the choice to install the demo data, the language, and the activation of the SSL certificate.

However, this information can also be changed later.
Let’s see specifically how to change the default language and the localization that will allow us to adapt our shop to different countries.
Also note that you can showcase your online store in multiple languages and create a translation for each page and product.
Access the PrestaShop back office
To login to PrestaShop you will need to connect to the path of the admin folder.
When installing PrestaShop, the system automatically creates a folder name which will look like:
/admin123
The address to access the back office, i.e., the site administration area, will therefore look like this:
https://website.com/admin123/Connecting you will find yourself in front of a page like this:

You will see the name of the shop you entered during installation, in our example above “TutorialSH”. To log in, just enter the data: email address and password that you set during installation.
Configure the default language and localization settings
After logging into the back office, one of the first settings we can change in our PrestaShop store is the localization.
If you set the language during installation, as we did, you will not need to change these settings.
Anyway, let’s see how to change the language.
From the PrestaShop back office go to Enhance > International > Localization.
Here we will first find the section “Import a localization package”. From here we can import the new language packs which include not only the language but also other essential data: currencies, units of measure, provinces, and taxes. We will return to this section later when we look at how to add more currencies to our shop.
The “Configuration” section is the one that allows us to change the basic settings of the shop:
- language
- nation
- currency
- time zone.
The language options we choose here will determine both the language used in the front end and back office.
Let’s configure the default localization settings by following the steps shown in this screenshot:

From the localization tab we can also go and modify:
- local units of measure (weights, distances, dimensions, etc)
- the advanced settings to change the language identification codes.
How to activate and deactivate the shop (maintenance mode)
If you are starting to create your e-commerce with PrestaShop, before making the site public, it is better to have completed the changes.
For this, one of the first things to do during creation is to deactivate the shop so that it is not yet visible to visitors.
To do this, follow these steps.
From the side menu access Shop parameters > General and open the “Maintenance” tab, then deactivate the “Enable shop” option by setting it to “No”:

This option allows you to activate maintenance mode on the site and make the shop invisible to visitors.
By entering your IP address in the Maintenance IP field, you will be able to view the store as if it were active.
- To know your current IP address, just connect to https://ip.supporthost.com/
- Copy the IP address.
- Paste the IP address into the Maintenance IP field and click Add my IP.
- Click Save.

If you need to, you can also add multiple IP addresses, just separate them using a comma.
From this area you can also edit the message that is shown to site visitors while maintenance mode is active.

This is what the site’s home page will look like when it is in maintenance mode:

In the next chapter of this PrestaShop tutorial we will see how to set your logo to appear in the shop and on pages like these.
PrestaShop tutorial: manage appearance and themes
PrestaShop themes are what allow us to change the look of our e-commerce.
By default, PrestaShop already comes with a basic theme: Classic.
In this section of our PrestaShop guide, we’ll see how to manage themes and change the logo in order to customize the look of our online store.
How to manage PrestaShop themes
To manage the themes in use, go to Design > Theme & Logo. Here we can see the current theme and access the theme catalog.

The theme catalog refers us to the PrestaShop addons section, the official directory where PrestaShop themes and modules are available.
How to add a new theme
From the Design > Theme & Logo section, click on Add Theme.

We can therefore choose to:
- upload the zip file of the theme from our computer.
- enter the URL where the theme is present (for example a free theme).
- import the theme we previously uploaded into the themes folder.

How to change the logo
From the Design > Theme & Logo section we can customize our shop by inserting our company logo.
Header Logo: this is the logo that will be shown on the home page.
Email logo (optional): The version of the logo we enter here will be able to be used in the emails we send to users.
By clicking on Invoice logo we can choose whether to show a different logo on invoices. Again, this is an optional choice. If we don’t insert different logos, the main logo will be used in all these sections (emails, invoices, home page).
Favicon: here we can insert the icon that will be shown in the browser tabs.
After uploading your logo images, remember to click Save to make your changes.
PrestaShop tutorial: how to manage modules
Along with the themes, another aspect that deserves close attention is the PrestaShop modules. Modules are extensions that allow us to add new functions to e-commerce.
Any examples?
With the modules we can activate new payment methods or synchronize our site with the shop created on a marketplace like Amazon and sell online using multiple channels.
With PrestaShop, the modules are installed directly from the back office. In this section of our PrestaShop guide we will learn how to manage them.
Manage installed modules
To see all the modules installed on our PrestaShop site go to Modules > Module Management.
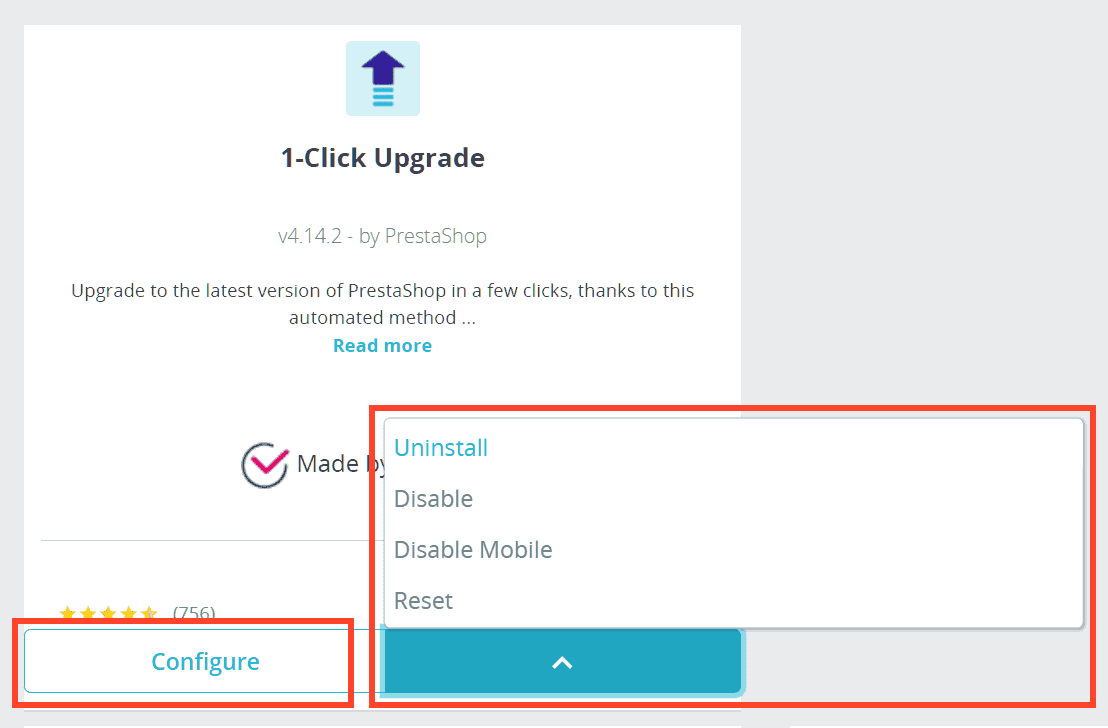
Here we will find the list of all installed modules and we will be able to filter them by categories or by status. By clicking on the drop-down menu under Status, we can choose whether to show: all modules, enabled modules, disabled ones.

Next to each module we see different options according to their status, as I show you here:

Let’s see what operations we can do on the installed modules.
Enabled modules will show Disable to disable the module but not uninstall it.
By clicking on the arrow next to it we will be able to access other options:
- Uninstall to uninstall the module.
- Disable Mobile version: the module will no longer be active in the mobile version of the site. That is to say that the functions of the form will not be used for those visiting the site from mobile devices.
- Reset: this button allows us to restore the default settings.
- Configure: some modules will also show the “configure” item which allows us to access the module settings.
- Update: if the system has encountered an update, the form will report this item and from this button we can proceed with the update.
Keep in mind that if your shop is active it is always good to update PrestaShop and the modules in a test version.
It is never recommended to perform updates on the active site in order not to compromise its functions. Our guide on how to create a site staging environment can help you create a test installation on which to perform changes and updates.
Find modules that need updating or configuring
How do we understand if the modules need to be updated or need to be configured in order to be used?
Go to Forms > Form Manager and then open the Alerts tab.
In this section we will see the list of modules that must be configured to work correctly:

Again, from the Modules > Module management section, by accessing the Updates tab, we can see the list of modules to update:

Install new modules
To find new modules we can go to Modules > Module Catalog. This will show us a selection of free and paid modules.
If the module we are interested in is free, we can install it by clicking on Install, as you can see in this example:

After the installation is complete we will see new options appear. In this case we will be able to access the module configuration page by clicking on “Configure”.
Or we can perform other operations such as: deactivating, uninstalling, or resetting the module.
PrestaShop guide: create static shop pages
Every e-commerce needs a catalog, but like every site it is also necessary to create other pages, for example the contact page or the privacy policy.
Our catalog will consist of product categories and individual product pages. We will see the creation of the catalog in the next chapters of this PrestaShop guide.
Now let’s see how to create a page in PrestaShop and how to assign each page to a category.
How to create a page on PrestaShop
Click on Design > Pages to access page management.
If you have installed PrestaShop using demo data, here you will see a number of pages already created as a template.

To add a new page, click on “Add a new page”.

We will then be redirected to the page creation form, which requires several collections of data.
Category page: here we have to choose the category the page belongs to. At the beginning the pages we will create will be assigned to the “Home” category which is created automatically and is the only one available.
Title: enter the page title.

The other fields are self-explanatory:

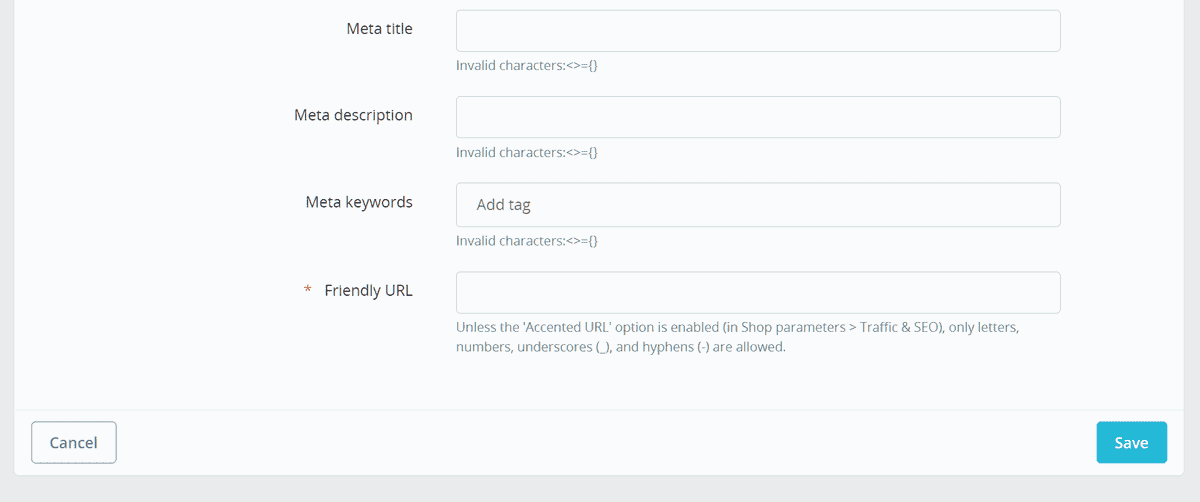
- Meta title: we insert the title tag that will be shown in search engines and in the browser tab.
- Meta description.
- Keywords: Add tags.
- Friendly URL: we can modify the slug, i.e. the final portion of the page’s URL.
- Editor: through the editor we can insert the page content with headers, paragraphs, images and so on.

- Indexing by Search Engines: If set to no, it will discourage search engines from including the page in their index.
- Shown: if set to no, the page will remain in draft before being published.
At the end, click on Save or on Save and preview to see how the page will appear.
How to create categories for pages
If there are no other categories, all pages will be placed in the “Home” category. We can create new categories like this:
1. Click on Add a new category page, like this:

2. Fill in the required fields: category name, description, title, etc.
3. Click on Save.
Note that new categories are created as sub-categories of Home.
Associate a page with a category
To modify a page that we have created and associate it with another category, follow these steps.
1. Go to Design > Pages to see the list of pages.
Click on the pencil corresponding to the page to be modified.

Let’s change the category by selecting it from the Category page box, as I show you here:

Finally, click on Save.
How to create the shop’s main menu
We have just seen how to create static pages and categories. Now we also need to create a menu for our PrestaShop e-commerce.
The menu will be displayed on the main page of our site and will allow visitors to reach the main pages.
PrestaShop allows us to create menus in a simple way thanks to an integrated module.
Click on Modules > Manage modules and look for the “Main Menu” module, then click on the Configure button, like this:

From this section we can edit the main menu of our PrestaShop site.
If you have the default data installed, the menu will consist of three items: Clothes, Accessories and Art.
We can remove the default elements and insert the pages we want to show in order to customize the menu. For example, here are the steps to create a menu that displays: Category 1, About Us Page, and Terms and Conditions of Use:
1. Select the items we want to remove from the selected items section and click on remove.

2. Select the elements to insert, among those in the Available elements box and click on add.

3. Click on Save to make the changes.
The result of our menu with the classic theme will look like this:

How to edit your footer and contact information
If you have installed the demo site content, the footer will be created automatically and will look like this.

As you can see, the store information and email address are shown. Let’s see how to modify them and then learn how to create the links that will be displayed in the footer.
Change shop information
To change the contact information that is displayed in the footer section that I showed you above, go to Configure > Shop Settings > Contact.
Let’s open the Stores tab and scroll down to the Contact Details section.

From here we can change the shop name and email address and enter additional data such as shop address and telephone number.
Edit the links shown in the footer
If you are using the PrestaShop Classic theme, your site will display a menu like this with links leading to the main pages from the footer:

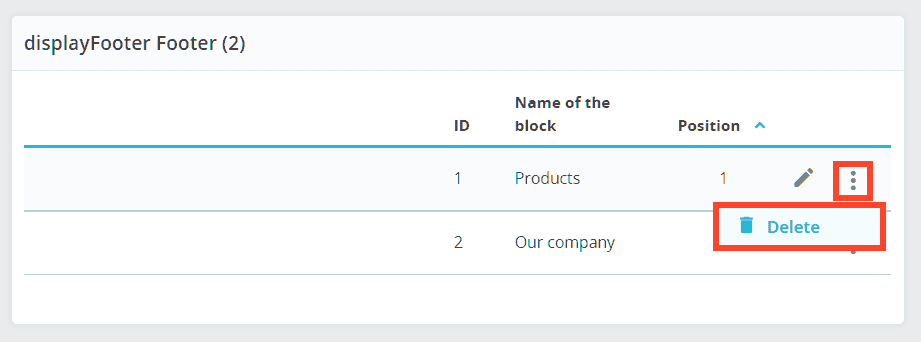
To change it, go to Design > Link List. Here we will find the building block that contains links to two columns entitled “Products” and “Our Company”, as we saw in the previous image.
To modify them we can act on the pencil icon, like this:

In the page that will open we will be able to change the name of the block and choose which pages to show. Here is an example where we’re going to create a “Featured Categories” block where we only show a few product categories:

To delete one of the columns shown in the footer we can click on the menu with the three dots and then on Delete, like this:
To add other elements, click on New block and then select displayFooter from the drop-down menu to insert the block in the footer of the pages:

PrestaShop tutorial: product management
In this chapter of the PrestaShop guide, we will show you how to create your product catalog. Let’s start with creating individual product pages.
How to access the list of products in the catalog
To create our catalog of products to sell on e-commerce, we can start by creating the first product.
If you want to easily learn how to use PrestaShop and how to create new products, we suggest starting with the default products. First we access the list of products in the catalog.
Go to Catalog > Products to access the list of all products. If you are using demo data, you’ll see a list like this here.

In the table we can see useful information for each product in the catalog:
- id
- image
- first name
- reference
- belonging category
- price (with and without taxes)
- quantity in stock
- status (active or deactivated).
From the Actions section we can modify the products or perform these other actions: show the preview, duplicate, or delete the products.

How to create and edit products
Note that editing and creating the product is similar, so in this section of our PrestaShop tutorial we will see the different options we have in the product creation tab.
We modify an existing product
To modify an existing product, go to Catalog > Products and view the list of all products. From here, click on the pencil icon corresponding to the single product we want to modify, like this:

We create a new product
To create a new product, go to Catalog > Products and then click on the “New product” button at the top, as indicated here:

At this point, the procedure is the same whether we are creating a new product or modifying an existing one. For simplicity, we will use a demo product as an example in this PrestaShop guide.
Product sheets: how many options do we have?
By accessing the modification or creation of a new product, we will see that each one has different tabs:
- basic settings
- combinations (optional)
- quantity
- shipment
- prices
- SEO
- options.
In each of these tabs we can enter specific information that will be useful both for visitors to our e-commerce (for example product images) and for our internal management (such as the cost price of the products).
Product > basic settings
The main tab “Basic settings” allows us to define the characteristics of the product.

At the top, you’ll see the name of the product, in this example “Customizable mug”.
Next to it we can find the type of product: we can choose between standard, product pack, virtual product.
Images
The top section of the Basic Settings tab allows us to insert product images.
Click on the “+” to add new images. By clicking on a single image we can go to change the caption and choose which image to set as the cover.

Summary and description
The summary is a section where we can enter a brief description of our product. The characters allowed are up to 800.
The description is a deeper description where we can use a maximum of 21,844 characters.
Functions
In this section we can define the characteristics of the products for sale on our PrestaShop e-commerce. For example, we can insert details on the material of which the product is made: ceramic, glass, wool and so on.
Using the Add a feature button we can enter different properties for each product.

Brand
From here you can associate the product with a brand.
To do this, however, we have to create the brands from the Catalog > Brands and Suppliers section. We just need to click on Add new brand, as you see above and then fill in all the required fields.

Related product
This section allows us to add similar products. These products will be shown to users who visit the product page we are creating or editing.
Combinations
If the product comes in multiple variants, for example a cup available in different colors and sizes, we can check the Product with combinations option from the “Combinations” section.
In this way, a new “Combinations” tab will be created from which we will be able to define the characteristics of the variants of our product.

Reference
In this field we can enter an internal reference code that will allow us to uniquely recognize the products in the catalog.

Price
In this section we can enter the price. It is necessary to indicate the price inclusive of taxes and the price exclusive of taxes.
From the VAT Regime drop-down menu, we can indicate which type of tax is applied. In this way the price including taxes will be calculated automatically.

Categories
From this panel we can define the category to which the product belongs. From the product sheet we can also quickly create a new category.

Click on Create category and then enter “name” and “parent category”, then click on Create, like this:

In the next chapter we will see another system for creating product categories from the appropriate section: Catalog > Categories.
Product > combinations
If we have checked the “Product with combinations” option, we will see the “Combinations” tab. We can use it to create alternate versions of our product by choosing the settings.
For example, we can make our product available in different colors and sizes.
Before we proceed though, we need to create the attributes.
Go to Catalog > Attributes and Features. Let’s see how to use this tab to create new attributes.
1. Click Add New Attribute and name the attribute “Size,” then click Save.

2. Click on Add new value. Use the “group of attributes” drop-down menu to select the attribute for which you want to add a value.
In this example, select “Size” and enter the value “S.” Click Save and add another value.

3. Repeat the same procedure to create other values, such as “M,” “L,” “XL,” and so on.
At this point, if we go back to the Combinations tab of our product, we will see the attributes we have just created, and we can combine them to create variations of color and size.

For each combination we create we can define a different price, we just need to change the value corresponding to Impact on the price.

Product > Shipping
The “Shipping” tab of each product allows us to enter additional information. If you have selected “Virtual Product” as the product type, you will not see this tab.

Here we can enter:
- the dimensions of the package.
- delivery times (there will be products that require delivery times other than the standard ones);
- shipping cost.
- available couriers: in this section you can specify if the product is shipped only with some couriers. If you want all carriers to be available for that product, just don’t select any.
Product > prices
The “Prices” tab allows us to define the retail price, as we have already seen before. In addition, here we can enter a price per unit that we need in the case of products sold by the liter or kilo.
PrestaShop also allows us to enter the cost price, in this way we can calculate the profits based on the orders we will receive with our e-commerce.
The Specific Pricing section allows us to customize the price based on certain conditions. For example, we can enter a promotion for a certain period of time. Or apply advantageous prices if the customer chooses to order a greater number of units.

Product > SEO
Each PrestaShop product that we are going to create or modify also has an “SEO” tab.
From here we can change how the product page will look when it appears in search engine results.

Check out our guide on how to optimize SEO on PrestaShop for full details.
This section also allows us to set up a 301 redirect if the page in question is offline.
Product > Options
The last tab that allows us to customize the PrestaShop product pages is the “Options” tab.
From here we can choose whether to make the product available for order and how to view it. For example, we could choose to show the product in the catalog but not have it appear in search results on the site.
The Conditions & References section allows us to insert additional information about the products. For example, we can label the product as “used” or “Refurbished” or enter an identification code such as the ISBN for books.

Then there are other options accessible from this tab, let’s see them briefly.
Personalization: from here we can define fields for products that can be personalized. Think, for example, of wanting to sell a T-shirt with personalized text chosen by the customers.
Attached files: this section allows us to attach files that will be shown on the product page. For example, you might want to include instructions for using a kettle.
Suppliers: every single product can be associated with a supplier through this panel. If a product comes from multiple suppliers, we can enter the reference of the individual suppliers and the price.

PrestaShop Guide: Manage Categories
Now that we’ve finished the chapter on creating products, let’s move on to categories. For e-commerce, creating categories and subcategories is essential to simplify navigation by users and allow everyone to find the products they are looking for.
So, let’s see how to create and manage the categories of our e-commerce.
Access the list of created categories
You can access the list of categories by going to Catalog > Categories. Here I show you what the category list looks like with predefined examples:

How to edit product categories
To modify one of the categories that we have already created, just click on the pencil icon. If the icon is not visible, click on the “⁝” symbol and then on Modify.

Note that categories that have a magnifying glass icon are those that themselves include subcategories. By clicking on the magnifying glass, we can see these associated sub-categories.

This is an example of two sub-categories, “Stationery” and “Home Accessories”, which are part of the “Accessories” category, as highlighted in the screenshot above.
How to create a new product category
To create a new category, just go to Catalog > Categories and then click on Add a new category, like so:

Creating and editing categories
At this point, if we create or modify an existing category, the procedure is analogous. We will find ourselves in front of this page which allows us to enter the details to create the new product category.

In essence, we just need to fill in the required data by entering:
- the name of the category;
- the parent category (the new one will be created as a subcategory of the one set – all categories are created as subcategories of the home);
- the description;
- the cover image;
- the SEO section (title, meta description, tag, friendly URL);
- group access (we can create categories that are visible only to “customers” – understood as users who have logged in – and not to all visitors).
Associate products with a category
After we have created one or more categories for our e-commerce, we need to associate the products with the categories.
To do this we have to go and modify the individual products and specify the category they belong to in the Basic Settings tab. You can refer to the previous chapter of this guide where we showed the creation of products in detail.
Catalog Management: Helpful Tips
When we create the product catalog for our e-commerce, we have to make sure that nothing is left out.
Some mistakes we could make are:
- leave some categories empty;
- forget to reactivate products;
- do not fill in all the important information of the products.
Fortunately, the “Monitoring” section of the catalog helps us identify these problems and fix them before putting the site online.
Let’s see some things we can do from here.
Find categories with no products
Let’s go to Catalog > Monitoring, here we will find ourselves in front of the “List of empty categories” box. If there are categories that are not associated with any product, we can display them in this list as in our example:

PrestaShop warns us to pay attention to the fact that empty categories can in turn contain sub-categories with associated products. In this list there will therefore be only the categories that do not have directly related products.
Find products that need verification
The Monitoring section also allows us to quickly find the products to which we have not associated some important information.
Specifically, we can identify products for which we have not specified these details:
- image
- description and summary
- price.

Checking this section will help us during the creation of our site and help us maintain the catalog without leaving out important information for customers.
From here we can also identify “deactivated” products. With PrestaShop, in fact, we can temporarily deactivate some products and then reactivate them later or choose whether to remove them from the catalog.

Tutorial on how to set up payment methods and currencies in PrestaShop
This section of our PrestaShop guide is dedicated to payment methods and currencies. As you already know, having multiple payment methods for an e-commerce is essential to meet the needs of all customers.
Verify and configure active payment methods
From the PrestaShop back office go to Payment > Payment Methods to view the active payment methods.
By default, we will find three modules ready to be configured:
- check,
- PrestaShop checkout,
- wire transfer.
We can configure the active modules by clicking on the Configure button next to each one. We will be redirected to the module configuration page.

For example, here I show you what the configuration of the “PrestaShop checkout” module looks like:

Add new payment methods
To add a new payment gateway, we can use PrestaShop modules. Going to Payment > Payment Methods we will find the Recommended Modules and Services section where other modules connected to payments and not yet installed are listed.
We can install them directly from here with a simple click on Install, like this:

Payment method settings
PrestaShop offers us the possibility of making payment methods available according to the currencies or countries of origin of our customers.
To manage these settings go to Payment > Settings. From here we can choose which payment methods to make available based on the country or currency.

Add new currencies
With PrestaShop we can create an international e-commerce and also accept payments in other currencies.
By default when we set the country the currency of that country is set as standard. For example setting the store in Italy, we will have the currency in €.
Adding new currencies is very simple, go to International > Localization.
From here we can choose whether to import a localization package that includes not only currencies, but also units, taxes, provinces, and languages.
We just choose the country, for example United States, select which content to import and click on Import, as I show you here:

Alternatively, we can add the currencies individually. Go to International > Localization and open the Currencies tab, finally click on Add new currency.

At this point we can select the currency from the drop-down menu and the other fields will be populated automatically, as I show you here:

If you want to add local currencies that are not included in the official list, just fill in the data manually: you will need to enter the name and exchange rate against the current currency.
After we have entered more than one currency, in the International > Localization > Currencies section we will see the updated list. This list shows the current exchange rate, if we want to update it or set it in real time we can use the “Exchange rate” box that I show you here:

How to configure shipments in PrestaShop
Another essential element in the creation of an e-commerce is the management of logistics. PrestaShop allows us to configure shipments and couriers from the back office.
To implement a logistics system we must:
1. manage the zones;
2. create couriers;
3. configure shipping (set up costs, package dimensions, etc.).
Manage zones
The first thing to do is to create Zones that correspond to the locations where customers reside.
From the International > Locality section we can access: Zones, Nations, and Provinces.
Zones
What PrestaShop calls “Zones” are the sub-regions into which the world is divided: Europe, North America, South America and so on.
From here we can see which zones are activated and deactivate the ones we don’t want to ship to.

Countries
By default, there are already 244 countries. We can add new countries by specifying id, ISO code and area of origin.
From the Country tab we can activate or deactivate the zones by clicking on the symbols in the “Activated” column, thus:

Provinces
Provinces are the individual provinces within countries, as you can see in this example:
Also, in this case we can activate or deactivate the provinces, or add new ones by clicking on the top button “Add new province”.
Create couriers
After setting up the zones, we can configure the carriers. Click on Shipping > Shipping Means to access the list of couriers. If you have demo data installed, you will see a set of default carriers.
Generally, there are always two default carriers:
- one with the name of the shop to allow the collection of the goods directly on the spot.
- another one called “My carrier” created by default.
To remove the default carriers, just select them and click on Mass actions > Remove selection, as you can see here:

You can choose whether to modify the existing couriers by clicking on Modify, or create a new one using the Add a new courier button:

After that we will have to fill in the data requested in the wizard to create the new courier:

In step 2 “Shipping destinations and costs”, we can set up free shipping and choose what type of shipping costs to apply based on the weight or price of the order.

We must therefore set the bands for example based on a weight range and for each area define the cost of shipping, as you see here:

1. fill in the range, in this case the weight range;
2. we set the cost according to the zone (we can activate several zones);
3. add a new band (optional);
4. repeat the procedure for the new weight range.
In step 3 “Dimensions, weight and group access” we can enter details on the maximum dimensions of the parcels.

In step 4 “Summary”, we can check the settings we have chosen and go back by clicking on Previous if we want to make changes.

By clicking on Finish, we complete the creation of our carrier and we will see it on the list.

Add a carrier with a pre-set form
If you want to rely on one of the main carriers, you can simplify the configuration by using a carrier module.
We can install the modules as we saw before by going to Modules > Module Catalog.
After doing so, depending on the module we have installed, a new item will appear in the Shipping menu, as you can see here in the case of the “DHL” module:

Configure shipping
By clicking on Shipping > Settings we can access the basic configurations of our shipments.
Handling

Handling charges – we can enter the necessary costs for logistics. Keep in mind that here you must enter the cost necessary to manage the shipment and not the shipping costs.
Free shipping starts at– we can activate free shipping after a price or weight threshold.
Carrier options
From here we can select the courier to use as default. We can also choose the priority with which to show the couriers, for example showing those who offer shipments at the lowest price first.

Guide to order management on PrestaShop
Order management is essential for an online store. In this chapter of our PrestaShop tutorial we will learn how to manage the orders we receive through the store.
Manage orders
To view the list of all the orders received, go to Orders > Orders and we will find ourselves in front of the complete list as you can see in this example:

The orders in this list can be opened individually to view all the information. To do this, click on the magnifying glass icon, as you can see here:

By doing so we will access the order form which contains various details.

Let’s take a closer look at the various sections.
Order actions
For each order, the first section allows us to access different actions. Available options change based on order status. Let’s look at some example situations.
If the order is awaiting payment we will be able to: update the status or print the order.
Orders that have been shipped will report several actions such as: view invoice, delivery note and partial refund.

Customer
In this section we can see the customer’s name and have information on the delivery and billing address as well as being able to access previous orders.
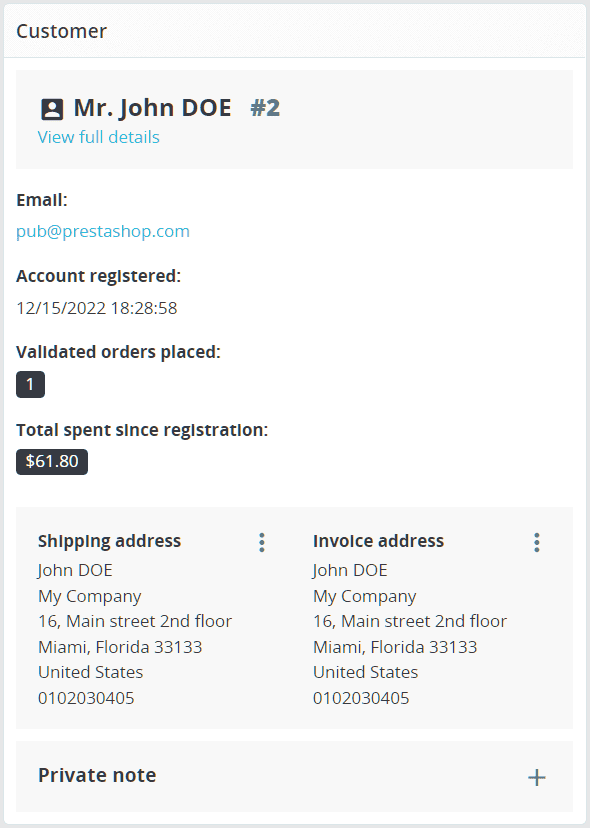
From here you can manually edit addresses or add notes.
By clicking on See all the details we are redirected to the customer file, as you can see here:

We can also access all the tabs by going to Customers > Customers and then clicking on View corresponding to the client we are interested in, in this way:

Products
The products section allows us to see the content of the order.

From here we can modify the order in several ways:
- we can add other goods by clicking on add a product;
- we can apply a discount by clicking on add a discount.
It is also possible to change the quantity of products or delete one of the products included in the order. We just need to act on the two buttons that we find in the Actions column.
Messages
From here we can send messages to the customer. By clicking on Configure predefined messages we can also create a series of standard communications to send to our customers.

This can be useful for us, for example, to notify customers of a delivery delay.
Order information
In each order file we find a section that contains 4 files: Status, Documents, Shipping means and Product return.
Status: from here we can check or change the status of the order.

Documents: this section allows us to generate the invoice or view the invoice if it already exists. Note that the invoice is created when the order status is “Payment accepted”.

Means of shipping: here we see the courier associated with the order and details such as shipping cost and tracking number.

Product return: if we have activated the returns we will be able to see the information of the return of the goods in this section.
Payment
In this box we will see the list of payments with: payment method, transaction ID, amount and invoice reference.

Manage invoices
We can view the invoices relating to individual orders by directly accessing the order list.
Going to Orders > Orders it will be possible to see in the list the orders for which the invoice has been issued. They will be those accompanied by an icon like the one I show you here:

PrestaShop also allows us to create PDF files in which to group invoices for a certain period. In this case, click on Orders > Invoices to open the dedicated back-office section.
We have several options.
We can generate a PDF file which collects the invoices issued over a certain period of time.

It is possible to group invoices by order status, for example to have an overview of canceled orders, like this:

Invoice options
From the Orders > Invoices section we can change the billing settings as you can see here:

The first option allows us to disable billing. We may want to use a different method for managing invoices, in this case we just need to disable the system’s automatic creation of invoices.
If we choose to use PrestaShop’s internal billing system, we can change the other settings from this screen.
For example, we can set the numbering and the way in which invoices will be stored.
Note that the invoice prefix varies by language. By default, if we set the shop in Italian, the invoice prefix will be: #FA, if the shop is in English it will be #IN.
PrestaShop Guide: summary and other functions
If you want to create an e-commerce with PrestaShop, the best way to learn how to use it is to start getting your hands dirty right away.
In this guide we have seen exactly how to proceed to start learning PrestaShop.
What are the logical steps to follow to start using PrestaShop?
1. Install the CMS: as we said there are several ways to avoid manual installation. You can install PrestaShop locally or start by activating a free trial on our site.
2. Configure the basic settings: add the languages you need and turn on maintenance mode until you’re ready to publish your site.
3. Install the theme of your choice or use the default one.
4. Install the modules you need (you can also do this step later when you know what modules you need).
5. Create the shop pages: create the static pages that you will display in your e-commerce, such as the contact page.
6. Create the menu of your PrestaShop site and customize the footer.
7. Create your catalog: add products and categories.
8. Configure payment methods: choose the gateways to use and add other currencies.
9. Manage Logistics: Add carriers and set rules for shipments.
10. Start managing the orders you receive: learn to understand how to manage orders, change them and take care of billing.
Since this is an introductory guide to PrestaShop, our indications for the moment stop here.
What can you do from here on out?
PrestaShop offers you many other possibilities to manage your e-commerce, more advanced functions that we have not yet explored here, but of which we present an overview.
Customer service
PrestaShop includes an internal customer service with which it allows you to manage conversations with customers. You can enter contact information in the shop parameters as we saw in the chapter “How to edit the footer and contact information”.
By accessing Customer Service, you can manage requests directly from the panel. The system is similar to a ticket management system and requests are marked with a status (e.g., open, closed or pending).
From this macro section, through Customer Service > Product Returns, you can manage product returns.
The statistics
From the PrestaShop back office we can access the Statistics section. Here we will find information on sales, and we will be able to access the data to identify the best-selling products, report on the orders received or trace the origin of site visitors.

The multiple shops
As we saw in the article on what PrestaShop is, this CMS also provides us with advanced tools. One of these is the “multi-store” function with which you can manage different stores from a single administration platform. You can consult the PrestaShop documentation for more details.
Conclusion
In this tutorial on PrestaShop we have seen how to approach the creation of an e-commerce using this very versatile CMS.
The basic functions of PrestaShop allow us to completely manage an online sales site: from creating the catalog to managing orders. In some cases, it may be necessary to expand the functions, and this is where the modules that allow us to add new payment methods or activate other integrations come into play.
With this guide, you are ready to go and start using PrestaShop to the fullest.
Was the tutorial helpful to you? Do you have any observations to make? Let us know what you think with a comment.
Ready to build your WordPress site?
Try our service free for 14 days. No obligation, no credit card required.


