
If you want to start selling online, PrestaShop is one of the CMSs that’s ideal for you. In this article, How to install Prestashop: the definitive guide we will see the step by step process to install PrestaShop, so you can start creating your ecommerce!
First, let’s see how to install PrestaShop using a quick method thanks to an automatic installer. Then we’ll see all the steps needed to install PrestaShop manually and finally, we’ll find out how to install PrestaShop locally.
Table of Contents
Installing PrestaShop: Prerequisites
There are two alternatives to start using PrestaShop and to launch your e-shop: you can start creating your ecommerce locally or use a hosting service to bring your business online immediately.
In the second case, you’ll have to choose a hosting and you can also opt for a PrestaShop Hosting plan and have the CMS ready to use. For the other plans to start you’ll have to install PrestaShop first, let’s see all the methods we have for installation one by one, starting with the easiest method.
How to install PrestaShop with Softaculous
When you want to install a CMS, the easiest and quickest way to do it is to use an auto-installer that does everything for you. With our shared hosting, semi-dedicated hosting and reseller hosting you can use Softaculous to install PrestaShop with just a few clicks.
Let’s see how to proceed straight away.
The first step is to login to cPanel, scroll down to the Software section and click on Softaculous Apps Installer to open the tool.

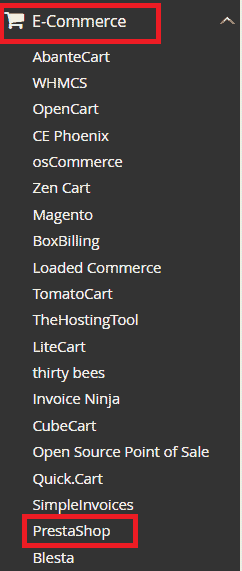
On the left, we can see a menu with a list of applications and CMS that we can install, for example, Softaculous allows us to install WordPress. The applications are divided into categories to allow us to find more easily what we need. In this case, we click on e-commerce and we find PrestaShop in the list.
In the screen that will open we can get information about the version and release date. Through the other tabs you can also read reviews and ratings or try the PrestaShop demo. Let’s click on Install Now to proceed.

Before the installation, we can choose the CMS settings. The Software Settings section allows us to choose the version of PrestaShop that we want to install. By default the last available version is set, but if we want we have the possibility to choose one of the previous ones.
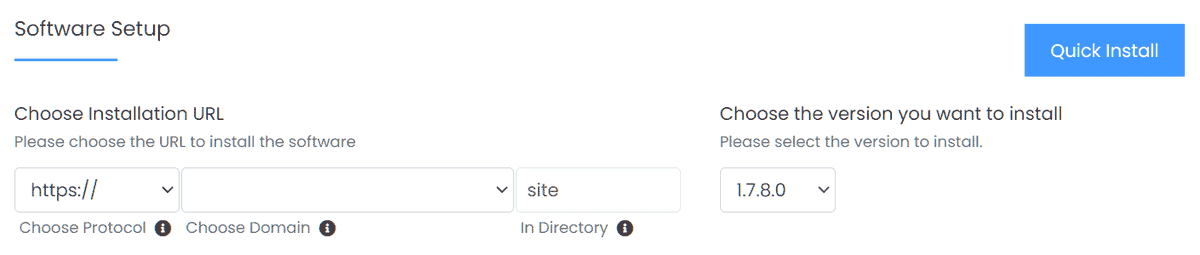
In the Choose Installation URL field, we must choose the location where to install PrestaShop. If you have more than one domain associated with the account remember to select the one where you want to install the CMS by selecting it through the drop-down menu Choose Domain.
If you want to install PrestaShop in the root you must leave the field In the folder blank, otherwise, you can specify a folder.
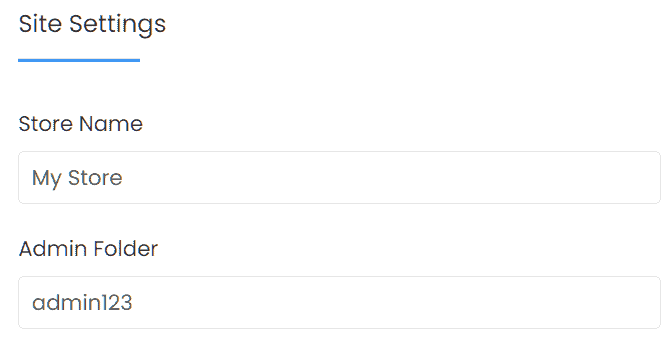
The Site Settings section allows us to choose the name to give to our store and to specify a name for the administrator folder. It is advisable not to use admin, but change the name of the folder since it will be included in the URL that will allow you to access the back office of PrestaShop to manage the site.
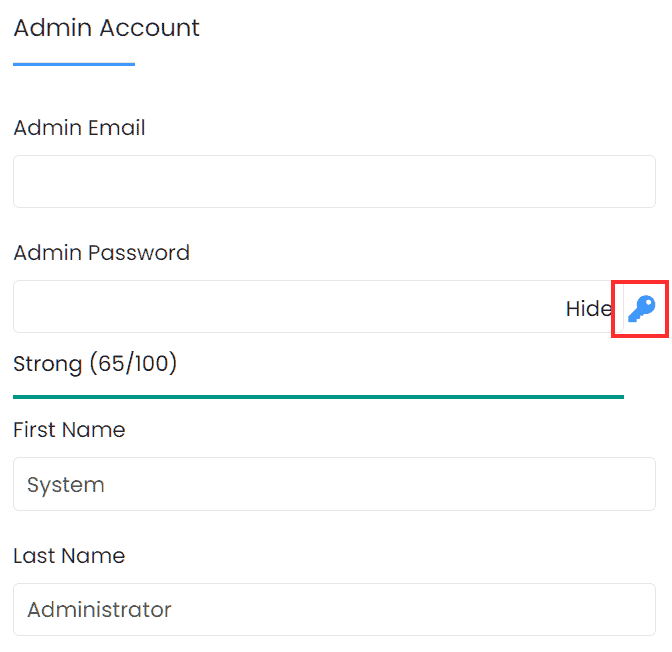
In Account admin, we will have to enter the data of the site administrator, i.e. email, password, first and last name. To generate a password we can click on the key icon.
By clicking on the Advanced Options we have the ability to change the database settings by choosing the name we prefer. These options also allow us to disable update notifications and set the frequency of automatic backups. They are disabled by default, but we can choose whether to set them and how often to do so: once a day, a week, a month or on a specific date.

By changing the value next to the Backup rotation item we can define the maximum number of backups to keep. When setting the number of backups to keep, you have to take into account the amount of space you have available on the server. If you reach the space limit you can always proceed to a disk cleaning deleting the oldest backups and keeping the recent ones.
Enter your email address in the Send installation details field and we’ll receive an installation report. At this point, we click on Install to start the PrestaShop installation.

When the process is complete you will see a screen notifying you that the installation is successful.

You can then click on the address to visit your site or on the address next to the URL admin to access the control panel.

To log in, simply use the email and password you provided for the administrator.
Install PrestaShop manually
To manually install PrestaShop the first thing to do is download the latest version (currently 1.7.7.4) from the download section of the official site.
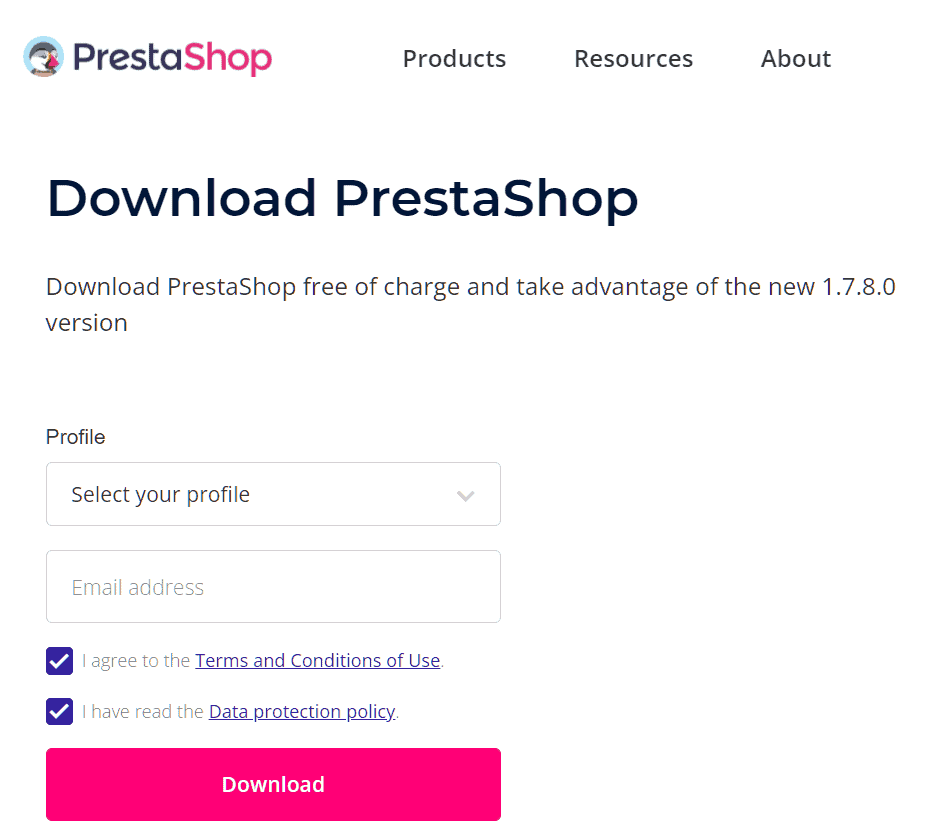
Enter an email address and click Download, then choose where to save the zip file that contains the files for the installation on our computer.
After the download is complete we will have to extract the archive, inside we will find the files that we need to upload to the server: the index.php file and the prestashop.zipper file that we will unzip after uploading it to the server.
The third file contained in the archive (Install_PrestaShop.html) refers to the installation guide and we do not need to upload it to the server.
Upload files to the server
To upload the installation files we can use the hosting control panel or an FTP client like Filezilla. In our case, we will use the cPanel file manager. Open the file manager and click on the folder where you want to install PrestaShop, usually you can use the root or the public_html folder. If, however, you want to create the installation in a subfolder or subdomain you just need to upload the files there.
Click on Upload and select the two files that interest us one at a time.

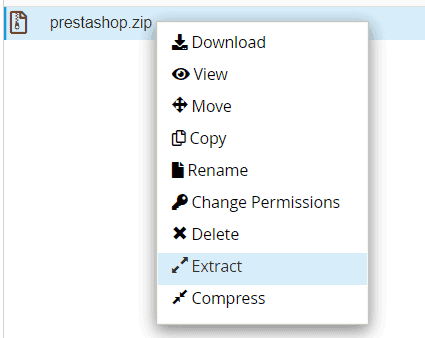
Then wait for the upload to complete and go back to the file manager.

Right-click on the archive and click on Extract, a window will open in which you have to confirm the path where you want to extract the files, click on Extract File and proceed.
Create the database
Before installing PrestaShop you need to create a MySQL database on the server. You can follow our tutorial to see step by step how to create a database with cPanel.
While creating make sure to take note of the database login details that you will need during the installation, i.e. database name and database username.
Start PrestaShop installation
Connect to the address of your site using the path you used to install PrestaShop. If you uploaded the files in the root you will just need to connect to the main domain, if you used a subfolder you will need to indicate it in the URL.
First, the installer makes us choose the language, click Next to continue.

Accept the license agreement and continue by clicking Next. The system’s compatibility will then be checked and you will be sent to the next screen where you can enter your store information.

Enter the required information: store name, type of business and country. You can choose to use demo products that will help you create more easily the products to add to the shop.

Enter the information about you and choose a password that you will need to access the control panel of the site. Once you have filled in all the required fields click on Next.
In the following step, we need to insert the data that will allow connecting the installation to the database. We need, therefore, the data of the database we created earlier.

The server address of the database: in most cases localhost. Otherwise, you will have to enter the address provided by your provider.
Database name: enter the name of the database you created earlier.
Database login name and password: here you have to enter the username associated with the database and the password.
Table prefix: you can leave the default prefix.
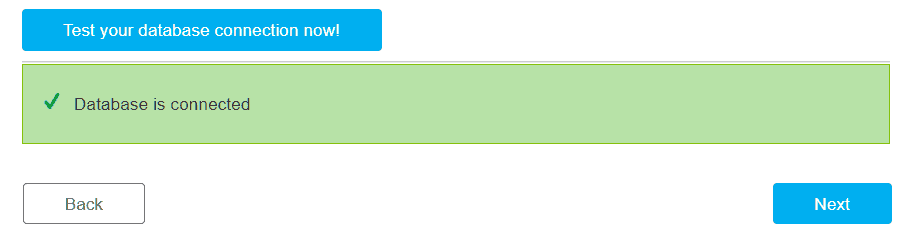
After you have filled in all the data click on Verify connection to your database now!
If the data is correct you will see a message that the database is connected. Click on Next to continue and wait until the creation of the database tables is completed and the store is configured.
In the end, you will see a summary screen with the login data.

By clicking on Manage your store you can access the PrestaShop administration panel. By clicking on Discover the store you can see how your site looks to visitors.
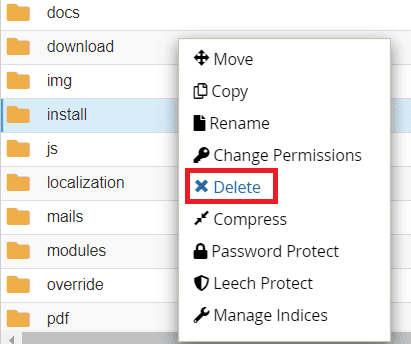
After you have finished installing PrestaShop you should delete the install folder from the server. Indeed if we try to access the administration panel a warning like this reminds us to delete the folder before proceeding.
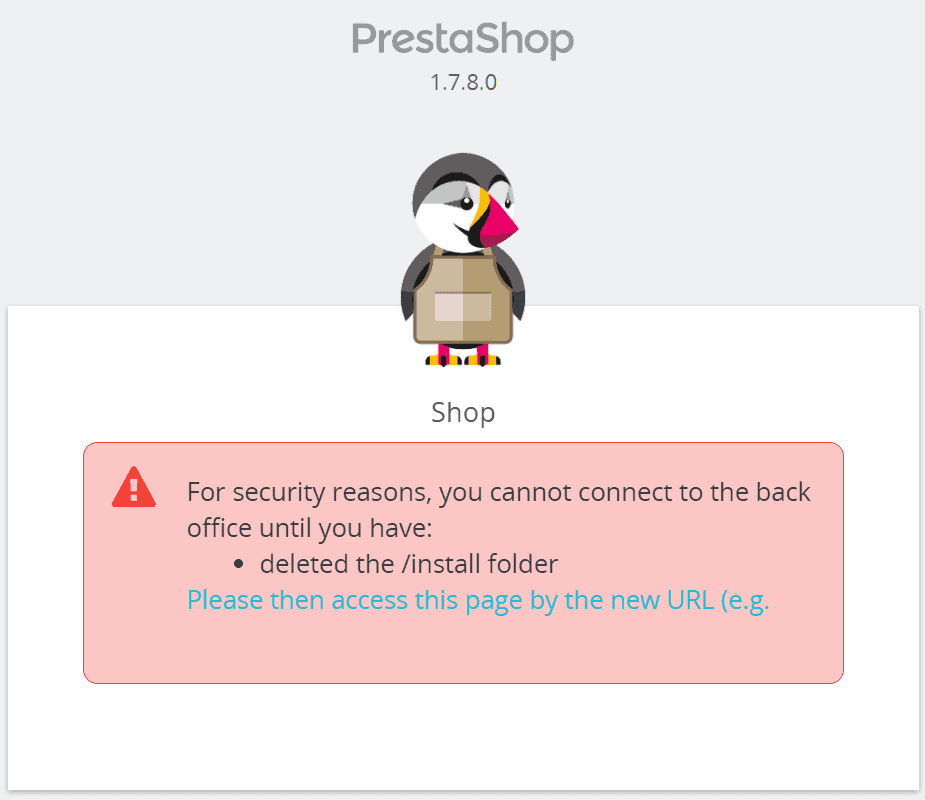
We access again the files on the server using the cPanel file manager or via FTP. Find the install folder and delete it.
After deleting the folder, connect to the URL of the administration panel again.
This time we will be in front of the login page, enter the data and log in. We are ready to create our store!
Install PrestaShop locally with XAMPP
You can also install PrestaShop locally to create your store and make all the changes on your computer before bringing the site online.
To do this, we can use a program that simulates an Apache webserver such as:
Let’s install XAMPP
In this article, How to install Prestashop: the definitive guide, we will use XAMPP for our local PrestaShop installation. The first thing you need to do is to connect on the site apachefriends.org and download XAMPP on your pc choosing the version according to your operating system.

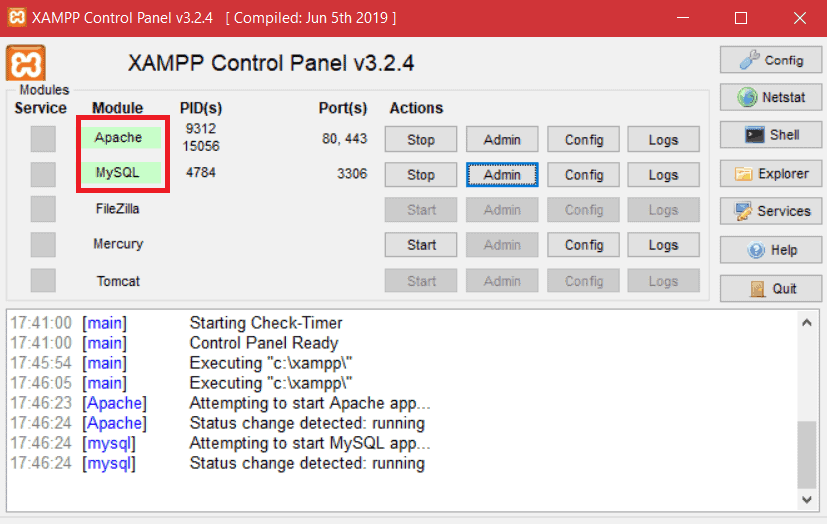
Follow the wizard and complete the installation. Open XAMPP and activate the Apache and MySQL modules by clicking on Start.
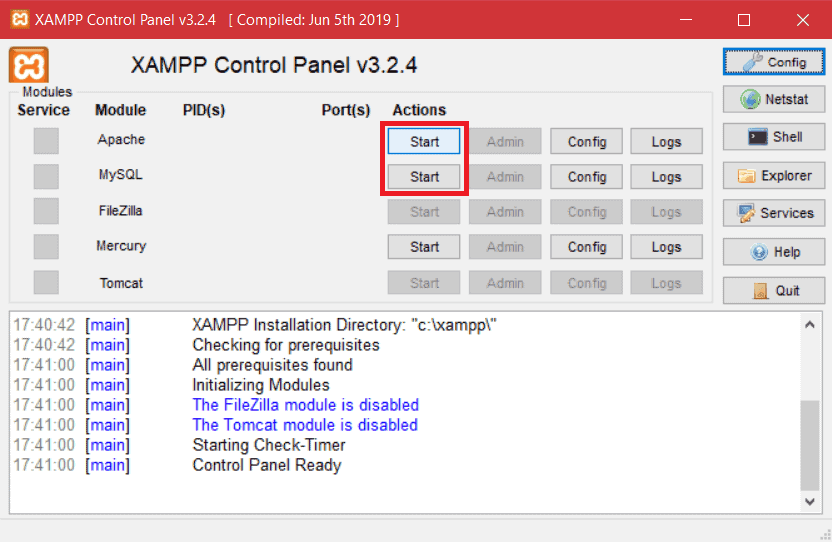
The modules will turn green as soon as they are activated.
Download the files
Now we need to download the files to install PrestaShop on our pc. Connect to the site and download the latest version.
Move the files
Now that we have the archive with the files useful for the installation we have to move it to the XAMPP folder. From the control panel of the program click on Explorer to open the folder of the program. We then open the folder htdocs and inside it we create a new folder called prestashop.

Let’s extract the zip file that we have downloaded (in our case prestashop_1.7.7.4). Inside it, we’ll find a file prestashop.zipper and a file index.php that we will have to move to the prestashop folder that we created. We can avoid moving the .html file.
We extract the prestashop.zipper file into the \htdocs\prestashop\ folder and delete the zip file.

Now let’s open the browser and visit the localhost/prestashop/ address to start the installation procedure.

During the wizard you will be asked for the data to connect the installation to the database, so you must create one before proceeding and be able to install PrestaShop.
Creating the database with XAMPP
On XAMPP click on the Admin button next to MySQL.

The browser will open the page that redirects you to phpMyAdmin, you can also go to it at localhost/phpmyadmin/.
Let’s click on Database, enter the name we want to give to our database and click on Create.

Install PrestaShop
Let’s go back to the Prestashop installation wizard (localhost/prestashop) and follow all the steps until the database is created. You can follow the detailed steps in the paragraph Let’s Start PrestaShop Installation.
When we get to the fifth step, which is the database configuration, we use the following settings.

The server address of the database: let’s leave 127.0.0.1 or localhost.
Database name: enter the name of the database we have created, in our case prest.
We leave the other fields as they are:
Database login name: root.
Database password: leave it blank.
Let’s click on Verify the connection to your database now!
The database at this point is connected as it shows us the warning, let’s click on Next and wait for the procedure to be completed.
By clicking on Manage store at the end of the installation you can see the address in the warning that tells you to delete the install folder, as you see in the screenshot below.
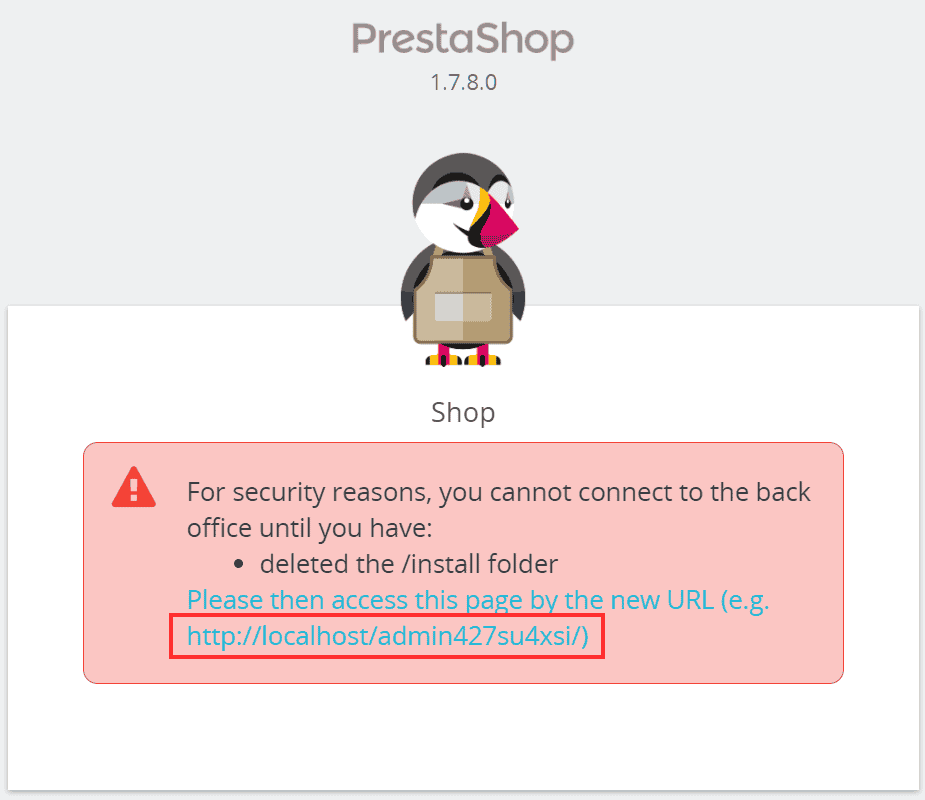
At the end of the installation, therefore, we will have to delete the installation folder present in \xampp\htdocs\prestashop\.
After deleting it we can access the administration panel of PrestaShop and start creating our store. The URL to access the Back Office of PrestaShop will be of this type localhost/prestashop/admin458/.
The last part of the address (admin458) will be replaced by a string generated automatically during the installation.
Common problems during installation
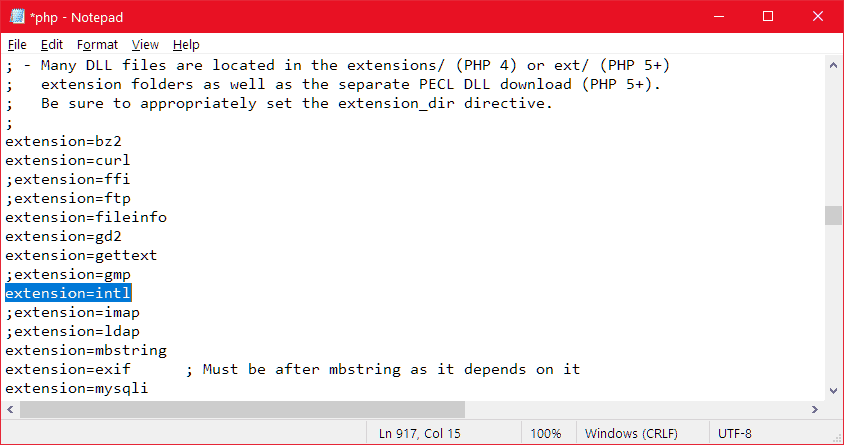
In our case at the third step of the installation wizard, we received a warning about an error in the system configuration due to the Intl extension that was not loaded.

To solve this problem we modified the php.ini file (found in \xampp\php) removing the comment on the following line extension=intl.
To make the changes effective we need to restart Apache.
Conclusion
In this article: How to install Prestashop: the definitive guide, we have seen all the ways to install PrestaShop. In addition to using a ready-made plan with PrestaShop pre-installed, we can choose from the different plans available and complete the installation in just a few clicks.
If, on the other hand, you need to proceed with a manual installation there will be some additional steps to take. As we have seen, we can also install PrestaShop locally, just as if we were following the steps of a manual installation, but on our computer instead of an online server.
Were you able to install PrestaShop? Did you use Softaculous or did you install the CMS manually? Let me know if you encountered any problems during the installation in the comments below.
Ready to build your WordPress site?
Try our service free for 14 days. No obligation, no credit card required.


