
Drupal is a powerful open source CMS that you can use to build your project on the web. In this Drupal tutorial we will discover how to get started with it.
This article aims to be a real introductory manual for those who are preparing to create their first site with Drupal. If you already have experience with this CMS, our guide may still reserve you some pleasant surprises because we will see several suggestions that will help us create a site quickly and manage it in every respect.
Let’s start immediately with the installation methods.
Table of Contents

Install Drupal
To create a site with Drupal, the first thing to do is install the CMS.
Let’s start with the quickest option: choosing Drupal hosting allows you to have the CMS already pre-installed and be able to create your site without wasting time.
There are other possibilities as well. For example you can install the CMS locally (on your PC). In our guide on how to install Drupal we have detailed all the steps to:
- install the CMS locally with XAMPP;
- install it on the server with an autoinstaller;
- install it manually.
If you’ve already installed it, you’re ready to go.
In this Drupal tutorial we have used Drupal 9.4.8 as a reference so if your version doesn’t match we suggest you update Drupal so you don’t have problems following the guide.
Drupal tutorial: how to access the backend
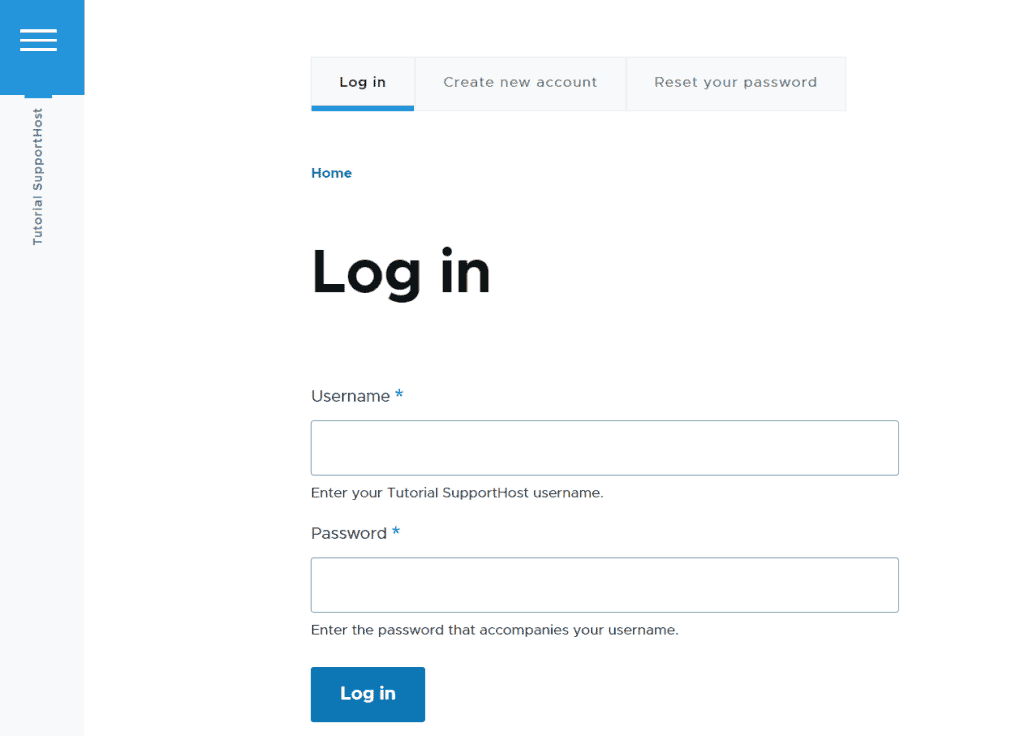
After installing Drupal, the first thing to do is access the administration area of the CMS, also called the backend.
To do this, just go to the following address:
https://domain.com/user/loginJust replace “domain.com” with the domain name you chose during installation.
You will find yourself in front of a login page like this where you just need to enter the login details you set up during installation.
Initial Drupal configurations
Before we get into this Drupal guide, let’s start with the basic configurations. If you installed Drupal with an auto-installer like Softaculous it is possible that the default language is English.
For this reason, the first thing I’m going to explain to you is how to change the Drupal language.
Changing the default language of Drupal
First, we need to activate the module that will allow us to view the user interface in other languages.
Go to Extend and search the page for the “Interface Translation” module, then activate it: just select it and click Install.
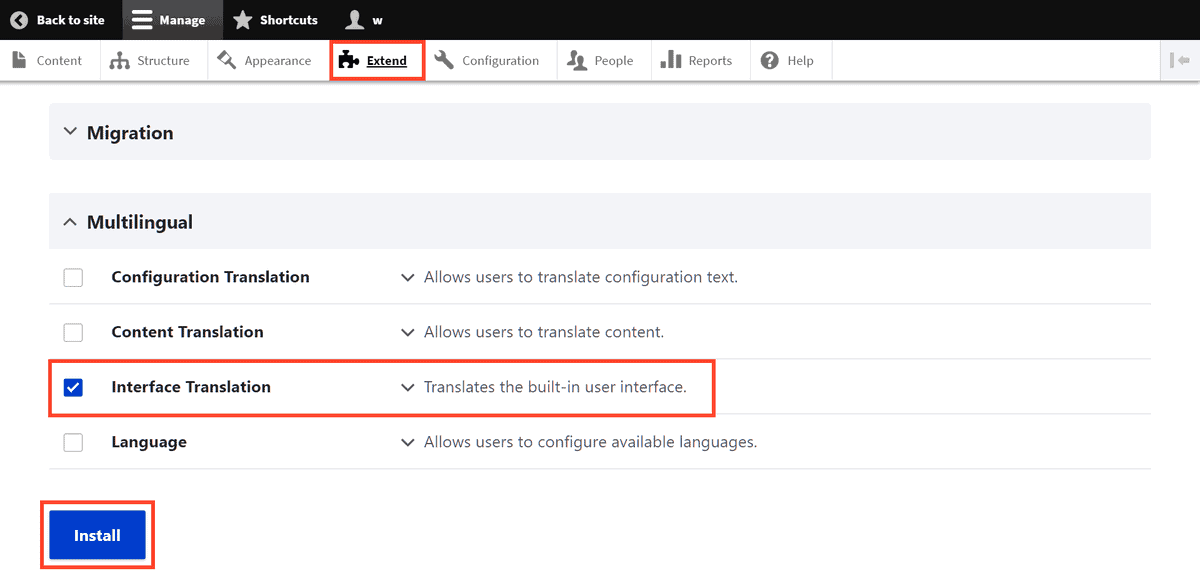
We will also be asked to activate the “Language” module, click on Continue to confirm.
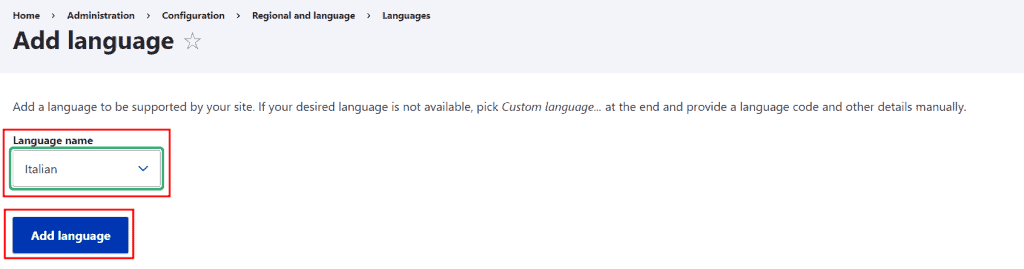
Let’s go to Configuration and scroll down to the “Regional and language” section, here we will find the Languages item from which it is possible to change the language used:

In the next screen, click on the “Add language” button, like this:

Then we just need to choose the language and click on “Add language”:
We wait for the new language to be installed and then it will be possible to set it as default by selecting it from this list and clicking on Save configuration:
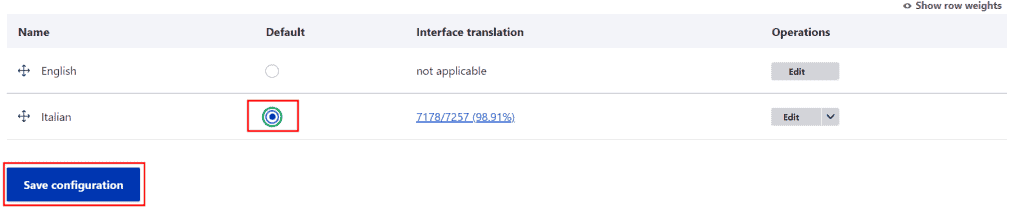
In doing so, the interface of the Drupal administration area will be in the language we have chosen, in our example in Italian.
Drupal user interface overview
Now that we’ve changed the user interface language, we’re ready to see a brief overview of the features. During our Drupal tutorial we will then go into the details and learn how to perform the main operations with the CMS.
The top bar contains the following buttons:
- Back to site
- Manage
- Shortcuts
- Username.

Let’s see what they are for.
When we are in the administration area we can move to the front-end by clicking on “Back to site“.
By clicking on “Manage” at the top left we can show or hide the main bar.

From here we can to different sections.
- Content: it is the section that we will use to create pages and articles. From here we can also manage comments and files uploaded to the site.
- Structure: this area will allow us to manage menus, contact forms, site taxonomy and to configure blocks.
- Appearance: From here, you will be able to manage your installed themes or add new ones.
- Extend: This section is dedicated to Drupal modules.
- Configuration: the site settings menu from which you can also change some aspects useful for Drupal SEO.
- People: from here we can manage the users who have access to our site.
- Reports: this area of the administration panel allows us to access the logs, check if there are any updates or other problems encountered on the site.
- Help: you can use this section to quickly access the help of the Drupal.org site.
Next to “Manage” we see two other items.
Shortcuts: We can add links to this menu to quickly access certain areas of the administration interface.

Username: we can edit the current user profile.
Create pages with Drupal
To create a website, one of the first things you need to know how to do is create the pages that will make up the site.
Drupal, like other CMS, allows you to create pages through a simplified interface.
To add a new page, click on Manage > Content and then on “Add content”:

We can choose between two options, for the pages we click on “Basic page”:

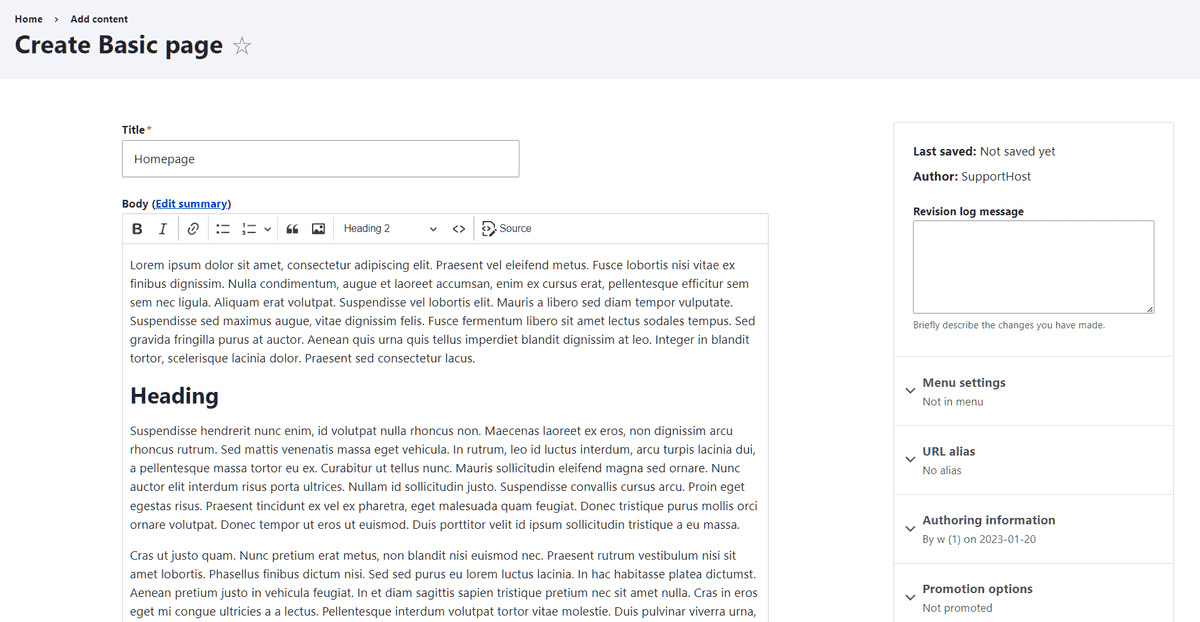
At this point it is sufficient to fill in all the important fields. Let’s see together how.
Title: enter the title of the page.
Body: we use the editor to insert the page content, we can format the text and insert images.
Publication box: on the right we find several options that allow us to add the page to the menu, modify the URL, change the author and the publication date.
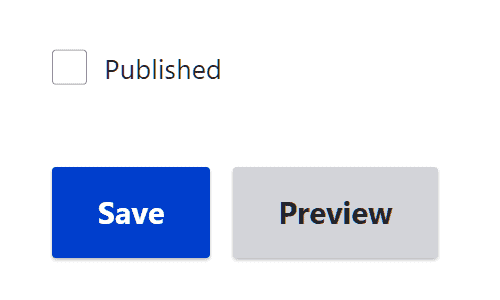
When we are satisfied with the changes we can click on “Save”.
Tip: if we want to save the page as a draft without publishing it, just remove the check next to “Published”.
By following these steps we can create our home page, like in this example:
Now let’s see how to set the page we just created as the site’s home page.
Set the home page
After we have created a page with Drupal we can set it as the home page. Let’s go to Configuration > System > Basic settings:
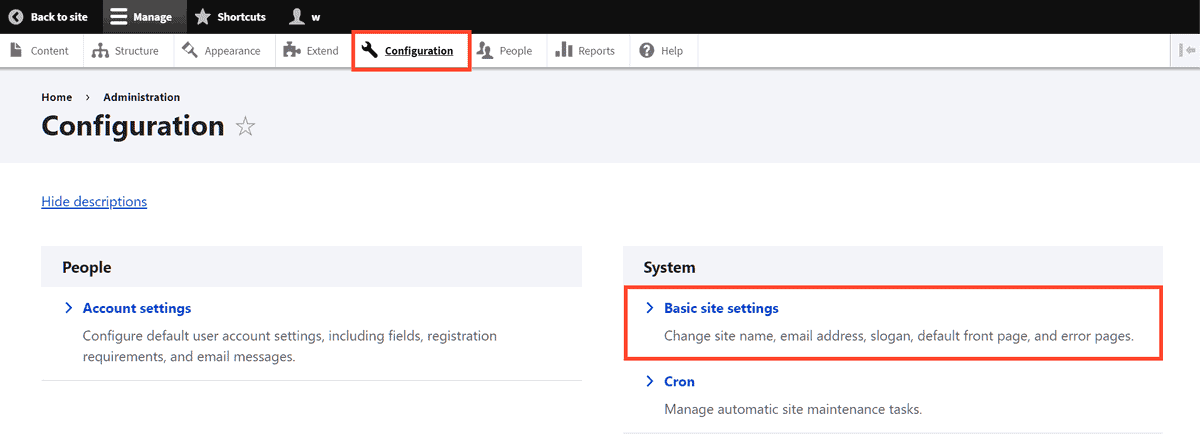
Here we will see the “Default Home Page” section and we will be able to enter the URL of the page we want to use as home. In our example above, we created a home page, so now we just need to enter the URL we set earlier.
At this point, click on “Save Configuration”:

Create a website menu with Drupal
After creating the different pages of our site, we can move on to creating the menu.
As we have seen before we can insert pages into the menu directly when we create or edit them. We just need to check the option “Provides a menu item” and then fill in the other fields that I show you here:

We can also create and manage the site menus from another section. Let’s go to Manage > Structure > Menu:

By default, the system automatically creates the main menu of the site and inserts a link to the home. To change it, click on Change menu next to the “main navigation” menu:

From this section we can change the title and language of the menu and then add new items. For example, let’s add the “About Us” page by following these steps:
1. Click on “Add link”.
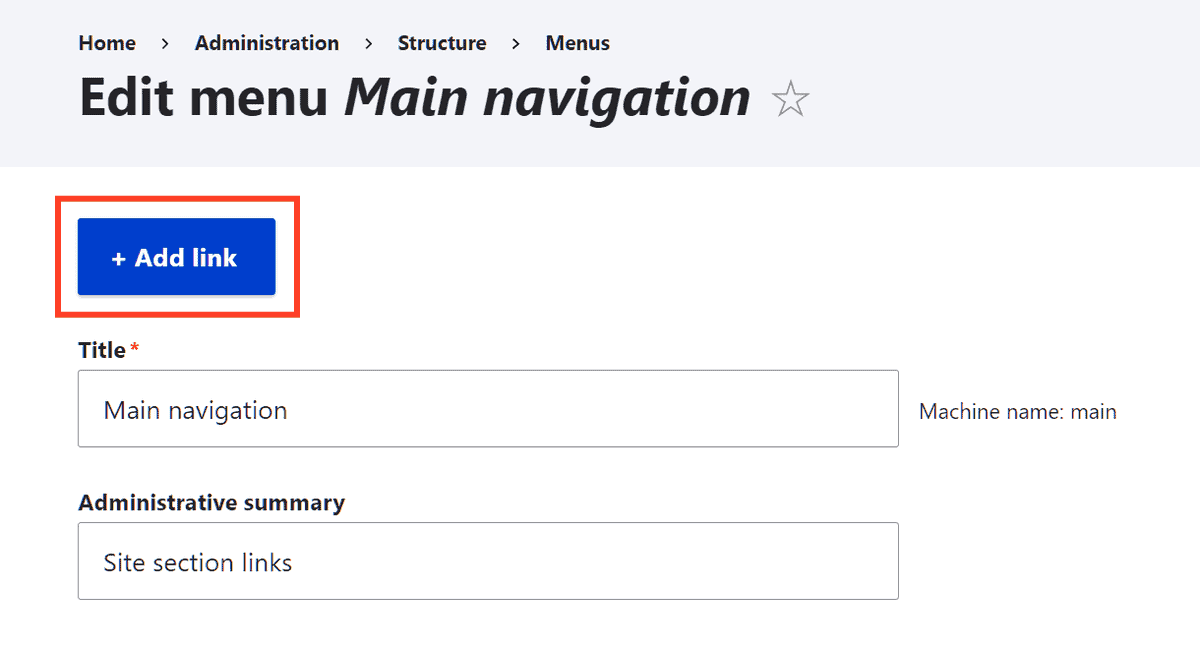
2. Enter the title to display in the menu, for example “About us”.
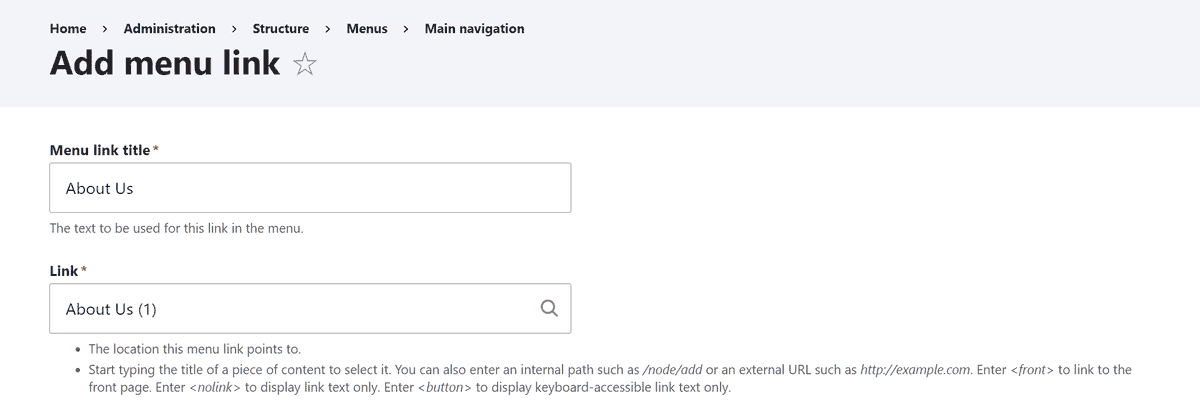
3. Enter the URL in the Links section. You can also type the page name to search the site without having to enter the full URL.
4. If you want to create the menu item as a sub-item of another, select it from the “Parent link” option.

5. Click on “Save”.
The menu we created will look like this:

We can change the order of the items in the menu by dragging them from one position to another, as I show you here:

Drupal guide: how to create a blog
In this chapter of our Drupal guide you will learn how to create a blog.
We will see how to:
- create articles;
- generate a blog page to display articles;
- manage tags.
How to use Drupal to create articles
Let’s start with creating the articles.
Like WordPress, Drupal has two distinct sections for creating site pages and posts. We saw earlier how to do it for pages.
To create an article, go to Manage > Content and then to “Add content”:
This time we click on “Article”:

The interface that will be shown to us is very similar to that of creating pages.
In this case, there are additional settings that are only for articles.
1. When we create an article we can insert tags in the “Tags” section.

2. From the appropriate section we can set an image that will be used as the featured image of the article.

3. From the box on the right we can manage the comment settings and choose whether to allow them or not.

Create a blog page with Drupal
To create a blog with Drupal we can use a form or create a view. In this case we will use the second method.
Drupal views allow us to create lists in which to display content and sort them, for example, by creation date starting from the most recent. This function is therefore ideal for creating a “Blog” page on our site in which to show the list of articles.
Creating one is very simple.
Go to Manage > Structure > Views.

Click on “Add view”.

We must therefore set all the fields. First, we enter the name of the view, for example “Blog”.

We then choose which contents to show, in our case only the contents of the Article type. Let’s set the sort order, for example “Most recent first”. By doing so, the latest articles will be shown first on the blog page.

From the “Page settings” we choose the Create a page option. Then we also fill in the other fields to set the title and path of our blog page. From here we can also choose how many elements to display, for example “5”.

This section also allows us to create a menu item for the page we are creating. We can use it to add the blog link to the main menu.

When you have chosen all the settings, just click on Save and modify.
Depending on the settings you’ve chosen, the appearance of the list will vary. You can tweak the options until you find the ones that fit your project best.
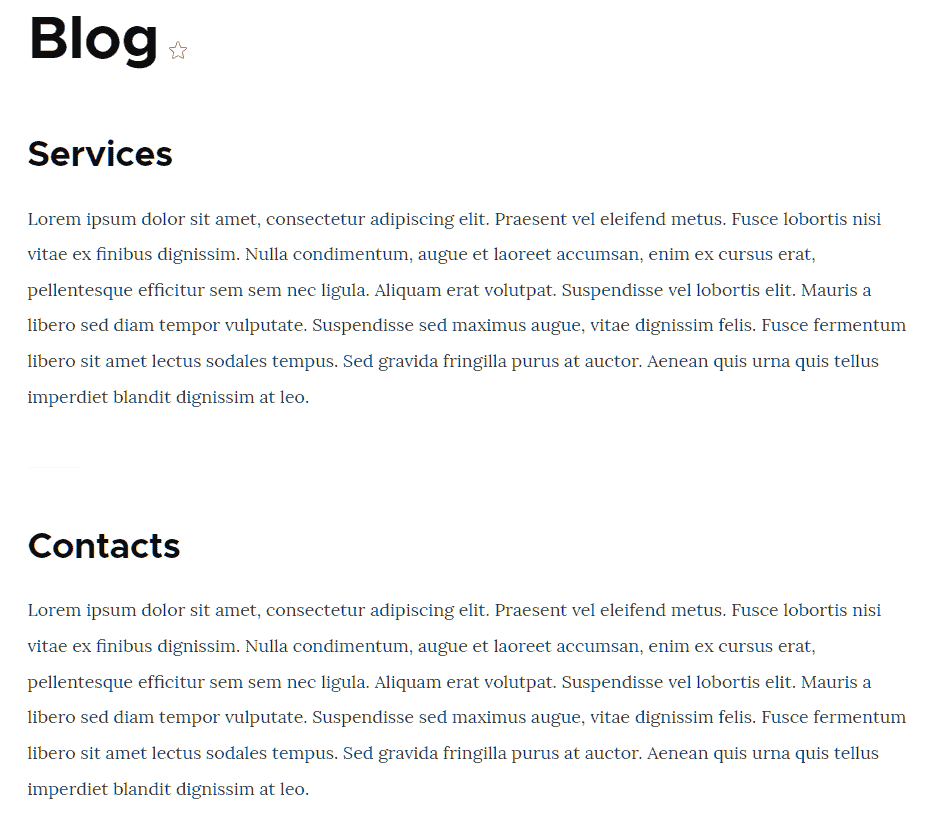
In our case we have created a view to generate a “Blog” page with an unformatted list showing the previews of the articles.
Manage tags with Drupal
Now that we have seen how to create articles with Drupal and how to display them on the site in a blog page, let’s move on to the taxonomy.
With Drupal we can manage the taxonomy by going to Manage > Structure > Taxonomy.

By default, Drupal creates a vocabulary for tags.

From this section we can view the terms we have added, add new ones or change the settings.

Note that you can create a new tag directly from the post creation screen. Just type it in the “Labels” section, as we saw earlier.
How to manage forms with Drupal
Drupal modules are extensions that allow us to add new functions to our site. Some of these modules, called core modules, are already integrated and to make them work you just need to activate them.
For example, at the beginning of this guide we saw how to activate the modules to change the language of the administration interface.
In addition to the core modules, we find third-party modules that are called “contributed“. In this section we will see how to install this type of module.
Advanced tip: there are also custom modules, in this case to install them it is better to use Drush, the command line application that allows us to manage Drupal.
Access the list of installed modules
To see which modules we have installed on our site, just go to Manage > Extend. Here we will find three tabs that allow us to manage the modules.

Using the “List” tab we can view the list of modules present.
The “Update” tab allows us to check for updates.
Finally, the “Uninstall” tab allows us to manage the modules and uninstall them.
Installing a module with Drupal
To install a third-party module:
Go to Manage > Extend and click on “Add new module”:

We can then enter the URL of the module to install or upload the module archive.
The fastest way is to get the URL without having to download the form and then upload it to the site.
If the module is present in the Drupal.org directory, we just need to do this:
1. Open the module tab, for example “Redirect”, and click on the version number.
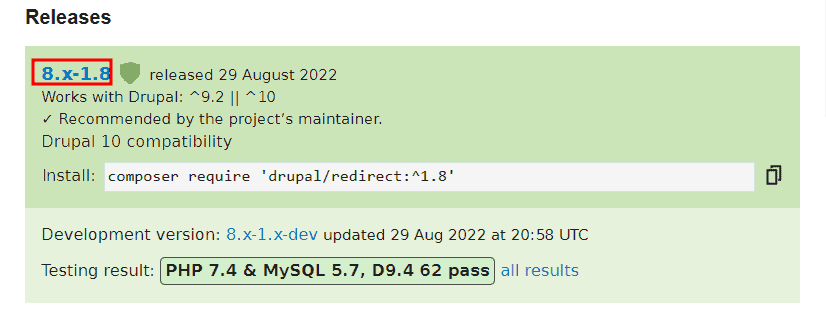
2. Copy the download link of the tar.gz archive as I show you here:
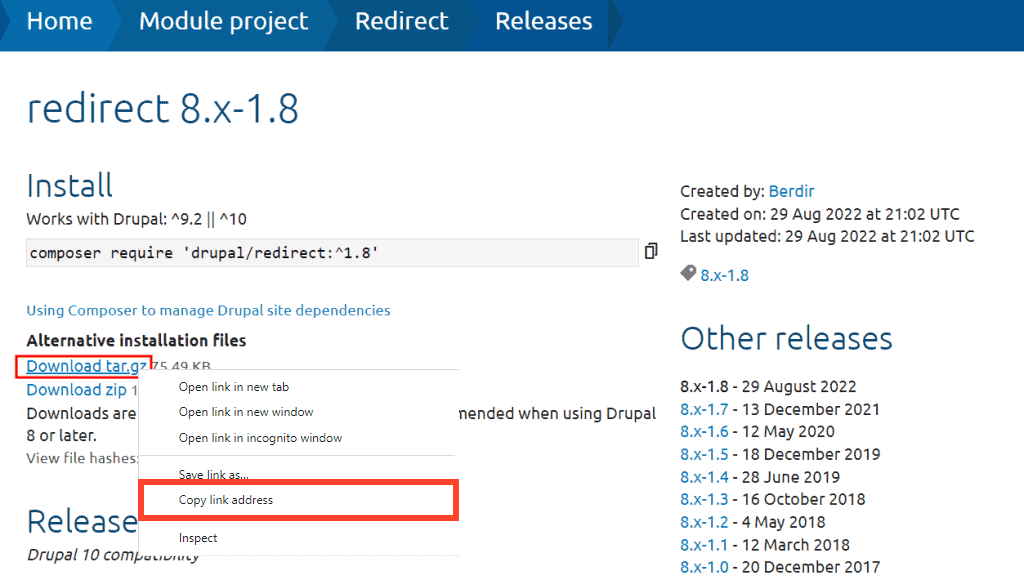
3. Paste it into the “add from a URL” field of the Drupal interface and then click Continue.
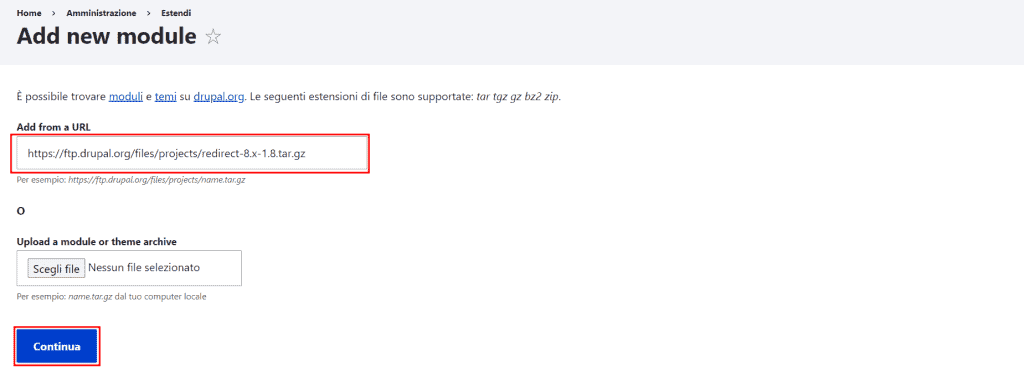
An alert like the one I show you here will let you know that the operation was successful.

Activate a form
After installing a new module, we can activate it by going to Manage > Extend and looking for it in the list.
At this point we select the extensions and then click on the “Install” button at the bottom of the page.

Drupal Guide: Managing Themes and Appearance
In this chapter of our Drupal tutorial, we will see how to:
- change the backend theme;
- change and install new front-end themes;
- change the theme and add a logo;
- customize the look of the site by adding blocks.
First, let’s start with the topics.
The default theme of Drupal changes according to the version we are using. With the latest version currently available, Drupal 9.4.8, we have the Olivero theme available.
We can manage and configure Drupal themes from the Manage > Appearance panel. In this section we will find the installed themes and the available ones.

As you can see there are two themes installed by default:
- Default theme – it is the theme that determines the appearance of the front-end.
- Administration theme – allows us to define the appearance of the administration panel (back-end).
Let’s first see how to change the admin panel theme. In the next paragraph, however, we will focus on front-end issues.
Change the admin theme
To change the admin theme go to Manage > Appearance and scroll down to the Admin theme section.
We can choose from those available by selecting it from the drop-down menu and then clicking on “Save configuration”.

Install a new theme (front end)
Drupal themes are installed from the Manage > Appearance panel.
To install a new theme we can choose from the available and uninstalled themes, or add a new theme.
If there are themes available we will find them in the “Uninstalled Themes” section which I show you here:

In this case we can click on Install or Install and set as default to activate them on the site.
To add a new theme, click on the Add new theme button at the top.
Just as we have seen for the installation of modules, we can install a new theme by entering the URL of the archive or by loading the archive that we have previously downloaded on our computer.
If the theme we are interested in is in the Drupal directory, we can quickly retrieve the URL in the way we saw before and then paste it into the Add from a URL field as I show you here:

The following screen will confirm that the theme has been added. Click on Install the added themes to proceed with the installation.

We will be redirected to the themes section and we will be able to find the newly added theme among the “Uninstalled themes”.
In our case we have added “Bootstrap” one of the free themes available in the official directory. To install it, just click on Install or Install and set as default to apply it directly.

Change the look of the theme and add your logo
After choosing the theme to use, we can change some settings. To do this, go to Manage > Appearance and then open the Settings tab.

In the tab we will see global site settings as well as specific ones for back-end and front-end themes. The latter will have the name of the theme, in our case “Claro” and “Olivero”.
From the settings we can customize the logo and favicon.
Click on Logo image and deselect the Use the logo supplied by the theme optio. In this way we will be able to upload the image with our logo.
We can repeat the same procedure for the favicon:

Note that the location of the logo may change based on the theme. Here I show you an example with the “Olivero” theme:
The header you see in this example is a block. Drupal blocks are elements that allow us to display certain content on the page. Let’s open a new chapter of this tutorial to see how to create and manage them.
How to use blocks to change the look of your site
As we said, the blocks allow us to show some elements in certain areas of the page.
Through a block we can insert search bars, boxes with recent comments and so on.
Let’s see how to use this Drupal feature.
First we go to Manage > Structure > Block Layout.

This panel shows us the blocks present and allows us to change their order. Remember that the available blocks and their placement depend on the theme you are using.
Let’s take an example with a block to see what functions are available.
The “Site branding” block that we see in the Header is the one in which the logo and the name of the site are shown. Next to each block we have operations available: we can configure, deactivate, or delete the elements.

By clicking on Configure we can modify the block options. In this specific case, we can choose which elements to show: logo, name and slogan.

Scrolling through the following sections we can change the visibility of the block, for example to make it visible only to logged in users.

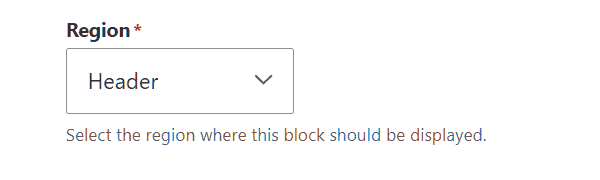
Finally, from the “Region” item, we can change the position of the block.
Add a new block
We have seen how to change the settings of an existing block. Now let’s see how to add a new block.
Go to Manage > Structure > Block Layout.
- Let’s scroll to the region that interests us, for example “Footer Top” and click on the Place block button:
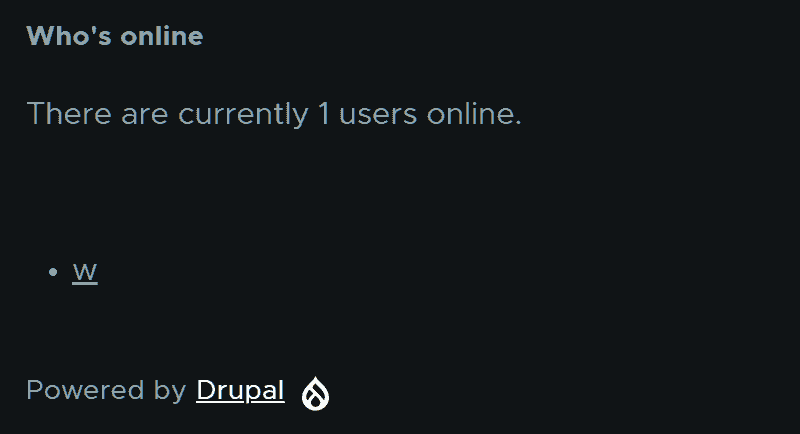
- Then we choose from the list the type of block we want to add, for example “Online Users”.
Here I show you the steps just described:

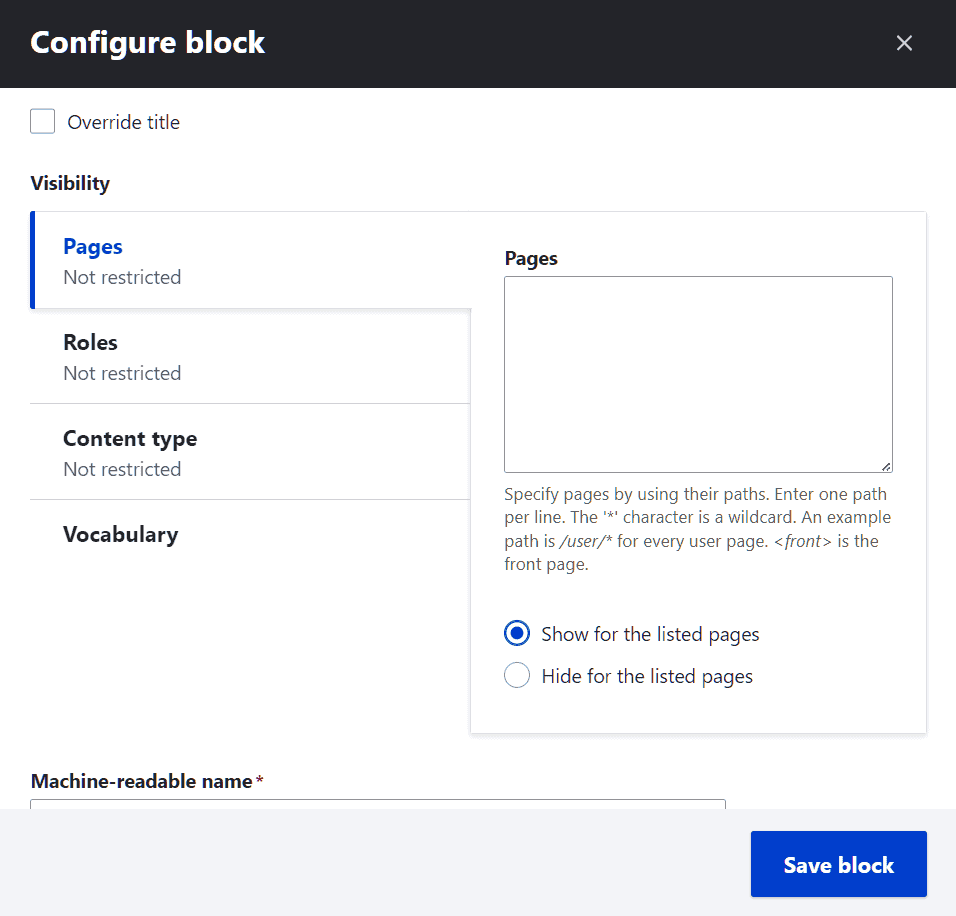
A modal window will open from which we can directly configure the block. The configuration settings depend on the type of block. In our case we want to make it visible only to authenticated users, so let’s change the visibility options and then click on “Save block”.
This will look like the block we created:
Other resources
In this guide to Drupal we have tried to touch on the most important aspects for those approaching to use the CMS for the first time. From content management to customizing the look and feel of your site.
Now it’s your turn to continue exploring all the features Drupal has to offer.
If you have difficulty performing any operation, remember that you can consult the user guide available on Drupal.org. This resource will allow you to learn more advanced operations including how to create a multilingual site or manage users on the site.
Conclusion
We’ve seen what it takes to start building a site with Drupal. We started from the general settings and how to change the language to then get to the heart of the Drupal guide and see how to manage the contents.
As you have seen, creating pages and menus with Drupal is quite simple. This CMS is also an excellent tool for creating a blog, which is why in the guide we focused on how to create articles, manage the taxonomy and create a blog page in which to show recent articles.
Like any CMS Drupal can be extended thanks to modules and its appearance can be customized thanks to the use of themes and their customization.
Now you have everything you need to get started with Drupal and create a website from scratch.
What is your experience with this CMS? What do you think are the strengths compared to other open-source platforms? Let us know in the comments.
Ready to build your WordPress site?
Try our service free for 14 days. No obligation, no credit card required.


