Optimizing Drupal SEO consists of implementing a series of strategies in order to obtain a better ranking.
In this guide we will see practical advice that you can apply immediately if you are creating a new site with Drupal. If you haven’t purchased a plan yet or are undecided, you can try our Drupal hosting by activating a free plan.
Remember that an SEO strategy involves analysis and depends on the specific sector and project. What we will see today is how to take advantage of Drupal’s built-in SEO functions and which modules help us to extend them.
We won’t present you with a simple list of Drupal extensions, but we will see how to improve every aspect of the site in practice.
Let’s start with On-page optimization.
Table of Contents

Drupal and On-Page SEO: how to optimize content
In this chapter, we want to provide you with a practical guide to optimizing content.
We have decided not to dispense generic advice on how to improve the site’s texts and contents with the aim of obtaining a better positioning. Instead, we focused on how to put these suggestions into practice.
In this section we will learn:
- how to optimize the URLs of a Drupal site;
- where you set the tags: title, meta description and alternative text;
- how to improve the contents from the point of view of the structure and internal links.
Set up SEO-friendly URLs in Drupal
By default, Drupal creates URLs that have this structure:
https://website.com/node/3In some cases, the URL can also contain parameters and look like this:
https://website.com/?q=node/3If you are using Drupal 9, the Clean URL option which removes parameters from URLs is enabled by default. Otherwise you will have to activate it by going to Configuration > Search and metadata > Clean URLs.
As you already know URLs are important for SEO. Google recommends using simplified structures and removing all elements that are not essential.
Our goal is, therefore, to create readable URLs in which we will use words that describe the content of the pages or articles.
There are two methods to do this:
- set URLs manually;
- automate URL generation with a form.
We quickly learn how to do it.
Manually set URLs
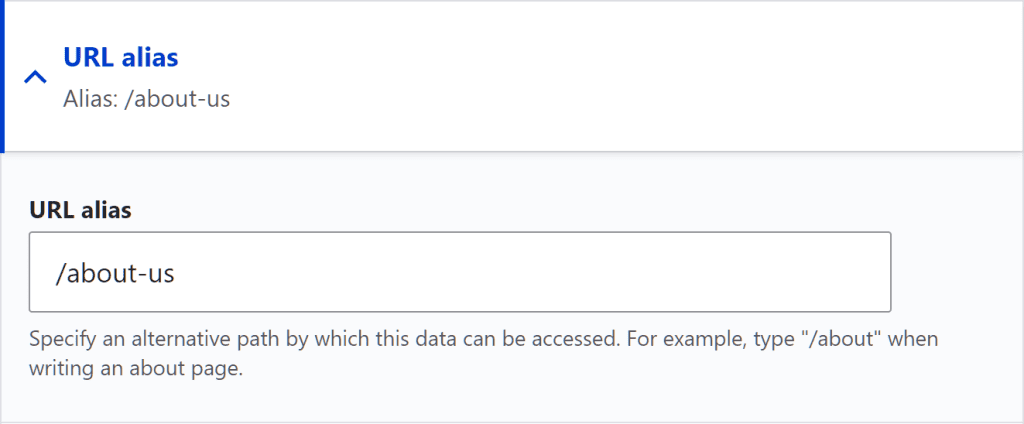
With Drupal 9 we can set URL aliases to create a custom URL that replaces the one that is automatically generated.
This allows us to customize the final portion of the URL, called the slug, to describe the page and not use an unreadable path like “/node/3”.
When we create new content, we just need to expand the Alias URL section of the right menu and enter the slug. For example, if we are creating the “About Us” page we can use “who-we-are” as a slug, like this:
Use Pathauto to auto-generate URLs
We can simplify the handling of URL aliases using a form. Pathauto is a free module that is kept up to date and that allows us to automate this operation.
To begin we install and activate the Pathauto module.

Please note that the form needs other extensions to work (Path, Path alias and Token). You will be prompted to activate them if you haven’t already.
If you’re not familiar with module management, check out our Drupal tutorial to see how.
Creating a pattern with Pathauto
In this section we are going to learn how to use Pathauto to set URLs automatically and use the title of pages or articles as a slug.
By opening the module configuration page we can manage its settings.
To set URLs automatically we need to create a pattern first. To do this, open the Pattern tab and click on Add Pathauto pattern and then fill in the required fields.

We can create, as in this example, a pattern that is applied to pages and articles and set the title of the page or article as URL alias.
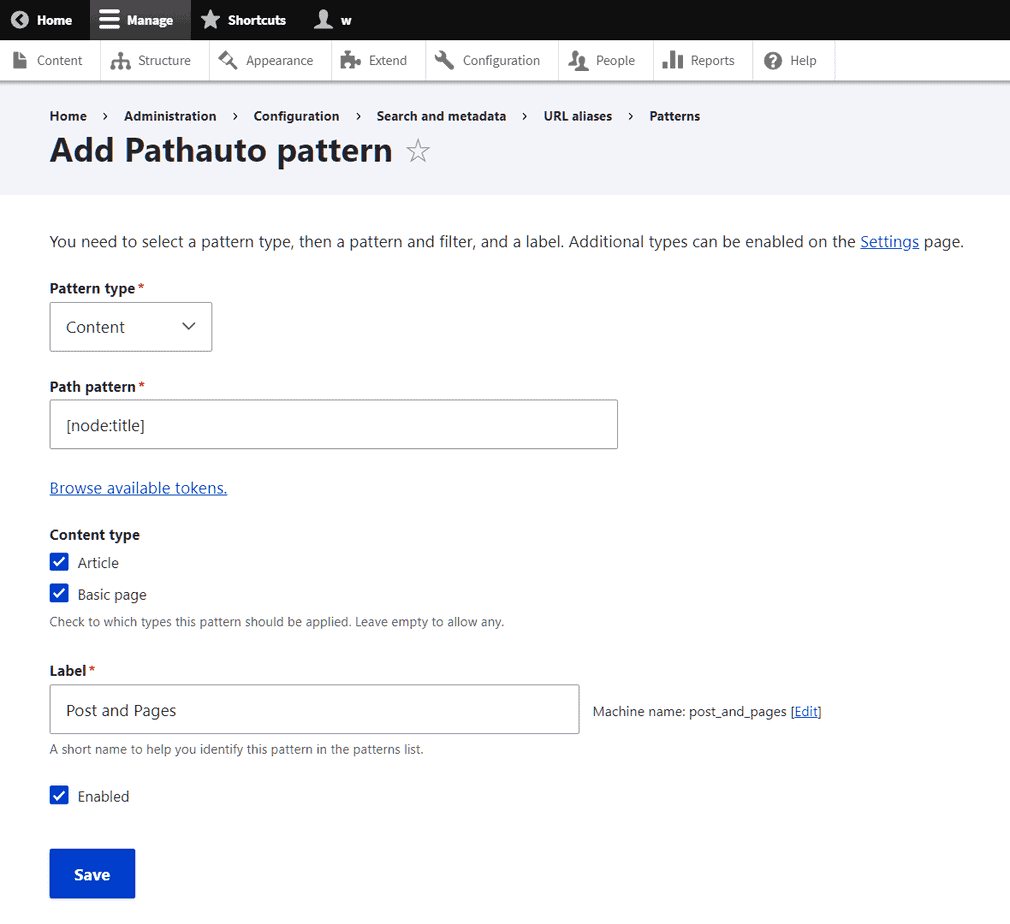
To do this we use these settings:
- Pattern type: content
- Path pattern: [node:title]
- Type of content: article, basic page
- Label: we can insert the name we prefer.
Finally, click on Save.
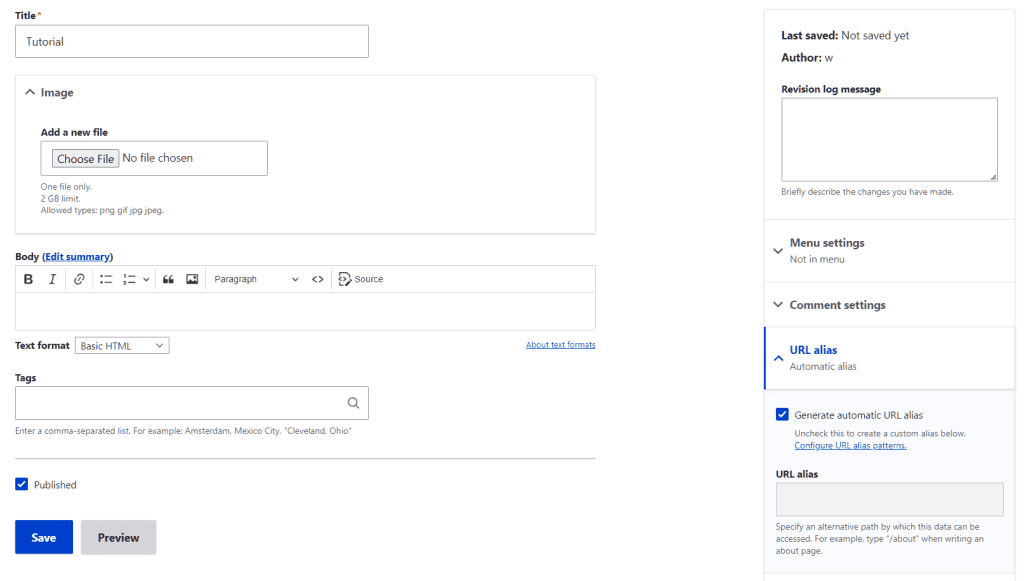
When we go to create a new post or a new page, we will see a new option appear in the Alias URL section which informs us that the alias is created automatically:
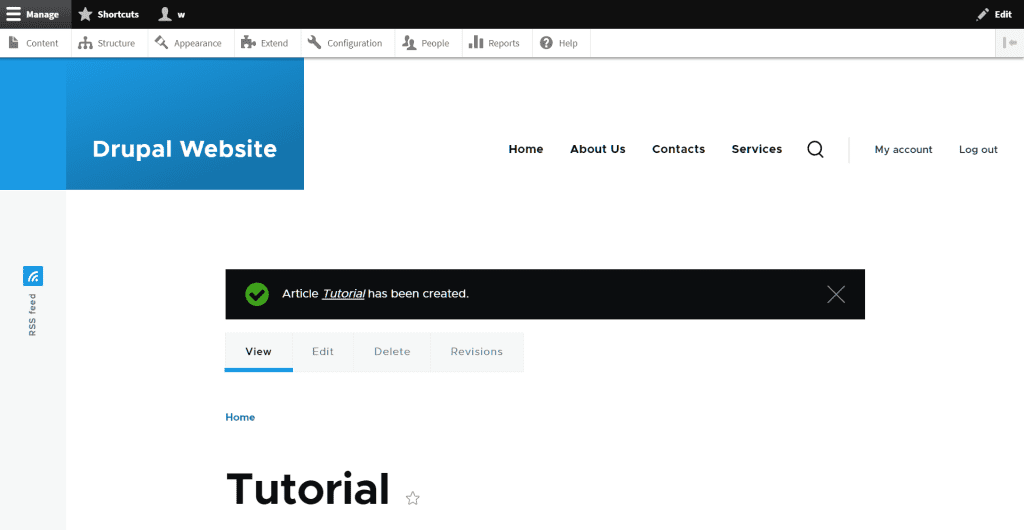
After publishing the page, we will be able to make sure that the URL has been set correctly, as in our case where it corresponds to the title of the article.
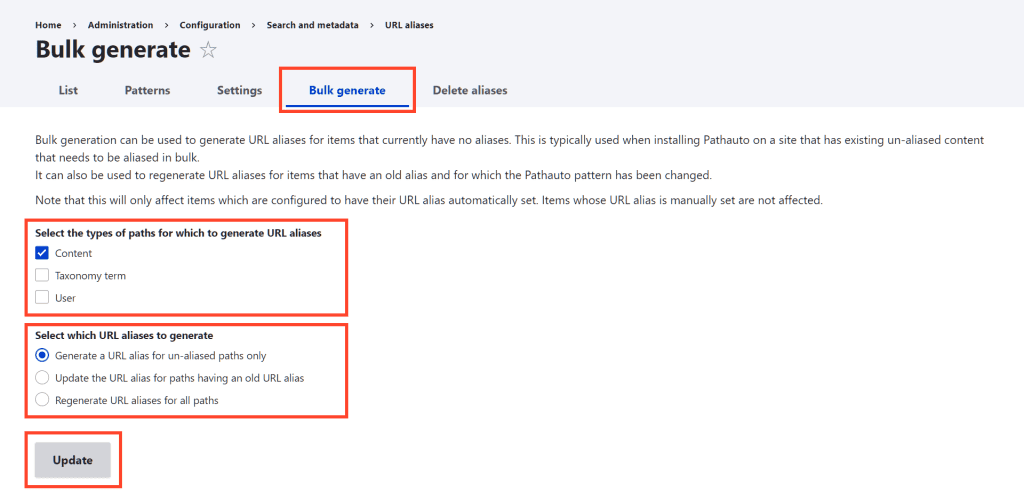
Regenerate URL aliases with Pathauto
From the configuration page we can also generate URL aliases for items that have not yet been set up.

We just need to open the Bulk generate tab, choose the settings to use, for example apply the changes only to the contents (Pages and posts) and then click on Update.
With the settings you see in this example, we’re going to generate URLs only for content that doesn’t already have an alias:
Drupal SEO: how to set title and meta description tags
HTML tags are important for SEO because they affect how pages on our site are displayed in the SERPs.
When we search on Google, a series of results are shown in response. Each consists of a title (or title tag) and a description (the meta description). In this chapter and the next we will see just how to set these two tags on Drupal.
For both we need to use an additional module, in this guide we will see how to use the “Metatag” module.
So first we install and activate the module.

Configure the Metatag module
Before proceeding, let’s take a closer look at what the title tag and meta description look like.
In the HTML code, the title looks like this:
<title>Tutorial Drupal</title>The meta description, on the other hand, has this structure:
<meta name="description" content="Learn how to use Drupal" />Using the Metatag module we can automatically generate the title and meta description of pages and articles. The two tags will be inserted in the source code of the page as I show you in this example:

After installing and activating the module go to Configuration > Metatags:
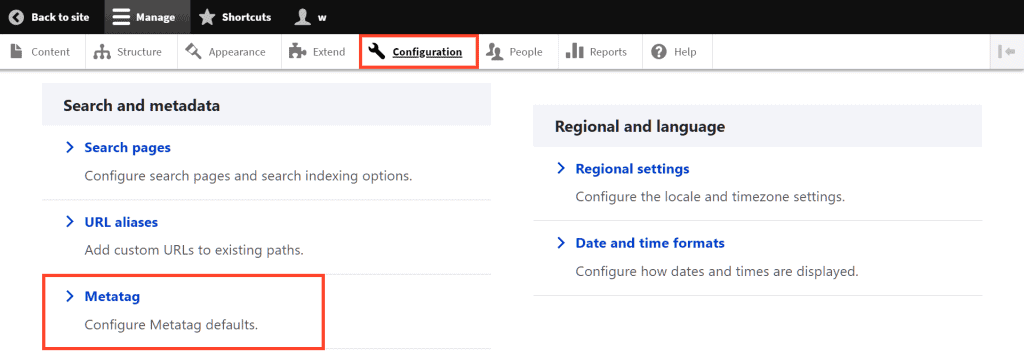
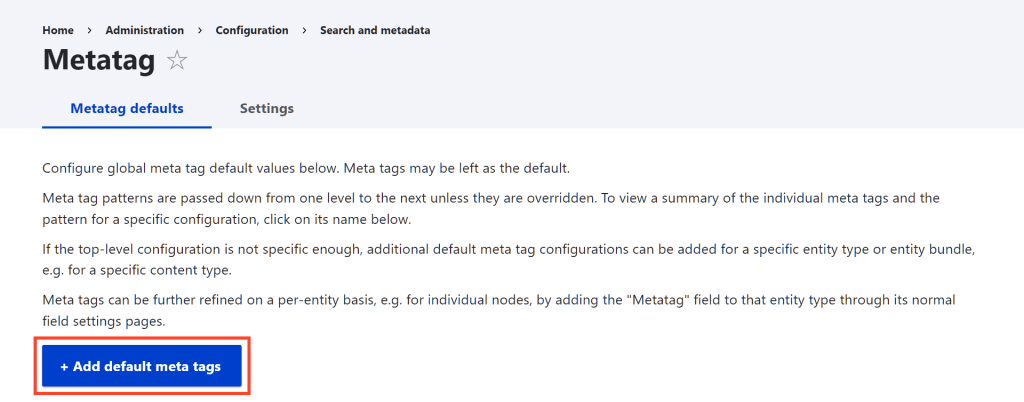
From this panel we can change the module settings. In our case we are going to insert a parameter that will allow us to automatically generate the title and meta description for the articles.
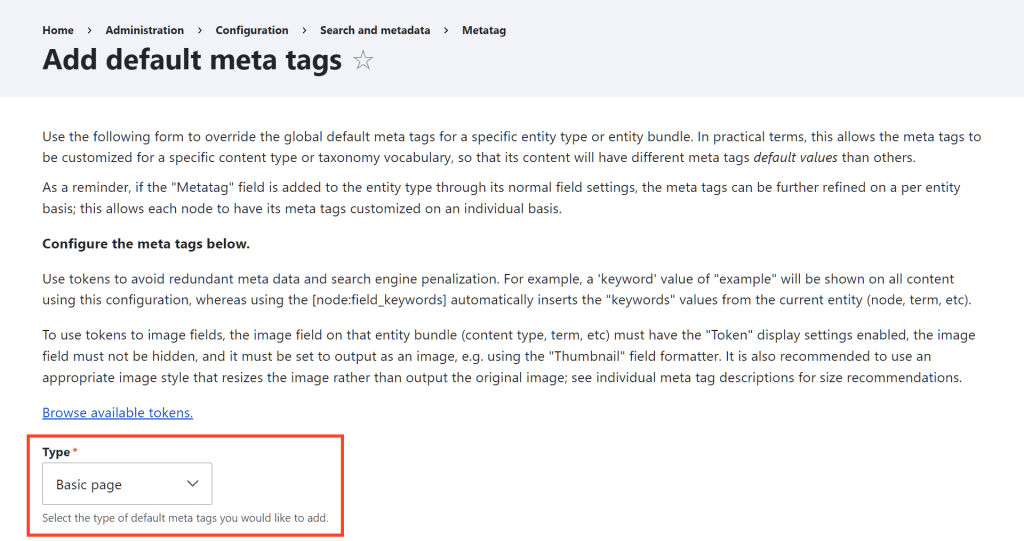
Click on Add predefined meta tags.
Under Type, we select Articles.
Let’s expand the basic tags panel and fill in the following fields:
Page title: [node:title] – [site:name]
This will allow us to generate the title so that it is composed of the title of the page (or article) followed by the name of the site, like this:
Article Title – Site Name
Description: [node:summary]
The text that we are going to insert in the table of contents will be used as a meta description.
At this point, to get the result of the example we have seen before, we just need to create a new article and enter the Title and Summary, like this:
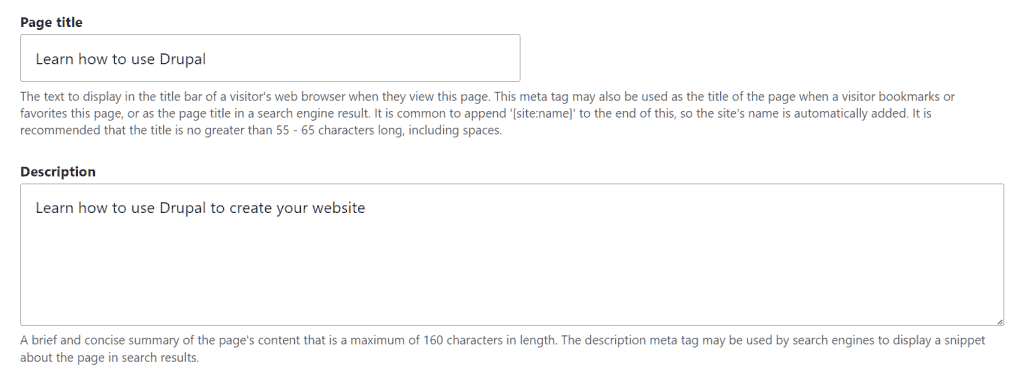
In our example we will have:
Title: Learn to use Drupal – SupportHost tutorial
Meta description: Find out how to learn Drupal.
We can repeat the same procedure for the pages, in this case in the Type field we will set Base page.
Drupal SEO optimization for images: how to insert alt text
If you’ve heard of image alt text before, you may have heard it referred to in various terms: alt attribute, alt tag, or alternative text.
Alt text is a tag that is indicated in the HTML code like this:
alt="alternative text"In the page code it will be inserted in the img tag, as you see in this example:
<img alt="logo drupal" src="/sites/default/files/inline-images/drupal.png" width="127" height="167" />With Drupal we can insert the alt text of the images directly from the content creation panel. When we create a page or an article and insert a new image, we will see a window like this:
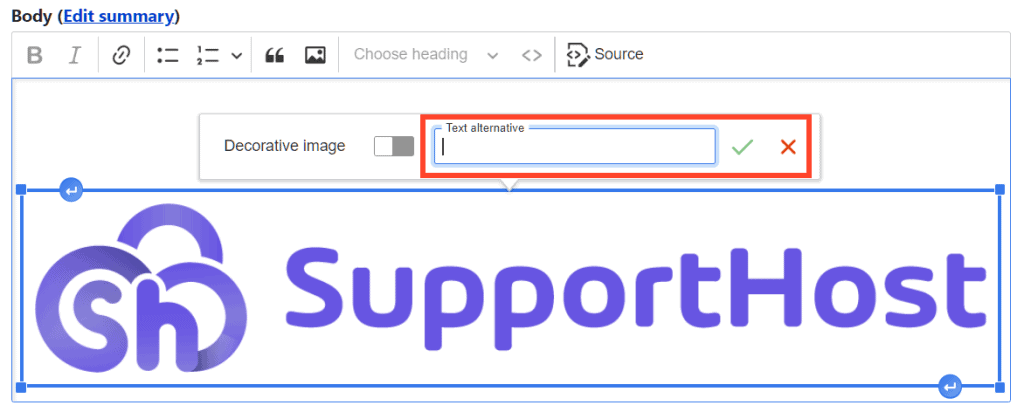
We just need to upload the image and fill in the field with the alternative text.
If we have already uploaded the image into the article and we want to change the alternative text, just click on it and then on Change image alternative text, like this:
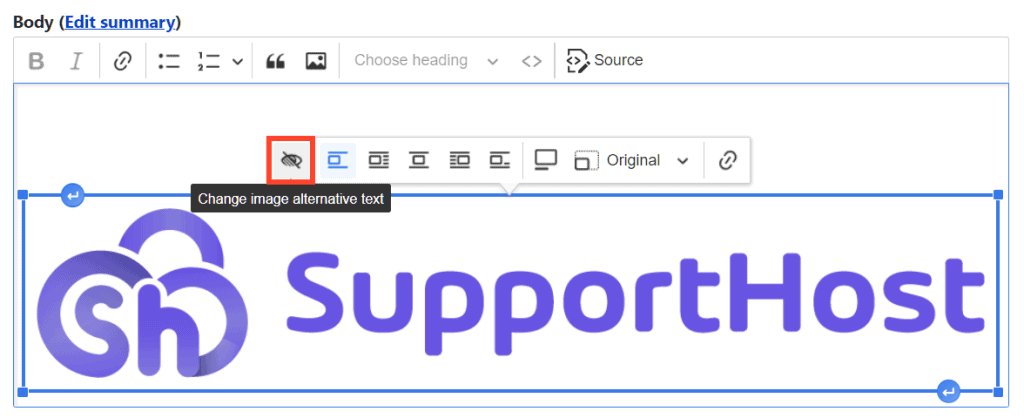
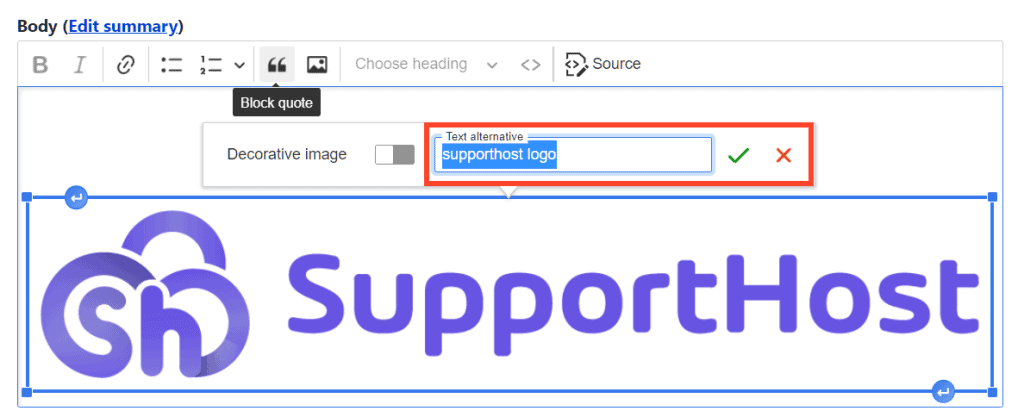
At this point we just have to edit the alternative text and click on Save check icon.
Manage internal links with Drupal
Internal links are important for SEO and that’s why in this section of the guide we’re going to see how to simplify their management on a Drupal site.
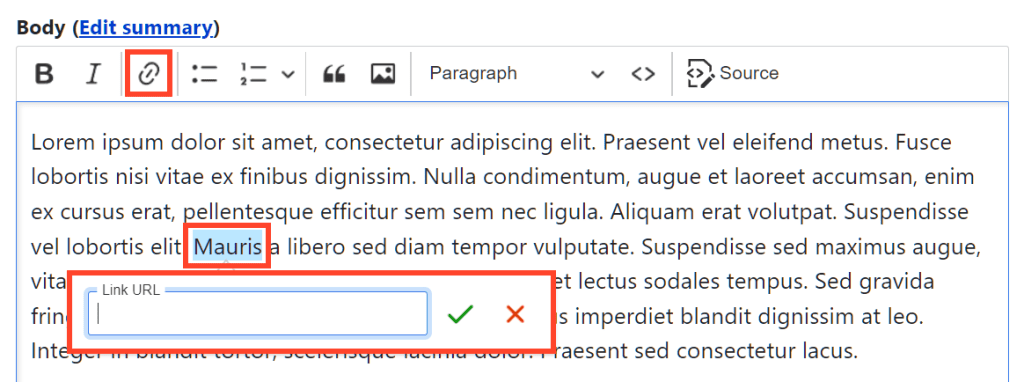
When we create content with Drupal we can insert links using the default editor.
We just need to select the portion of text that will act as an anchor for the link and click on the appropriate icon of the editor.
At this point we will have to enter the URL in full because Drupal does not integrate a system to search the contents already published on the site.
To solve this lack, a module comes in handy: Linkit. With this extension we will be able to search through pages and articles already published without having to copy every single URL.
First, we install and activate Linkit on our site.

To access the settings we can go to Configuration > Linkit. We can usually leave the default options.
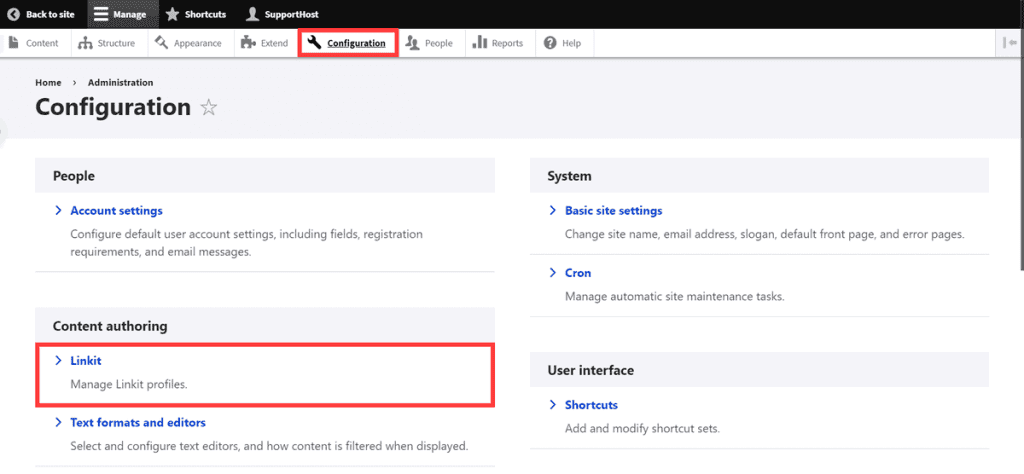
What we need to do is activate Linkit so that it can be used in Drupal’s default editor. So let’s go to Configuration > Text formats and editors.
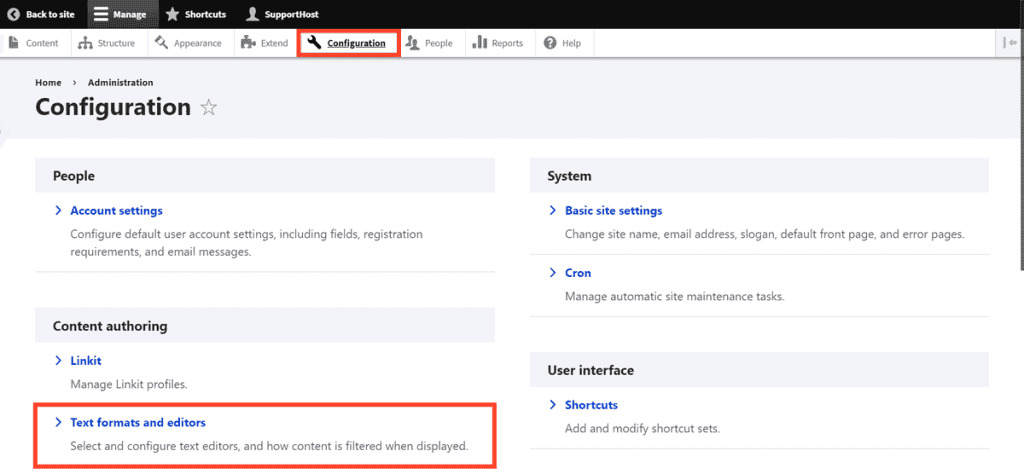
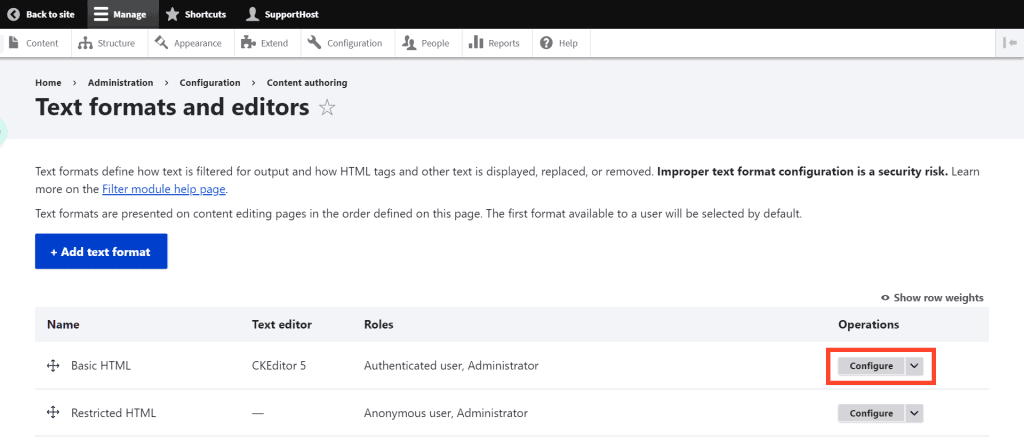
Click on Configure next to Basic HTML, the format that is generally used to create content.
Scroll down to the CKEditor Plugin Settings section and activate the Linkit enabled option as you see here:

Finally, click on the Save button at the bottom of the page.
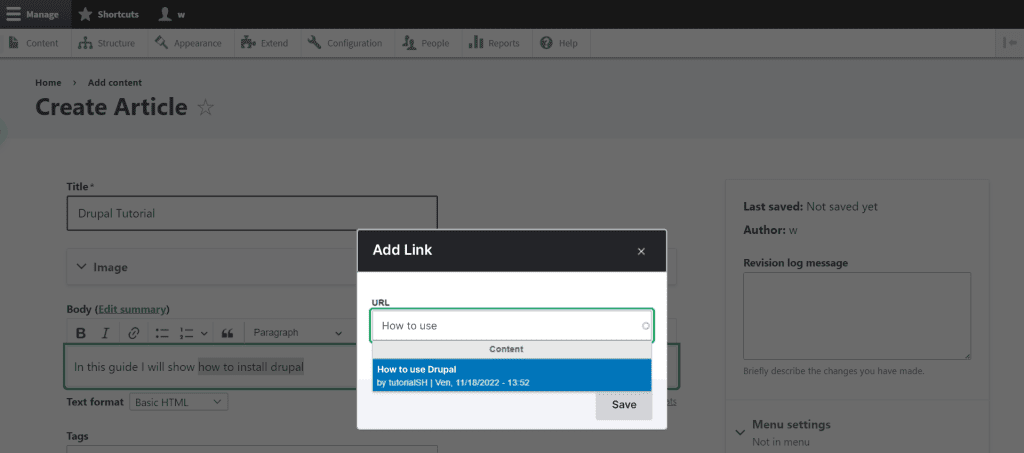
After completing these steps the form will be active. If we go to create a new content and insert a link we will be able to search among the content already present, as you can see in this example:
Improving technical SEO with Drupal
In the previous chapter we focused on the On-page aspects of content. With over 200 ranking factors, there are also other aspects that should not be underestimated.
These are technical interventions that help you to have a performing, responsive and secure site and analysis operations that allow you to make sure that the site is accessible.
Let’s start by seeing what the fundamental aspects are.
In the second part of this chapter we will move on to the operational part and learn to:
- create a sitemap with Drupal;
- manage returns.
Crucial aspects for technical SEO optimization
Discover some of the main aspects to consider to improve the optimization of your site. To learn more, you can read our guide on how to perform an SEO analysis of the site.
Site speed
Site loading times are important to ensure a great user experience and are considered among the factors affecting ranking.
Having a fast site is important and it is certainly not new. But how do you test performance?
Some useful tools:
Tip: Google is putting more emphasis on Core Web Vitals. These are metrics that take into consideration not only loading times, but also the behavior of the page itself while it is loading.
Mobile friendly sites
Also, in this case we are not talking about a novelty. Nowadays having a responsive site is practically a must if you don’t want to risk being cut off from the market.
How to design the site to be responsive and how to test it? You can start from this Drupal.org hub where you will find references to the tools to use.
Using the https protocol
Google recommends using a secure connection on sites by adopting the HTTPS protocol. To use this protocol you need an SSL certificate.
Free SSL certificate is available with all our plans. There is no need to activate or renew it because the whole procedure is automatic.
Analyze the site’s accessibility and indexability
It’s important to make sure your site is accessible to users and search engines.
If you use the robots.txt file you can restrict access by search engine crawlers to certain sections of the site. In order not to do damage and exclude important sections, however, you must use the directives of this file adequately.
To make sure that pages on your site can be indexed by search engines you can help them find them by submitting your site’s sitemap.
If you make changes to URLs you need to make sure that the pages are reachable. You can use a 301 redirect to do this. This is a redirect that lets users and search engines know that you’ve moved a particular page.
How-To Guide: Improving Drupal SEO
Now that we have seen which aspects to take into consideration, let’s see how to implement some of these operations.
Create the sitemap with Drupal
With Drupal we can create the sitemap of the site using a module like Simple XML sitemap.
There are several ways to create a sitemap, for example manually or using an online generator. This extension, on the other hand, allows us to generate the sitemap automatically and save time.
The sitemap will be accessible from the address:
domain.com/sitemap.xmlTo proceed, we install and activate the module on our site.
We can also activate the Simple XML Sitemap (Search engines) add -on to directly submit the sitemap to search engines.

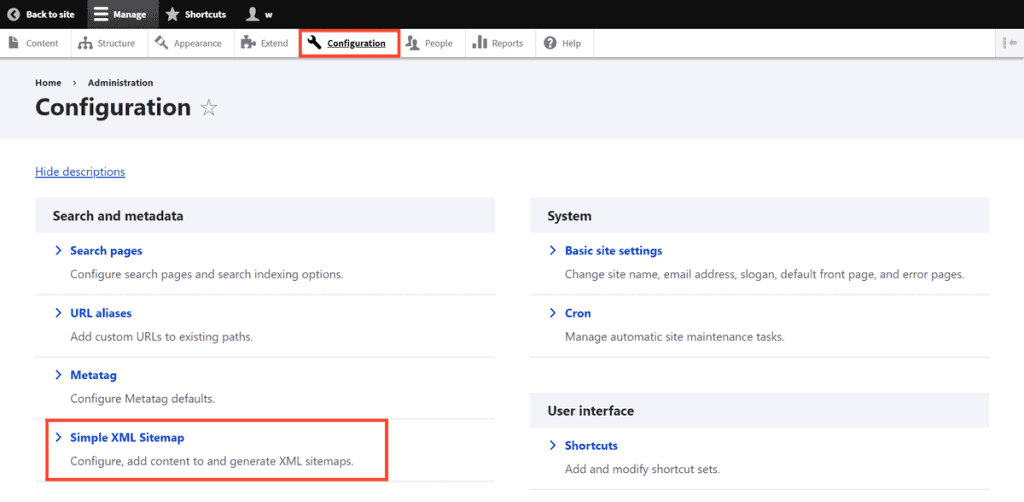
To access the settings go to Configuration > Simple XML Sitemap:
When we generate the sitemap, without having changed the settings, only the home page URL will be inserted, as I show you here:

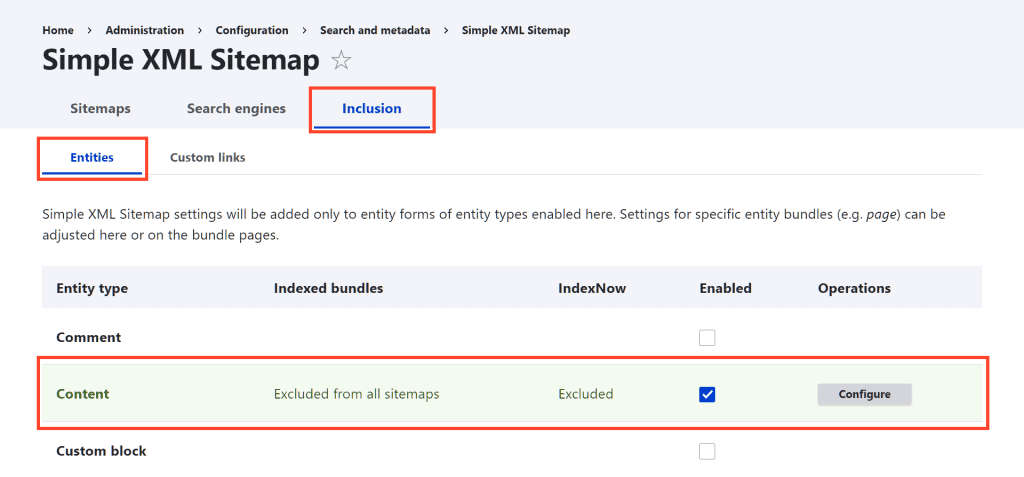
For this reason, the first thing to do is to change the settings in order to choose which elements to insert in the sitemap. If we open the Inclusion > Entities tab we will see that the content is excluded from the sitemaps, as I show you here:
We can then activate the Index entities of type Article in sitemap Default option for the sitemaps that interest us.
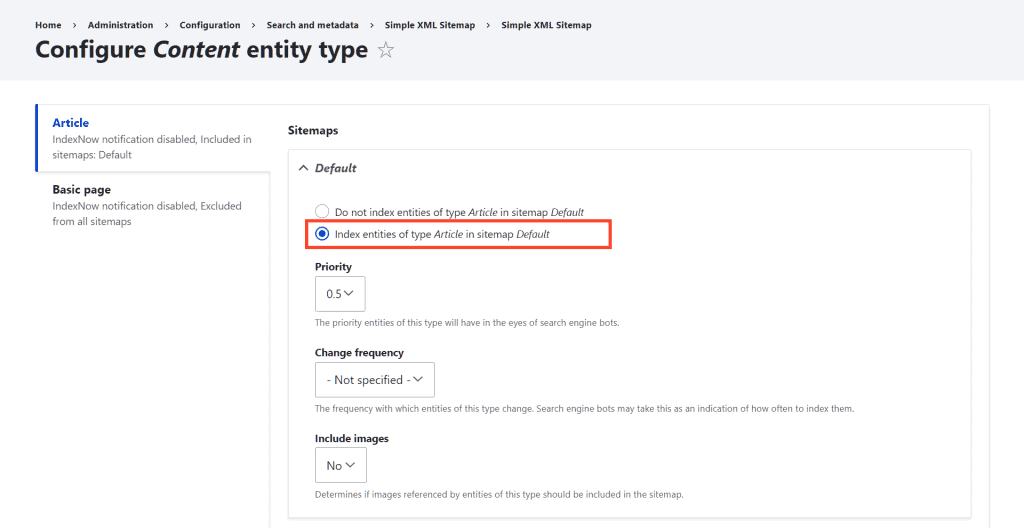
We repeat the same procedure for the Base Page content so as to include the pages in the sitemap as well. Finally, we tick the Regenerate all sitemaps after hitting Save option and click on Save configuration. By doing this our sitemap will be generated.
Visiting the domain.com/sitemap.xml page again we will see the new updated sitemap:

Manage redirects with Drupal
There are several modules that allow us to create and manage redirects with Drupal. The module that we are going to see in this case is “Redirect“.
This extension is part of the core modules, so we just have to look for it in the extensions list and activate it, like this:

To access the module settings go to Configuration > URL redirects.
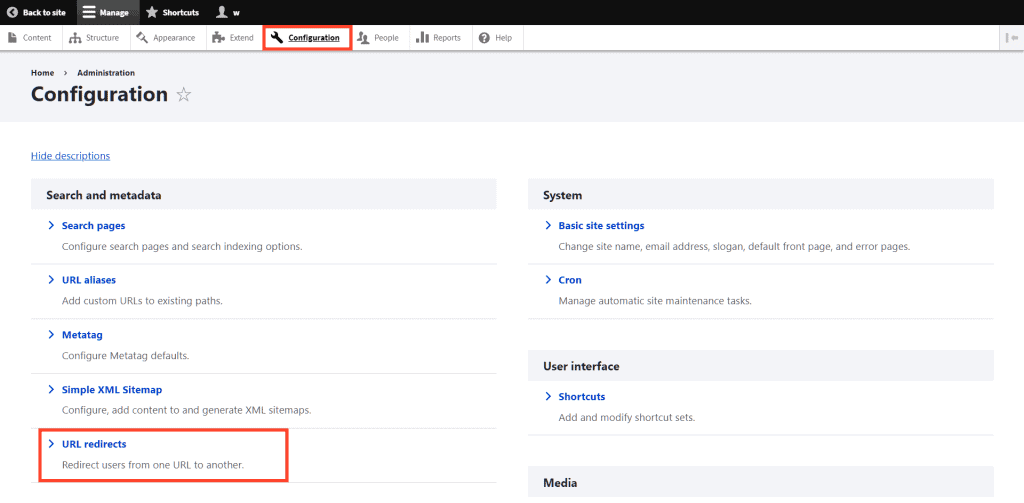
From this panel we can add new redirects and modify the existing ones.
To create a new redirect, click on Add redirection.
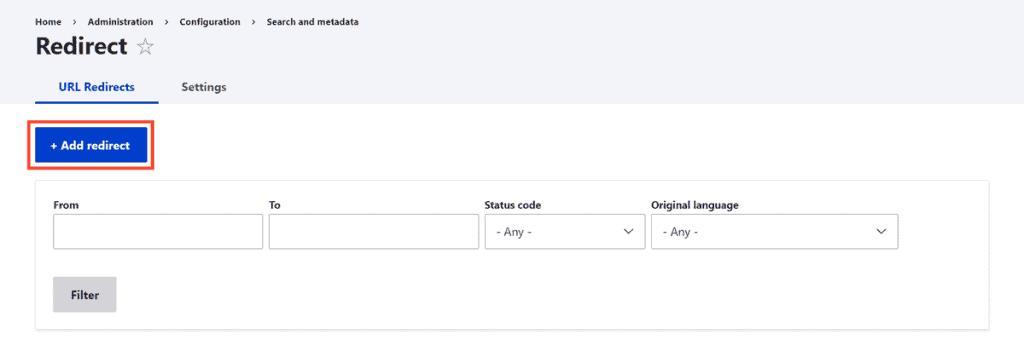
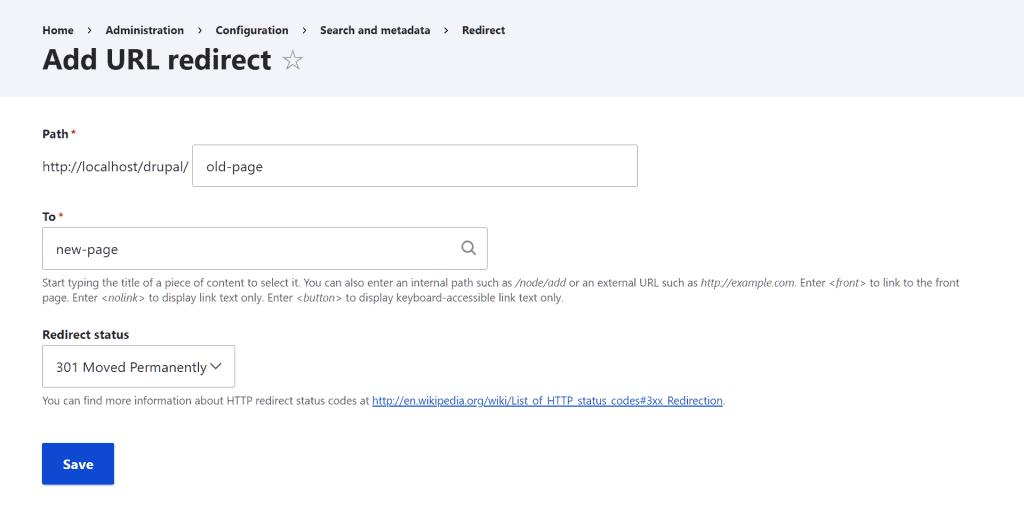
Then we fill in the fields:
- From: we must enter the starting URL.
- To: we enter the destination URL.
- Redirect status: we choose the type of redirect, for example 301 redirect.
- Language: we can set the redirect for a certain language only.
After filling everything out, click on Save to create the redirect.
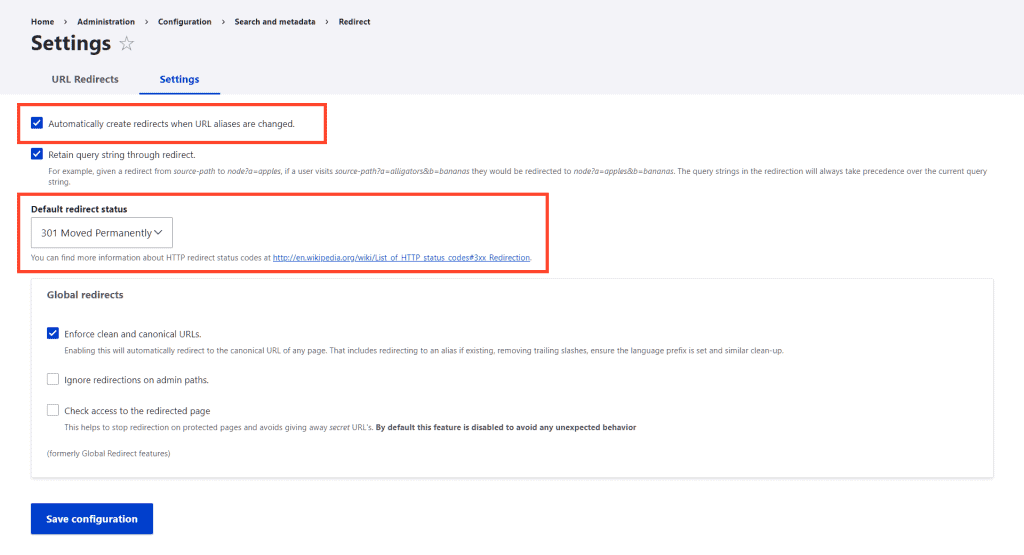
When we activate this module, redirects will be created automatically when we change the slug of already published URLs. By entering the Settings tab we can disable this option and manage the type of redirect we want to use by default.
In our experience, manually added redirects don’t work, the same issue was also reported in the module threads here. In our case the problem occurred with version: 8.x-1.8 of the module.
When we modify an existing URL, however, the redirect is created automatically and is functional.
Conclusion
Improving the SEO of a Drupal site is certainly not child’s play. There are best practices that we can follow, but real results can only be achieved by testing them in practice.
With this guide we have seen how to exploit the basic functions and modules to improve various aspects of the site that may be relevant for positioning.
First, we started from On-Page SEO and saw how to intervene on the URL structure and on the actual content. We then dedicated ourselves to the technical improvements and saw some starting points but also a real practical guide to managing redirects and creating the sitemap.
Now you can start implementing these tips on your site and start climbing the SERPs. Which SEO modules would you not give up on your Drupal site? Let us know with a comment.


Leave a Reply