Would you like to know how to create a forum from scratch?
If you are looking for:
- The best options for creating a forum;
- A practical guide to getting you started right away;
- A tutorial updated to phpBB and bbPress.
Then this is the guide for you: How to a create forum from scratch.
Let’s start right away with the available alternatives.
Table of Contents

How to create a forum: what alternatives are there?
If we want to create a forum, we have two main paths:
- Create a forum on our website OR
- Create a forum within a platform designed for creating forums.
Let’s take a closer look at what these two alternatives consist.
What does it mean to create a forum on our site?
This is the best option if you want to create an independent forum.
In this way, you can have your own internet domain and your own hosting space and have maximum control over managing it.
In this case, you will need a forum creation script or plugin if you choose to create a forum with WordPress.
Programs to create and manage a forum
Some of the most widely used software are:
- phpBB
- Simple Machines Forum
- vBulletin
- MyBB
Let’s briefly take a look at what these alternatives offer.
phpBB

phpBB is one of the most popular forum and bulletin board creation systems. It an open source software based on PHP and it’s free.
Remember that this is a free solution, but to bring the site online you will need a hosting, for example, to get started you could use shared hosting.
The tool allows us to create forums and subforums, with the ability to manage user roles, assign moderators, and manage the forum in every aspect.
Simple Machines Forum

Simple Machines Forum, known as SMF, is a free, open source script that allows us to create a forum easily.
Created as a replacement for YaBB, SMF is based on the PHP language and uses a database to function.
vBulletin
vBullettin, abbreviated to vB is a paid script for creating forums. It is written in PHP and uses a MySQL database to run. It is one of the most widely used platforms, after phpBB.
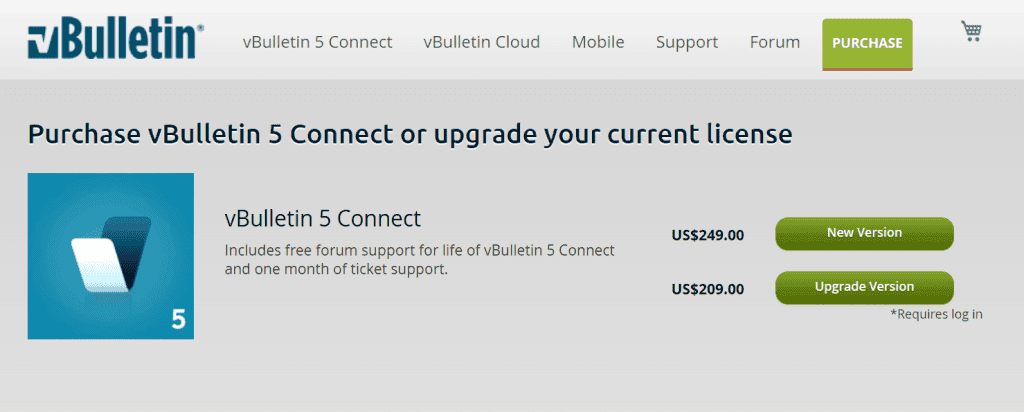
License purchase includes support via forum and one month of support via ticket.
MyBB

MyBulletinBoard also known as MyBB is an open source software. It is written in PHP and supports several databases including MySQL and PostgreSQL.
Again, this is free software with several functions that can be expanded with extensions.
How to create and manage a forum with WordPress plugins
As for WordPress plugins in order to create a forum we find:
- bbPress
- wpForo Forum
- Asgaros Forum
- Discussion Board.
In this case, the plugins are free, but to bring the site online you need a web space such as WordPress hosting.
Let’s take a look at the main features of these plugins.
bbPress
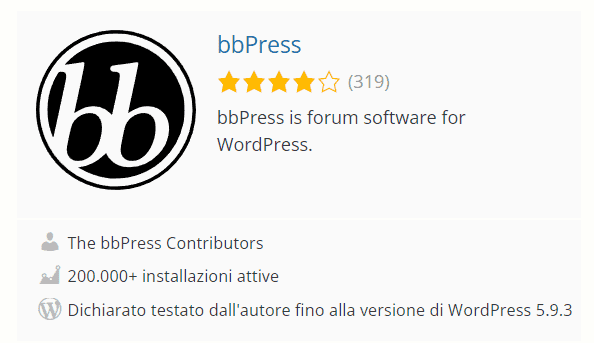
bbPress is one of the most widely used WordPress plugins for creating a forum. There are currently over 200,000 WordPress installations using this plugin.
The feature that makes this plugin one of the best is definitely the ease of use. bbPress, in fact, provides us with many functions such as shortcodes for creating registration and password recovery forms.
wpForo Forum
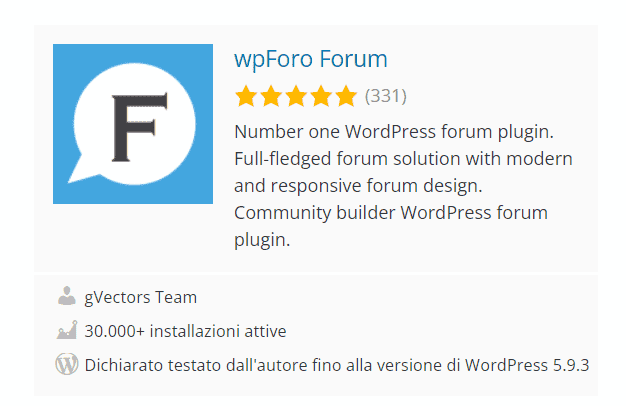
wpForo Forum is used by more than 30,000 sites and is one of the most popular plugins for creating and managing a forum.
Features include integration with Akismet for spam, the ability to group users, and a tool that helps move data from one forum to another.
Asgaros Forum
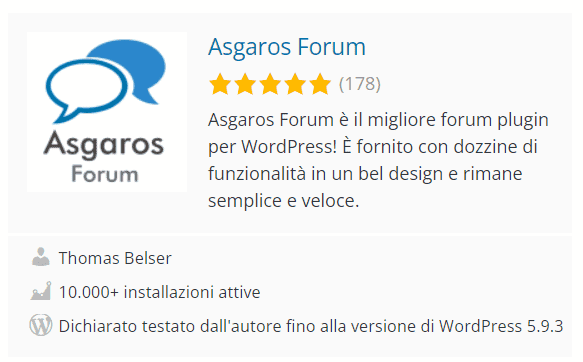
Asgaros Forum is a plugin that allows us to create a forum in a WordPress site. It currently has over 10,000 installations.
Features include automatic creation of the forum page, which can then be directly added to the menu, and simplified content management.
Discussion Board
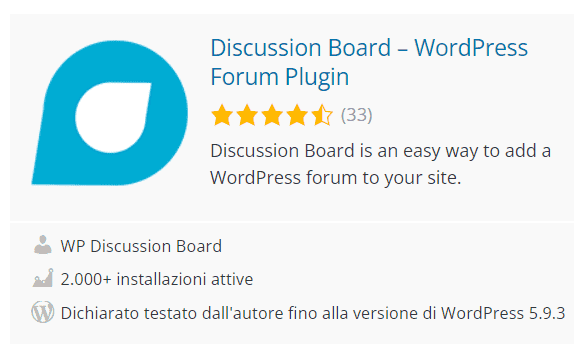
Discussion Board is a plugin active on more than 2,000 WordPress sites. Features include the ability to allow forum users to register directly from the front-end of the site via a form.
Also just activate the plugin to automatically create a page for logging in, a page for creating new threads, and the forum page for accessing existing threads.
How do the platforms for creating forums work?
There are several services that allow us to create a free forum such as Forumattivo (forumotion) and Forumfree.
These are just a few examples, let’s see what they offer by taking Forumattivo as an example.
The site allows us to create a forum for free with a subdomain like:
nameoftheforum.forumactive.com
We can choose from these platforms: phpBB2, phpBB3, punBB, Invision and ModernBB.
There is also an international version of the site that can be reached at forumotion.com.
Compared to creating a forum on our own site, these platforms are more limited and do not allow us to have complete control. For example, in many cases, you have the disadvantage that advertisements will be displayed on the forum.
How to create a forum: a step-by-step guide
Now that we have seen an overview of the main methods of creating a forum, let’s get into the meat of our guide.
Let’s take a look at how to create a forum using two of the most popular methods.
We will see how to create a forum with phpBB and how to do it with bbPress, WordPress plugin is most widely used for this purpose.
How to create a forum with phpBB
Now that we have seen the different alternatives, let’s move on to the practical part of this guide and start by finding out how to create a forum with phpBB.
phpBB, short for PHP Bulletin Board, is a free, open source tool that allows us to create and manage a forum.
To learn how to create a forum with phpBB, we will see how:
- to install and configure phpBB
- to create and manage the forum.
Install phpBB with Softaculous
If your hosting provides you with an auto-installer, you can install phpBB with a one-click installation.
For example on all our plans including semi-dedicated hosting, dedicated servers and VPS cloud hosting you have Softaculous available. This allows you to easily install hundreds of scripts.
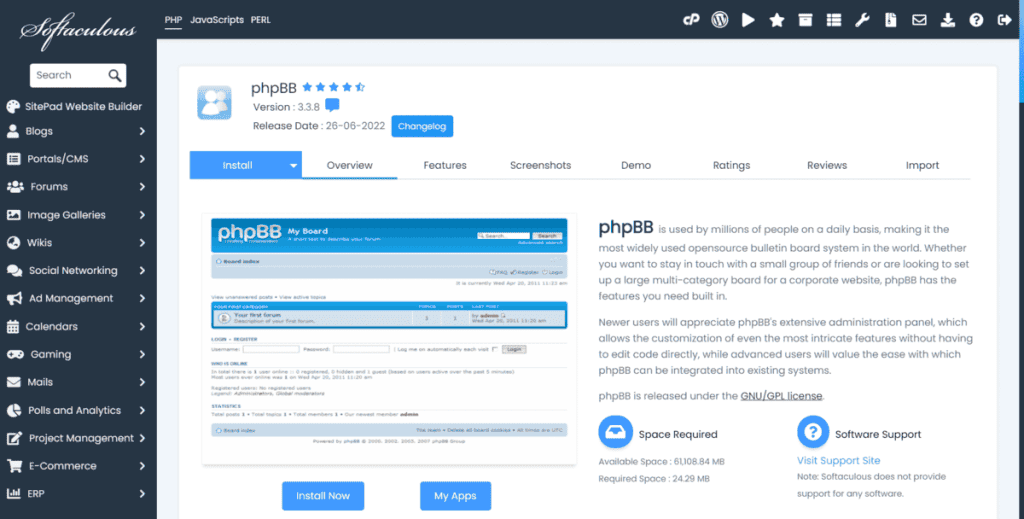
You just choose the domain on which you want to install the program and enter the required information about the forum and administrator account.
Install phpBB manually
To install phpBB manually, these steps are required:
- download phpBB
- upload files to the server
- create a database
- start the installation.
Let’s see how to proceed.
Download phpBB
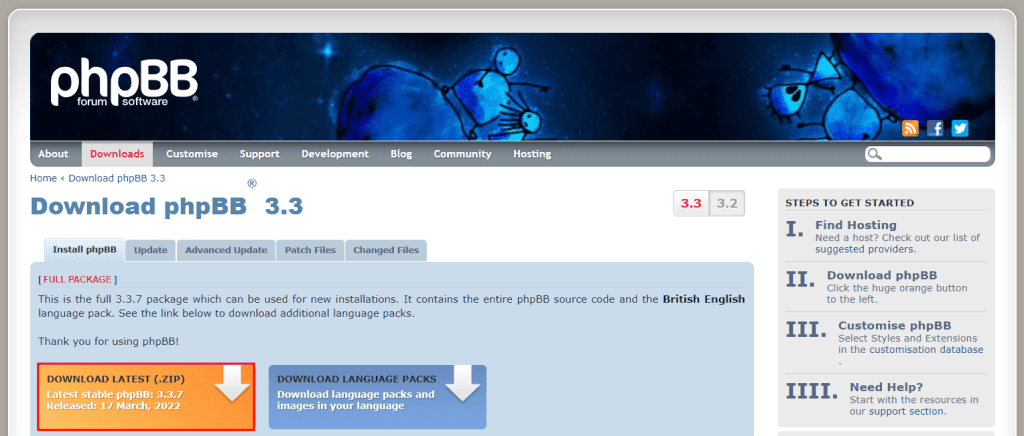
First we need to download phpBB from the download of the site.
We will be looking at the latest version, currently 3.3.7 released on March 17, 2022. By clicking on Download latest we will be able to download the .zip file to our computer.
Upload files to the server
At this point we can upload the files to our hosting space and unzip the archive.
We can follow several methods to do this:
- use a file manager such as the file manager of cPanel;
- use an FTP client such as FileZilla or Cyberduck.
For the purpose of this guide we will use the cPanel file manager.
The first thing to do is to upload the .zip file to the server. If we want our forum to be accessible from the main domain we need to upload the .zip file to the root, i.e. the public_html directory.
We can also upload it to a subfolder or subdomain. In our example we used a subdomain.
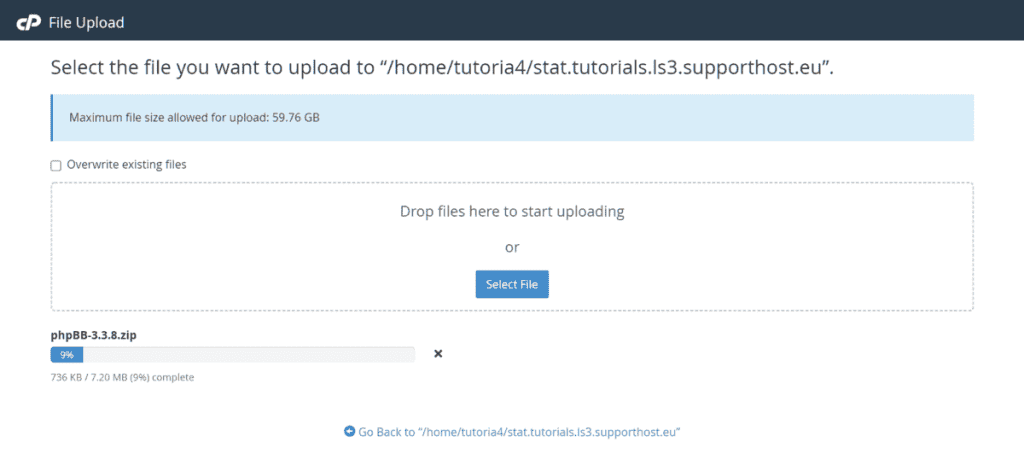
At this point, we can extract the archive.
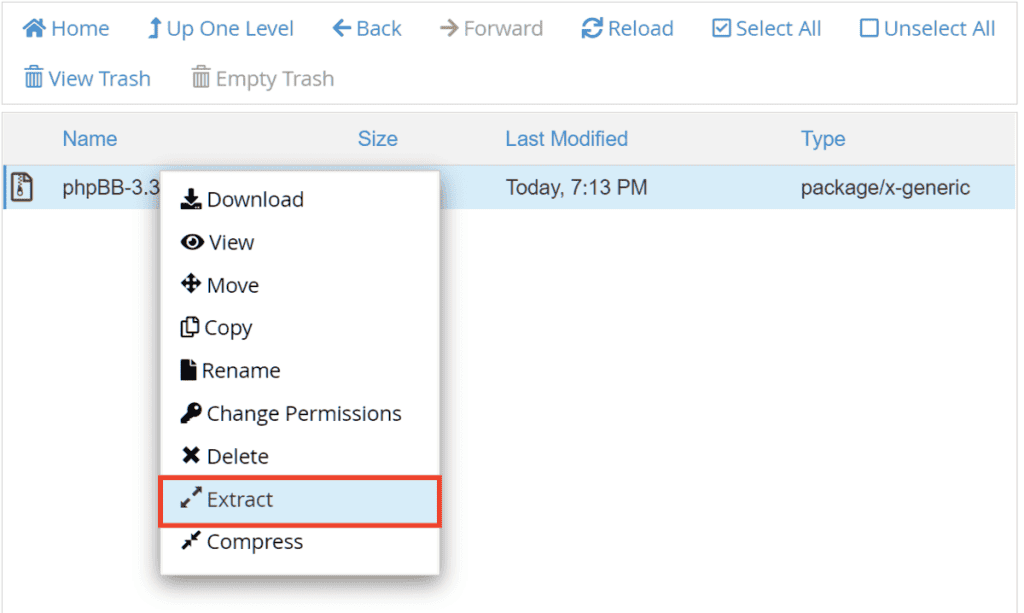
The phpBB3 folder will be created automatically.
Create a database
phpBB needs a database to work, so we need to create one before installing it.
You can follow our tutorial on how to create a database with cPanel.
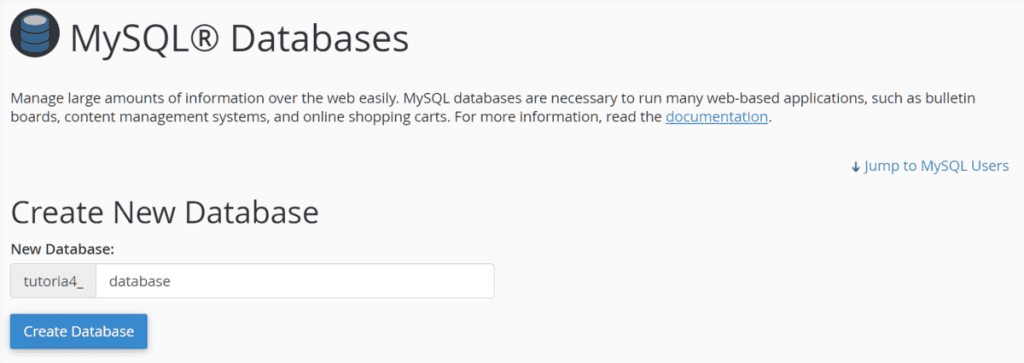
In short, you will have to:
- create a new database
- create a database user
- Associate the user with the database.
At the end of these steps, you will need to memorize or take note of the database name, user name and password because you will need them during installation.
Start the installation
At this point to start the installation, we need to link to the URL where the folder with the phpBB files is located, for example:
www.dominio.com/phpBB3
You just replace the address above with the exact path.
We will get a page like this one, and all we have to do is click on the Install tab to start the phpBB installation procedure.

This section tells us the requirements and we can click on the Install button to start the installation.
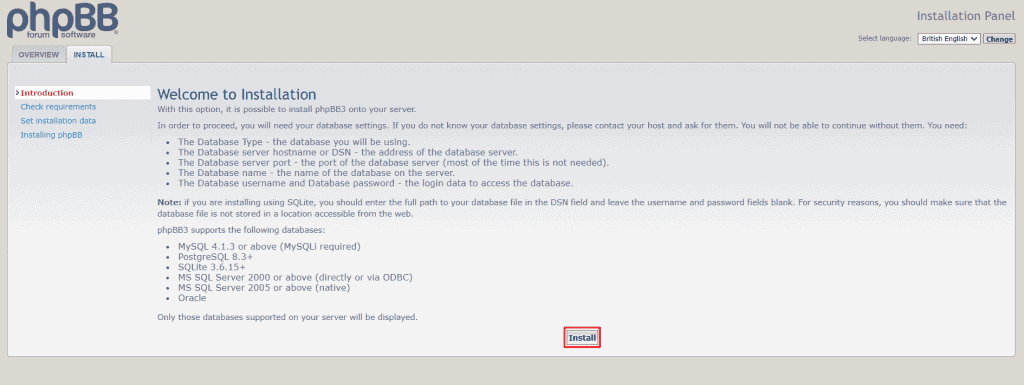
The program will check the requirements, and if there are no problems, we will be shown the next step.
Create administrator account
At this point we need to configure the administrator account.

We are asked to fill in these fields:
Administrator username: choose a username between 3 and 20 characters.
Contact email address: enter email address.
Administrator password: choose password with 6 to 30 characters.
Confirm administrator password: enter the chosen password again.
After filling in the fields click on Submit to proceed.
Configure the database
The next step is to configure the database.
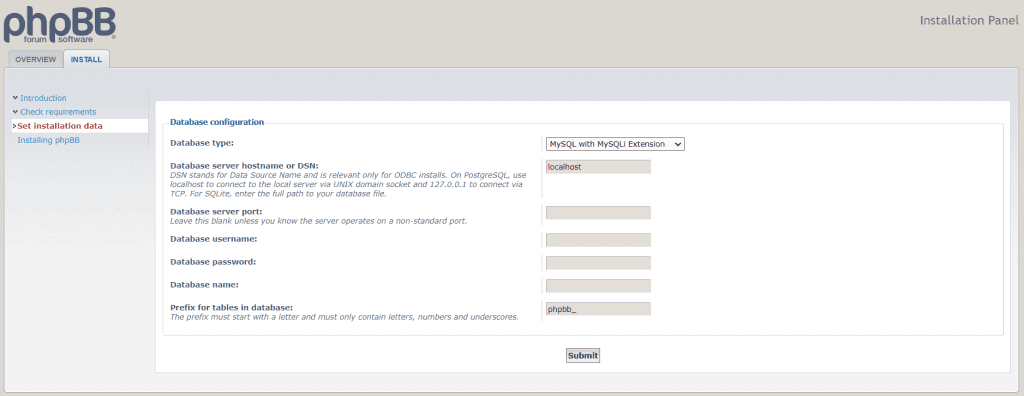
We will be asked to indicate:
Database type: choose from the list the type of database, e.g., MySQL.
Database server hostname or DSN: typically “localhost,” unless your provider has given you different directions.
Database server port: you can leave blank unless the server uses a nonstandard port. Again, refer to the provider’s directions on the database access data.
Database username: enter the username associated with the database.
Database password: enter the password of the user associated with the database.
Database name: enter the name of the database.
Prefix for tables in database: this field is generated automatically, you can change the prefix of database tables or leave it as it is.
After filling in all the fields you can click on Submit.
Configure server settings
The next step is server configuration.
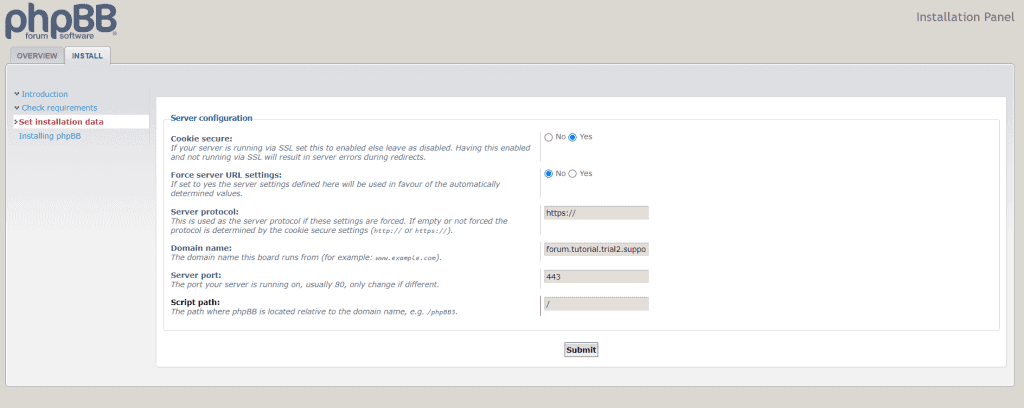
We are asked to verify the settings on protocol, domain, port, and route. We can leave the settings as it is and proceed by clicking Submit.
Configure email settings
At this point we need to choose email settings.
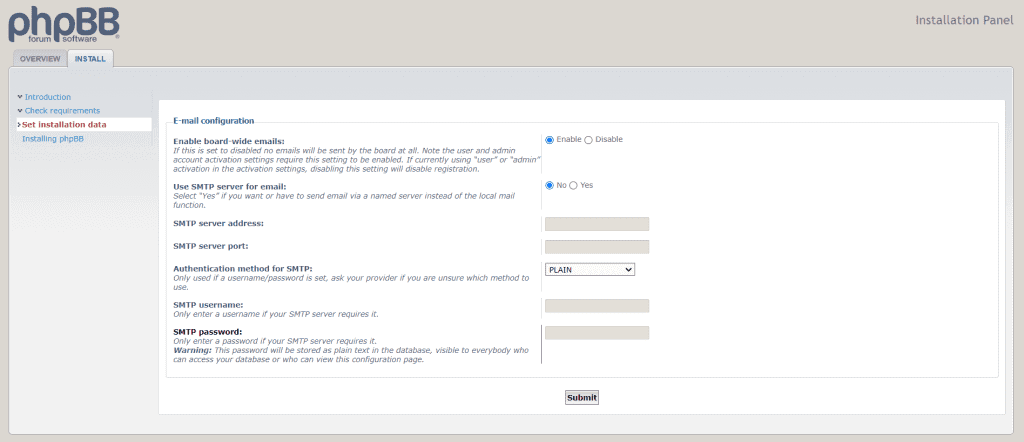
From here we can choose whether to use an SMTP server for email. In that case we have to enter the details: server address, port, username and password.
After that we can click on Submit.
Configure the forum
The next step allows us to configure the forum.

From here we can choose:
Default language: if we have not installed other languages, only English will be available. Later we can install other languages as well.
Title of the board: we can choose the title of the board.
Short description of the board: we enter a short description.
After filling in the fields we can proceed by clicking Submit.
Complete the installation of phpBB
At this point we have to wait for the installation process to complete. Eventually, we will see a notice like this one telling us that the installation was successful.

We can click on take me to the ACP to access the control panel.
The first time we login we will see an alert like this one telling us to delete the installation folder.
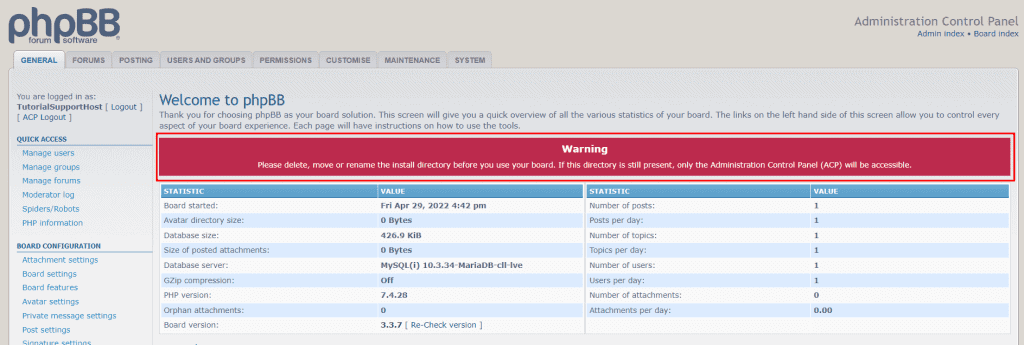
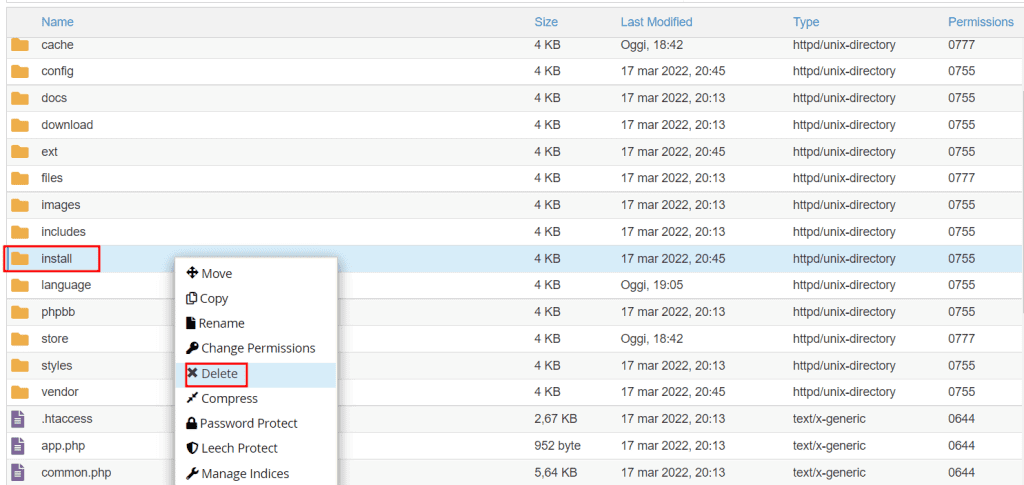
We must then delete the “install” folder located inside the “phpBB3” folder.
How to use phpBB
To access the control panel (ACP) of phpBB we need to connect to the forum address, for example:
https://mydomain.com/phpBB3/
From here we can click on the Login button in the upper right corner and enter our login information.
At this point, if we are logged in with the administrator account, we will see the ACP button on the top bar.
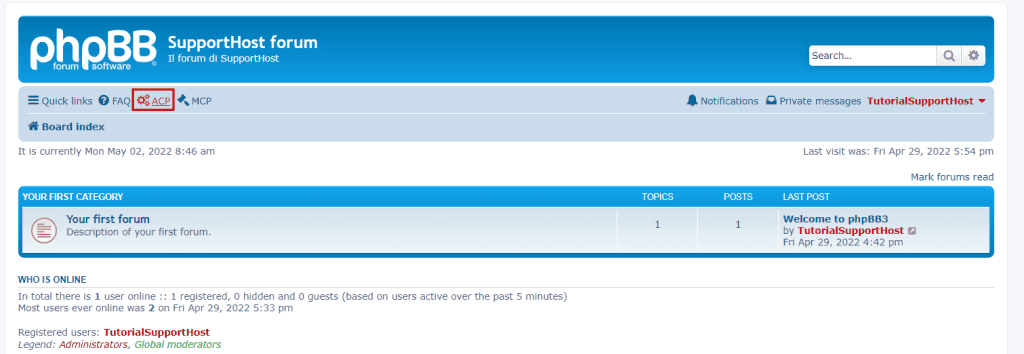
Click on it and enter the login credentials again. This will redirect us to the panel.
The phpBB control panel is divided into 8 tabs:
- General
- Forums
- Posting
- Users and Groups
- Permissions
- Customise
- Maintenance
- System.
Each of these tabs gives us access to manage certain elements of our forum.
In this part of the guide, we will see how to manage the main options and how to create a forum step by step.
Add a new language
If we have phpBB installed and have the control panel in English, but we want to use another language for our users and thus for the front-end, we can add a language package.
From the download section of phpbb.com we can download the language packs we need.
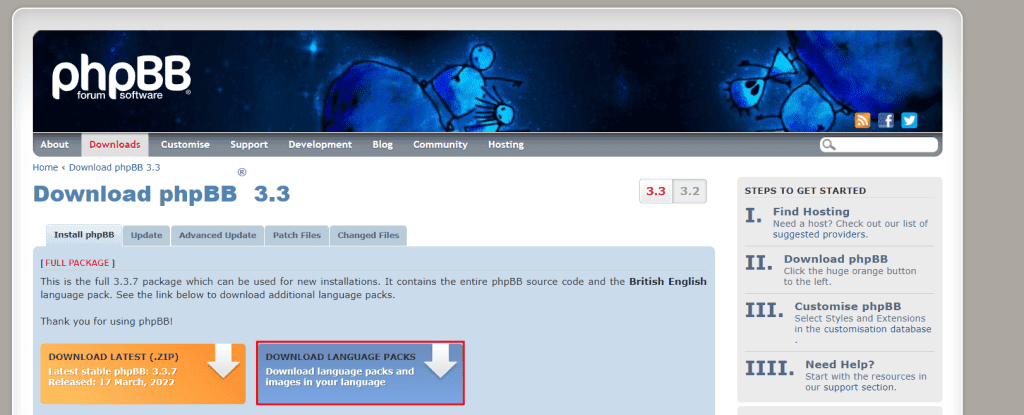
Select the language we are interested in, for example, Italian.
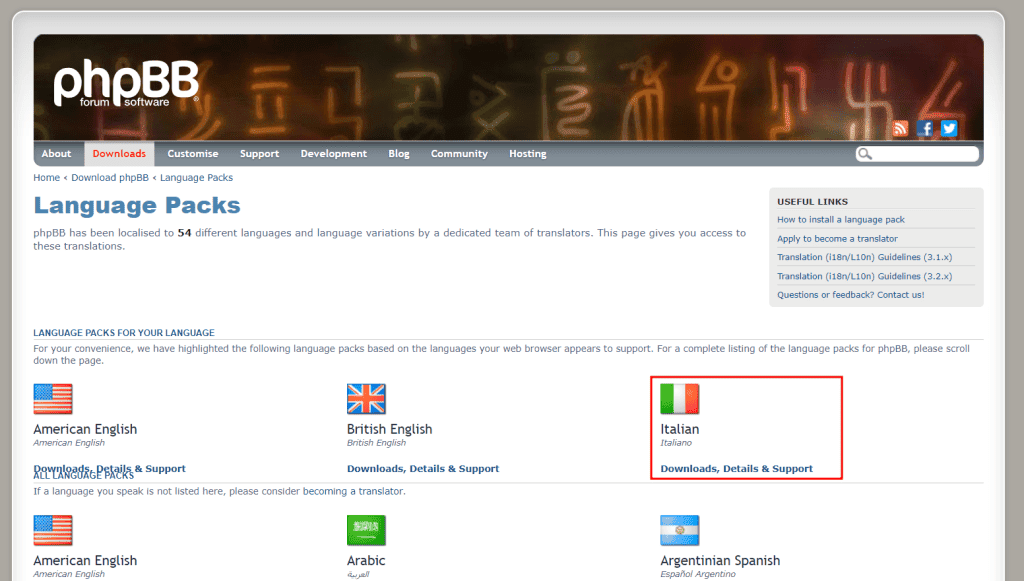
After that, download the files corresponding to the version of phpBB we have installed.
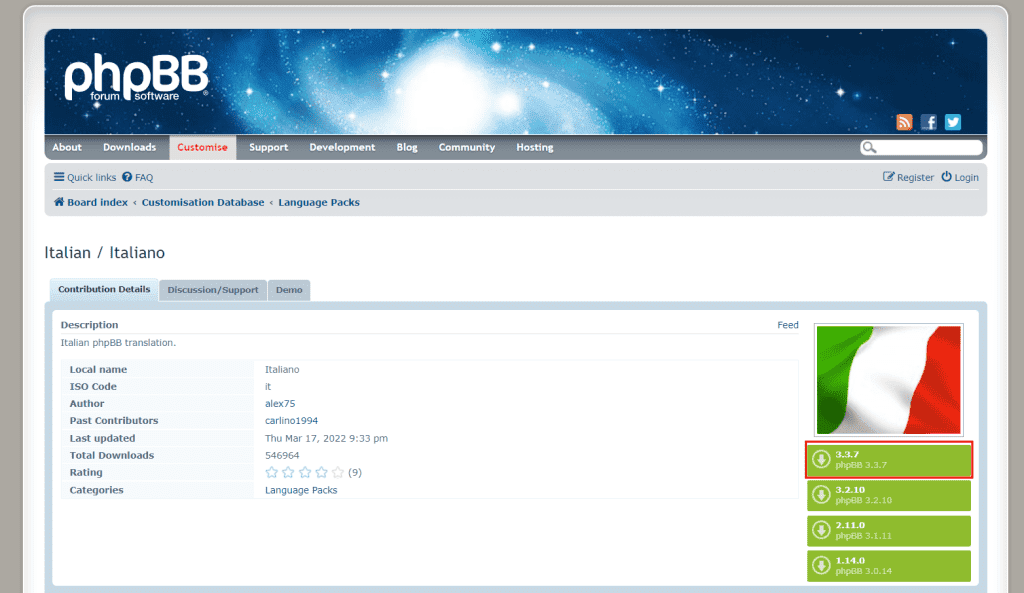
After extracting the archive we will see three folders inside: ext, language and styles. Inside each of them there will be a subfolder with the name of the language, for example “en” for English. We need to upload the inner folder to their respective folders: ext, language and styles on the server.
After uploading the files, we need to install the language package we added.
To do this, open the control panel and click on the Customise tab, after which we click on Language packs from the side menu.
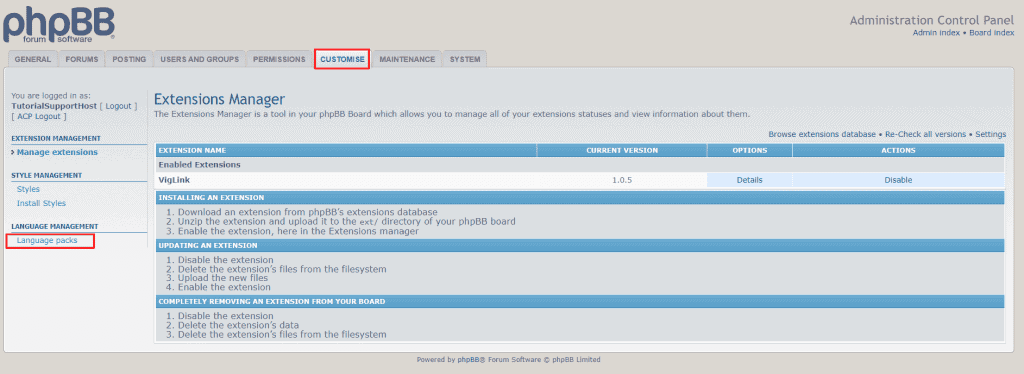
We will see the list of installed languages and those available but have not yet been installed. Let’s click on Install to install the new language packages.

General settings: board settings and board features
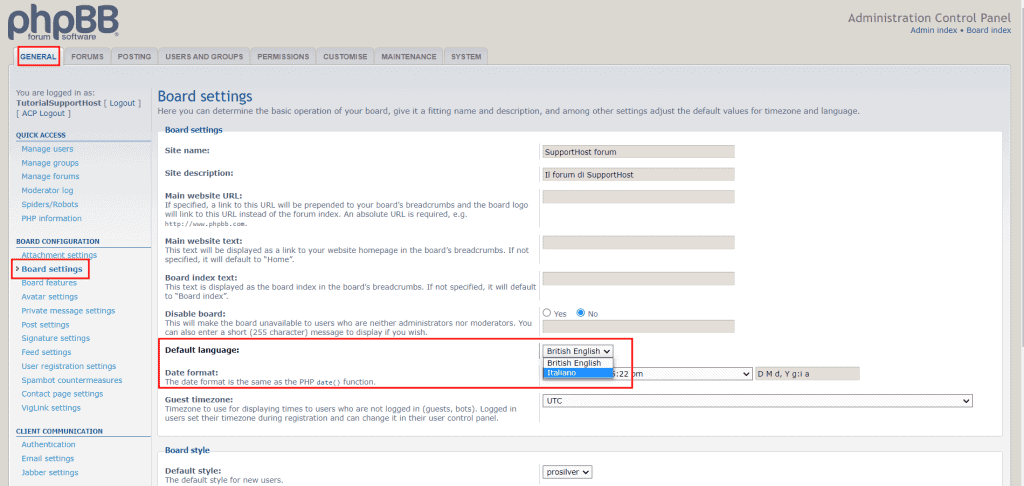
From the General tab we can manage the main settings, for example, changing the default language or the date and time format.
To change the language we need to click on Board settings and select the language from the drop-down menu next to Default language.
To change the date format, simply choose the format we prefer from the drop-down menu.
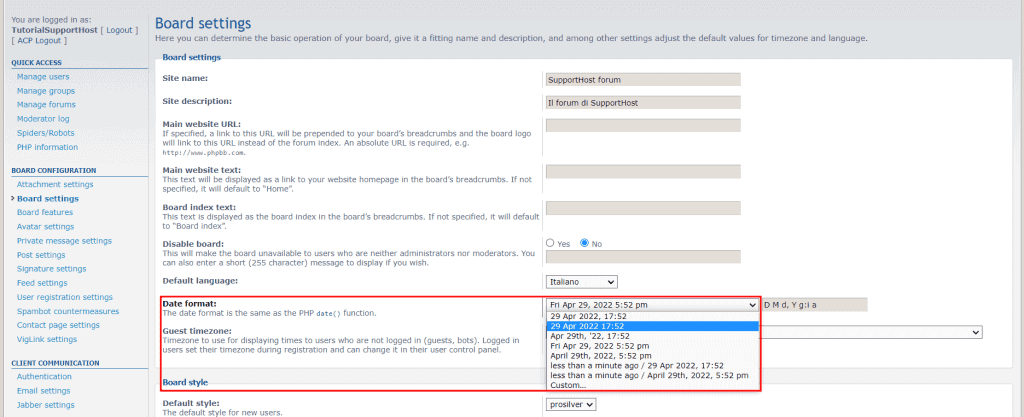
After the changes, to save the new settings click on Submit.
The Board features section allows us to turn on or off some of the basic functions that will determine what users can do.
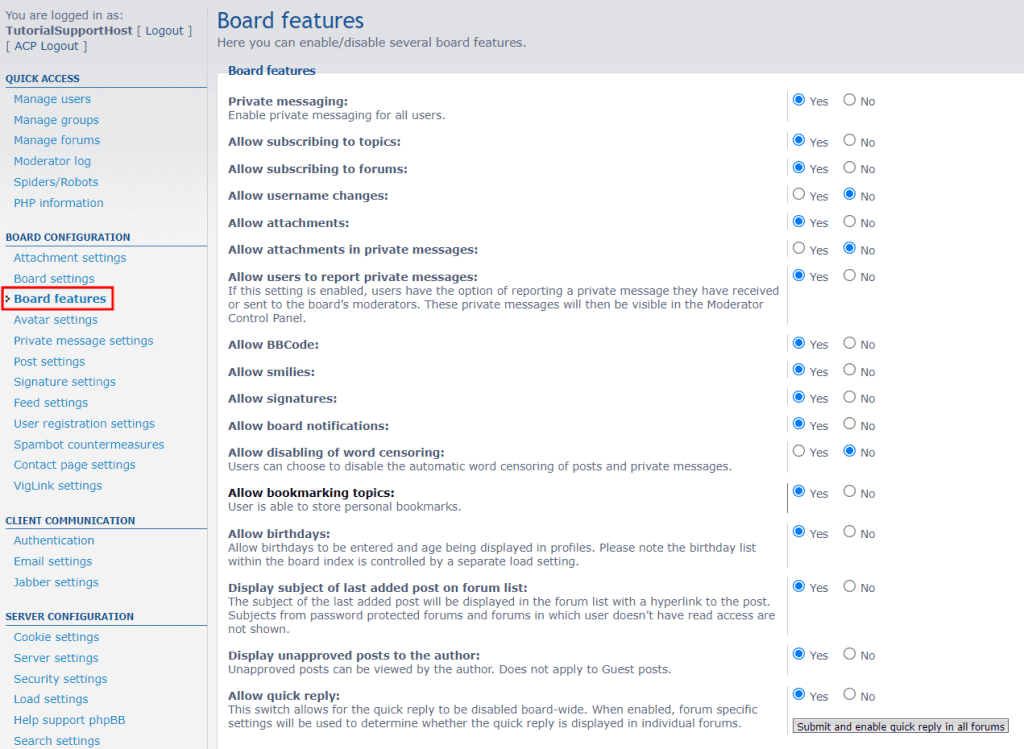
Here are some specific examples:
- enable private messages,
- Choose whether to enable membership in topics and forums,
- Allow users to change usernames
- Allow attachments to be uploaded in private messages.
Create the forum
To create a forum we have to access the control panel and open the Forums tab.
From this section we can create and manage the forum or create subforums.
To create a new forum we simply have to enter the forum name and click Create new forum as you see in this screenshot.

We can then choose to change several options or create a forum with the default settings.
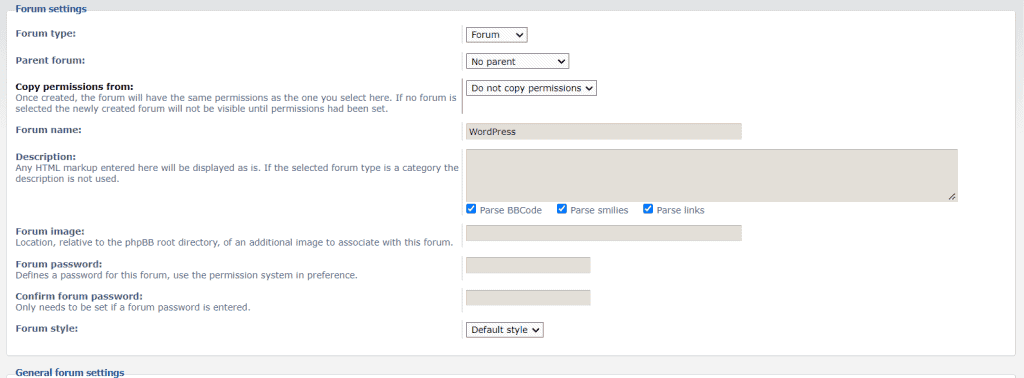
For example, we can create a subforum by setting a “Parent forum” from the drop-down menu. In this way we could create a “WordPress” forum and a “WordPress Plugin” subforum.
We can change the forum name, add description and picture, and set a password.
The general options also allow us to manage automatic replies, post reviews, the number of topics to show per page, and so on.
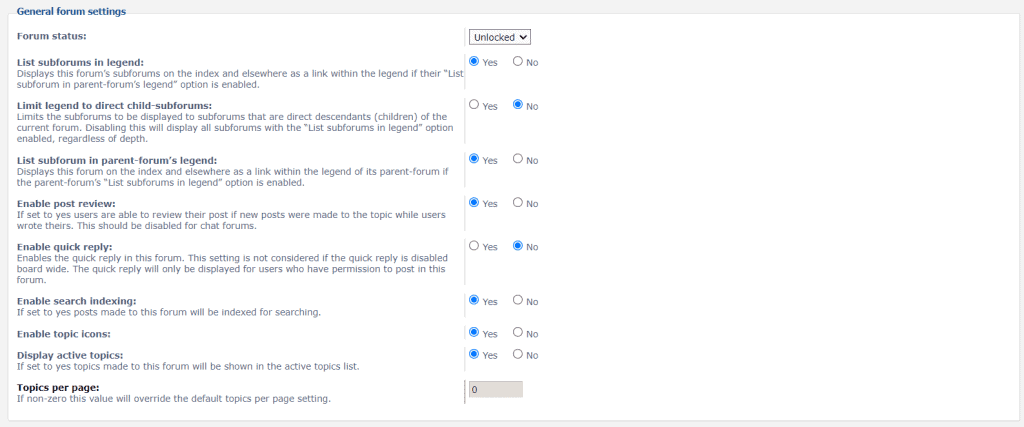
We can also put a link to the forum rules or insert rules to be displayed on every page of the forum.

When we are satisfied with the settings, we can click the Submit button at the bottom of the page to create the forum.
After creating the forum we can manage the permissions. We just have to open the “Forums” tab and click on Forum Permissions.
Permissions allow us to establish roles and also to designate moderators and administrators for a forum.
Next to each role, we will see a brief explanation, for example, if we want to assign to a user, the ability to only read discussions, and not reply or create a discussion, we can assign that user to the “Read only access” role.
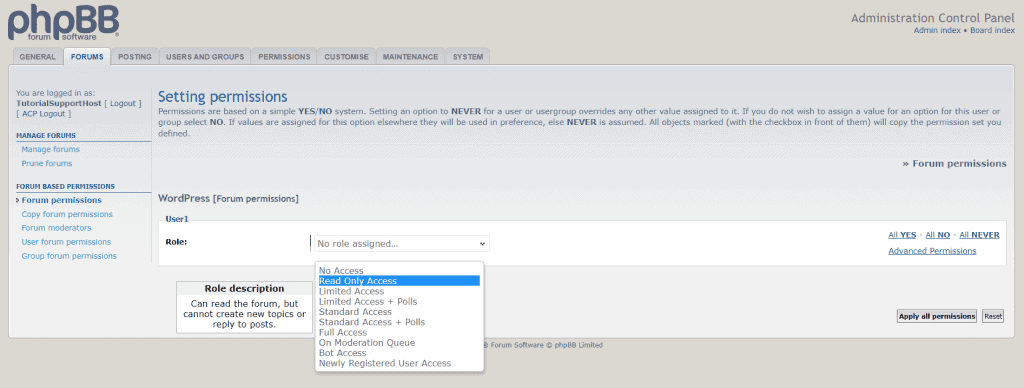
Remember that you can set both permissions for an individual forum and global permissions for each user.
Let’s see how to make changes to individual user permissions and how to assign moderators to individual forums.
Manage user permissions
Keep in mind that these are global permissions and apply to all forums. If you want to change user permissions for only a single forum, you must use the Forum permissions feature from the Forums tab, as we saw in the previous section.
To change the global permissions of individual users, we can open the User permissions section from the Users and groups tab.
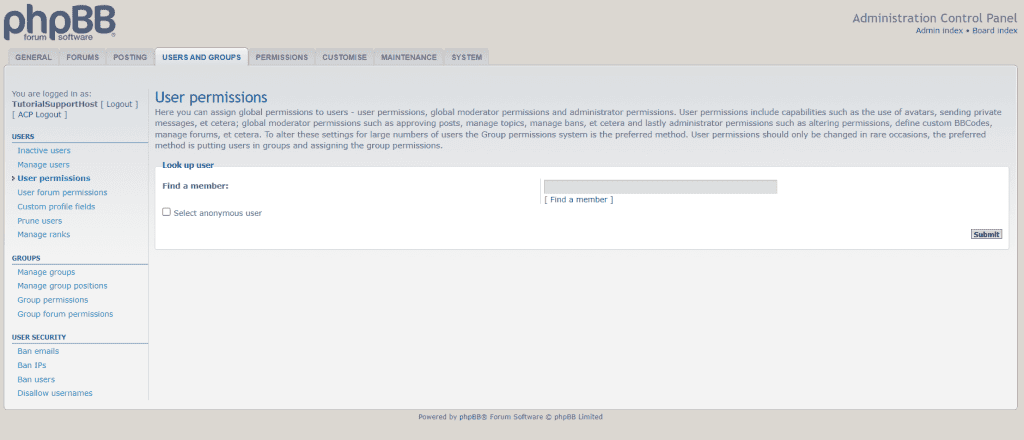
We can then choose whether to assign user, moderator or administrator permissions.
For simple users we will be able to assign one of the “user” roles in this way:
Select type: choose “user permissions.”
Role: we choose one of the available roles as “standard features” or “limited features.”
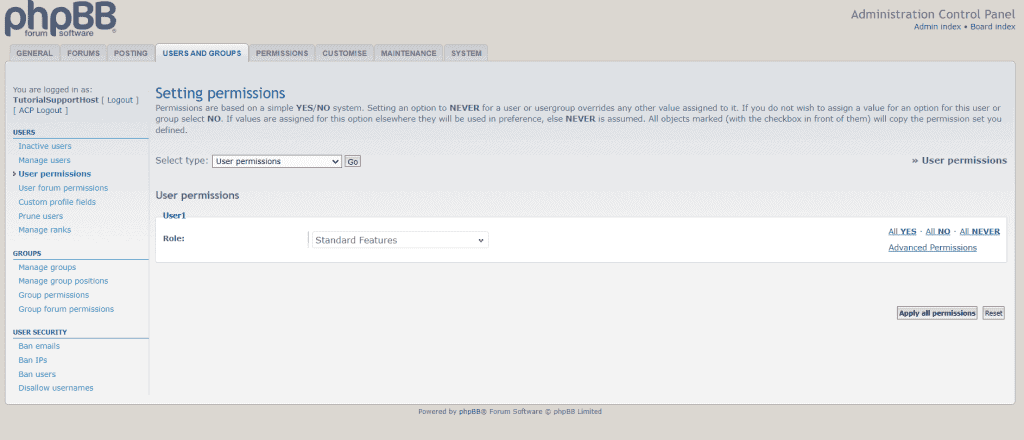
in this way we can choose from preset roles to save time. If, on the other hand, we want to change permissions in detail, you can click on Advanced Permissions and manage all the options.
As an example, let’s see what the “Limited features” role settings are.
Profile: from this section we can change the user’s permissions. By default option users with this role can change the avatar, password, email address and profile information, but cannot change the user name.

Posts: this section allows us to establish permissions for creating posts. In this case the user cannot upload attachments or save drafts, but can download files and use a signature.

Private messages: from here we can determine whether the user can send private messages, add attachments, send multiple messages, and so on.
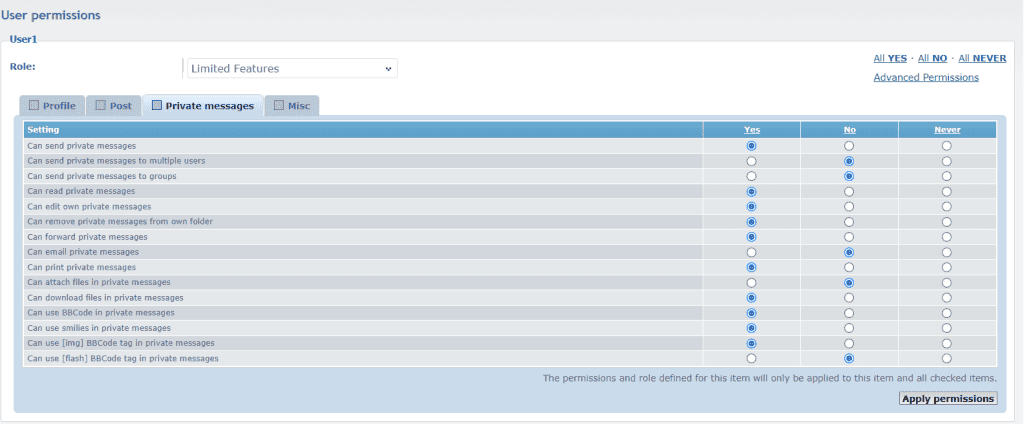
Misc: From this section we can change other settings, such as the ability to hide one’s “status,” being offline or sending instant messages or emails.

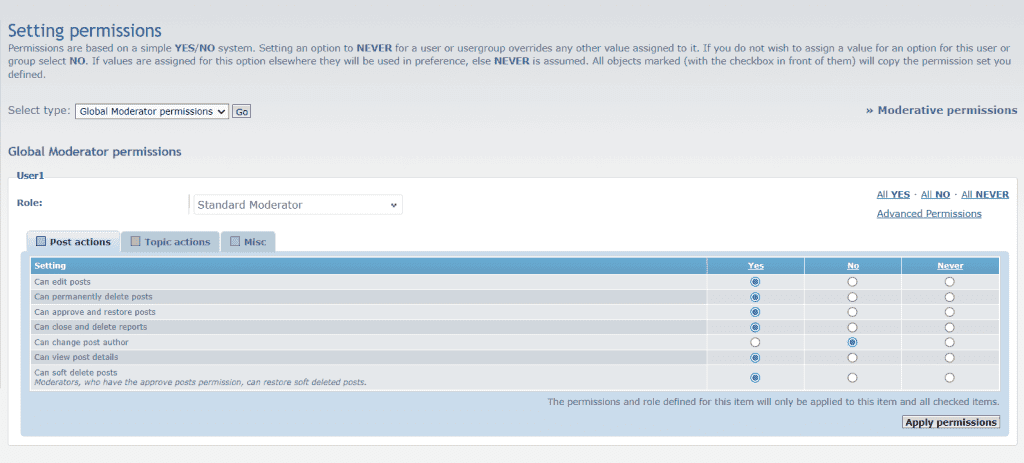
These are the permissions for simple users, but if we want to give a user the moderator role, we just have to choose the Global Moderator permissions option next to Select type.
After that we can choose from the predefined roles:
Standard Moderator: does not have the ability to ban users or edit posts.
Simple Moderator: cannot post warnings or use the moderation queue.
Full Moderator: has access to all moderator permissions and can also ban users.
Queue Moderator: is only in charge of accepting or editing posts, so he is only in charge of moderating discussions.
Again, we can change the permissions in detail by clicking on Advanced Permissions.
Assign moderators to forums
To assign moderators to individual forums we must act from the Forums tab.
From here we click on Forum moderators in the “Forum based permissions” section.
First we need to select the forum or more than one. We can use the Select a forum section at the top to select one or more forums, or the bottom section to select the forum and all subforums.
In this example we will assign moderators to the “WordPress” forum. Keep in mind that in this way moderators will be assigned to the individual forum, but not to the subforums.
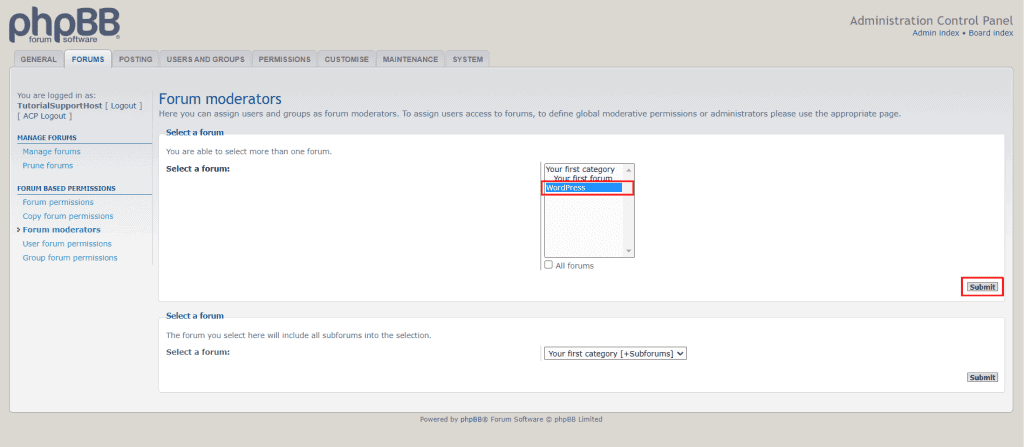
The next section allows us to select moderators. We click on Find a member and select the user who will become a moderator, then click on Select.
The user, in our example “User1”, will appear in the Add users list, at which point we click on the Add permissions button.
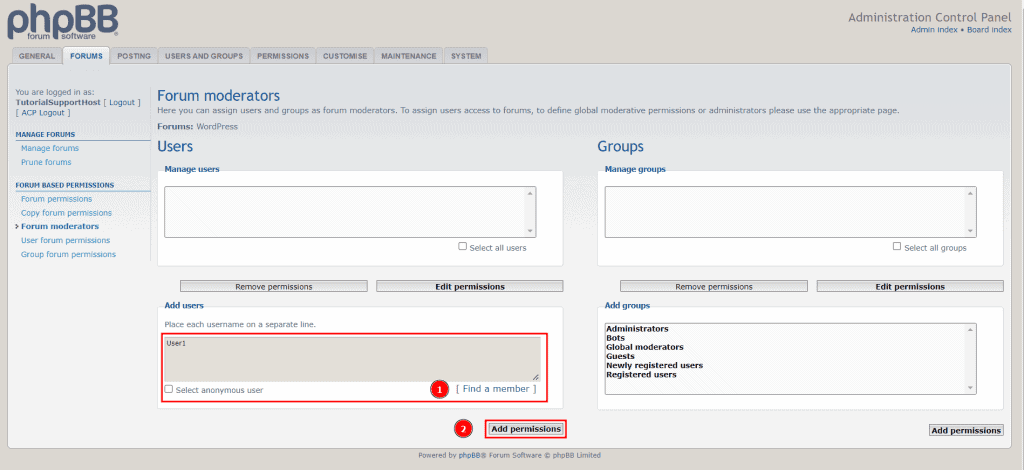
We must then select a role from those present, for example Full Moderator and click on Apply all permissions.
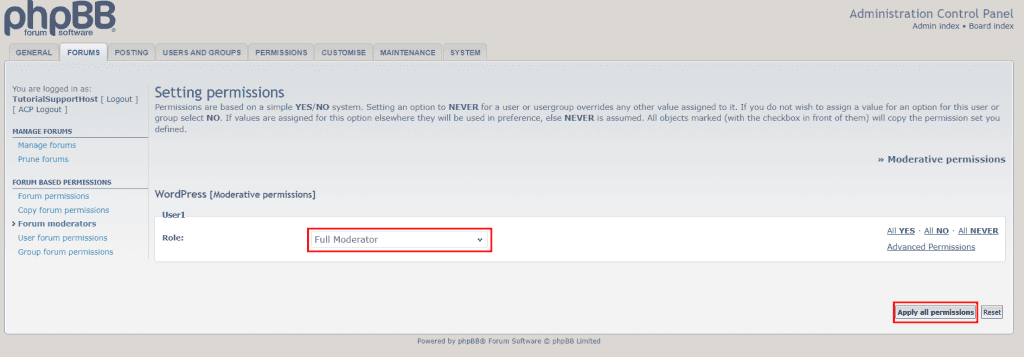
We will be taken back to the previous page and then we’ll see that the user to whom we have given moderator permissions is in the Manage users list. Next we can edit the permissions by clicking Edit permissions or remove them by clicking Remove permissions.
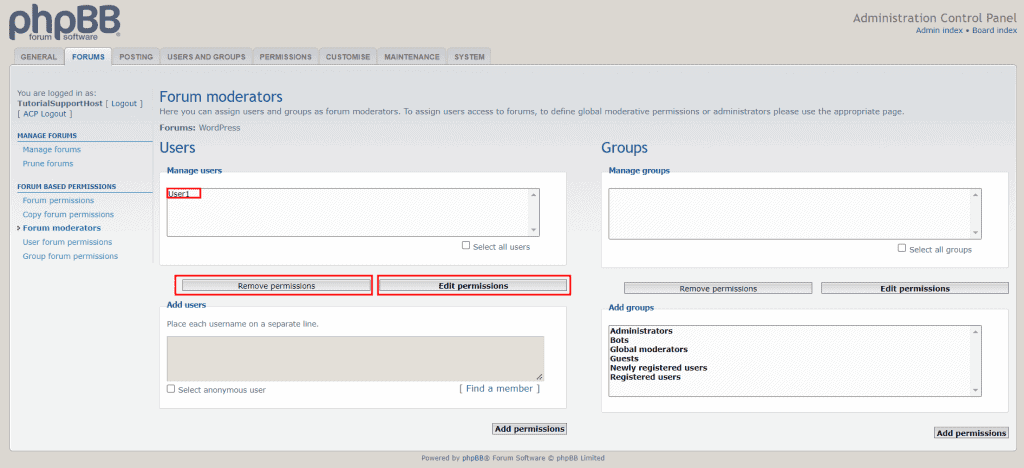
This concludes the part of our guide on how to create a forum with phpBB. By now the main settings of this script should be clear to you.
Now let’s move on to take a look at the other main alternative: how to create a forum with WordPress.
How to create a forum with WordPress by using bbPress
If you want to know how to create a forum you might be interested in creating one with WordPress.
As we have seen, in this case there are several plugins that come our way. One of the most widely used with over 200,000 active installations is bbPress.
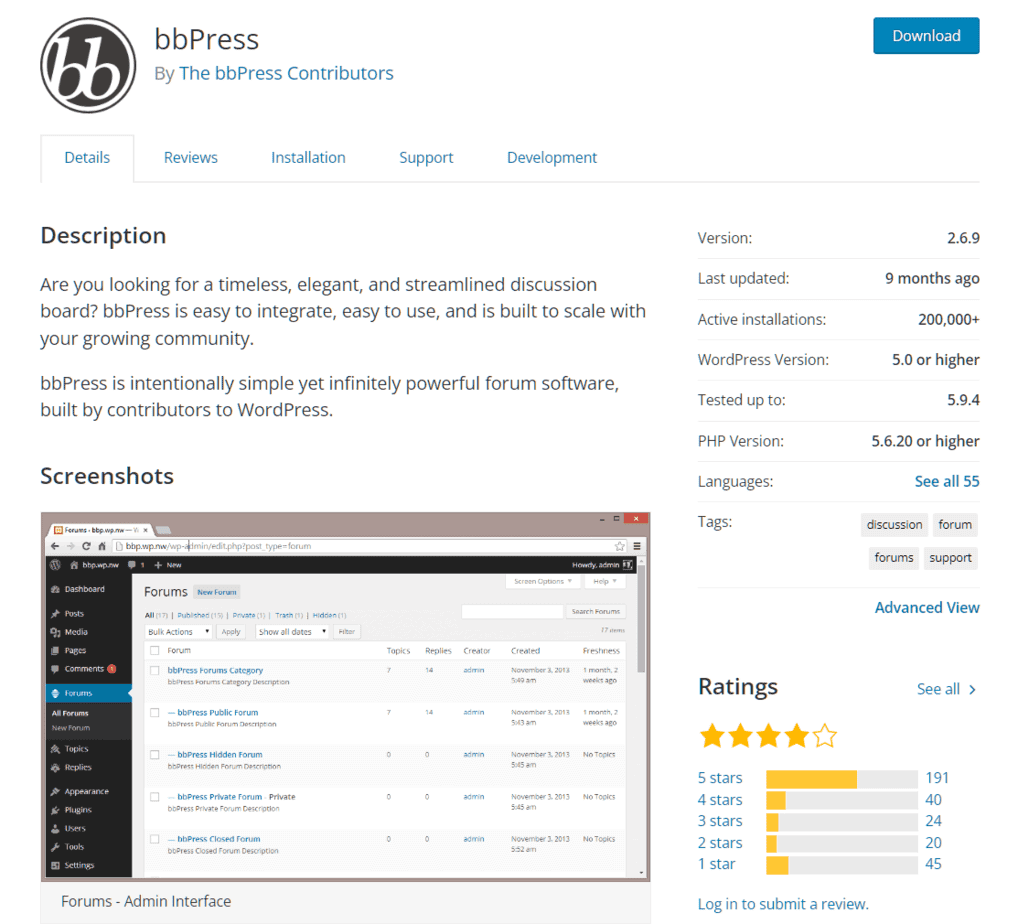
In this section of our guide, we will see how to install and use bbPress to create a forum with WordPress.
We will see step by step how to create a forum, if you want to follow the instructions as you read them and you don’t have a WordPress site yet, you can activate our free hosting trial plan. In this way, you can do as many trials as you want for 14 days, risk-free.
Install and activate the bbPress plugin
In order to create a forum with WordPress, first we need to install bbPress.
After logging into the WordPress dashboard, click on Plugins -> Add New and search for “bbPress”.
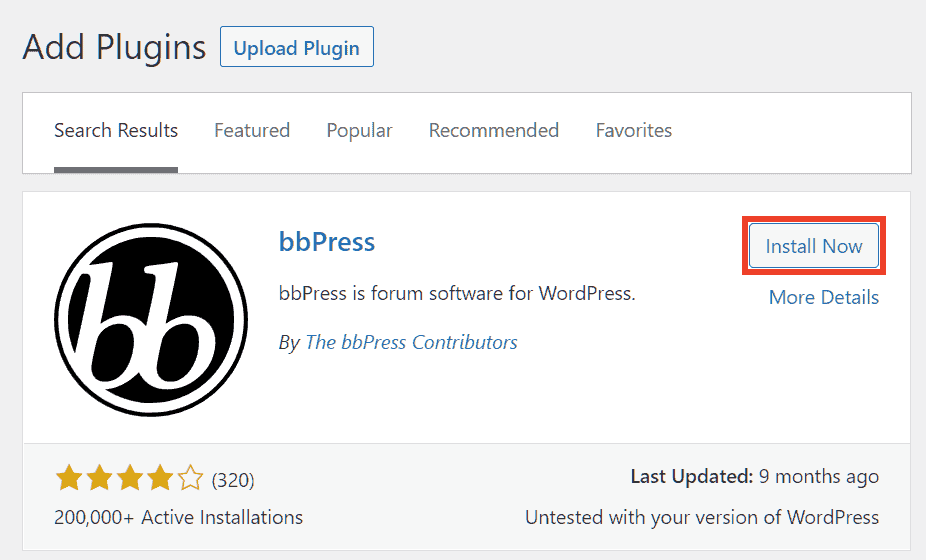
Click on Install Now and then on Activate to install and activate the plugin.
bbPress: forum settings
After activating the plugin, the WordPress navigation menu will appear, in there you’ll see three new items: Forum, Topic and Replies.
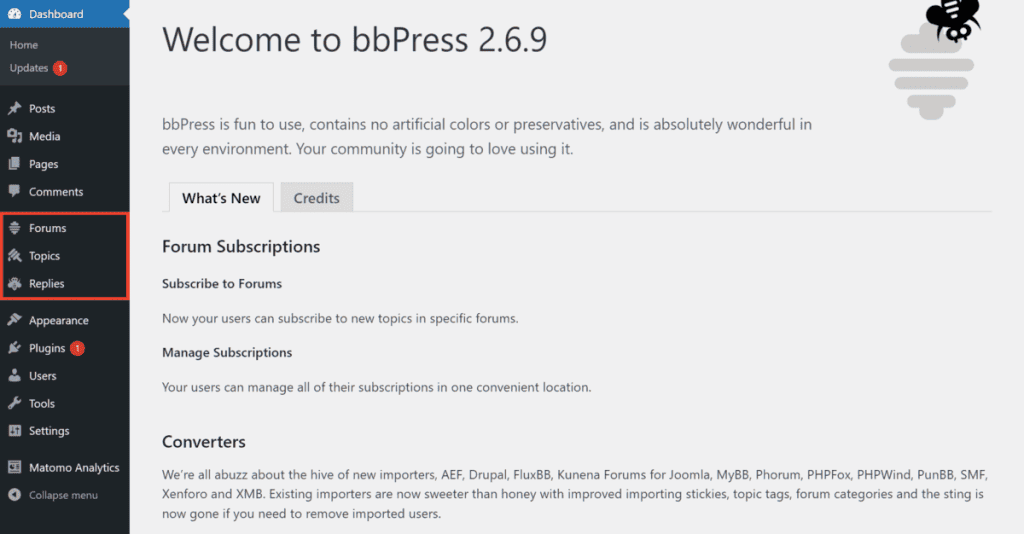
We will also see a new item in the Settings section: Forum.
Let’s start right from the settings, click on Settings -> Forum.
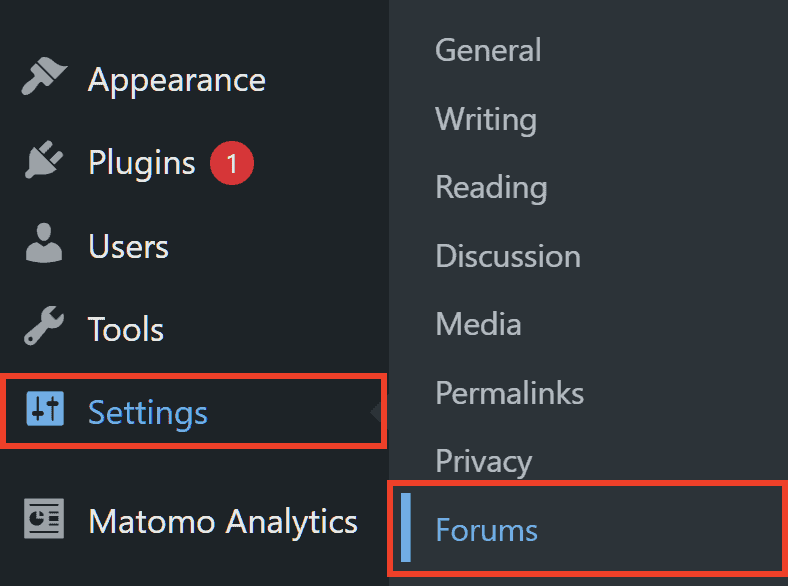
In this section, we can find the main options, let’s see what they allow us to do.
Setting forum users
From here we can manage permissions for forum users.
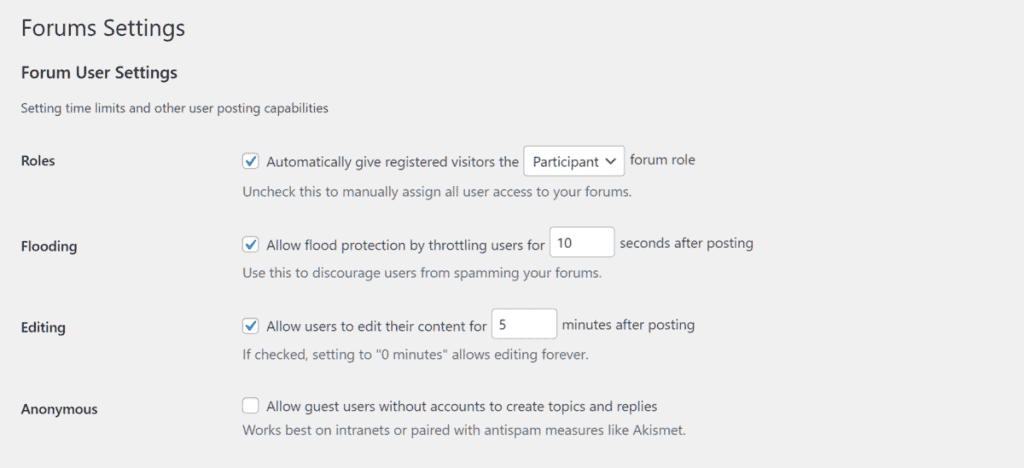
Role: we can set a default role to be assigned to new forum members. The default option allows us to create new users with the role “participant”. If we want to manage registrations manually by going to assign the role to new members individually, we can disable this option.
Flooding: from here we can set a time interval within which new comments cannot be posted. By default, this interval is set to 10 seconds.
Editing: we can choose to allow content edits and set a time interval after which users can edit their posts. The default option is 5 minutes. If we want to remove this limit we simply enter “0” and users will be able to edit their content immediately after posting.
Anonymous: We can decide whether to allow guests, i.e. unregistered users, to create discussions. By default, this option is turned off and you will need to register to participate in the forum. If you turn it on, make sure you have a system in place to protect you from spam.
Features of forums
These settings allow us to manage the functions of the forum.
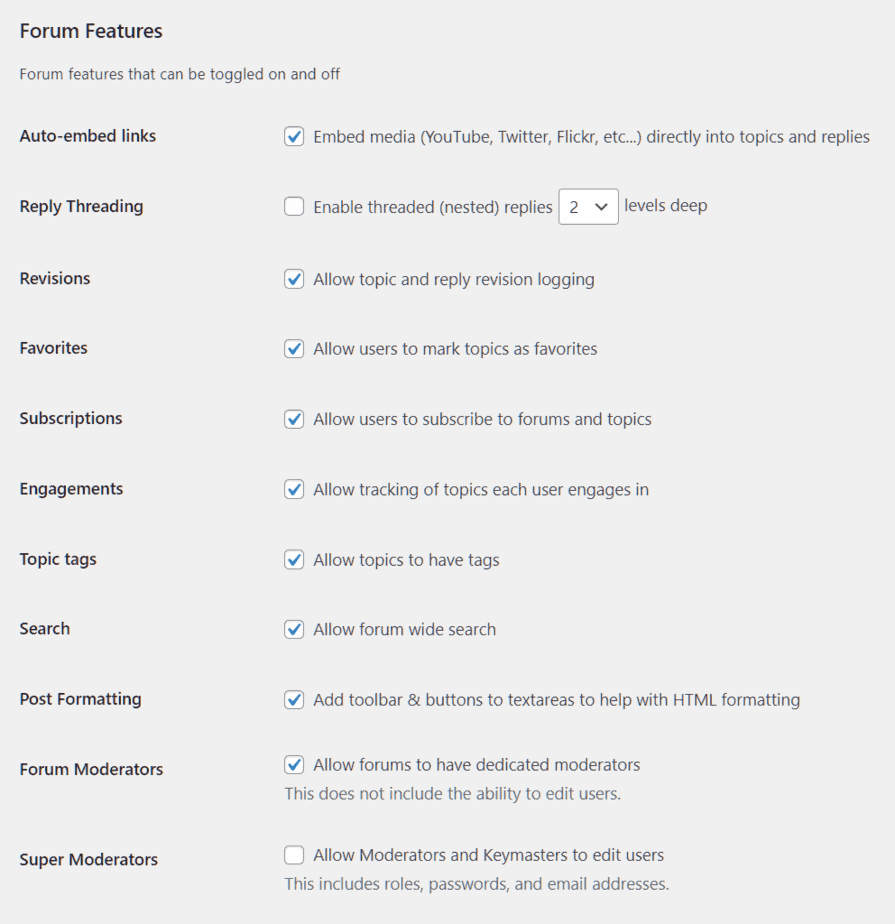
Auto-embed links: we can choose whether to leave media embedding active in discussions.
Nested responses: we can activate nested responses and choose depth levels.
Revisions: we can decide whether to keep track of changes in posts and replies.
Favorites: with this option enabled, users will be able to save some topics as favorites.
Subscriptions: With this option we allow users to subscribe to forums and discussions.
Engagements: we can keep track of the topics in which users are active.
Topic Tags: enable tags in topics.
Search: this allows you to search within the forum.
Post Formatting: shows formatting options for posts.
Forum Moderators: allows moderators, but they cannot change user information (such as role).
Super Moderators: an advanced level for moderator who can also change the role of users.
Topic and replies per page / RSS
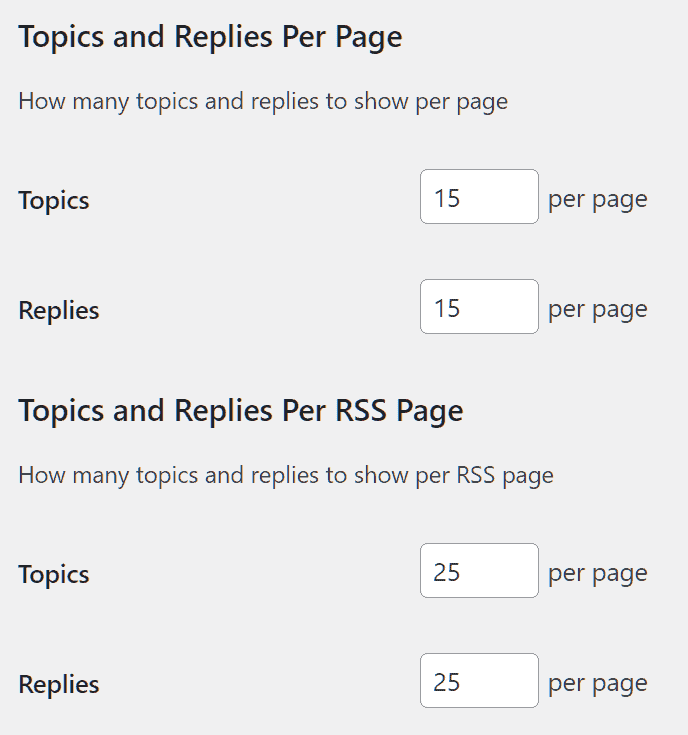
From here we can decide how many topics and responses will be displayed for each page and for each RSS page.
Abbreviation forum root
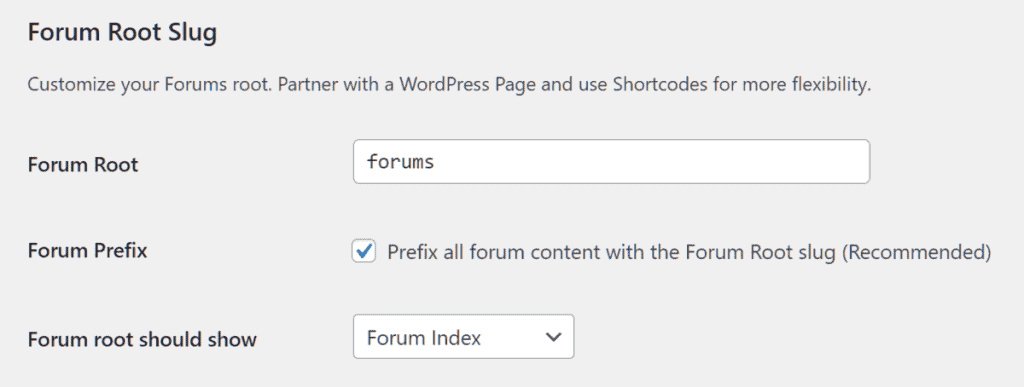
From this section we can manage the prefix to use in the forum root slug and whether to use the prefix for all forum content. The default option is “forums”.
We can also decide what should be shown in the root: “forum index” or “topic by the last post.”
Slug of the individual forum
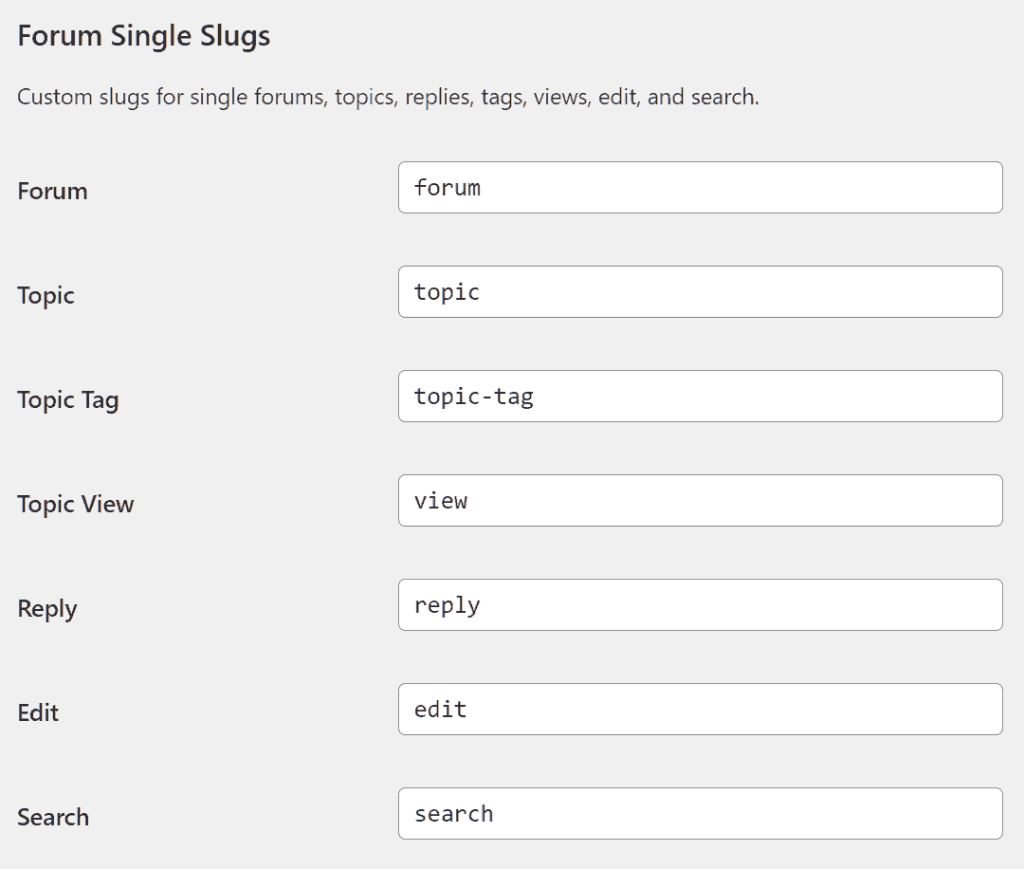
This section allows us to choose the section slug prefixes: forum, topic, tag, and so on.
Slug of forum users
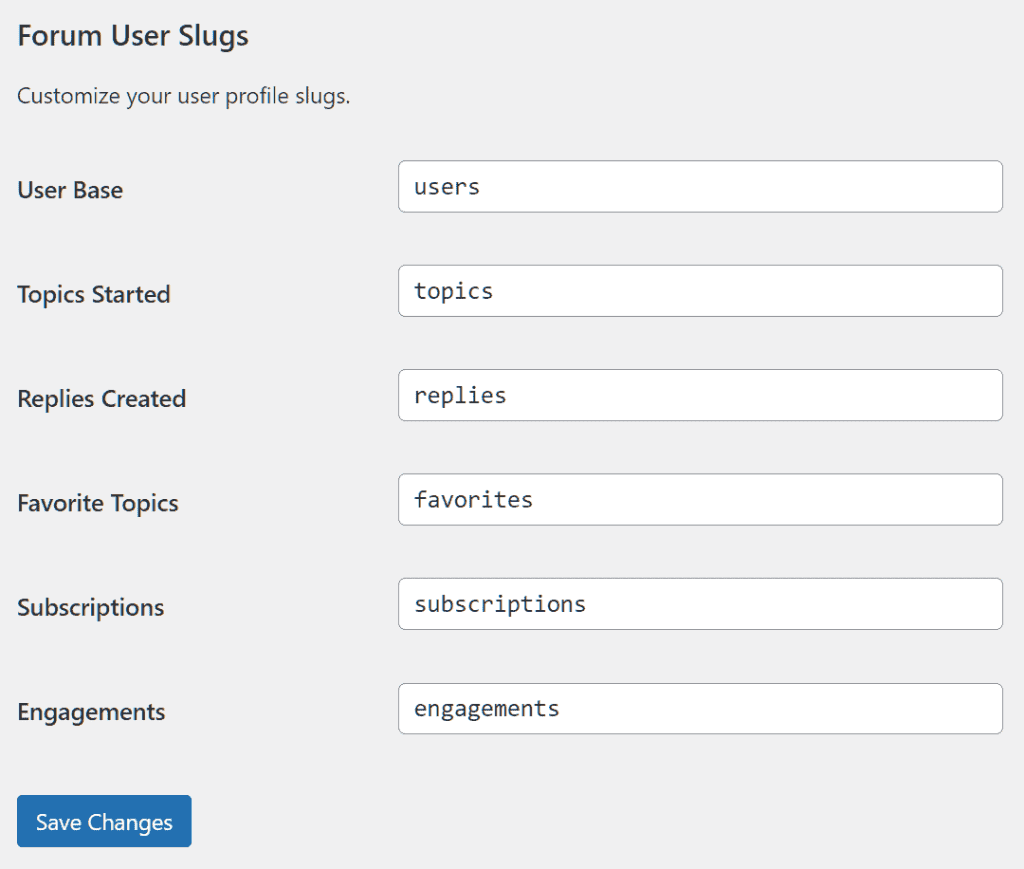
From here we can change the slug of user profile sections topics, replies, favorites, etc.
Create a forum
Now that we have seen what the main settings of bbPress are, let’s see how to create a forum.
From the WordPress dashboard click on Forum -> Add New.
We can then create a forum as if it were a regular WordPress page by entering the title and content.
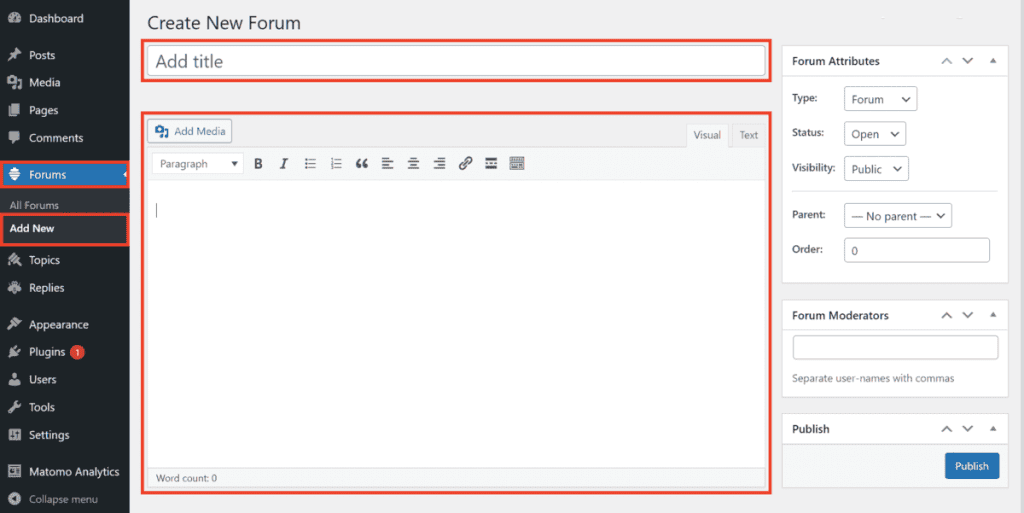
From the Forum Attributes section we can manage the settings:
- Type: forum/category, we can create forums or categories.
- Status: open/close, allows us to open or close the forum.
- Visibility: public/private/hidden.
- Parent: we can create a subforum by setting another forum as “Parent”.
- Order: we can change the order of the subforums.
- Forum moderators: here we can enter usernames to set users as moderators. We will return to this later.
When we are satisfied with the settings, we can publish the forum by clicking Publish.
Create a topic
To create a new topic click on Topic -> Add New and create the topic with title and content.
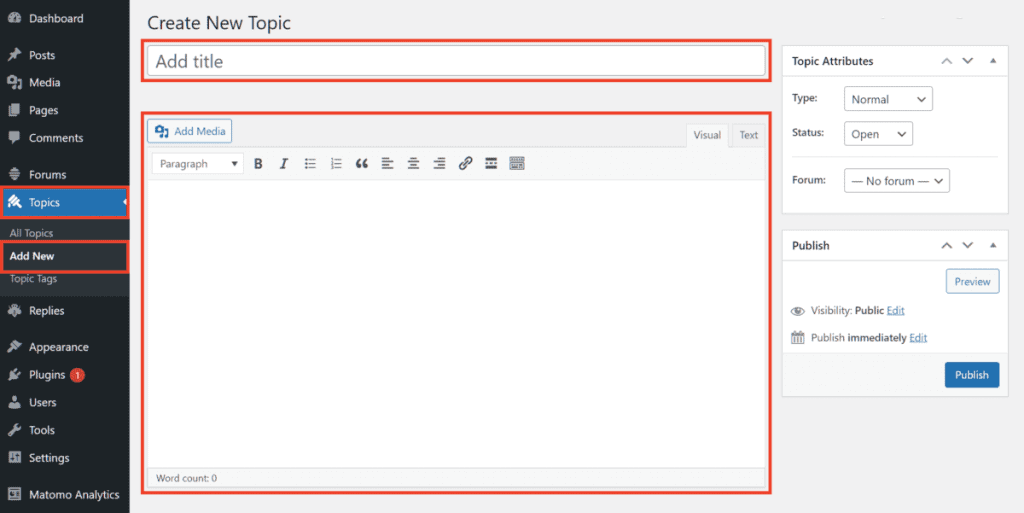
From the Attributes section of the topic we can choose:
- Type: normal, featured, super featured.
- Status: open/closed.
- Forum: we choose the forum in which the topic will be posted.
We can also insert tags from the appropriate Tag section of the topic.
Create the forum page
After creating one or more forums, we need to display them on the front end of the site, that is, on a page that will be viewed by users.
To do this we simply create a new page with WordPress and call it a “forum” or whatever we want.
In the content we are going to insert this shortcode:
[bbp-forum-index]After that we publish the page, so the page will automatically show the index of forums.
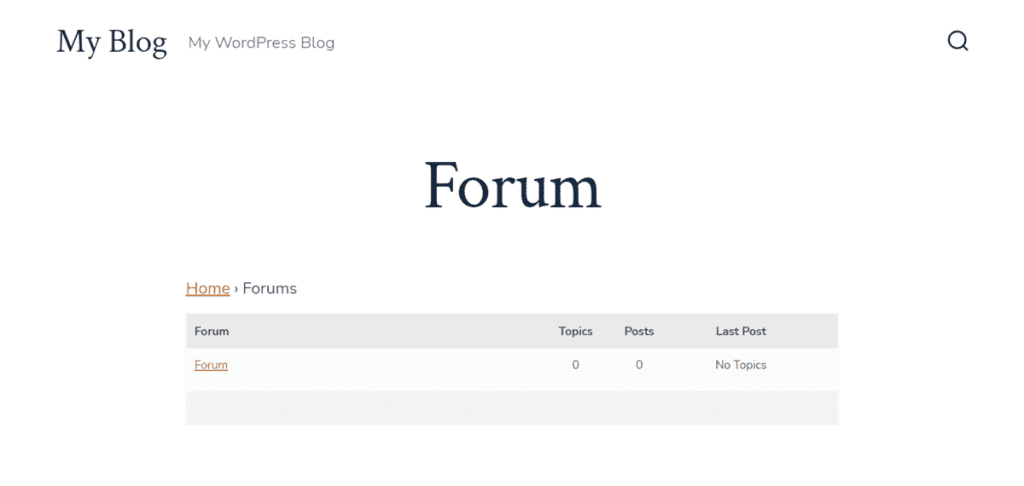
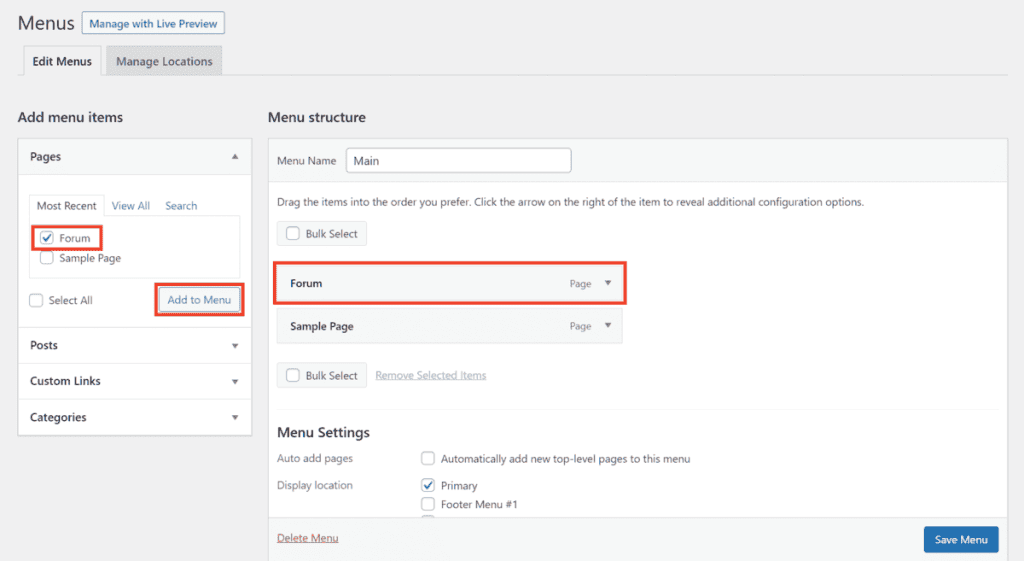
We can then add the forum index page to the site menu so that it is displayed as in this example.

To do this click on Appearance -> Menu and add the page to the menu, in our case the “Forum” page.
Enable forum registration
If we leave the default options, only registered users will be able to create new discussions or post replies.
We must then allow users to register for our site. We can choose to enable automatic registrations or manage registrations manually. Let’s see how to do it in both cases.
Activate automatic recordings
To allow users to register themselves, we need to enable new user registration on WordPress.
To do this go to Settings > General and check the “Anyone can register” option. You can leave the “Default role new users” option as “Subscriber”.

Create a page for registration
We then need to create a registration page for users.
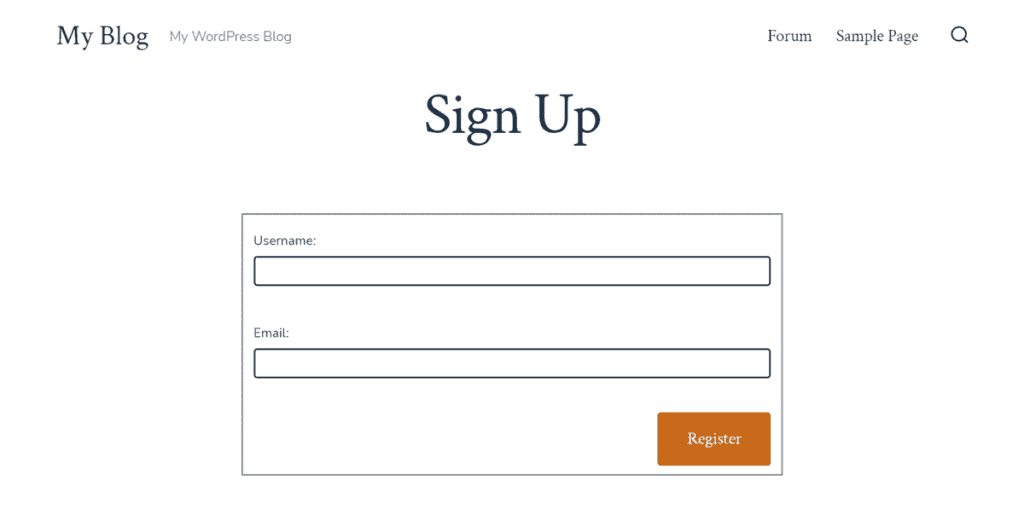
Click on Pages > Add Page and create a new page called, “Registration.”
In the content of the page insert this shortcode:
[bbp-register]After that we can publish the page, here is an example below.
Manually manage records
We can also handle new user registrations manually. In this case, we can create a page with a contact form, for example using a plugin like Contact Form 7 and have the registration information emailed to us.
After that, we will have to proceed manually to register users.
Let’s see how to do that right away.
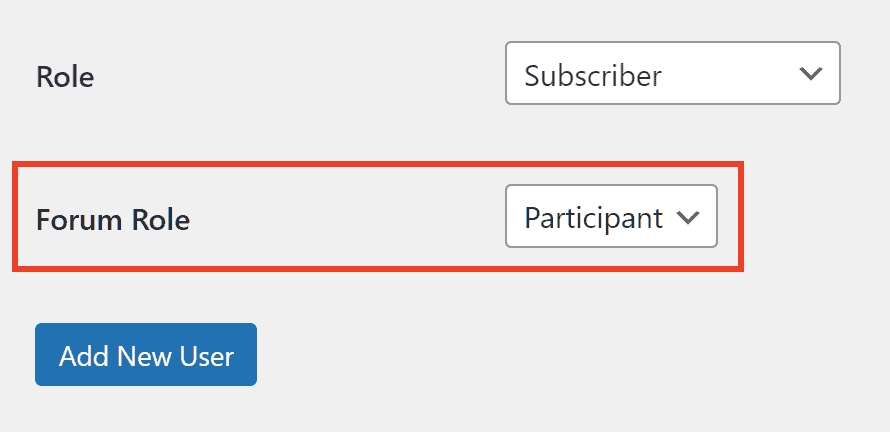
To add a new user from the WordPress dashboard simply click on Users -> Add New and fill in the required information.
If you are not yet familiar with WordPress, you can check out our WordPress tutorials under the section of user management.
In this case, in addition to the role that sets the user’s permissions on WordPress, we also have the forum role item that allows us to set the user’s permissions on the forum.
User roles on bbPress
By default there are 5 user roles on bbPress:
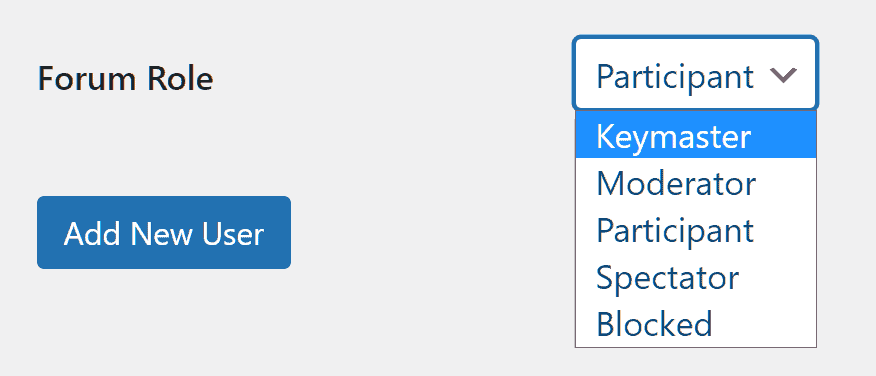
Locked: all permissions are locked.
Spectator: can read discussions and responses.
Participant: can create discussions and responses and can make changes to their posts.
Moderator: can create and edit forums, also can edit or delete threads and replies from other users, can manage tags and moderate the forum.
Forum Administrator: has all moderator permissions, plus can change forum settings.
Add a moderator to the forum
After creating a new user and setting the forum role as “moderator” we can assign the moderator one or more forums.
To do this, edit a forum we have already created and add the user name in the “Forum Moderators” field as shown in this example:
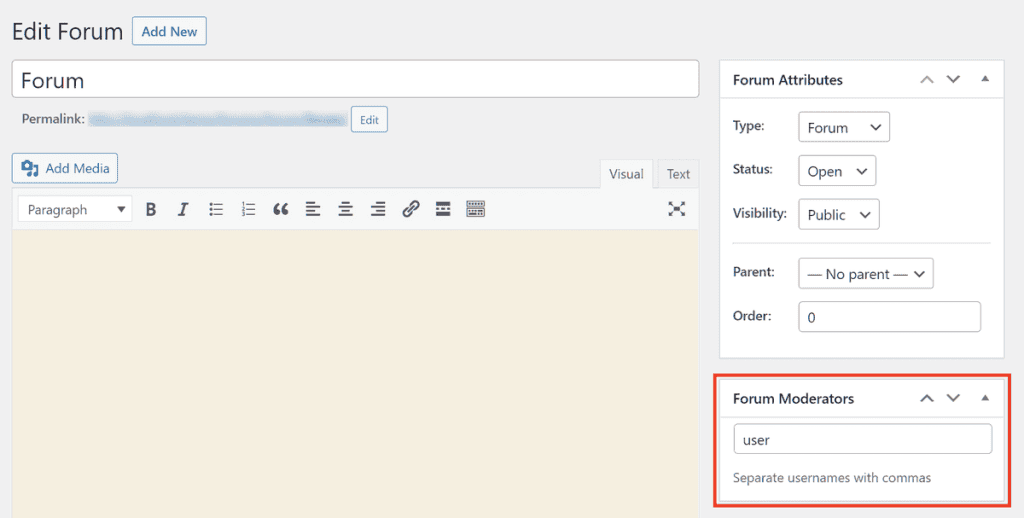
For each forum we can also enter multiple moderators, we just enter the usernames in this field separating them from each other with commas.
Create page for password recovery
Next to the registration page, another important element if we want to create a forum is to create a page from which users can retrieve their passwords.
Again we can do this using a shortcode in the plugin, let’s see how.
Create a new page (Pages -> Add Page) and enter a title of our choice, for example, “Retrieve Password.”
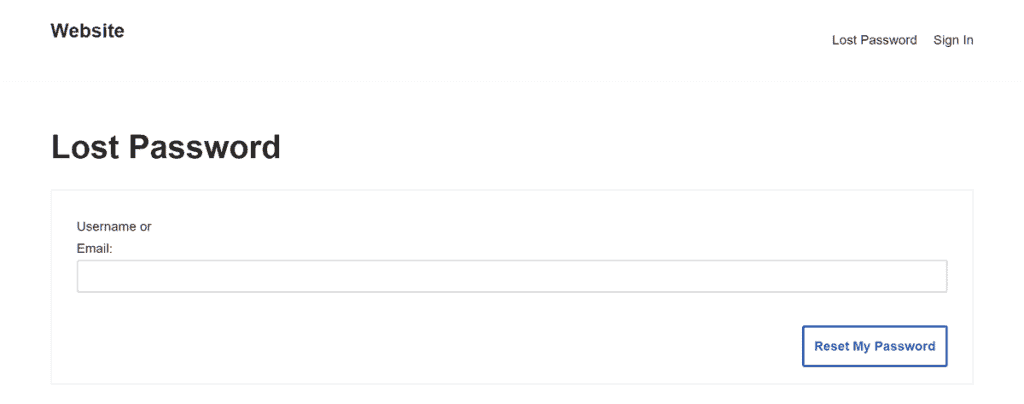
After that insert the shortcode into the content:
[bbp-lost-pass]We can then publish the page that will look similar to this one shown in this example:
Create a login widget
bbPress allows us to create a widget to allow users to log in.
Click on Appearance -> Widgets and add the “bbPress widget login” widget.
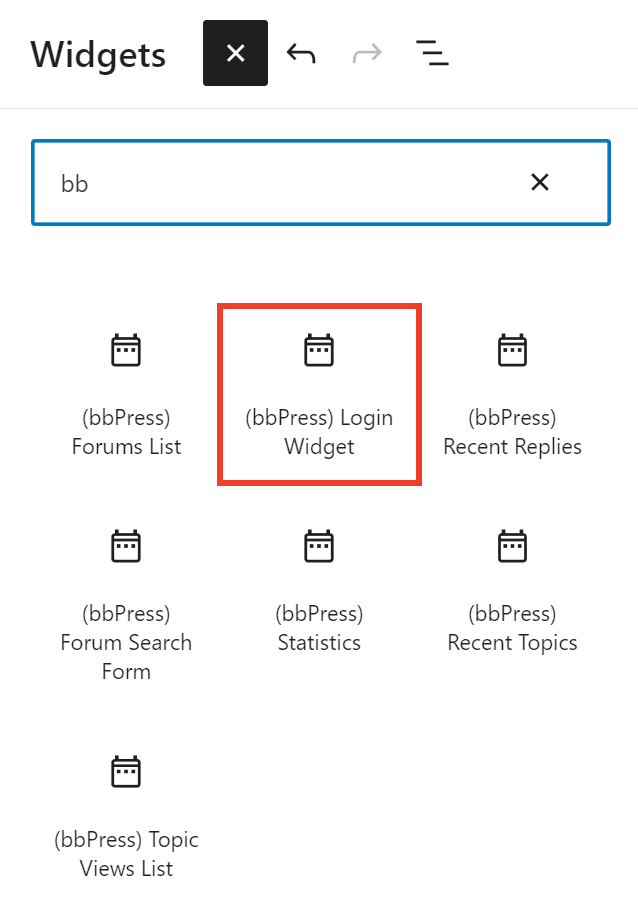
We can edit it by entering a title and then URLs for registration and password retrieval.
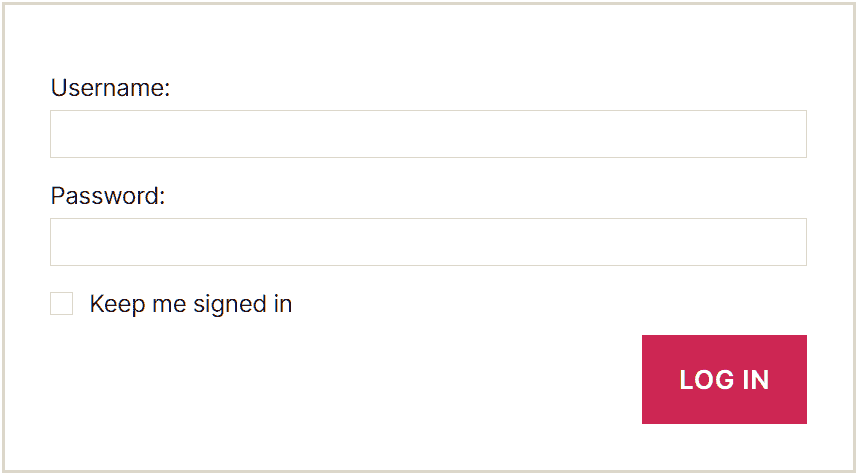
The login widget will appear this way when users are not logged in:
Conclusion
In this article, How to create a forum from scratch, we have seen what the alternatives and options are if you want to create a forum. Next to services that allow us to create a free forum, there are several methods to create a forum using your own domain and hosting space.
In this guide, we saw how to create a forum step by step with two of the most widely used systems: phpBB and bbPress with WordPress. We saw how to install the script or plugin, how to create the forum and configure it, manage users and moderators.
What about you, have you ever tried to create a forum? What script or plugin did you use? Do you have any other suggestions? Let us know in the comments below.


Leave a Reply