

You click publish, wait a second, and instead of your post going live, you get a red error bar at the top of the editor that says updating failed. Or maybe you’re trying to publish a new post and see publishing failed instead. Either way, your content is stuck, and WordPress isn’t telling you much about why.
These errors are closely tied to the WordPress block editor and how it communicates with your site’s database. Once you understand what’s happening behind the scenes, the troubleshooting process becomes a lot more manageable. Most of the fixes below don’t require advanced technical knowledge, just a willingness to test a few things one at a time.
This guide covers the most common causes of the WordPress updating failed and publishing failed errors. First, we’ll walk through a few diagnostic steps to help you figure out what’s actually wrong. Then we’ll get into the fixes.
Table of Contents
What’s Actually Causing These Errors
The block editor doesn’t save or publish content the same way the old classic editor did. It uses the REST API, which serves as the communication channel between the editor and your WordPress database.
When you hit Publish or Update, the block editor sends a REST API request to your server. If that request fails for any reason, the editor can’t confirm the post was saved, and it throws the updating failed or publishing failed message.
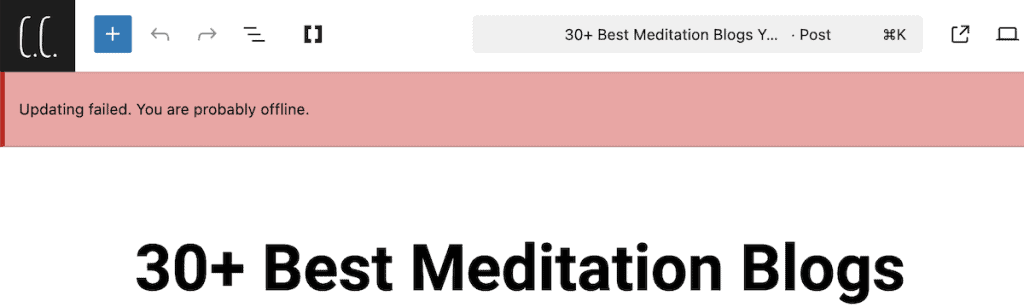
The root cause is almost always something interrupting that request. It could be a plugin conflict, a firewall, a memory limit, a misconfigured URL setting, or a server-level rule blocking traffic it shouldn’t be. The good news is that each of those things is fixable.
Before You Start: Back Up Your Site
Before making any changes to your site files or settings, back up your site. This is especially important if you plan to edit files like wp-config.php or .htaccess.
You can use a plugin like UpdraftPlus or WPVivid to create a full WordPress backup in a few clicks. If you have access to your hosting control panel, many hosts also offer one-click backup options from the dashboard.
Check out our guide on the best WordPress backup plugins if you need help choosing one. Either way, having a recent backup means you can restore your site if something goes wrong during troubleshooting.
Figuring Out What’s Causing the Error
Before jumping straight into fixes, it’s worth spending a few minutes identifying the source of the problem. These three steps won’t fix the WordPress updating failed error on their own, but they’ll give you information that makes the rest of the process much faster.
Check Your Internet Connection and Site URL
A dropped internet connection is one of the more common reasons WordPress fails to save content. If your connection cuts out while the editor is trying to communicate with the server, the request fails, and you see the error.
Open a new browser tab and visit a few other websites to confirm you’re still connected. If your connection looks fine, the next step is to check your WordPress URL settings.
To do this, go to Settings > General in your WordPress dashboard. Look at the two fields labeled WordPress Address (URL) and Site Address (URL). In most cases, these should match. If one of them has an extra character, a missing “s” in https, or a trailing slash where there shouldn’t be one, that mismatch can break the REST API.

Be careful about changing these fields unless you’re certain something is wrong. Incorrect URL settings can lock you out of your dashboard. If you’re not sure what these should be set to, check with your hosting provider before making any edits.
Check the REST API Status in Site Health
WordPress has a built-in tool that can tell you whether the REST API is working correctly. Go to Tools > Site Health and click the Status tab.

WordPress will run a series of checks on your installation. If the REST API encounters an issue, you’ll see a message like The REST API encountered an unexpected result. The tool usually provides additional details below, including the specific error it encountered.
Common errors codes you might see here include a 401 Unauthorized response, a 403 Forbidden message, or a cookie nonce error. Each of these points to a slightly different cause, but they’re all worth noting because they’ll help you narrow down which fix to apply.
If Site Health doesn’t show any REST API problems, that doesn’t necessarily mean everything is fine. It means the tool didn’t detect an issue during its check. Keep going through the other steps.
Enable Debugging to Surface Hidden Errors
If the Site Health tool doesn’t give you enough to go on, enabling WordPress debugging can help surface errors that aren’t visible in the normal editor interface. Enabling debugging lets you view your WordPress error logs. This is a diagnostic step, not a fix, but it can save you a lot of guesswork.

To do this, open your wp-config.php file using FTP or File Manager in your hosting control panel. The file is located in the root directory of your WordPress installation.

Before adding anything, check whether the file already contains a line that says:
define('WP_DEBUG', false);If it does, remove that line. Then add the following two lines before the section that says “That’s all, stop editing! Happy blogging”:
define('WP_DEBUG', true);

define('WP_DEBUG_LOG', true);
Then, save and upload the file. Now, attempt to update or publish a post to trigger the error.
After that, connect to your server again and navigate to the wp-content folder. Look for a file called debug.log. Download it and open it in a plain text editor like Notepad.
The log file lists PHP errors, warnings, and notices your site has encountered. If a plugin or theme file generates errors during the publishing process, they will appear here. That information can help you identify exactly which part of your setup is causing the problem before you start working through the fixes below.
Once you’re done troubleshooting, go back into wp-config.php and remove those two debug lines. Leaving debugging enabled on a live site isn’t recommended.
7 Ways to Fix the WordPress Updating Failed and Publishing Failed Errors
Now that you have a better idea of what might be going on, work through these fixes in order. Test after each one before moving to the next.
1. Update WordPress to the Latest Version
Running an outdated version of WordPress can cause unexpected errors, including issues with the block editor and the REST API. WordPress updates frequently include bug fixes, and it’s possible the version you’re running has a known issue that’s already been resolved.
Go to Dashboard > Updates and check whether a newer version is available. If an update is available, make sure your backup is in place, then install it.

After updating, try updating or publishing a post to see if the error is gone. If it’s still there, move on to the next fix.
2. Disable Your Plugins One by One
Plugin conflicts are behind a large percentage of updating and publishing errors. A security plugin, caching plugin, or any plugin that modifies how WordPress handles requests can interfere with the REST API without you realizing it.
The most reliable way to find a conflicting plugin is to deactivate all of them at once, then test the editor.
Navigate to Plugins > Installed Plugins. Then, check the box at the top of the list to select all plugins, open the Bulk Actions dropdown and choose Deactivate. Finally, click Apply.

Now try updating or publishing a post. If the error is gone, then a plugin was causing it. Reactivate your plugins one at a time, testing after each one, until the error comes back. That’s your culprit.
Once you’ve found the problem plugin, you have a few options. Check whether an update is available for it, reach out to the plugin developer to report the conflict, or look for an alternative plugin that does the same thing without interfering with the REST API.
Security and performance plugins are the most common offenders. Tools that add extra authentication layers or modify HTTP headers can accidentally block the REST API even when that’s not their intention.
3. Check Your Firewall Settings
If you’re using a firewall service like Cloudflare or Sucuri, it may be blocking REST API requests from reaching your server. This can happen because the firewall misidentifies the request as suspicious traffic.
To test whether your firewall is the issue, temporarily disable it and try updating or publishing a post again. If the error disappears, the firewall is blocking something it shouldn’t be.
For Cloudflare users, you can manage these settings from within your Cloudflare account or your hosting dashboard. Look for any firewall rules or security settings that are set too aggressively and adjust them to allow REST API requests through.
If you’re using Sucuri, contact their support team. They can whitelist your IP address or adjust the rules so that legitimate REST API requests are not blocked.
Some hosting servers also use a module called mod_security, which works at the server level to block traffic that looks potentially harmful. Occasionally, it incorrectly flags REST API requests. If you suspect this is the issue, contact your hosting provider and ask them to review the mod_security rules for your account.
4. Verify Your File Permissions
Incorrect file permissions can prevent WordPress from saving content. If WordPress doesn’t have the right level of access to read and write to its own folders, the publishing process can fail silently.
To check your permissions, connect to your server using an FTP client like FileZilla or Cyberduck, or open the File Manager in your hosting control panel.
Once you’re connected, navigate to your WordPress root directory. This is usually the public_html folder. From there, locate the wp-content folder. Right-click on it and look for an option like File Permissions or Change Permissions, depending on the tool you’re using.

The standard permissions for WordPress are:
- Folders: 755
- Files: 644
The wp-content folder and its subdirectories should be set to 755. Individual files inside them should be 644. If you see something significantly more restrictive than that, for example, 444 on a folder, WordPress won’t be able to write to it, which can cause updating and publishing errors.
Adjust any incorrect permissions through your FTP client or File Manager, then try publishing again.
5. Increase the PHP Memory Limit
WordPress allocates a certain amount of PHP memory to handle tasks like saving content, processing images, and running plugin code. If your site is memory-hungry, for example because you have a lot of plugins active or a particularly complex page, the publishing process may run out of memory before it can complete.
The recommended PHP memory limit for most WordPress sites is 256MB. Sites running WooCommerce or other resource-intensive tools may need more.
You can increase the memory limit by editing your wp-config.php file. Just like the other options above, connect to your server using FTP or File Manager, navigate to the root directory of your WordPress installation, and open the wp-config.php file.
Then, add the following line before the section that says “That’s all, stop editing! Happy blogging”:
define('WP_MEMORY_LIMIT', '256M');Save the file and upload it back to your server. Then try updating or publishing your content again.
If this doesn’t work, your hosting plan may have a hard cap on PHP memory that can’t be overridden through wp-config.php. In that case, contact your hosting provider and ask them to increase the limit directly on the server. You can also read our full guide on increasing the WordPress memory limit for more options.
6. Fix REST API Authentication Issues in wp-config.php and .htaccess
In some cases, the REST API fails because WordPress can’t authenticate properly when making requests. There are two places to address this: the wp-config.php file and the .htaccess file.
Start with wp-config.php. Open it through FTP or File Manager (just like above) and add the following line before “That’s all, stop editing! Happy blogging”:
define('ALTERNATE_WP_CRON', true);This changes how WordPress handles background tasks and can resolve certain authentication-related failures with the REST API.
If that doesn’t help, check your .htaccess file. You can open it through FTP or File Manager. You may need to enable the option to show hidden files in your hosting control panel first. Next, confirm it contains these standard WordPress rewrite rules:
RewriteEngine On
RewriteBase /
RewriteRule ^index\.php$ - [L]
RewriteCond %{REQUEST_FILENAME} !-f
RewriteCond %{REQUEST_FILENAME} !-d
RewriteRule . /index.php [L]
If these lines are missing or have been modified, it can interfere with REST API requests. The quickest way to regenerate a clean .htaccess file is to go to Settings > Permalinks and click Save Changes without making any changes. WordPress will rewrite the file automatically.

7. Switch to the Classic Editor as a Temporary Workaround
If you need to publish content urgently and haven’t been able to fix the underlying issue yet, switching to the classic editor gives you a way to keep working in the meantime.
The classic editor uses a different method for saving and publishing posts. It doesn’t rely on the REST API the same way the block editor does, so if a REST API issue is the source of your WordPress updating failed or publishing failed error, the classic editor will often let you publish without any problems.
The easiest way to switch to the block editor is by using the Classic Editor plugin. It’s the official plugin maintained by the WordPress team. To install it go to Plugins > Add New in your WordPress dashboard and search for Classic Editor. Then, click Install Now, then Activate.

Once activated, the editor will switch to the older interface when you create or edit posts. You can publish content there while you continue troubleshooting the block editor issue.

Keep in mind that this is not a permanent fix. The block editor is WordPress’s default going forward, and it includes features the Classic Editor doesn’t support. Use this as breathing room while you work through the other fixes, not a long-term solution.
If None of the Fixes Work, Contact Your Hosting Provider
If you’ve gone through every step above and the WordPress updating failed error is still there, the issue may be on the server side. Some things, like misconfigured server settings, restrictive security modules, or resource limits set by the host, are outside your control as a site owner.
When you contact your hosting provider, give them as much detail as possible. Let them know you’re seeing the updating failed or publishing failed error in the WordPress block editor, that you’ve tested the REST API through Site Health, and that you’ve already ruled out plugin conflicts and firewall issues. The more context you can provide, the faster they can diagnose it.
If you’re hosting with SupportHost, then you can reach out to the support team directly. They have access to server logs and can investigate issues that aren’t visible from the WordPress dashboard.
WordPress Updating Failed and Publishing Failed FAQs
What causes the updating failed error in WordPress?
The WordPress updating failed error is almost always caused by something blocking the REST API, which is the communication channel the block editor uses to save and publish content. Common causes include plugin conflicts, firewall rules, incorrect site URL settings, and insufficient PHP memory.
Why does the updating failed error keep coming back?
If the error keeps returning after you’ve fixed it, a plugin is likely the cause. Something gets reactivated or updated that interferes with the REST API again. Go through the plugin deactivation process to identify the offender, then check whether an update or replacement is available.
Can I fix the updating failed or publishing failed error without editing any files?
Yes. Start by checking your internet connection, running the Site Health check, and deactivating your plugins one by one. In many cases, one of those steps resolves the issue without needing to touch any core files.
Is the classic editor a permanent solution to these errors?
No. Switching to the classic editor is a temporary workaround that lets you keep publishing while you troubleshoot the root cause. The block editor is WordPress’s default going forward, so it’s worth resolving the underlying REST API issue rather than relying on the classic editor long term.
Closing Thoughts: Fixing WordPress Updating Failed and Publishing Failed Errors
The WordPress updating failed and publishing failed errors both trace back to the same underlying issue: something is preventing the block editor from completing its communication with the server through the REST API.
Start with the diagnostic steps to get a clear picture of what’s going wrong before you start making changes. The Site Health tool and the debug log can point you directly to the cause and save you from working through fixes that don’t apply to your situation.
From there, work through the numbered fixes in order. For most sites, the WordPress updating failed error turns out to be caused by a plugin conflict or an overly aggressive firewall rule, so fixes 2 and 3 are often where things get resolved.
Once everything is working again, keep your plugins, themes, and WordPress core updated. Many updating and publishing errors are tied to compatibility issues that get resolved in newer versions, so staying current is one of the better ways to avoid running into this again.
Now, it’s your turn. Have you solved the WordPress updating failed and publishing failed errors? Which method did you use?
Ready to build your WordPress site?
Try our service free for 14 days. No obligation, no credit card required.


