
UpdraftPlus is a WordPress plugin that allows you to create site backups and restore them in a few clicks.
In this article, we will find out how to use UpdraftPlus at different stages, from creating a backup to restoring data and configuring cloud storage.
After the setup, we will compare the free and premium versions, find out how to configure UpdraftCentral to manage multiple sites using UpdraftPlus, and see how to fix any problems with the plugin during backup.
Table of Contents

What is UpdraftPlus
UpdraftPlus is a WordPress plugin that allows us to do site backups and restore them. With the premium version, we can also migrate and clone a WordPress site.
Since the plugin integrates with several cloud storage services (even in the free version), we can create and schedule backups for our site and save them directly in the cloud. The premium version of the plugin has additional features.
The plugin comes in a free version and a premium version with additional features. Later on we will take a look at the differences.
First, let’s look at the main procedures for creating a backup and why it is important to do so.
How to do a WordPress backup
There are several ways to do a backup for a WordPress site:
- we can create a manual backup by copying all the site files and downloading a copy of the database;
- we can use a plugin.
In any case, having a backup of your site is important because it lets you restore the site if something goes wrong.
What is a backup used for?
With all our plans from shared hosting to WordPress hosting and semidedicated hosting, we offer automatic backups on a daily basis and keep the last 30 backups.
Keep in mind, however, that before a major operation such as a site update, it is always recommended to do a manual backup.
It is necessary to do a backup:
- before updating WordPress or a plugin
- before making major changes to the site.
In addition, backups also allow us to restore the site in the event of getting hacked.
How to install UpdraftPlus
To use UpdraftPlus to do a backup of a WordPress site, we need to install the plugin on our site.
Keep in mind that in this guide, we will use the free version of the plugin.
To install the plugin, we have to access the WordPress bulletin board and click Plugin → Add New.
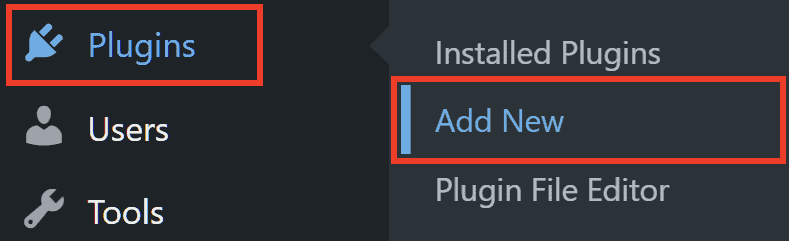
Look for the name of the plugin using the search bar and click on the Install Now button next to “UpdraftPlus WordPress Backup Plugin“.

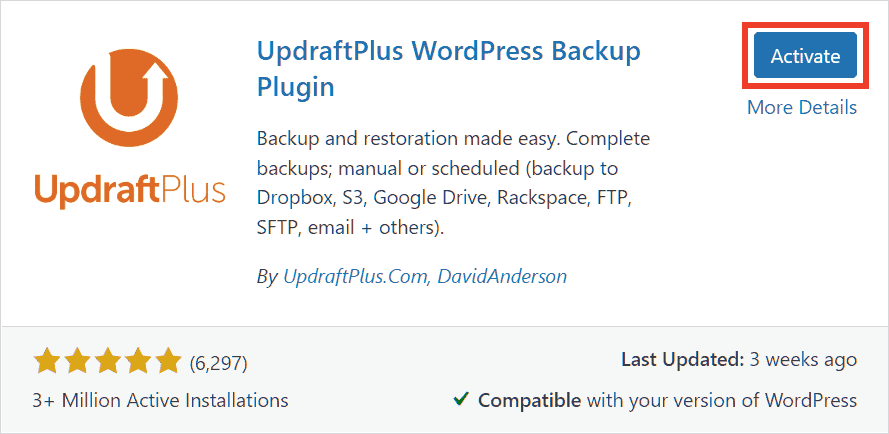
After installation, activate the plugin by clicking Activate.
Now our backup plugin is ready to be used. Let’s see how to access the settings and what the free version allows us to do.
How to use UpdraftPlus
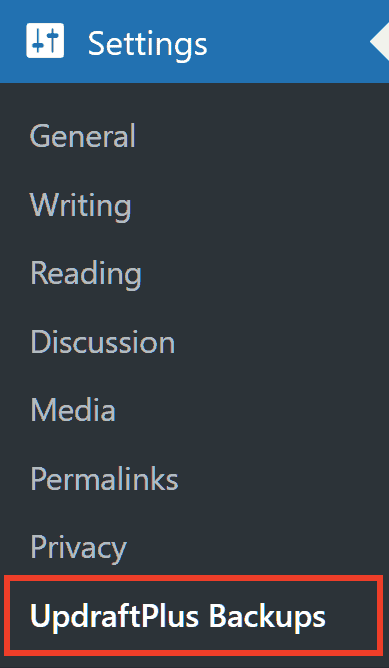
After installing the plugin, we can access the settings.
In the Settings section of WordPress, the UpdraftPlus Backup item will appear.
Through the settings, we can do a backup, schedule it, or restore a site backup.
There are six menu tabs:
- Backup / Restore;
- Migration / Clone;
- Settings;
- Advanced tools;
- Premium / Extensions.
Remember that you can also access the tabs by clicking on UpdraftPlus from the WordPress toolbar.

Let’s look at everything you can do by going through the 6 tabs of the plugin one by one.
Backup / Restore
The first settings tab, Backup / Restore, allows us to make a manual backup and view scheduled and existing backups.
In the Next scheduled backup section, we can check if there are any scheduled backups, and we can create a new one.
How to create a backup
To create a manual backup with UpdraftPlus we simply click on Run Backup.

A window will open allowing us to select settings and choose whether to include the database and files in the backup.

In addition, if we have activated other services such as UpdraftPlus Vault, we can choose to save the backup remotely as well by checking the corresponding option.
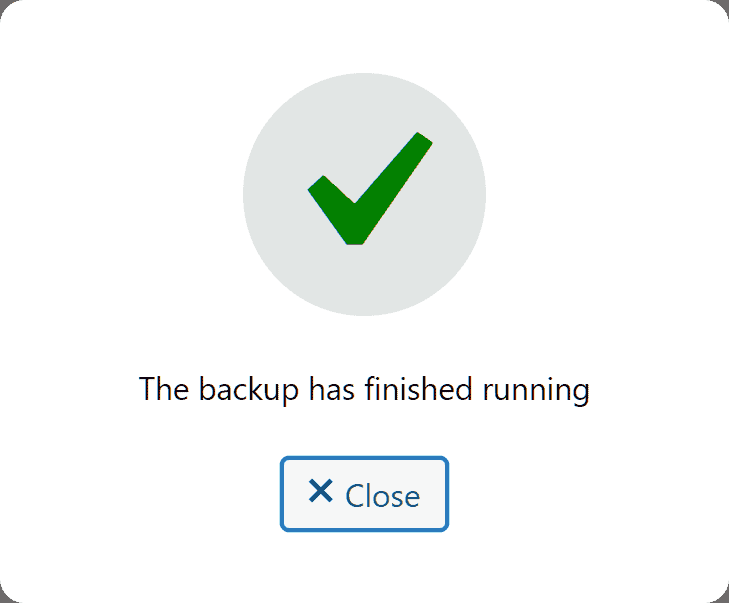
We can leave the default settings and click on Backup Now.
An alert like this will confirm that the backup has been completed.
How to manage backups
From the Backup / Restore tab, we can also restore a backup we made previously.
We simply scroll down to the Existing Backups section to see a list of all the backups that are there.

If you don’t see any backups in the list, try retrieving the archives by clicking on “Recan remote storage“. Keep in mind that you must first have configured the type of storage to use, such as Google Drive, Dropbox, or other methods.
If on the other hand, you want to search for backups among local files, click on “Repeat local folder scan“.
For each backup in the “Existing Backups” list, we will see the date and what files were stored, and we will be able to access a list of actions.
Specifically, we can restore a backup, download a copy of the backup locally, or delete a backup. Let’s see how.
Download backup data
Under “Backup data” we find a number of entries: database, plugins, themes, uploads, and others.
These are the individual files in the backup. By clicking on one of them, we can download a copy of the files—for example, by clicking on “database” we can download the database backup.

After that, we will be asked whether to download the backup locally.

Carry a backup
You can also upload backup files by clicking on Upload backup files and then dragging them directly to the indicated section.

This function is useful if we need to restore a backup that we downloaded locally.

Keep in mind that with the free version of the plugin, we can only upload backups created with UpdraftPlus.
Restore a backup
If you want to restore a backup with UpdraftPlus, you just have to click on the Restore button below the list of actions.

Before restoring, you will be asked which files you want to restore. You can select a few specific files or all of them—for example, only themes or plugins.

You are then prompted again to confirm and start the restoration. To continue, click on Restore.

When the operation is complete, a notice like this will appear, telling you that the restoration was successful.

You can then click Back to UpdraftPlus configuration to return to the plugin settings.
After restoring, the old directories are modified by adding the “-old” suffix. To delete folders after restoration, you can click on the Delete old directories button that appears on the message at the top of WordPress.
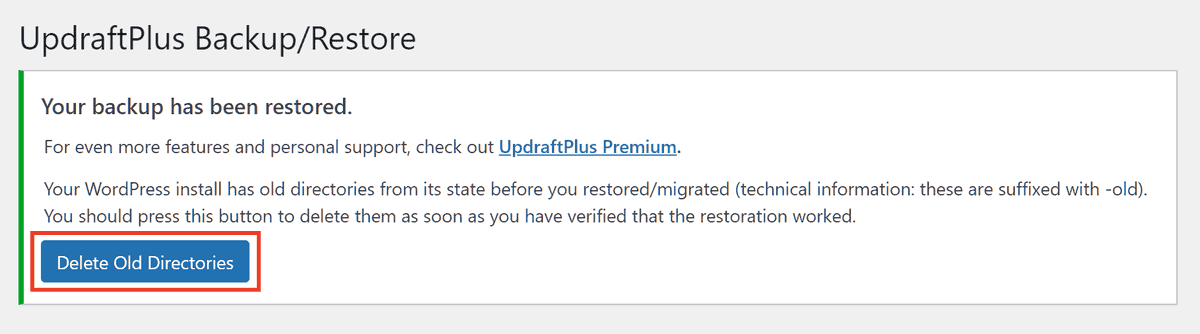
Before deleting previous directories, make sure the site is working properly after restoration.
Migration / Clone
We can use the Migration / Clone tab to create a copy of the site that will be saved on the UpdraftPlus servers.
In order to use this feature, we must have UpdraftClone tokens available.
From this same tab, if we have the Migrator add-on (available with the paid version of the plugin), we can start the site migration.

Settings
From the Settings tab, we can schedule backups.
By default, backups are not scheduled, let’s see how to schedule them.
Remember that after making changes to the settings, you will need to click the Save Changes button at the bottom of the page.
Schedule backups
First, we need to choose how often we want schedule backups:
- Every 2, 4, 8 or 12 hours;
- every day;
- every week;
- every 15 days;
- Once a month.

Remember that with UpdraftPlus Premium we can set up scheduled backups for any interval.
From here we can also choose the number of scheduled backups to keep. The default setting is 2.
We can choose to schedule file and database backups. In this example, we’ll set up scheduled backups on a daily basis for both the files and the database.

The second step is to choose where the backups should be stored. With the free version of the plugin we can choose from the most common options such as Dropbox or Google Drive.

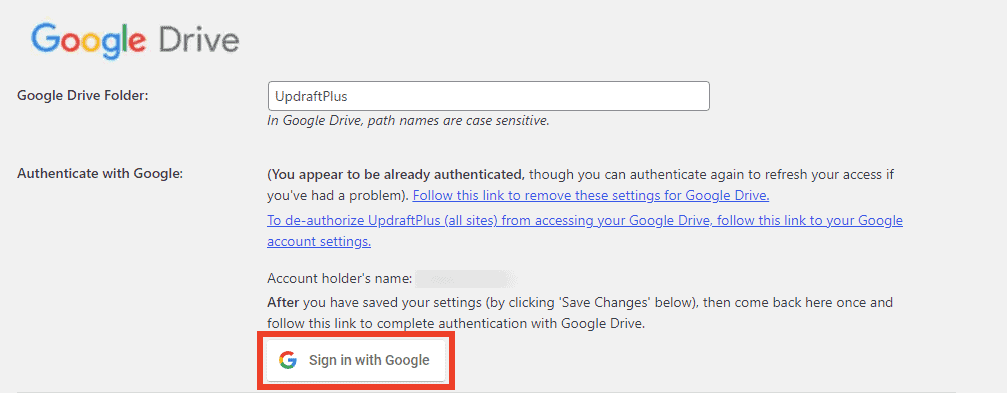
After selecting one of the options, we need to provide the necessary information. For example, in the case of Google Drive, we have to log in with Google to confirm authentication.
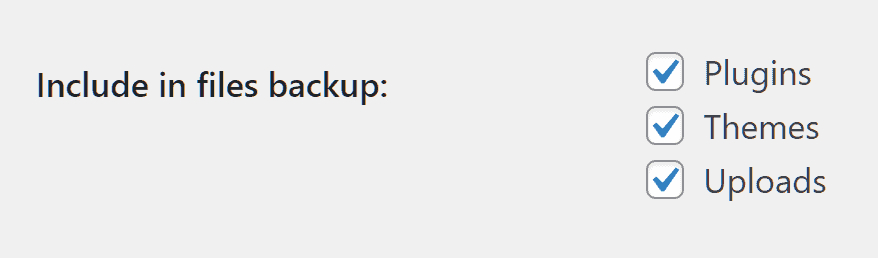
The third step is to choose which files should be included in the backup.
By default, all files except WordPress core files are selected.
If you need to restore these files just download the installation files from the download section of WordPress.org.
Let’s see how to configure remote storage using Google Drive as an example.
Configure Google Drive with UpdraftPlus
After choosing Google Drive as the remote storage option click on the Save Changes button at the bottom of the page.
At this point, a message will appear stating that we need to authorize access to the Google Drive account in order to perform backups.

By clicking on Sign in with Google, we are redirected to the Google login page and can select the account with which to authenticate.

After confirming the authorization, we can click on Complete setup.
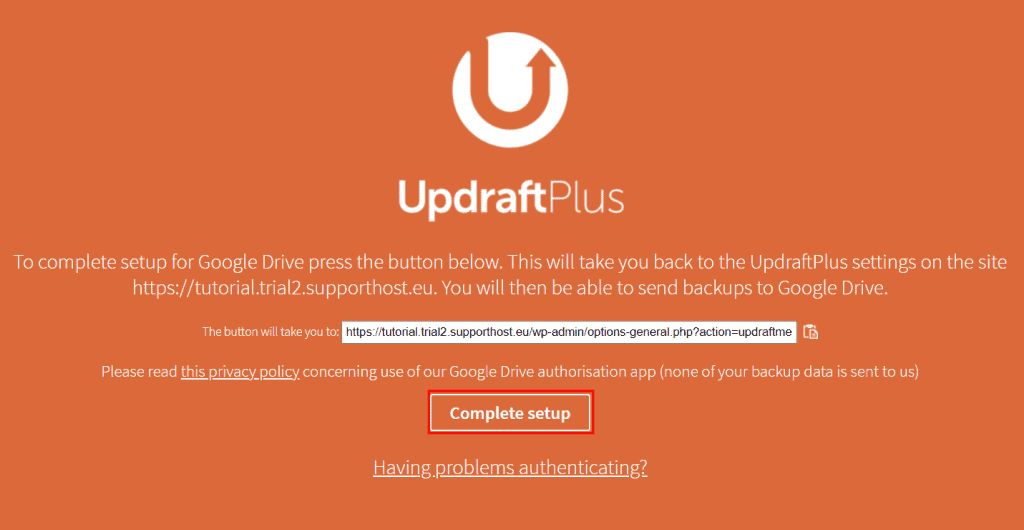
We will be redirected to the WordPress message board and will see a notice like this one telling us that the authentication was successful.

At this point, if we have already created site backups, we can upload them to Google Drive.
Simply to go to Settings → UpdraftPlus Backup, select one of existing backups from the list and click Upload.

After that, the Google Drive logo will appear under the backups saved in the cloud.

After the backup is completed, all the archives will be stored on Google Drive.

Keep in mind that with the free version of UpdraftPlus, the archives will be stored inside the “UpdraftPlus” folder.
With the premium version of the plugin, however, you can rename the folder.
After configuring the storage method (in this case with Google Drive), to perform a manual backup, click on Run Backup in the Backup/Restore. Among the options, you will see “send this backup to a remote storage.” Simply check the box to directly save the backup on Google Drive.

Exclude files or folders from backup
From the Settings tab, we can choose to exclude certain folders or files from the backup. To do so, simply follow these steps.
First, click on Add an exclusion rule in the “exclude these from Others” section to enter the name of a file or folder within wp-content not to be included in the backup.

At this point, we are then asked whether to exclude all files that begin with a certain string, all files with an extension, or specific files/directories.
If we want to exclude a specific folder or file, we have to select “file/directory.”
We can then choose the folder from the list and click the Add an exclusion rule button.

If we want to exclude files with a specific extension, we have to click on “All files with this extension“.

After that, type in the extension—for example, “.zip”—and click on Add an exclusion rule.

With this rule we exclude all “.zip” files contained in the “wp-content” folder.
Advanced settings
In the Settings tab, click on Show advanced settings to access other options that will help you fix any problems that might occur during the creation of the backup.
Let’s look at the settings we can use to solve possible problems with UpdraftPlus.

Debug mode: we can enable debug mode if something went wrong during the backup process. Remember to turn off this option after you are done. If it stays on, errors from other WordPress plugins will appear on the screen.
Split each archive: It is possible to encounter errors when doing a large-size backup. If it happens, try setting a limit and splitting the backup file into smaller archives.
Delete local backup: by default, local backups will be deleted after the backup is sent to the remote location we have chosen (e.g., Google Drive).
Backup folder: from here we can change the name of the directory where backups will be stored.
We went over the advanced settings. In the section Solve problems with UpdraftPlus, we will see how to proceed in case of any issue when creating the backup
Advanced tools
From the Advanced Tools tab of UpdraftPlus, we can access a variety of information and functions.
Site information: check information about the site, such as the path to the wp-content folder and plugin folder, the server space used by the plugin, and so on.
Lock settings: with UpdraftPlus Premium, we can set a password so that only authorized users can access the plugin.
UpdraftCentral: a plugin that allows us to manage multiple sites on which we have installed it from one panel. In the section Use the UpdraftCentral plugin, we will learn how to use it.
Search / replace database: with UpdraftPlus Premium, we can use the search and replace function in the database.
Site size: from here, we can calculate the space occupied by plugins, themes, uploads and other site files.
Export/import settings: export or import the plugin configuration.

Clean the settings: from here, we can restore the settings.

Extensions / Premium
Use the Extensions / Premium tab to upgrade to the premium version of the plugin.
How to delete backups
In the previous sections, we have seen how to create a backup, schedule backups at regular intervals, and restore a backup.
In some cases, it may be useful to delete previous backups to free up space.
To delete previous backups, access the UpdraftPlus settings, go to the Backup / Restore tab, and access the list of existing backups.
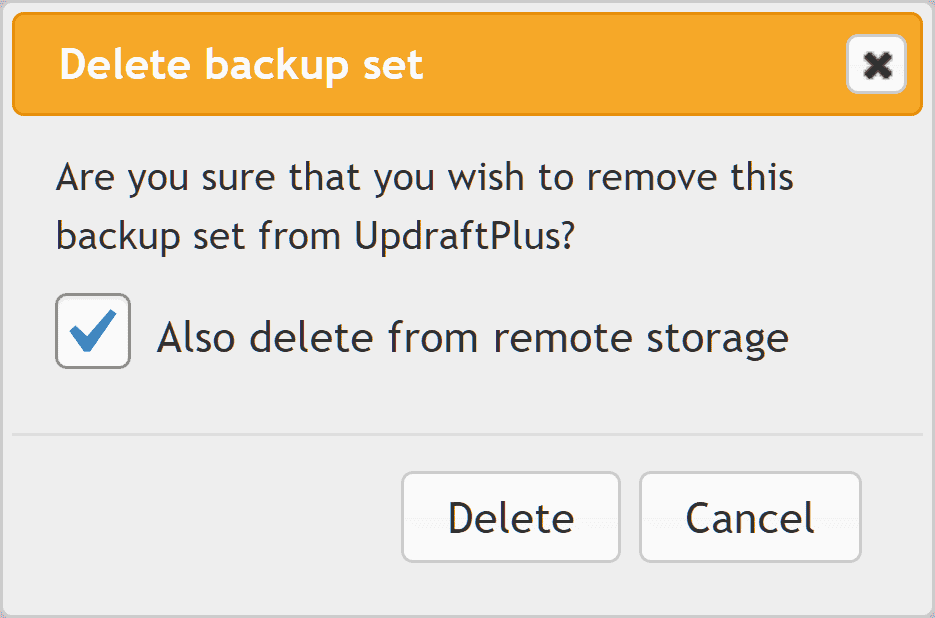
From the “Actions” section, we can click Delete to delete individual backups or select more than one and click on the Delete button next to “Actions on selected backups“.

We will then be asked if we want to delete the backup from remote storage as well.
UpdraftPlus free vs. premium
Now that we have seen what the plugin is used for and how to use it, let’s go into detail and see what the functions of the free and paid versions are.
Functions | UpdraftPlus (free) | UpdraftPlus Premium |
|---|---|---|
Manual and scheduled backups | Yes, with limitations on those scheduled | Yes |
Cloud backup | Yes, with limitations on the number of compatible services | Yes, with more options available |
Incremental backups | No | Yes |
Site migration | No | Yes |
Clone site | No | Yes, with a limited number of tokens and ability to extend |
Support and updates | No | Yes, for one year and with the possibility of an extension |
Automatic backups | No | Yes |
Backups extended to “non-WordPress” files | No | Yes |
Backup for WordPress multisite | No | |
Backup for database | No (the database is backed up with the full backup) | Yes, with multiple options, including databases “external” to WordPress |
Restoring backups created with other plugins | No | Yes |
Compatible with WP-CLI | No | Yes |
Let’s take an in-depth look at the functionality of the two versions of the plugin. This will help you understand whether the free version is sufficient for you or whether you may need the features of UpdraftPlus Premium.
Manual and scheduled backups
UpdraftPlus free
With both versions of UpdraftPlus we can make manual and scheduled backups. Backups are complete and include WordPress files, including plugins and themes and databases.

With the free version of the plugin, we can set up scheduled backups for the following intervals: every 2, 4, 8 or 12 hours, or on a daily, weekly, every 15 days or monthly basis.
With the free version of the plugin, we can restore backups directly from the WordPress back-end.
UpdraftPlus premium
With UpdraftPlus premium, we can also make incremental backups.
An incremental backup is a backup that allows us to save only the changes made since the last backup, rather than copying all the files.
In addition, backups can be scheduled for any time. We are not limited to fixed time intervals as with the free version.
Backup in the cloud
UpdraftPlus free
The free version of the plugin allows us to save backups by relying on cloud storage services.
The main compatible services are:
- Dropbox;
- Google Drive;
- Amazon S3 of Amazon AWS;
- RackSpace.
UpdraftPlus premium
With the premium version, we can access more services in addition to those of the free version, including:
- One Drive;
- Azure;
- Google Cloud Storage;
- WebDAV.
In addition, with UpdraftPlus Premium we have 1 GB of storage space with UpdraftVault that relies on Amazon S3.
Migrate and clone the site
UpdraftPlus is also a WordPress migration plugin. With the premium version we have access to Updraft Migrator, an add-on that allows us to migrate and clone the site. This feature helps us with migrations from one server to another.
Also, using the UpdraftClone service we can create a copy of the site to create a test environment.

Transfer the site
There are several cases in which it may be necessary to transfer a WordPress site. In some cases it may be necessary to transfer the site manually or use a plugin to do so.
If you want to change hosting, with SupportHost migrating your website is free and we take care of everything.
Going back to the plugins, Updraft Migrator is included in UpdraftPlus Premium but can also be purchased separately as an add-on.
With Updraft Migrator we can migrate the site without any limitation on the number of transfers.
Clone the site
The UpdraftClone service allows us to create a test environment using UpdraftPlus servers.
The service works with tokens: one token allows us to create the test environment for 24 hours, and with each subsequent token, we can extend that period for an additional seven days.
UpdraftPlus Premium includes one or more free tokens (depending on the plan), but you can purchase tokens even if you do not have the premium version of the plugin.
Not all providers allow you to create a site testing environment. With SupportHost, site staging is offered free of charge with all hosting plans.
Support and updates
UpdraftPlus premium offers free updates and support through the forum and via email for one year. After that period, it is possible to renew the service and maintain access to support and new updates.

Automatic Backups
UpdraftPlus premium also includes an automatic backup feature to back up your site before every WordPress update and applies to core, theme, and plugin updates.
ExtendedBackups
The premium version of the plugin allows us, in addition to WordPress files, to back up other kinds of files and databases as well as other folders on the server.
With the free version, we can only do backups for WordPress (its database, themes, plugins, and the upload folder). In this case, to do a full backup, we can use cPanel backup, which has a feature that allows us to create a copy of the entire account.
Backup for WordPress multisite and networks
The free version of the plugin is limited to classic WordPress installations and does not allow us to create backups of installations such as WordPress multisite.
With the premium version, we can use the plugin to create backups of the multisite installation. In addition, we can create separate backups, so we can restore it for individual resources or individual sites on the network.
However, it is not possible to migrate or clone a single site in the network.
More backup options for databases
With the premium version of this plugin, we can choose different options for a database backup.
We can back up databases even if they are not related to WordPress sites. This means that if we have other applications on the server that use databases, we can create backups of them with the plugin.
We can also back up tables that are not part of WordPress, but are within the same CMS database.
Tip: You can create a backup copy of the database using the Export function of phpMyAdmin.
Import backups created with other plugins
UpdraftPlus Premium also allows us to restore backups created with other plugins. This way, we can restore a backup of the site even if we backed it up with a different plugin.
The list of compatible plugins and services is as follows:
- InfiniteWP;
- BackWPup;
- Simple Backups;
- BackupWordPress;
- WordPress Backup To Dropbox;
- Dropbox Backup by WPAdm;
- Generic database backups (with or without bzip2 or gzip compression).
Compatibility with WP-CLI
The premium version of UpdraftPlus can be used directly from WP-CLI, the command-line tool that allows us to speed up management operations on WordPress.
Protect backups with passwords
With UpdraftPlus Premium, a password can be set to protect backups.
Use the UpdraftCentral Dashboard plugin
If we want to manage multiple WordPress sites from a single dashboard we might need the UpdraftCentral Dashboard plugin.
This plugin is also available in a free version. To use it we just need to install it and activate it like any other plugin.

The first thing to do after activating the plugin is to create a new page on our site. From this page we will be able to access the dashboard to check our other sites.
We then click on Pages -> Add Page and paste this shortcode within the page content:
[updraft_central]

After that we save or publish the page. Remember that this page will only be visible to site administrators.
From this page we will be able to manage our sites, but first we need to add the sites.
From the WordPress bulletin board, we have to click on Settings -> UpdraftPlus Backup. Then we open the Advanced Tools tab and click on UpdraftCentral.

At this point we click on Self-hosted dashboard and enter the address of the site on which we installed the UpdraftCentral plugin.

Then we have to click on Create to create the encrypted key that will allow us to connect to the dashboard.

We then copy the key and open the dashboard page again and click on the “+” icon.

Then paste the key in the indicated section and click Add website.
We can repeat the same process for the other sites.

In this way, we can back up multiple sites from one dashboard.
Resolve problems with UpdraftPlus
In some cases, you may run into errors when creating your backup with UpdraftPlus. Here are some checks you can do to try to fix them.
Problems with other plugins
First, verify that you have the latest version of the plugin installed. If not, update to the latest version. In most cases, the errors may be due to outdated versions of the plugins.
If you recently installed a new plugin and, after doing so, you started having problems with UpdraftPlus, it may be that the error is due to a conflict between plugins. In that case, try deactivating your most recently installed plugins.
Unable to connect to remote archive
If you are having trouble restoring a backup saved in the cloud or uploading a backup to the cloud, you may need to authenticate again.
You can follow the steps I explained in the Configuring Google Drive with UpdraftPlus section and authenticate again.
Also, make sure that have adequate space. If so, you could delete some files or upgrade your cloud storage service.
Backup of files too large
Another common problem is the failure of the backup process due to excessively large files.
In that case, we simply have to go and change the plugin settings so that we can create smaller archives into which we can divide our backup.
To do that, we open the Settings tab and click on Show advanced settings. After that, we edit the Split archive every section and set a lower limit, for example, 100 MB.

Remember to save the changes you made to the settings.
Conclusion
In this article, UpdraftPlus: the definitive guide, we have learned how to use UpdraftPlus, one of the most widely used backup plugins. Even in its free version, UpdraftPlus allows us to easily create a backup of our WordPress site and restore it when needed.
What about you? Have you already used UpdraftPlus? Do you have any other plugins to recommend for backing up WordPress? Let us know in the comments below.
Ready to build your WordPress site?
Try our service free for 14 days. No obligation, no credit card required.


