
Moving your WordPress site to a new host can be an overwhelming process. Maybe you’ve outgrown your current hosting provider. Or, you’re looking for better security or performance. Or, you simply want to move to a more affordable option.
Don’t let the confusing and complicated nature of a website migration be a roadblock that’s holding you back.
The good news is that with the right tools, moving your WordPress site doesn’t have to be complicated.
Below, we’ll take a look at one of the tools that helps to simplify this process, All-in-One WP Migration. We’ll take an in-depth look at this migration plugin, show you its core features, and how you can use it to migrate your WordPress website.
Table of Contents
Why Migrate Your WordPress Site?
Before diving into the migration process, let’s look at some common reasons why you might want to move your WordPress website in the first place:
- Your current hosting is slow and impacting the user experience
- You’re experiencing server downtime or have issues with reliability
- Your website has outgrown your current hosting plan’s resources
- You’re paying too much for your current hosting
- You’re unhappy with your current host’s customer support
- You need features your current host doesn’t offer
If any of these reasons sound like you, then it’s probably time to consider moving to a better hosting provider. While you could pay a developer to handle the migration, the All-in-One WP Migration plugin makes it simple enough that most WordPress users can handle it themselves.
What is All-in-One WP Migration?
All-in-One WP Migration and Backup is a popular WordPress plugin created by ServMask that’s been trusted by over 60 million websites since 2013. It’s designed to make WordPress migrations as simple as possible, allowing you to export your entire WordPress site, including the database, media files, plugins, themes, and settings. Then, import it to a new location with just a few clicks.
The plugin is available in both free and premium versions. The free version works great for smaller sites (under 512MB), while the premium extensions remove size limitations and add extra features like cloud storage integration, scheduled backups, multisite support, and more.
This plugin is very beginner-friendly, so if the thought of migrating your own site is intimidating, don’t worry, it really only takes a couple of clicks.
Here are a few unique features of the plugin:
- It works with every single hosting provider
- Your site will stay online throughout the migration
- It has automatic URL path replacement
- Has a find and replace feature to make custom changes (like when changing your domain)
- Works across multiple databases like MySQL, MariaDB, and SQLite
How to Use All-in-One WP Migration
Now that you know a bit more about the plugin, let’s show you how you can use All-in-One WP Migration to migrate your WordPress website to a new host.
1. Install the Plugin on Your Original Site
The first step is to install the All-in-One WP Migration plugin on your current WordPress site (the one you want to migrate).
To do this, log in to your WordPress dashboard and go to Plugins > Add Plugin. Search for “All-in-One WP Migration” and look for the plugin by ServMask. Click Install Now, and after installation completes, click Activate.

Once activated, you’ll see a new All-in-One WP Migration menu item in your WordPress admin sidebar.
2. Export Your WordPress Site
Now it’s time to create an export file of your current website. From your WordPress dashboard, click on All-in-One WP Migration in the sidebar and then click on Export to bring you to the export screen.
Here, you have a few different options.

First, if you’re keeping the same domain name and want to export your entire site, then click the Export Site To drop-down.
This gives you a list of locations where you can export your site. You can export your site locally or directly to one of many third-party cloud storage providers. Note that you can only use cloud storage providers if you’ve purchased a premium extension (highlighted below).
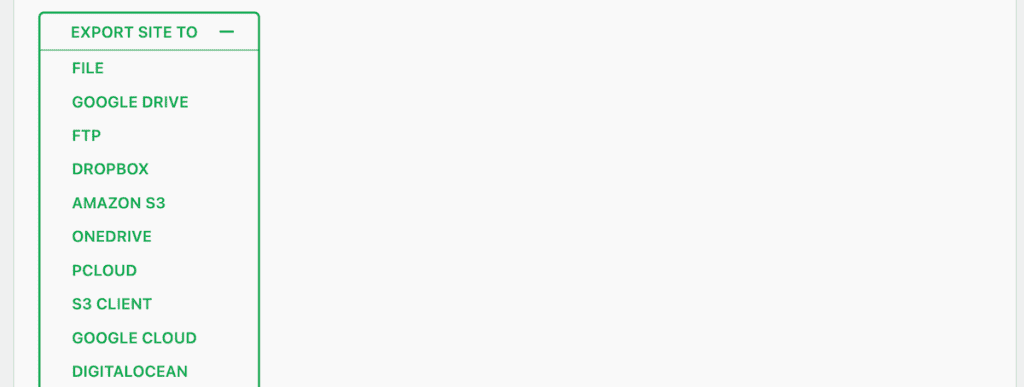
Once you click the location, it will automatically start the backup. Make sure you click the Download button to download your exported site.

Customizing your website export
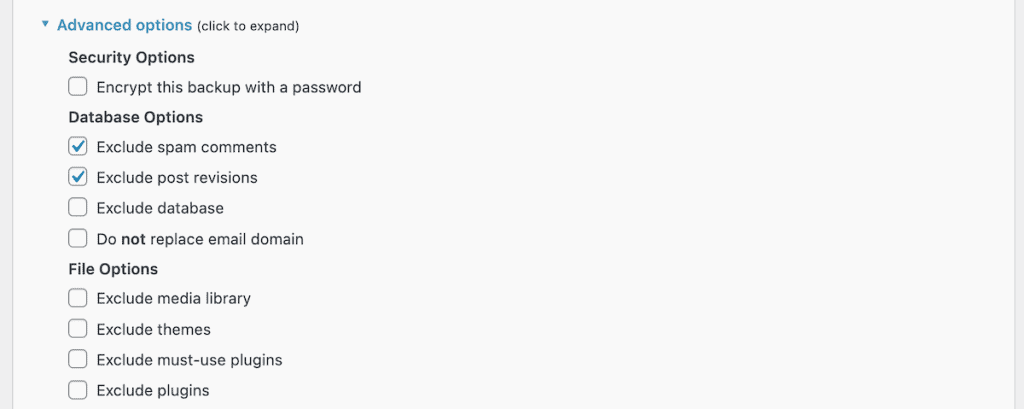
If you want to customize your website export, then click the Advanced options drop-down. This gives you a list of elements to exclude from your backups. For example, you can exclude spam comments, post revisions, media library, and more.
Once you’re finished, click the Export Site To drop-down just as you did above.
Exporting the site but changing domains
If you’re changing domains, then you’ll want to use the search and replace feature. This is at the very top of the Export Site screen. This will search your entire WordPress database for mentions of your old domain name and replace it with your new domain.

Then, click the Export Site To drop-down and choose where you’d like to download your exported site.
Once you’re finished, the plugin will create a .wpress file containing your entire WordPress site. This file includes your database, themes, plugins, media files, and any customizations or changes you made above.
When you create an export file, this will automatically be added to your backup list within the plugin. To see all of the site exports you made, go to All-in-One WP Migration > Backup, and you’ll be able to view the list of your backups. If you forget to make a customization or change your domain in an earlier backup, all you have to do is go to this list to download a previous version.

3. Prepare Your New Hosting
Now we’re at the point where you’ll be importing your WordPress site to a new hosting provider
But, before we do this, you’ll need to make sure WordPress is installed on your new hosting provider. Most quality hosting companies offer one-click WordPress installation through their control panel.
If not, then you can follow our guide on how to install WordPress. Regardless of your hosting provider, the steps will be similar.
Once WordPress is installed on your new hosting provider, you’re all set. You can move forward to the next step of actually importing your new website.
Note: If you’re switching to SupportHost WordPress hosting, you can skip this entire migration process. SupportHost offers free website migrations for new customers, handling everything for you.
4. Import Your WordPress Site
Now you’re ready to import your website to your new host. Just like above, you’ll need to install the All-in-One WP Migration plugin on your new website, following the same steps as above.
Then, once the plugin is installed, click on All-in-One WP Migration in the sidebar and then click on Import.
You’ll see a screen where you can drag and drop your export file or click to select it. Click on Import From and select File, then select the .wpress file you downloaded earlier.

The plugin will start processing your file for import. When prompted with a warning that the current data will be replaced, click Proceed. Wait for the import process to complete, which can take several minutes depending on the size of your site.
Keep in mind that this will overwrite any work that you’ve already done on the website. So, if you’ve already added content or anything, then you’ll want to run a backup before proceeding.
Note that the free version of the plugin will only replace matching content. If you want to do a complete change, where the plugin will overwrite everything, then you’ll need one of the premium extensions.

After the import finishes, you’ll see a success message with further instructions.

5. Finalize Your Migration
To complete the migration process, first click on the Save permalinks structure link. Then, you’ll need to log in using your login credentials from the site that you exported earlier, not your fresh install site.

After that, you’ll be taken to the Permalink Settings page in your WordPress dashboard. All you need to do is make sure they’re correct, and then click Save Changes.

That’s it. Your site should now be fully migrated to your new hosting provider. Take some time to browse through your pages and posts to make sure everything is working correctly.
Common All-in-One WP Migration Issues and Troubleshooting
While All-in-One WP Migration is designed to make migrations simple, you might encounter some issues along the way. Here are some of the most common problems you might run into:
File Size Limitations
The free version of All-in-One WP Migration let’s you migrate sites that are smaller than 512MB.
If you’re experiencing an error and your site is below the 512MB limit, then you can increase the upload limit in WordPress. See our guide on how to increase the file upload size limit in WordPress for more details.
If your site is larger than this, then you have a few options for migrating your site.
First, you can purchase the Unlimited Extension, which removes the file size limit and costs $69 per year.
Second, you can exclude large files when exporting by using the Advanced Options during export. Here, you’ll want to exclude media files, plugins, themes, or your entire uploads folder, then manually transfer these via FTP afterward.
Import Getting Stuck
If your import seems to get stuck and doesn’t complete, first wait at least 15 minutes before assuming it’s frozen. Sometimes large imports take longer than expected.
Try refreshing the page and restarting the import if needed. You can also temporarily deactivate all other plugins on your new site and switch to a default WordPress theme before importing.
If you’re still having issues, try importing in a different browser or clearing your browser cache.
404 Errors After Migration
If you’re seeing 404 errors after completing the migration, go to Settings > Permalinks and select a different permalink structure, save changes, then switch back to your preferred permalink structure and save changes again.
Chances are, there was an issue with the permalink structure during migration. Or, the permalink changes you made didn’t save properly.
White Screen or 500 Error
If you’re experiencing other errors like, the WordPress critical error, or other error codes, then your best bet is to enable WordPress debugging, so you can at least see what’s the source of the error.
Often, it can be a conflict with your themes, plugins, your PHP version, or something else. Using debugging will tell you what’s causing the error, so you can fix it.
This is a good reason why a lot of people choose a free migration service like we offer here at SupportHost. That way, the migration and any errors that might arise are handled completely on your behalf.
Best Practices for a Smooth Migration
To ensure your migration goes as smoothly as possible, follow these best practices:
Before the Migration
Always create a separate backup of your site beyond the export file. It’s also a good idea to clean up your site by removing unused plugins, themes, and media files to reduce the export file size.
Plan your migration during low-traffic periods and check that your current plugins and themes will work with your new hosting provider.
During the Migration
Avoid making changes to either site during the migration process.
Be patient, as large sites can take time to export and import. Follow each step carefully and don’t skip any part of the process. Keep your export file safe and secure, as it can serve as a backup if needed.
After the Migration is Complete
After completing the migration, test your site thoroughly by checking all pages, forms, and features. Only update your domain’s DNS settings after confirming the new site works properly.
Monitor your site’s performance in the days following migration and create a fresh backup once everything is working correctly.
Premium All-in-One WP Migration Extensions Worth Considering
While the free version of All-in-One WP Migration works well for most basic migrations, there two premium extensions that can make the process easier for larger and more complex sites:
- Unlimited Extension ($69/year): Removes the 512MB file size limit.
- All-in-One WP Migration Pro ($99/year): Unlimited upload size, cloud storage, automated backups, site reset hub, and more.
These extensions can be purchased directly from the ServMask website if you require additional backup or site migration features.
Why Choose a Professional Migration Instead
While All-in-One WP Migration makes it possible for most users to migrate their own sites, there are situations where a professional migration service makes more sense:
Very large or complex sites with extensive customizations or large databases might be better handled by professionals. The same goes for WooCommerce sites with active orders and customer data, or WordPress multisite installations with multiple subdomains.
If you’re short on time and need the migration completed quickly without your involvement, or if your site must remain fully functional during migration with zero downtime, professional assistance is valuable.
If you’re switching to SupportHost, you can take advantage of the free migration service. Our team will handle the entire process for you, ensuring a smooth transition without any technical hassle on your part.
All-in-One WordPress Migration FAQs
What’s the best way to migrate a WordPress site?
The best way to migrate a WordPress site depends on your specific needs. For beginners or those with smaller sites, using a plugin like All-in-One WP Migration offers the simplest approach. For larger or more complex sites, professional migration services provided by your new host (like SupportHost’s free migration service) can save time and ensure everything works correctly.
Is the All-in-One WP Migration plugin free?
Yes, the basic All-in-One WP Migration plugin is completely free and available from the WordPress plugin repository. The free version works well for sites under 512MB. For larger sites or additional features like direct cloud storage integration, premium extensions are available starting at $69.
How do I fix the upload limit error in All-in-One WP Migration?
To fix the upload limit error, you can either purchase the Unlimited Extension or increase your file size upload limits. You can increase your file size upload limits by making changes in cPanel, contacting your hosting provider, or modifying your php.ini file.
Can I migrate a WooCommerce store with All-in-One WP Migration?
Yes, you can migrate a WooCommerce store with All-in-One WP Migration. The plugin will export all your products, orders, and customer data. However, for active stores with frequent orders, it’s recommended to use a professional migration service to ensure no orders are lost during the transition.
How long does a WordPress migration take?
The time required for a WordPress migration varies depending on your site’s size and complexity. Small to medium sites typically take 15-30 minutes to export and import. Larger sites with extensive media libraries can take several hours. The actual DNS propagation after changing nameservers can take 24-48 hours, though the site will be functional during this time.
In Closing: Making WordPress Migration Easy with All-in-One WP Migration
Moving your WordPress site doesn’t have to be complicated. The All-in-One WP Migration plugin gives you a straightforward way to transfer your entire site from one host to another without needing technical expertise or expensive developers.
That said, if you’re moving to SupportHost, you might not need to use the plugin at all. Our free migration service can handle the entire process for you, saving you time and ensuring everything works perfectly from day one.
Whether you choose to migrate your site yourself with the help of a plugin or let professionals handle it, the important thing is that you don’t stay stuck with hosting that doesn’t meet your needs. With the tools and information in this guide, you’re now ready to move your WordPress site to a better home.
Have you used All-in-One WP Migration to move your WordPress site? Please share your experience in the comments below.
Ready to build your WordPress site?
Try our service free for 14 days. No obligation, no credit card required.


