
Transferring a WordPress site is a fairly simple task, if you know how to do it.
Without knowing how to do it, it is possible to create problems to the site, in some cases irreparable.
There are various ways to transfer a WordPress site, the easiest way is perhaps using a plugin, such as Duplicator which we talked about in another article.
This article only explains how to transfer WordPress site from one provider to another. If you need information about emailtransfer here I explain how to do it.
In this guide I will leave out the part about transferring emails, which I will talk about in a later article. If you need to transfer the site and change WordPress domain follow the directions in the guide related to domain change.
Every week we transfer about ten websites from other providers, so we have developed some experience in this type of operation.
I remind you that if you want to change hosting we take care of the migration of your site. As for the emails, if your provider has cPanel they will be transferred automatically. If your provider does not have cPanel we can migrate them at an extra cost per email account.
So let’s see how to migrate a WordPress site from one provider to another. If you want to understand how to transfer your site from another platform to WordPress check instead the articles on how to:
- switch from WordPress.com to WordPress.org
- from Wix to WordPress
- from Blogger to WordPress
- from Squarespace to WordPress.

Table of Contents
A WordPress site is nothing more than a set of files hosted on a server and a mysql database that contains all the information, such as the content of pages and articles and the settings of your website.
Having clear how it works serves us to understand what we need to do to transfer a WordPress site from one server to another. Basically, the operation boils down to three steps:
- Moving files
- Moving the database
- Reconfiguring WordPress to work with the new database
Once these operations are done we can proceed to change the nameservers of domain or verify that the website is working by editing the local hosts file.
So let’s see how to perform a manual WordPress transfer and what is meant by a manual transfer. Once we understand how to do it we’ll see that there are various systems, depending on the case it is convenient to use one rather than the other.
Transfer WordPress site manually
Our staff refers to a manual transfer in those cases where we need to manually move the files and database from another provider to SupportHost.
On the other hand, when the previous provider uses cPanel and has the native backup feature enabled, we can proceed with a transfer from cPanel to cPanel, which saves us time and performs a more complete job, copying the account from one server to another in a completely automatic way.
Manual file transfer
The first step when we want to move a website from one server to another is to transfer the files. To perform this operation we have various options. Let’s see how to do it.
File manager
Many hosting providers offer a file manager that allows you to manage the files on your account through a simple graphical interface directly from your browser.
Most of these file managers have a function to compress files and folders into a zipper file.

Create a zipper file with file manager
Once the archive is created you can download it through the file manager, upload it to the new account through the file manager of the new provider and unzip it.

Unzip a zipper file with the file manager
If you have SSH access to your account, you can download the compressed file directly to the server using “wget” so you don’t need to download the files to your computer first and then upload them from your computer to the new server.
FTP
You can download the files with FTP to your computer, then upload them via FTP to the new server. To do this you can use a software like Filezilla that through a simple graphical interface allows you to perform these operations.

The problem with this system, and with using the file manager, is that you have to download all the files to your computer before you can upload them back to the new server.
Let’s see how to skip this step.
LFTP with SSH
If your provider offers SSH access, we offer it included in the price on semi-dedicatedhosting, Magento hosting and PrestaShophosting, and with SSH offers LFTP then you can speed it up.
You don’t necessarily need to have root permissions to perform this operation, you can also do it as a cPanel user.
Basically you connect to the server, and then from the destination server (the one where you want to move the files of your site) you connect to the source server (the one that currently hosts the site) via LFTP.
This way you can download all the files from the source server without having to download them to your computer first, which will speed up the process a lot.
This is what we do when we transfer a client’s site from Aruba, since Aruba does not use cPanel.
If you don’t have root permissions
If you only have cPanel permissions you have to move to the public_html folder of your account and then run the command:
lftp -c 'open -e "set ftp:list-options -a; set ftp:ssl-allow no; set xfer:log 1; mirror source_folder . -c -P10 --log=./transfer.log" -u user_ftp,password address_ip'
If you have root permissions
If you are on a dedicated machine and you have root permissions you have to move to the public_html folder of the account you want to migrate and run this command:
sudo -u user_cpanel_supporthost lftp -c 'open -e "set ftp:list-options -a; set ftp:ssl-allow no; set xfer:log 1; mirror folder_source . -c -P10 --log=./transfer.log" -u user_ftp,password address_ip'
As you can see in both examples we need FTP access to be able to download all the files. We create a log file in case something goes wrong and set the number of simultaneous transfers to 10 to be faster.
In our specific case we prefer to use the “screen” command so that in case we accidentally close the shell the server continues the transfer until it is completed.
Manual transfer of MySQL database
At this point we have transferred the files to the new server, or they are being transferred. This depends on the total size of the files to be transferred and their number.
Now we need to move the database from the old to the new server.
Most CMSs, including of course WordPress use a MySQL database to store data. As I said before for example, the text of the articles is stored on the database. The text you are reading is nothing but a row in the database, inside a table called “wp_posts”.
For the export and subsequent import of a MySQL database, a .sql file format is used, usually compressed to reduce its size and make it easier to download from the source server and upload to the destination server.
The sql file is nothing else but a text file that contains a series of directives (queries) that explain to the server how to create an identical database.
To be able to manage and export a database every hosting provides you with a management tool, usually phpMyAdmin.
phpMyAdmin
phpMyAdmin is undoubtedly the most used tool for managing the MySQL database. It allows us to perform basic as well as more advanced operations. Basically it allows us to completely manage the database. Obviously it is possible to create problems if we perform a modification incorrectly.
If we want to transfer our website from one server to another we need to export the database in compressed SQL format, making sure to export both the structure and the data.
Adminer
Adminer is a great database management tool and has the advantage of being a single php file and a very lightweight tool.
This is also the default tool that is used by local by flywheel and so you may need to use it.
The fact that adminer consists of only one file makes it very useful in those cases where there is a problem in the source server. Some providers to try to block outgoing transfers block the export function of phpMyAdmin by deleting a file, in this way it becomes impossible to export the database because you receive an error.
In some cases we found ourselves in this situation, and we uploaded adminer to the server via FTP, a very fast operation since it is only one file. We then used adminer to export the database in sql format for migration.
Importing the database
To complete the migration we need to create a database on the target server. Once the database is created with its user we go to import the database on the target server.
If you are moving a site from another provider to SupportHost for import you will have to use phpMyAdmin, since this is the tool we provide with our service.

Import a database with phpMyAdmin
At this point we have completed the transfer of all files and the database as well. Most likely while we were migrating the database the files completed the transfer. But we are not done yet.
Now it’s time to reconfigure WordPress.
Re-configuring WordPress
What does it mean to reconfigure WordPress?
As I said at the beginning WordPress is nothing but a set of files that needs a database to work.
To access the database any script needs a username and a password. In addition, in order to access the database we need to know the name of the database and its hostname, i.e. the address where we can reach it.
Some providers have separate servers for MySQL databases (such as Aruba) so in the hostname field you will have to enter the IP address. In our case you will have to use localhost, it means that the database is hosted on the same server that hosts the files of your website.
So we need to modify the WordPress configuration file to provide the access data to the new database. Most likely in fact if you visited your newly migrated website now you would see a database connection error.
You will need to edit the wp-config.php file.
You can do this by downloading it to your computer and editing it with a text editor, or by using the file manager we provide.
You will need to go find this part and edit by entering the correct data:
/** The name of the database for WordPress */
define( 'DB_NAME', 'nome_database' );

/** MySQL database username */
define( 'DB_USER', 'username' );

/** MySQL database password */
define( 'DB_PASSWORD', 'password');

/** MySQL hostname */
define( 'DB_HOST', 'localhost' );
At this point we save and we have completed the migration.
Before going to explain how to check that we transferred WordPress correctly and change the domain pointing I want to spend a few words on how to transfer the site in a more automated way.
Automatic WordPress site migration
Actually in process is not manual, but within our team we call it that, since we call the process just described “manual transfer”.
I start by saying that there are several plugins to transfer a WordPress site, in my opinion too many. You can read a comparison of the most popular migration plugins.
The migration I am referring to is cPanel to cPanel migration. That is, if your old provider has cPanel you can copy the account in a few simple steps.
To perform this kind of operation you need root permissions. That is, if you don’t have a dedicated solution, you can’t do it on your own.
Root permissions on both servers
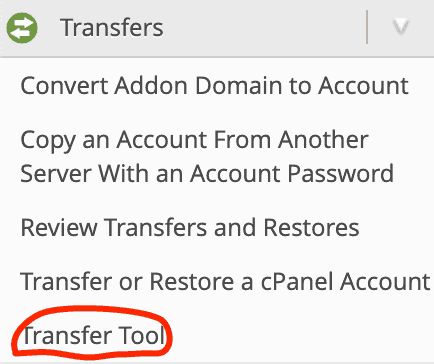
If you have root permissions on both servers the operation is quite easy. Go to WHM of the target server and click on the “transfer tool”.
Here you’ll need to enter the source server’s root access data:
- IP
- SSH port
- Root password (unless you have configured a public key for access)

At this point you’ll see a list of accounts and you can select the ones you want to migrate, which will be copied as they are from the old to the new server.
Using this system the account is copied in an integral way, as if you were doing copy-paste.
If you do not have the root password
This is the method we use when we move client site that is hosted on a provider that uses cPanel, such as SiteGround.
In most cases you will find yourself migrating accounts without having root access to the source server. In these cases you will only have access data to cPanel.
But don’t despair, we can still perform the migration automatically. In this case, the “Transfer or Restore a cPanel Account” function comes to our aid.

Let’s select “Transfer from Remote cPanel Account” and enter the access data of the cPanel account of the source server: ip, username and password.

In some cases this method may give errors.
In some cases it is necessary to add the IP of the source server to the list of allowed IPs in the destination server. Otherwise the migration cannot be completed and you will get an error.
In some cases the backup function via API (the very one we are trying to use) is blocked by the provider in order to make life difficult for customers who want to leave. A bad practice in our opinion but we can’t do anything about it, if not avoid the same treatment to our customers.
In this case it will be necessary to access the cPanel of the source server, then through the backup function of cPanel create a backup. While creating this backup we can decide to send the backup to another server via FTP, thus sending it to our cPanel account.
We can alternatively create it in the home folder of the source server, then download it via wget to the target server. The option to send it via FTP saves us time.
Once we have the backup file on the target server we can perform a restore.
Note that in order to perform a restore you must have root access and the file must be inside the /home folder of the server.
To perform the restore you have to use the same tool I mentioned before: “Transfer from Remote cPanel Account” but selecting the first option: “Restore from a local cpmove file”.
Change the targeting of the domain
At this point we find ourselves with the same site running on two different servers, or at least that’s what we hope.
The next step is to check that the site actually works. This should be done before changing the domain pointing.
So we have to tell our computer, but only ours, that when we visit the site we want to see what is on the new server and not what is still on the old server.
To do this we need to edit the hostsfile on our computer. This will tell our computer that when we view the site we want it to be loaded from the new server, whose IP address we indicate.
This way we are sure that the site is working properly. All we need to do is check the home page and an internal page. If both are working we have completed the migration of our WordPress site successfully.
At this point we have the same site, working on both servers and we can proceed to change the pointing of the domain.
Acting in this way we won’t have any downtime. Now the domain points to the source server, where the site is working. As soon as we change the pointing of the domain it will start pointing to the new server, where the exact same site has already been transferred and is working and we won’t have any downtime.
If you have ordered a domain transfer you will not always be able to change the pointing, some providers do not allow domain pointing to be changed if a domain is being transferred.
In this case it’s possible to modify manually the DNS zones from cPanel by modifying, on the source server, the old IP and changing it with the new one. In this way in a few minutes the site will point to the new one.
Relocation of an ecommerce site
If you have an ecommerce site, for example you use woocommerce to the transfer you add a layer of complexity.
If a customer orders one of your products after you have backed it up, but before the domain points to the new server the new order will be recorded on the database of the old server and will not be present on the new site. This is because we generated the database backup before the order was created.
We can prevent this problem in a fairly simple way.
Before starting the transfer in these cases it is advisable to set the website in maintenance mode, so that no user can visit it. Only at this point we proceed with the transfer of the website.
Once the transfer is complete, as indicated above we edit the hosts file on our computer to check that everything is working properly. At this time we disable the maintenance mode on the website on the new server.
In this way after we change the pointing of the domain users will start to see the site on the new server, no longer in maintenance. While those users who due to the propagation time of the domain will continue to see the old site will see it in maintenance, without the possibility to order, creating an order that would be lost during the migration.
Obviously given the delicacy of the migration of an ecommerce site is advisable to perform the migration at a time when traffic is minimal, such as at night or on weekends.
Errors during migration
If something can go wrong, it will.
MURPHY’S LAW
You may encounter some errors during the migration or when we go to check the correct functioning of the website.
Let’s go through the main ones to figure out how to solve them.
Database import gives error
In some cases, it is possible that a database that is too large can create problems during import.
The first check to be done in these cases is to understand which table is too big.
For example, a client’s site had a few pages, but a database of about 100MB. Upon inspection we noticed that the vast majority of the space was used by spam comments, never approved with Russian emails.
We solved it by running a query to remove these comments.
DELETE FROM wp_comments WHERE comment_author_email LIKE '%. ru' and comment_approved ! = '1'
Basically, we’ve removed all unapproved comments posted by Russian emails, thus blatantly spam.
We then deleted the meta for the comments that were just deleted.
DELETE FROM wp_commentmeta WHERE NOT IN (SELECT comment_ID FROM wp_comments)
Basically, we deleted all fields in the wp_commentmeta table for which the comment had already been deleted with the previous query.
If it is a large database, you can export the tables in small groups to reduce the size, or use a software like Sequel Pro to import the database.
Database connection error
In this case the solution is very simple. All you have to do is check the wp-config.php file and make sure that the data entered is correct.
This problem is due to incorrect database connection data.
WordPress 404 Error
If you see the home page of your site, but you can’t see the inner pages because of a 404 error the solution is very simple.
WordPress needs the .htaccess file to be configured correctly. Simply put, this file tells the server how the site’s urls should be seen. If this file is missing or contains an incorrect configuration you won’t be able to see the subpages.
In Linux files that start with a dot (.), like in this case .htaccess, are hidden files. So it is possible that during migration you did not transfer that file. In this case check if the file is present on the destination server. If it is not, all you have to do is to move it from the source server to the target server.
If the .htaccess file is present on the target server then you need to log in as administrator, go to:
Settings -> permalink
And save the settings without making any changes. In WordPress, saving permalink settings forces a rewrite of part of the .htaccess file and makes all internal page links work again.
WordPress Error 500
In some cases it is possible that WordPress will show you an error 500 on the new server, while it remains fully functional on the old one.
In this case the problem may be due to a setting on the new server, a wrong directive in .htaccess or some missing php file that was “lost on the way” during the migration.
The easiest way in this case is to check the error_log file, an error file that is saved in the WordPress root and based on the error shown understand the reason for the error so as to fix it.
You download as a file instead of seeing the site
This is a very common mistake.
Many providers, including us, use custom code in the .htaccess file to set a different PHP version than the server’s default.
When the systems used to choose the PHP version are different, it happens that these codes are not compatible between the two servers. In this case the site is displayed as a blank page and a file is downloaded.
To solve it, all you have to do is edit the .htaccess file and delete the part of the code that generates problems. It is a code of this type:
AddHandler application/x-httpd-php70 .php .php5 .php4 .php3
Conclusions
In this article, we have seen what different methods we can use to transfer a WordPress site from one server to another without creating problems.
We then saw how to test that everything is working and how to change the domain pointing so that you don’t have any downtime during the migration.
Are you unsure about how to migrate your website? Were some parts of the guide unclear? Let me know in the comments.
Ready to build your WordPress site?
Try our service free for 14 days. No obligation, no credit card required.


