
In this article, WordPress change domain: the definitive guide, we will see how to change the WordPress domain by examining two different scenarios.
In the first one, we’ll see how to transfer your WordPress site from one server to another by changing domains. Then we’ll see how to change the domain (while remaining on the same server).
If, on the other hand, you’re interested in knowing how to transfer your domain from one provider to another you can check out the guide on domain transfer.
After seeing how to transfer your site and change domain, we will focus on the impact a domain change has in terms of SEO. We will then see how to make sure you don’t lose traffic and get penalized in search engine rankings.
Table of Contents
Premise
If we want to transfer a WordPress site from one server to another, by changing the internet domain,or the domain without transferring the site, we must pay special attention to the WordPress database.
In the case of the transfer, moving the files from one server to another will be the easiest part, but when we move the database we have to make sure that the addresses in it are the correct ones that correspond to those of the new site.
Some of the information stored in the WordPress database is stored in serialized data. This means that we cannot directly replace the URLs in this serialized data, they would be compromised. So, in order not to compromise this data, we cannot use MySQL’s find and replace function.
Luckily, we are helped by the WP Migrate DB plugin that replaces URLs and file paths without compromising the database.
Another method is to use WP-CLI as we have shown in the dedicated guide.
Transfer site and change WordPress domain
There are several methods we can follow to transfer our site and change the WordPress domain.
Method 1: WP Migrate DB
Here are the steps we are going to follow in this first method to transfer the site and change the WordPress domain:
- install WordPress on the new account
- move the files
- export the database with WP Migrate DB
- import the database on the new site.
Firstly, let’s install WordPress on the new server. If you chose WordPress hosting you can skip this step.
Alternatively, you can use an auto-installer like Softaculous (if your provider makes it available) or install WordPress manually.
Note: when installing with Softaculous it is best to select the advanced options and set the database table prefix to be the same as the old site.
Move files
After installing WordPress we need to move the files from the old site to the new one. To do this we can use the cPanel file manager, an FTP client such as Filezilla or SSH connection.
In this case, we will use Filezilla.

The steps are simple:
- connect to the old site and download all the files in the wp-content folder to the computer.
- connect to the new site and upload the files to the server.
Exporting the database with WP Migrate DB
As I explained in the premise and at the beginning of this article WordPress change domain: the definitive guide, in order to properly export the database without corrupting the data we can use the free WP Migrate DB plugin. For the same reason, this plugin also comes to our aid when we need to switch from http a https with WordPress. The first thing to do is to install and activate the plugin on both sites: the old and the new one. This way we’ll use the plugin to detect the URLs and paths of the new site and replace them in the database of the old site.
Let’s access the WordPress admin panel and add a new plugin: WP Migrate DB by Delicious Brains, let’s install and activate it. Then we repeat the same procedure with the new site.

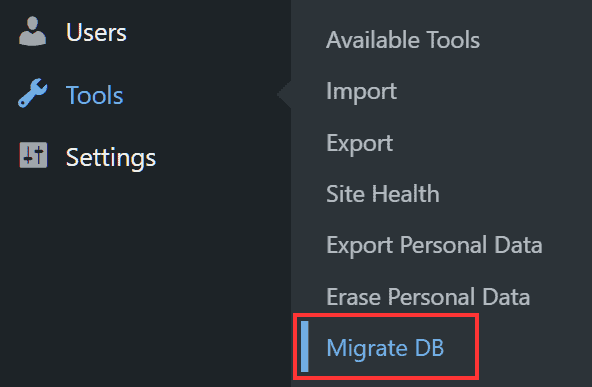
We access the WordPress backend of the old site and click on Tools → Migrate DB.
Then we click on the Migrate tab at the top and then click on Export Database.

Before exporting the database from the old site, however, we need to change the URLs to those of the new site.
Click on Custom Search & Replace and we will see on the left (Search) the URL and path of the old site, in the corresponding fields on the right (Replace) we must enter URL and path of the new site.
Let’s go to the WordPress of the new site. Click on Tools → Migrate DB and open the Migrate tab. In the same fields here we will find URL and path of the destination site. Let’s copy and paste them into the Replace fields of the old site as I show you in this example.

In our case, site2 is the new site and site1 the starting site.
Click on Export Database to download on your pc the database that we will import on the new site.
Import the database on the new site
To import the database on the new site we need to already have a database created. In our case, having created the WordPress installation with Softaculous the database was created directly.
To know the database of the site we just go to Softaculous and click on WordPress Manager.

We then click on the WordPress installation whose details we want to know and then on Database Details.
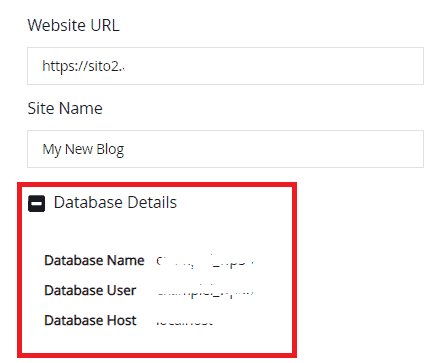
This way we know the name of the database associated with WordPress.
Another way to know the name of the database is to open the file wp-config.php and look for DB_NAME.
By clicking on View Database we access phpMyAdmin and can proceed to import the database we just exported with WP Migrate DB.
Let’s click on Import.

Let’s click on Choose File and select the compressed database we downloaded.

Let’s make sure the format is SQL and then click the Go button at the bottom of the page.

By importing the database the tables from the previous database (the ones from the new site) will be overwritten.
After importing the database phpMyAdmin will give us a warning if the operation was successful:

Check the result
Now that we’ve imported the database we need to check that the new site looks similar to the old one.
Remember that to log in to WordPress now you will have to use the login details from the old site.
Let’s log in and check that all posts and pages have been imported correctly.
Method 2: WP-CLI
Another possible way to transfer the site and change the WordPress domain is to use WP-CLI.
In this case, the steps to follow are as follows:
- Move the necessary files;
- Export and import the database with phpMyAdmin;
- Edit the wp-config file;
- Make the replacements in the database using WP-CLI.
Let’s take a look at them one at a time.
Move the necessary files
To move files from one server to another, we can use one of the systems we saw earlier in the Move Files of the first method. For example, we can use an FTP client such as Filezilla or Cyberduck.
In this case, we will have to move all the files and not just those in the wp-content folder.
Export and import the database
One of the quickest ways to export and import the database is to use phpMyAdmin.
The procedure is very simple, and you can follow the detailed steps in our tutorials to:
Note that, in this case, we export the database and import it to the new server as it is, without making replacements.
Edit the wp-config file
After copying the files, our wp-config.php will contain the information from the old database.
We then need to edit it and correct the information to match the newly created database.
We need to enter the following information:
database name;
database user username;
database user password.
These are the same steps I explain later in method 4, under the section Edit the wp-config.php file.
Use WP-CLI for substitutions
As I explained at the beginning of this guide, you need to go in and do the replacements in the database so that you don’t corrupt the data.
One way to do this is to use a simple WP-CLI command, search-replace, like this:
wp search-replace https://oldsite.com https://newsite.comMethod 3: Duplicator
We can transfer the site and change WordPress domain using a free plugin called Duplicator. In this case the steps we will have to follow are the same, but we will transfer the site using the plugin directly.
What we need to do is to install and activate the plugin on the old site. Then create the backup (package) and download the archive with our site data and the installer.
These two files will have to be uploaded to the new server, before starting the installation wizard. Let’s follow the steps of the procedure to extract the files and create the new database on the new server. You can check the step-by-step procedure in our Duplicator guide.
When we reach step 3, let’s make sure that the URL of the new domain and its path are present in the new settings. If the settings are not correct, change the URL to match the new domain.

In this way Duplicator will update the database to replace the addresses of the old site with those of the new one.
Verify the result
If only the home page of the new site works after the migration, but not the other pages. This could be a problem with the permalinks.
In most cases it’s enough to update permalinks, to do this you need to go to Settings → Permalink.

From here click the Save Changes button to re-save the permalinks without changing anything.
Method 4: WP Migrate DB (without installing WordPress)
We can avoid installing WordPress on the new server, in this case, we just need to move all the files of the old site to the new server.
We can then export the database with WP Migrate DB following the steps described in method 1.
Before importing the database we will need to create a database on the server of the new site. Then we import the database with phpMyAdmin following the steps described before.
After importing the database we will need to edit the wp-config file so that the database information matches the new database we created.
Edit the file wp-config.php
For WordPress to be able to connect to the new database we need to edit the wp-config.php file.
We can edit the file directly from the cPanel file manager. The lines where we need to enter the database name, username and password are these:
/** The name of the database for WordPress */
 define( 'DB_NAME', 'nome_db' );

 /** MySQL database username */
 define( 'DB_USER', 'username' );

 /** MySQL database password */
 define( 'DB_PASSWORD', 'password' );

 /** MySQL hostname */
 define( 'DB_HOST', 'localhost' );
Change WordPress domain
Before proceeding with the domain change of your site you need to register the new domain.
If we decide to change the domain of our WordPress site, but without transferring our site to another server, we must also modify the database to update the URLs.
Firstly, let’s do a backup of our site. If you have cPanel available you can follow our tutorials on how to do a backup or a cPanel guided backup.
Let’s install and activate the WP Migrate DB plugin on WordPress.
Let’s click on Tools → Migrate DB.
Let’s click on the Migrate tab and then click on Search & Replace as you see in this screenshot.

Fill in the fields under Replace with the address and path of the new domain. Then we click on the Search & Replace button at the bottom of the page.

At this point you just need to contact the support of your provider to communicate the change of domain in order to associate it to your plan. In our case you just need to open a ticket to submit the request.
Does changing the WordPress domain affect SEO?
Immediately after changing the domains, you can expect a temporary drop in traffic. This is simply due to the time it will take search engines to locate the new URLs.
In order for the domain change to not have a negative impact on your site’s ranking, there are a few things you can do to make life easy for the search engines (and users). First, you need to properly redirect traffic from the old to the new domain.
Set up 301 redirects
To do this you just need to add 301 redirects, in this way someone who is trying to visit your site from a link pointing to the old domain wouldn’t end up on an error page.
You have to consider, in fact, that there could be backlinks to your site’s home page or to its contents, coming from social networks or other sites. 301 redirects enable you not to lose the link juice of these external links coming to your site.
Remember that redirects serve both users who want to reach your site and search engines. By setting up permanent redirects you will be sure that search engines reach the right pages. Also, 301 redirects do not penalize your site in terms of ranking.
Communicate domain change to search engines
In Google’s Search Console there’s a special feature to tell the search engine that you’ve decided to change your WordPress domain.
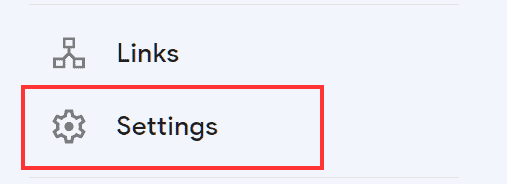
Log in to Search Console and add the ownership of the new site, then proceed with verification. Select the old domain property and click on Settings from the side menu as seen below.
Click on Change of Address and then select the new domain from the drop-down menu.

Submit a new sitemap
You can use Search Console to submit the sitemap for your new site, you can check out our article to see how to create and submit the sitemap or your site.
If you’ve decided to change WordPress domain send the updated Sitemap allows you to tell Google the pages of the site to be indexed.
By submitting the WordPress sitemap you can also follow the progress of indexing and you will see the number of indexed pages associated with the new site increase and decrease those of the old site. Naturally, in order to monitor the trend, you will have to send both the sitemap of the old site and that of the new one.
Check for errors
After transferring the site, changing the domain (or doing both) it’s good to check for 404 errors and also verify that there are no breaks in the links.
You can use Search Console’s Index Coverage report to do this. If you notice crawling errors due to redirects or a 404 error you can trace which pages they refer to and fix them on a case by case basis.
Conclusion
There are many reasons to change your WordPress domain, for example, you may want to transfer your site and change the domain as well. In other cases, you may decide to change the domain because the name you were using no longer reflects your project.
In any case, when you change the domain you have to make sure that not only your users can reach you at the new address, but also search engines can. You shouldn’t underestimate the impact of a change of this magnitude on your site’s ranking.
That’s why in this article, WordPress change domain: the definitive guide, we’ve focused on seeing how to change WordPress domains and how to make sure you minimize the impact of this change. By doing so, you can tackle the domain change without the fear of losing all the work you’ve done to succeed in positioning yourself.
Ready to build your WordPress site?
Try our service free for 14 days. No obligation, no credit card required.


