
Moodle is one of the most used LMS platforms for creating online courses. In this in-depth guide we will see how to take advantage of all its functions.
We will start with the installation of Moodle on the server, and we will see everything that needs to know who manages the site as an administrator.
In the second part of this tutorial for Moodle, we will see how to use the platform as teachers. We will start from the actual creation of the courses up to the management and evaluation of the enrolled students.
Before starting with the how-to guide, let’s see the main functions of Moodle.
Table of Contents

What is Moodle and what is it or?
Moodle is an LMS (Learning Management System) platform with which it is possible to structure and share e-Learning courses for online learning.

In addition to Moodle, there are many other LMS platforms, among the free ones we find Google Classroom, ILIAS and Chamilo LMS.
Let’s see what this platform offers us.
Moodle features and functions for users and teachers
Moodle offers all the tools necessary to create courses and follow students throughout the learning phase. In creating the course, the teacher can directly upload resources, embed videos and links from other sites and propose different types of content.
The platform can be used to propose various activities such as quizzes, assignments or surveys. It is also possible to create forums, glossaries and actual wikis.

Teachers will have an evaluation system at their disposal which also includes the calculation of grade averages. They will also be able to follow the progress of the students through reports that keep track of the progress of the students.

Moodle is also an excellent platform for group study because it allows you to create work groups to propose specific activities to each one.
Within the platform, in addition to the possibility of creating forums for discussions, there is also a messaging system that allows subscribers to communicate.

The presence of the dashboard, together with the activation of notifications and the calendar, allow students and teachers to better organize their activities on the platform.
Personalization and additional functions
The management of the site from an administrative point of view is structured and complete. The administrator can manage access settings and define individual user permissions, also creating custom roles as well as being able to use the standard ones.
The presence of plugins allows you to extend the basic functions and take advantage of the integrations with third-party tools. For example, if you want to make money online by offering a paid course, you can take advantage of these extensions to create reserved courses.
User management starting from account creation can be customized thanks to the various options for authentication.
Moodle is also very customizable, as site administrators, in fact, we will be able to change the appearance, insert the logo of our organization and customize the sections that will be shown to users such as the dashboard.
Frequently asked questions about Moodle
Before moving on to the practical part of this tutorial for Moodle, let’s clear up some of the most common doubts about the platform.
How do I log into Moodle?
As simple users, but also site administrators or teachers, the procedure for logging into Moodle is identical. We just need to connect to the address where the platform is installed and enter the login credentials.
Note that Moodle may be installed in a subfolder or a subdomain. If the site administrator has created your account, you should receive a notification email. In this email you will find the login link, which will look like:
domain.com/moodle/login/How to search for a course on Moodle?
After logging in, or logged in as a guest, you will usually find a search bar on the home page or on the “My courses” page that allows you to find the course you are interested in.

An example of a search with filters:

How much does the Moodle platform cost?
Moodle is a free platform that can be downloaded directly from the official website. In this guide we will see all the steps for downloading Moodle and installing it on the server.
There are no costs to buy Moodle, the only costs are those related to the hosting space if you want to create an online eLearning platform accessible to other users.
How much does it cost to create a MOOC or an eLearning platform?
Massive Open Online Courses (MOOCs) are an example of online training. Users can sign up, free or paid, take the course, and get certified.
Courses of this type can be organized by both privately and universities. Some MOOC courses provided by universities rely on Moodle.

It is difficult to estimate the cost of creating a MOOC or an eLearning course. As for the platform itself, if you choose to create a course using Moodle, there are no costs related to the platform which in this case is free.
What we must consider, however, is the cost of hosting to create the site where we will host the course and we will have to install Moodle or another LMS platform.
The choice of hosting also depends on the number of visits we expect, and the space needed.
Depending on your needs, you can also start with a smaller plan such as shared hosting and then upgrade to a semi-dedicated hosting plan or a dedicated server when needed. If you are unsure which plan to choose, do not hesitate to contact us, our team will be happy to advise you.
If you also use other services, for example Vimeo as video hosting, this additional expense must also be taken into account.
Practical guide to using Moodle
This extended guide to using Moodle is divided into two large blocks intended for two types of users: the site administrator and the course teacher.
First we will see how to install Moodle on our server.
In the Moodle guide for the site administrator we will see how to change the appearance and settings of the platform and how to create the default pages: home page, profile page and user dashboard.
We will then see how to create courses and add users to the site.
The second part of the guide is aimed at using Moodle as a teacher. We will see step by step how to set up the course and add content, how to create activities, manage assessments and consult reports.
How to install Moodle on the server
The installation of Moodle on the server can be done in two ways: manual or simplified installation.
You can follow the manual method, by downloading Moodle from the Moodle Downloads section of the official website or via Git. This system is recommended for advanced users.

Or if you want to speed up and simplify the process you can use an auto-installer.
On all of our plans from shared hosting to VPS cloud hosting, you will find Softaculous.
This handy auto-installer allows you to install hundreds of different scripts including Moodle.
In this guide we will see just how to install Moodle with Softaculous.
Now let’s move on to the minimum requirements that we must comply with.
Requirements for installing Moodle
At the time of writing this guide, the latest version of Moodle is 4.0.4, released on September 10, 2022.
In order to install Moodle on a server, you need to have:
- a web server such as Apache;
- PHP version 7.3
- a MariaDB 10.2.29 or MySQL 5.7 or Postgres 10 or MSSQL 2017 or Oracle 11.2 database.
The specific server requirements depend on the number of users who will use the platform and it is, therefore, difficult to make a prior estimate. The recommended resources according to the indications on the official website are the following:
- RAM: 512MB (minimum), 1GB + (recommended);
- Processor: 2 core 2GHz (or higher);
The space available depends on the content that will be uploaded to the server.
In case you want to create an e-learning platform with Moodle with video courses, the recommended option is to use a video hosting service and then embed the content. We will return to this in the section on how to show videos in a course.
Install Moodle locally
If you want to download and install Moodle on your computer, you can use a ready-to-use installer found here:
In the zip files that you can download from these two pages, you will find the Moodle files and everything you need to emulate a web server. The Windows package uses XAMPP, while the Mac package uses MAMP.
Install Moodle with Softaculous
Now that we’ve covered the requirements, let’s see how to install Moodle via Softaculous.
If you have a hosting plan with SupportHost, using Softaculous is very simple. Log in to cPanel and click on Softaculous Apps Installer from the Software section or use the search bar at the top.

After opening Softaculous, you can use the search bar to find the script you are interested in. In our case we will write “Moodle”, like this:
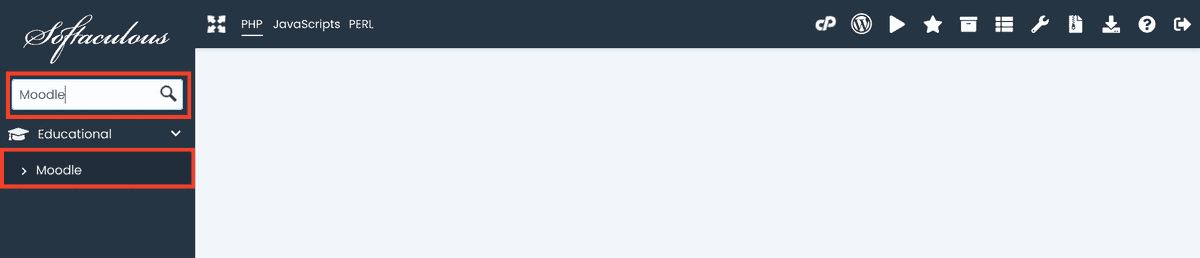
Click on the Install button to configure the Moodle installation.

We will be prompted for the information necessary for installation.
Software settings
We choose the URL of the installation: it will be the address where the platform will be installed.
We also select the version of Moodle to install: usually the most recent.

Site settings and admin account
We enter the name and description of the website.
Then we can fill in the fields relating to the site administrator by entering:
- username
- password
- personal data of the administrator
- email address.

Final settings and installation
At this point we select the language and click on the “Install” button at the bottom of the page.

Note that through the Advanced Options you can change the database name, the table prefix and change the backup settings.
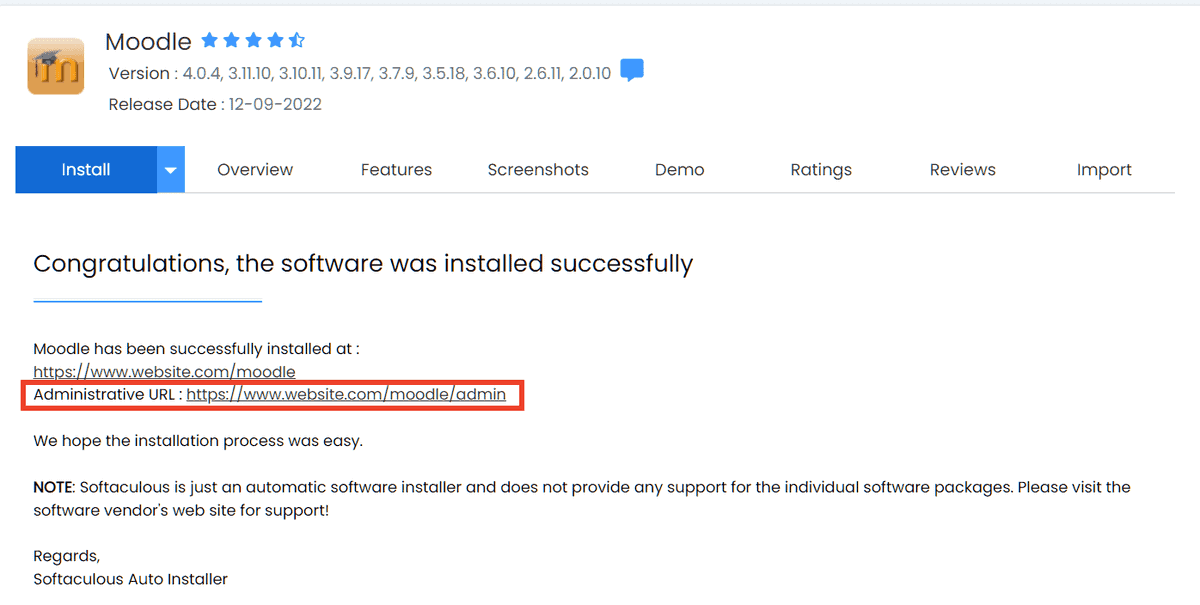
As soon as the installation is completed, we will be able to click on the link next to URL admin to access the administration area.
Moodle guide for the site administrator
This section of our Moodle user guide contains useful information for platform administrators.
As we will see in detail when we talk about roles, there are different types of users in Moodle platforms.
The administrator is the user with all permissions and can add new users and assign them roles.
In this part of our tutorial on how to use Moodle we will see how:
- configure the site and change its appearance;
- change the default pages: home page, dashboard and user profile;
- add a course;
- manage users.
If, on the other hand, you are only interested in the section relating to teachers, go to the dedicated section: Moodle guide for teachers.
Initial Moodle setup
As administrators, after completing the installation of Moodle we can access the administrative area of the platform.
To log in to Moodle, just connect to the address:
domain.com/login/We need to replace “domain.com” with the path of our installation.
Please note that the login procedure is the same for all users, not just for site administrators.
We will find ourselves in front of a login page like the one I show you below:

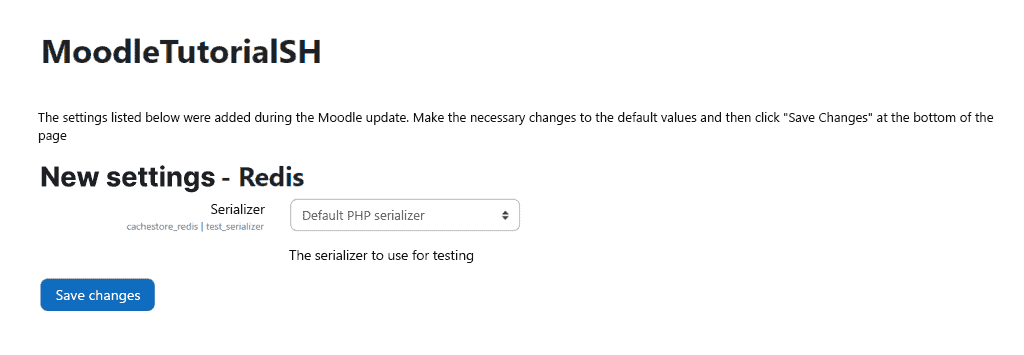
During the first login after installation, it is possible that we will be shown the settings of the cache system, in our case Redis.
Moodle: the admin area and settings
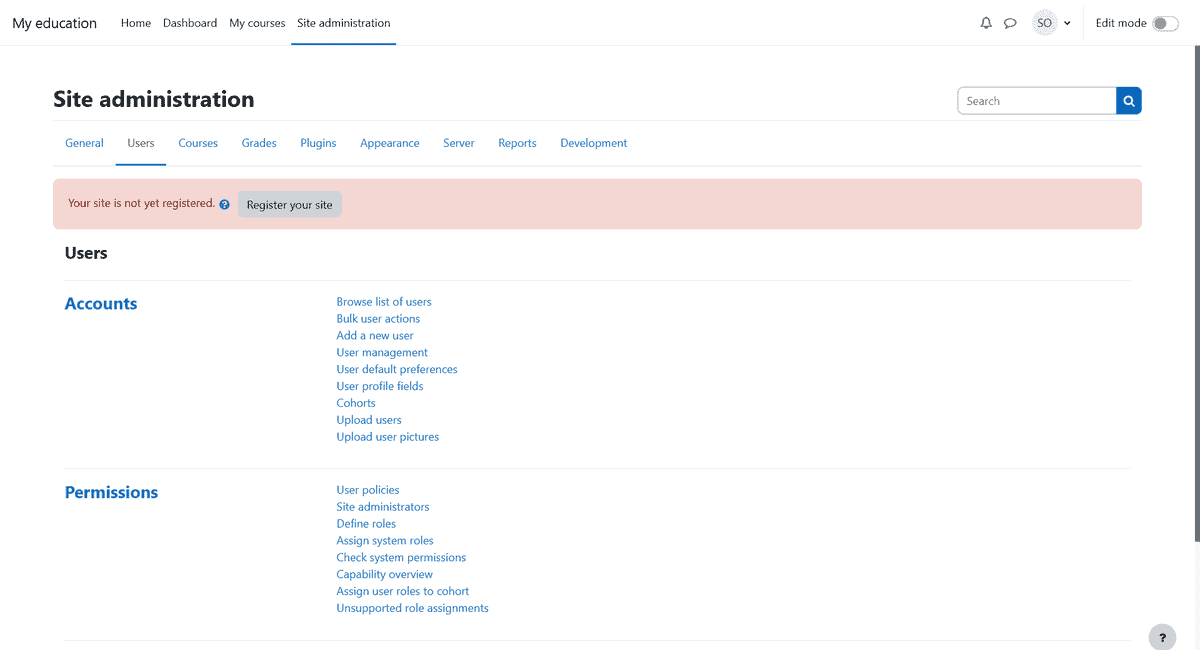
When logged in as an administrator, the Moodle administration area will be accessible by clicking on the Site Administration link from the top menu.
In this area we find several sections:
- general
- users
- courses
- evaluations
- plugin
- appearance
- server
- report
- development.
Let’s see an overview of the administration panel, then move on to the step by step guide on how to set up the platform.
Admin area: general
By clicking on the “General” tab we will be able to access the basic settings of our eLearning platform.
The settings in this section include:
- site information;
- badge settings;
- language;
- internal notification and messaging system;
- site security and IP blocking;
- home page setting.
General> Notifications
During the first access in this section we will be redirected to General> Notifications. Here we will see the site notices that will give us information such as:
- the installed version and new features;
- the Moodle Mobile app: in our case it tells us that it has not been activated;
- any errors: in our case it warns us that it is necessary to change the cron execution time.

You can check if you need to update Moodle by clicking on the Check for Updates button.
Admin area: users
From the “Users” section we can access the platform user management, manage the permissions of individual users and their roles and access the privacy settings.
In the following sections we will see in detail how to add new users and assign roles.
Admin area: courses
Through the “Courses” tab we can manage the settings relating to courses and categories. From here we can also select the suggested tasks and change the settings for backups.
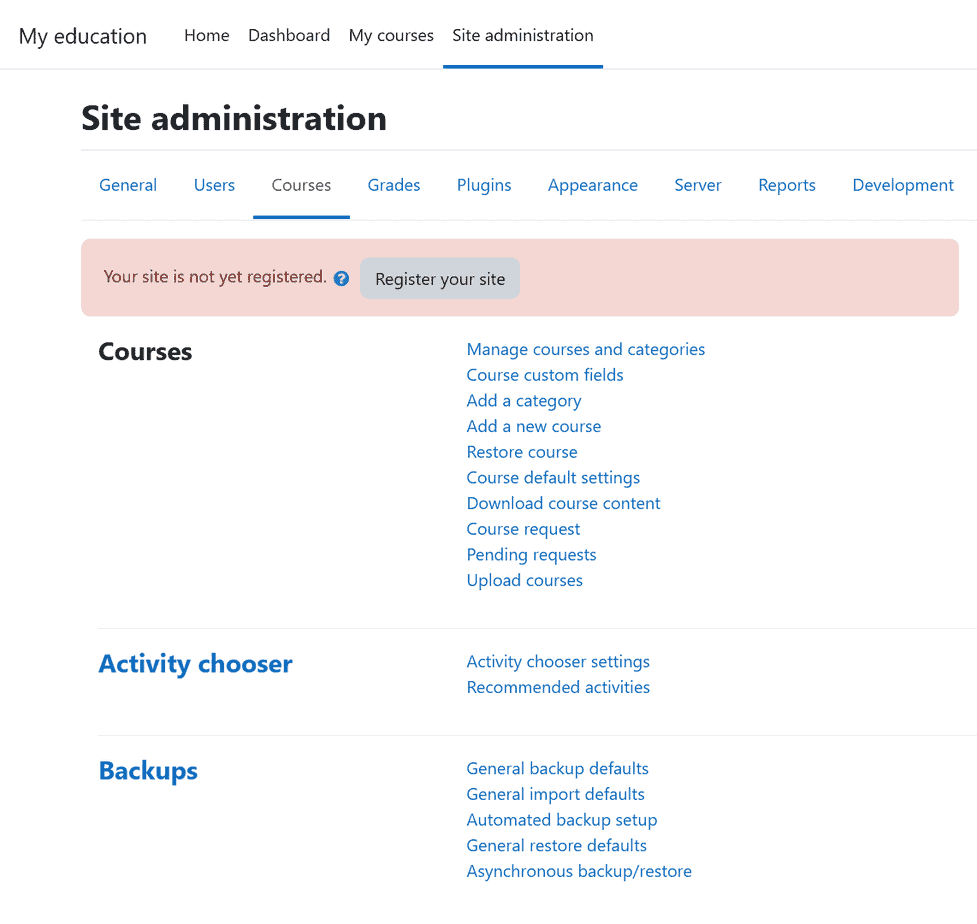
Later we will see how to create and manage courses.
Admin area: evaluations
From here we can access the activity grades settings. For example, we can change the maximum and minimum score for individual activities.

From the Report Settings we can modify the Register options and choose how the register with the votes will be displayed.
Among the present settings we can change the number of students that will be shown for each page, choose whether to show the average rating and so on.
Admin area: plugin
From the Administration> Plugins section, we can view the installed plugins and add new ones.
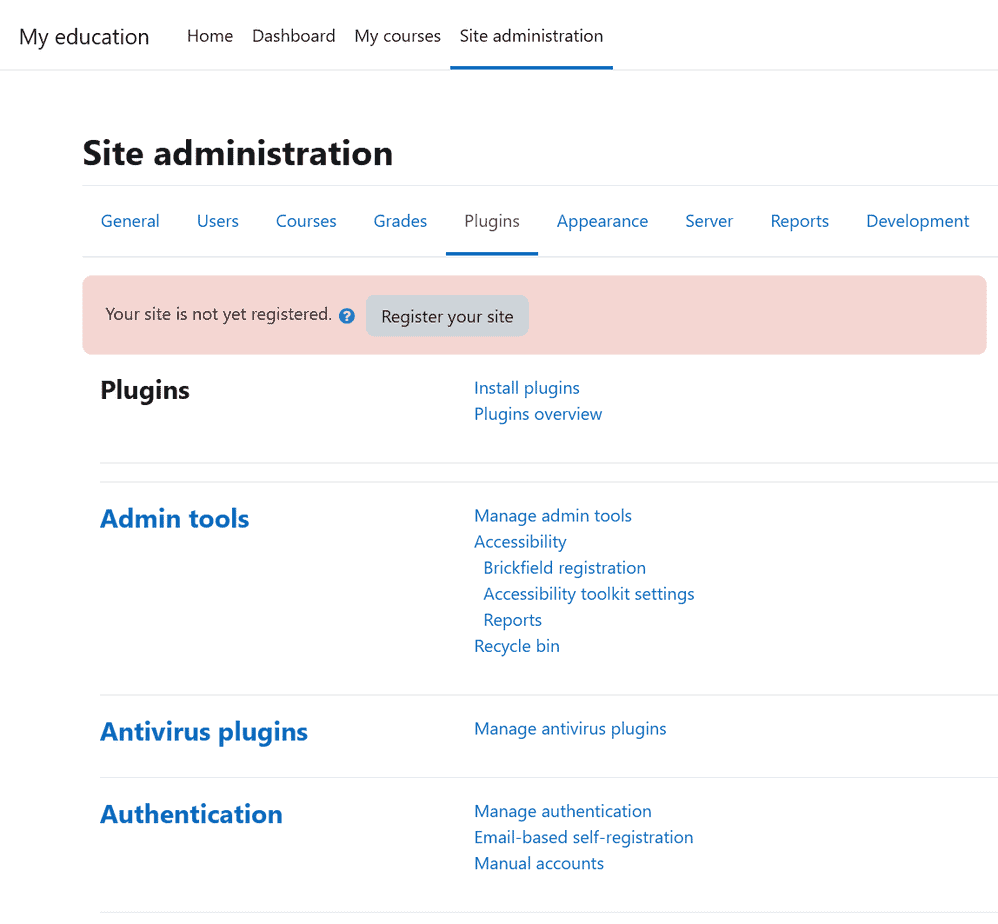
From here we can also manage all the features of the site, including:
- Blocks: we access the settings of all types of blocks e.g. courses, text, activity ratings.
- Caching: we can configure the cache according to the system used on the server, for example Memcached or Redis.
- Text editor: we can change the settings and manage spelling checking, inserting links, emoticons and images.
- Course formats: allows us to change the default settings and change the type of course, for example not to allow the weekly one.
- Registration: from here we can change the settings on course registration and the default role that will be assigned to users.
- Activity Modules: Allows us to access the module settings to create activities such as: quiz, chat, assignment, forum, glossary and so on.
- Types of questions: we can manage the types of questions that will be used in quizzes and assignments and choose which ones to make available (multiple choice, short answer, true / false, etc.).
Managing the functionality of the platform from these settings allows us to streamline the operation and make available only the functions that are really needed. In this way, for those who will have to create and manage the course on Moodle it will be easier to access only the necessary functions.
As we said, it is the site administrator who can change all the settings, while teachers and course creators will only manage aspects related to courses and students.
Admin area: appearance
This settings section allows us to change the look and feel of our Moodle platform.
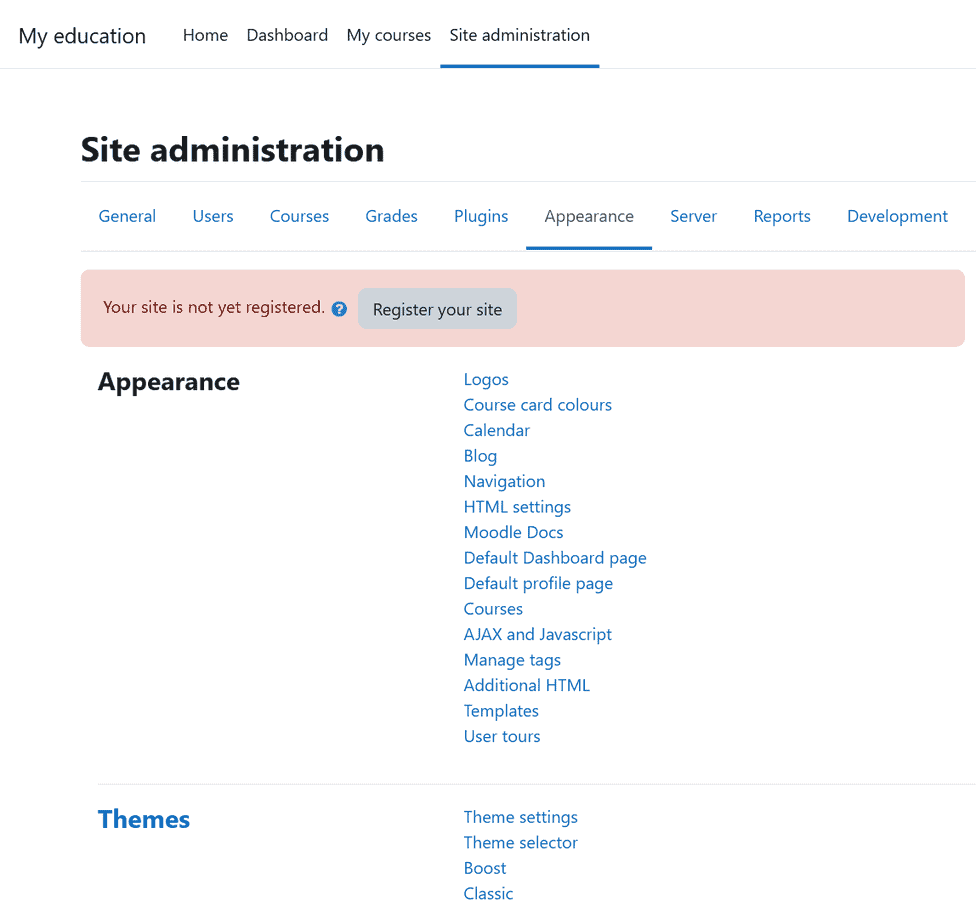
From here we can:
- insert a logo;
- change the colors that will be shown in the course boxes;
- change the appearance and settings of the calendar and blog;
- return dashboard and profile page to their default state;
- define the settings for the courses by choosing how many courses to show per page, whether to show the course title in full and so on;
- change theme settings;
- change the theme used among those available.
Admin area: server
The “Server” section allows us to access the server side settings.
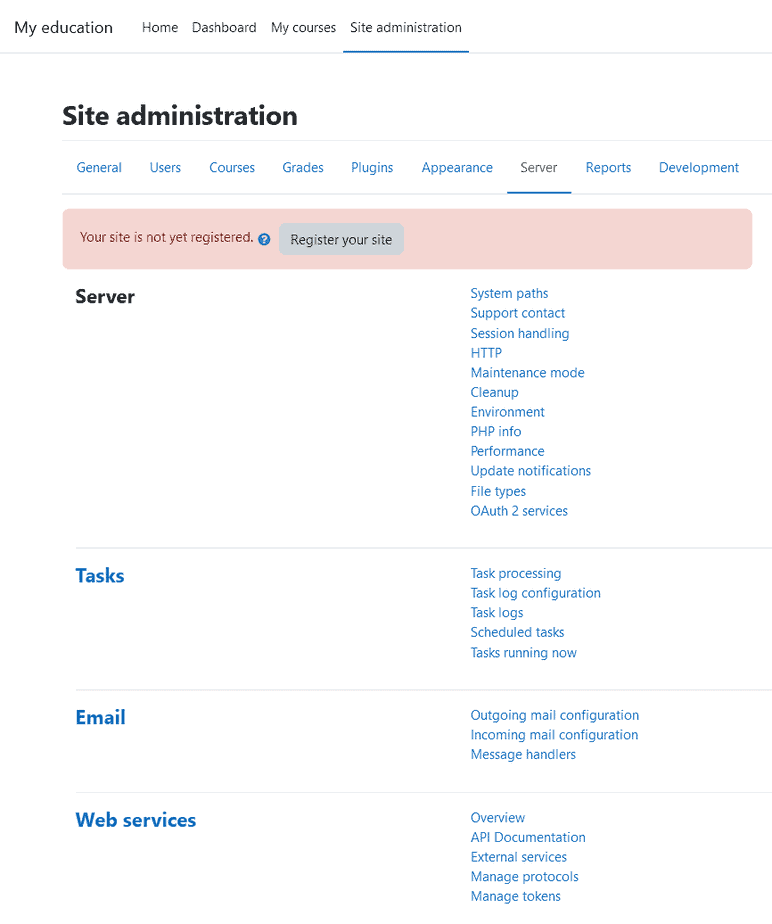
In particular we can modify the accepted file types, see the PHP version in use, but also to configure the incoming and outgoing emails.
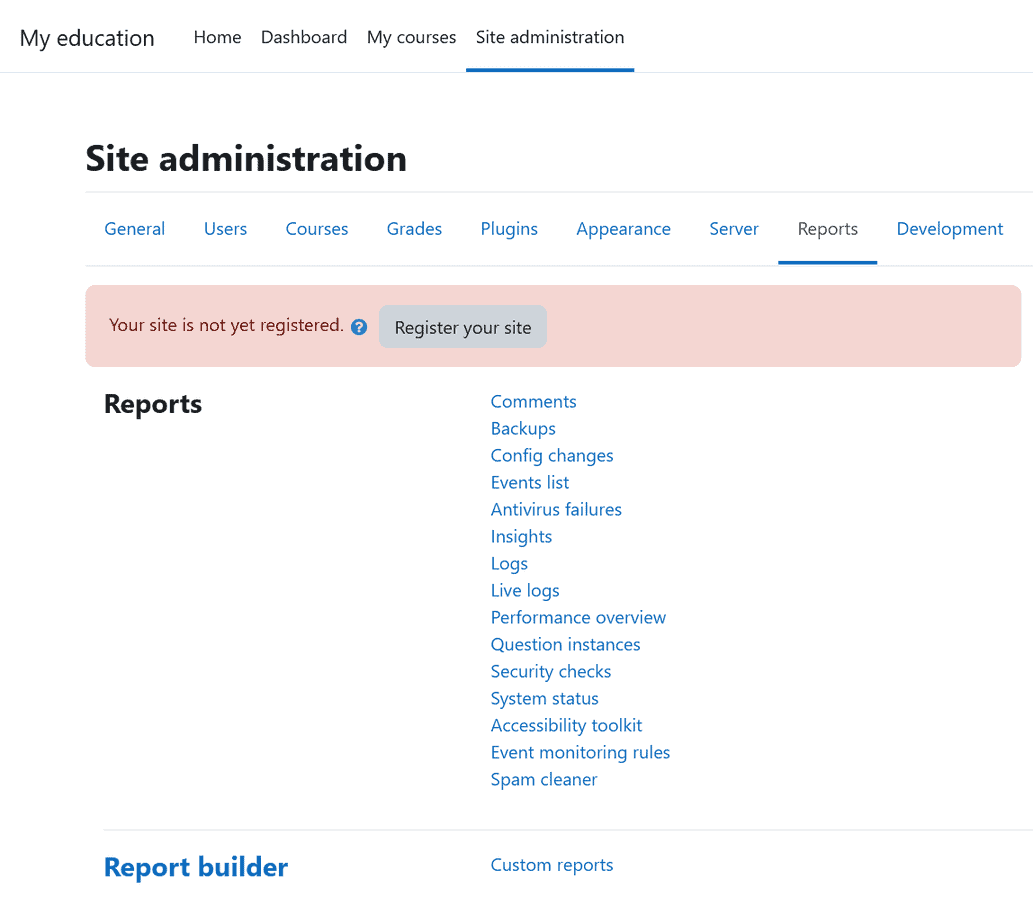
Admin area: report
From this area we can view the logs and any errors, as well as access the list of all the changes made to the platform configuration.
Admin area: development
The Development section allows us to test and use development tools. From here we can create a test course, change the debug settings or clear the cache.

Change the theme
To change the theme, just go to Site Administration> Appearance> Theme Selector.

Here we will find the list of available themes, the default one is Boost and it will give the site a look like the one you saw in the screenshots above.
By clicking on Change theme and then on Use theme we can set the Classic theme, like this:

Insert the logo
From Site Administration> Appearance> Logos we can change the logo settings.
Here we can upload two logos: normal size logo and small logo. Accepted formats are png and jpeg.
The full-size logo uploaded via this section will appear on the login page as you see here:
The small logo will be inserted at the top left instead of the site name, as you see in this screenshot:
Edit the Moodle home page
As administrators we can change the home page of our site with Moodle by choosing which elements to show to visitors and users registered on the platform.
Change the home page settings
To do this we can access the settings from Site Administration> General> Site Home Page Setup.
From here we can change the site’s full and abbreviated name and description.
We can then choose which elements to show in our home. By default only the list of courses will be shown, but we can add new items by selecting them from the drop down menu as I show you here:

You can choose to show new home items only after users have logged in. In this case we just need to add the new elements in the Site home items when logged in, as shown here:

Change the home with the edit mode
Let’s also see another way to change the home page.
Click on Home from the upper navigation menu and activate the edit mode with the selector at the top right, like this:

In this way a new element will appear that allows us to add activities or resources to the home. We click on Add an activity or resource to open the list like this:

We select the element we want to insert from the list to add it to our home page. We will then be redirected to the element creation form, as you can see in this example where we have inserted a folder:

After filling in the necessary fields, we can click on Save and return to the course or Save and view to complete the insertion of the new element. This will look like our home page after adding a folder item:

At this point we can also change the order of the elements. Just click on the directional arrow of one of them and then select the desired position, like this:

In this way we will have reversed the positions of the two elements, in our case “chat” and “folder” and this will be the result:

When the edit mode is active, we will see a gear icon just below the menu.

From here we can edit the summary of the site and thus show a section in the foreground.

Edit the Moodle dashboard
Let’s continue our guide for Moodle by seeing how to customize the dashboard. Administrators can change dashboard settings and customize them.
Let’s see, however, first what the Moodle dashboard looks like for a non-administrator user, for example a student.
Customize your dashboard as a user
Each user who has access to the platform can access his personal dashboard.
In this section we will see a welcome page with some building blocks: chronology of tasks to be done and calendar.

Through the main menu at the top, each user can access the home, the dashboard or “my courses“.
By activating the edit mode from the selector at the top right, it is possible to add blocks to the dashboard.

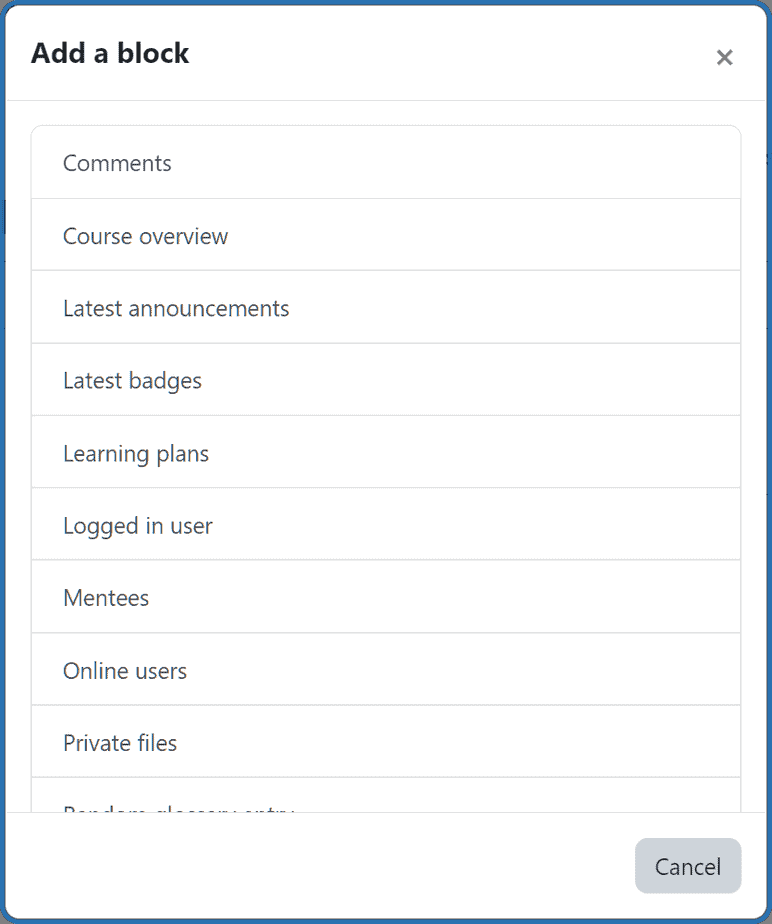
Click on Add a block and then choose the block we want to insert from the list, like this:
This option that allows all users to customize is turned on by default. As administrators we can decide to deactivate it. We can also create predefined dashboards for all users. Let’s see how to do it right away.
Change dashboard settings as administrators
As administrators we can create a default dashboard for all users.
To change the dashboard that will be shown as default, just go to Site Administration> Appearance> Default Dashboard.
From here we can activate the edit mode with the selector at the top right and add a block via Add a block, exactly as we have seen before.
We can repeat the procedure to add several blocks and change their order by dragging them after clicking on the icon highlighted here:

When we are satisfied, just click on the reset all users’ dashboards button to apply the changes to all users of the site.
Change the Moodle user profile
What we have just seen for the dashboard is also possible for the user profile. Each user in Moodle has his own personal profile which can be accessed by clicking on the initials of the name or profile photo, like this:

To change the profile just click on Change in the User Details section.

When we see how to create users, we will better see all the options available. In short, each user can enter information such as name, surname, email, which are mandatory to create an account and other optional ones such as profile picture and interests.

Set a default profile page
As an administrator we can change the appearance of the default profile pages. To do this, go to Site Administration> Appearance> default profile page.
From here you can reset all users’ profile pages to their default values.
Creating courses with Moodle
The core of a site created with Moodle is the courses: the sections that allow teachers and students to collaborate.
The admin can create a new course like this:
- log in as administrator from the login page;
- from the home page of the site click on the Add course button.

We will be sent to the course creation page from which we can enter all the information. Let’s go into the procedure in detail.
Adding a new Moodle course
If this is the first course we create, there will not be any categories yet, so a category called Category 1 will automatically be created in which the course will be inserted.
In the next section of our tutorial for Moodle, we will see how to manage courses and learn how to edit categories and also change their name.
There are several sections to fill in in order to create our course with Moodle:
- general
- Description
- course format
- appearance
- files and uploads
- tracking of completion
- groups
- role name customization
- tag.
After completing the changes remember to click on the Save button at the bottom of the page.
Let’s see specifically what settings these sections offer.
Add course> General
In this section we can enter general information about the course:
- Course title
- Short title
- Category
- Visibility
- Start date
- End date
- Identification code.

The first three fields: the titles and the category are required, all other information is optional. The identification code can be useful for recognizing the course based on other parameters or with other systems, think for example of SSD codes to identify courses within a degree program.
Add Course> Description
In the description section we can insert an introduction in which we explain the content of the course and an image to identify it.
This information will be shown in the course list.
Add Course> Course Format
Here you can change the format settings and choose from several options.
Single activity format: A single resource or activity will be shown that you can choose from the drop-down menu, as you see in this example where we have selected quiz.

By topics: there will be several sections, each corresponding to a topic or module of the course. You can change the number of sections shown and choose to display them on one page or split one section by page.

Relational: in this way the course will be structured in the form of a forum.
Weekly: with this option you can always show sections, as with the format “by topics”.
Add Course> Appearance
From this section you can choose whether to set the default language, choose whether to view ratings, reports and dates of activities.

Add Course> Files and Uploads
You can set a file size limit, by default it is set to 256 MB.
Add Course> Completion Tracking
It allows you to choose whether to show the progress of the course completion and whether to show the criteria also on the home page of the course.
Add course> Groups
You can decide whether to create user groups within the course and whether to apply the mode to all course activities.

Add Course> Role Name Customization
From here you can change the name of the roles, so that names of your choice are shown instead of “manager”, “teacher”, “student” and so on.

Add course> Tags
From here you can create tags to identify the course.

Manage courses with Moodle
After creating our first course, we will be able to click on My courses from the top menu and we will be redirected to the list of courses.
As administrators, we can access Site Administration> Courses> Course & Category Management to manage all courses.

On the left we will see the available categories and we will be able to change their order.
On the right there will be the individual categories and the courses contained in each of them.
From the Manage course categories and courses section we can also access these functions:
- create a new category by clicking on Create category;
- create a new course by clicking on Create course.

Edit a course category
To modify an existing category, click on the gear and then on edit, like this:

We can change the category to which it belongs and thus create sub-categories. If ours is a main category, we will leave the Top level setting.
We then enter a name and then fill in the optional fields if necessary with the identification code and description of the category.

User management with Moodle
As administrators we can add users to the site so that they can manage courses (in the case of teachers) or sign up (in the case of students).
Teachers, on the other hand, have the ability to add students to their courses.
Before the actual creation of users, we can change the authentication and registration methods.
The first thing to do is manage what the platform calls the authentication phase or create an account for the user so that they can access the site.
The second will be that of registration, in the second phase we will have to assign a role to each user and allow them to register for courses.
Let’s see how to proceed.
Change the authentication methods
To see what the methods to authenticate are, just go to Site Administration> Plugins> Authentication Management.
From here we will see a list of Moodle plugins that allow us to activate different authentication methods. If we want to activate a new method, just click on the eye-shaped icon corresponding to the “Enable” column.

The activated methods will be recognizable by the blue icon, in this case to deactivate them we always need to click on this same icon.
By activating the “account via email” method, users will be able to subscribe to the site independently. In the next sections we will see how to create accounts manually.
Change enrollment methods
Through Site Administration> Plugins> Enrolments we can view the registration methods activated on the site.
Also in this case we can activate or deactivate the methods by clicking on the selector corresponding to the “Enable” column.

With the “guest access” method, users will be able to consult the contents of the course, but not participate.
If the method used is “manual enrollment”, then the enrollment of users to the courses must be performed by an administrator or a teacher. In the next sections we will see how to do it.
Add users manually (authentication)
Note that this procedure is for adding users to the site by creating an account for each user (authentication). We will see later how to add users to the course (registration).
As administrators we can add new users manually via Site Administration> Users> Profiles> New User.
A screen will open that allows us to create a new user by entering the required data.

Keep in mind that the “name”, “surname” and “email address” fields are required to proceed with the creation of the new account.
Each user can also have a personal picture and other optional fields such as interests, mobile number, address and so on.

After filling in the necessary fields, click on Create user at the bottom of the page.
The user will receive an email with the temporary password and will have to change it after the first login.

After logging in with the access data, the user must enter a new password by filling in the fields, as follows:

Manage Moodle users
Through Site Administration> Users> Profiles> User List we can view the list of users registered on the site.
From here we can add new users by clicking on Add a new user.
Also from the actions in the Edit column you can:
- delete the user – just click on the trash can icon;
- suspend the account – to do this, click on the eye icon;
- edit account – use the gear icon for editing.

How user roles work on Moodle
In Moodle each user can be assigned a role, let’s see what the standard roles are.
Standard roles for Moodle users
Site administrator – is the user who manages the whole site, can add new users, change the look of the site and manage all the functions we have seen so far.
Manager – this is a management role that you can assign to a user so that they can change the settings related to courses, users and assessments. Sections of the site administration such as security, plugins, site appearance, server or advanced features will not be accessible to this role.
Course Creator – This predefined role can be used to allow the user to create new courses. By creating a new course, the user is associated with the course as a “Teacher”.
Teacher – this is the role assigned to teachers, i.e. to users who will have to manage the course. The teacher can add students to the course as well as create the content.
Teacher not editor – similar to the teacher, but does not have the possibility to modify the course, maintains the ability to evaluate the students enrolled.
Student – the role that users must be assigned so that they can access the course. The Student will be able to see the contents of the course and participate in the activities. Depending on the course settings you will also be able to view the grades you have received.
Guest – this is a role similar to that of the student, but in this case only the display of the course contents is foreseen. If there are any activities, assignments, surveys or forums in the course, the Guest user will not be able to participate.
In addition to the roles we have seen, there are two types of user: all users who have an account and can log in to the site are referred to as “Authenticated user“.
How to assign roles
As we said, every user who has an account on Moodle is an “authenticated user”. The user role, on the other hand, is not always global, that is, it is not valid in all areas of the site.
Let’s understand better what it means.
The site administrator has a global role and can access all functions and settings.
The other users, on the other hand, have a role only in reference to individual courses or categories of courses.
For example “user 1” can have the role of “student” in a given course and at the same time be “teacher” of another course.
To assign the role of “teacher” or “student”, you must therefore add them directly to the course or category. Let’s see how in the next chapter dedicated to registration.
Add teachers and students to the course (enrollment)
We access a course and click on the “Participants” tab, from here we can manage course registrations as administrators or teachers.
For each course, we can check the settings in the “Registration status” column:
- The “i” indicates the type of registration, in our case “manual registration”. In this case, users must be manually enrolled in the course, either by the administrator or by the teacher.
- The gear icon allows us to change the inscription.
- The trash allows us to unsubscribe that user from the course.

Add a teacher to the course
In the role of administrators, we can assign a teacher to the course.
Note that when we create a course, the teacher who is assigned is the user who created the course. If you have created a course as an “administrator” you will result as an assigned teacher, as in our case.
At this point, to assign the course to another teacher, the user must be enrolled in the course and assigned the role.
Click on “Enrol users” and search for the user via the search bar. Then assign the role to the user, in this case “Teacher”.

By clicking on View more it is also possible to set the start and end date of enrollment in the course.
Add students to the course
To subscribe other users to the course, just follow the same steps as before.
From the “Enrolment” section of the course, click on Enrol users.

Choose the user from the list, you can also select multiple users as you see in our example.
Select the role, in our case “Student”.
Click on Enrol Users.

Moodle guide for teachers
We have concluded the chapter of this guide intended for site administrators.
Another significant role within this eLearning platform is the teacher. The latter has the function of structuring the course, adding resources and activities and will have to manage the evaluation of the students enrolled.
Course settings
Remember that by default, the creation of courses is done by the site administrator and not by the user with the “Teacher” role. Therefore, the teacher turns to the administrator to create the course and enroll him as a teacher.
In any case, the administrator can also assign the teacher the role of “course creator” and allow the creation of courses independently.
After the course has been created, as teachers we can manage its settings. To do this, just click on the course we have access to and then on Settings.
From here we can change the title, category, description and so on. You can check in the section of this guide “Adding a new course” to review all the possible options.
Add content to the course
We access the course we are teaching and activate the edit mode with the selector at the top right, as follows:

In this way we will be able to add activities and resources to our course, but also other topics using the corresponding buttons.
Add resources to the course
To add a resource, click on Add an activity or resource.
We select the type of resource from the list, in our case a file.

At this point we fill in the required fields on the next page, like this:

When we are done, we click on Save and return to the course.
Add videos in the Moodle course: embed and upload
As we said at the beginning of this guide to Moodle, for courses in video format, it is recommended to use an external hosting service. For example you could use Vimeo or Wistia to host the videos and then embed them into your Moodle course.
There are several ways to both embed videos and upload them directly to your hosting space.
Let’s see them together.
Embed videos on Moodle
One of the ways to embed a video on Moodle is to add a “Page” resource and enter the URL of the video in the “Content” field, like this:

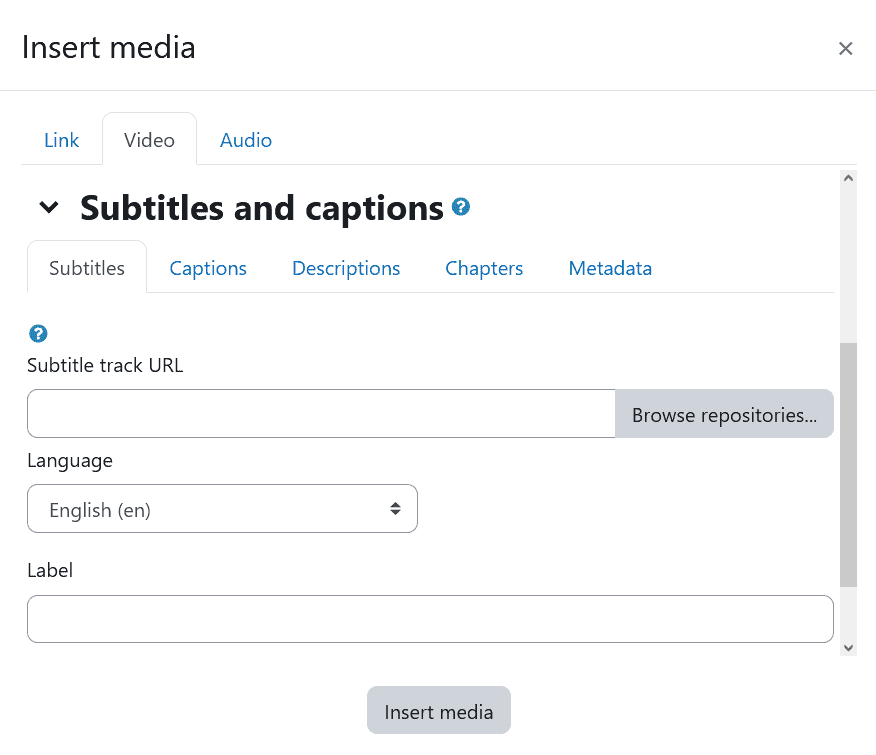
If present, we can use the Insert / Edit Audio / Video icon and then enter the URL in the “Video” tab, as shown in these steps:

This second method is more complete and also allows us to change the video display settings. We can specify height and width, as well as insert a different thumbnail to show. From here you can also add subtitles using the dedicated section.
Either way, the result will look like this:

By doing so, users will be able to follow the video directly from the platform.
#Enter video URL
Alternatively, you can also use the URL resource, in the latter case only a link will be shown, as in our example:

Upload a video to Moodle
To upload a video to our course, just follow the previous steps to add an activity or resource, then choose “File” as the resource type.
Then we just drag the video into the Select file section, like this:

In this case, users will see the video uploaded as an asset in the course (left screen) and opening the resource they will see the video (right screen):

Add activities to the course
Each module of the course can contain one or more resources, but also activities. Moodle allows us to create various activities, such as surveys or quizzes.
Click on Add an activity or a resource and then on the Activities tab to filter all those available. Then we select the one we want to insert, for example a Quiz.

Each activity will have different settings, let’s see which are the main ones in the case of quizzes.
General: in this section we enter a name and description (optional).
Timing: we can choose whether to make the quiz available within a time frame. Furthermore, we can set a maximum time and choose what to do at the deadline. This allows us, for example, to create a quiz and at the end of the set time, directly send the answers given up to that moment.

Grade: we can decide whether to set a minimum grade and whether to set a limit of attempts to complete the quiz.

Layout: we choose how to display the questions, for example all on one page.
Question Behavior: We can set the random order of the answers.
Common settings: from here we can choose whether to display the activity in the course or not make it visible to students yet.
Activity Completion: We can choose whether to allow the student to mark the activity as completed. We can also set an expiration date.

After creating the activity, we will see it in the list of course topics. In our case we have created a quiz, at this point we have to enter the questions. To do this, click on the name of the quiz, like this:

A new page will open that allows us to view the activity. As teachers, we can add questions by clicking on Add question.

Then we click on Add> a new question.

At this point we choose the type of question to insert, for example “True/false”, and click on Add.

It’s time to create your question by entering your name, text and score.

We also need to set the correct answer, in this case “true” or “false”.
We can insert feedback, optional, which will be shown based on the answer given. At the end, click on Save changes.
Returning to the “questions” section of our quiz, we can also set the maximum grade from here:

When we create a quiz, we can also create a Question bank.

From here we can view the questions entered and create new questions with the appropriate button. By creating a question deposit, we will be able to add one or more random questions to ours that will be taken from the list of questions we have created, like this:

Course Member Management
As teachers we can add new users to the course. To do this, just follow the same procedure that we saw in the section Adding students to the course.
In this case we can add users to the course and assign them one of these two roles:
- student
- not-editing teacher.

As teachers, we may also want to contact members. To do this, just click on the Participants tab of the course and then on a user’s name to view their profile.

Through the profile we can view the details, such as the email address, check the last access and user interventions in forums and blogs. From here we can also add the user to contacts and send messages.

Assign grades to students
In an eLearning platform like Moodle, an evaluation system cannot be missing. For each course we will find the Grades tab from which you can access the Grader report.
This function is equivalent to a real school register in which we will find the list of course participants, the scores of the individual tests, the total and the average.

By clicking on the names of the individual tests we can view the instructions, in the case of the “Tasks” and the results, in the case of the “Quizzes”. In the case of an assignment, we will have to click on View all deliveries to see the list of participants and their assignments.

In this list, in the “Status” column, we will see who delivered the task and we will be able to access the uploaded file that we find in the “File delivery” column.

To proceed with the grade, click on Grade corresponding to the student we want to evaluate.

The evaluation screen will open, on the left we will be able to see a preview of the delivery (if the file allows it), on the right we will be able to view all the files included. From this same section you can enter a score for the evaluation and comments (optional).
After completing the assessment, we can choose whether to notify students or not and then click Save changes or Save and show next to move on to the next student.

View course reports
With Moodle, teachers can access reports related to their course by clicking on the Report tab.
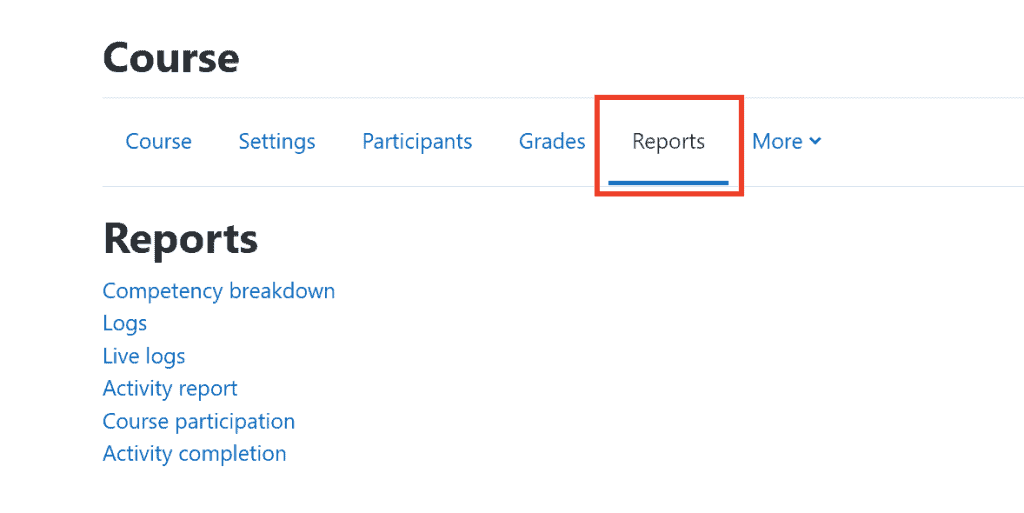
Let’s see the available reports.
Competency breakdown – allows us to view the skills and assessment for each individual student.
Logs – allows you to view the activities of the participants in the course and filter by type of activity, participants or period.
Live logs – reports the activities of the last hour.
Activity report – allows you to see overall activities, for example the number of video views.

Course participation – allows you to see which users have taken actions within the course.

Finally, we find the Activity Completion report which allows us to keep track of the level of completion of the course. Here we will find a list of all participants and ticks that indicate the level of completion of each.

From this section the teacher can also mark the activities as completed, as follows:

Conclusion
Moodle is a free platform for creating truly comprehensive eLearning courses. With this LMS we can create online courses with all kinds of content thanks to the variety of resources including forums, glossaries, wikis and videos.
It is possible to propose activities such as quizzes and assignments to students, to track the completion of the course of the students and to evaluate the tests directly within Moodle.
As administrators we can customize the appearance of the site and the type of course, manage the access method and user roles and much more.
Thanks to this guide you should have a complete overview of Moodle’s functions. Have you ever tried to use the platform? Share your impressions and if you have any questions, write us here in the comments.
Ready to build your WordPress site?
Try our service free for 14 days. No obligation, no credit card required.


