

You’re working on a new blog post, you go to upload an image, and instead of seeing it appear in the media library, you get an error message. Now you’re stuck. The post isn’t finished, the image won’t budge, and you have no idea what’s wrong.
Image upload errors in WordPress can be caused by the file, server, or plugins. Error messages often lack detail, making these issues frustrating.
In this guide, you’ll learn the most common causes of WordPress image upload issues and how to fix them. We’ll work through ten different solutions, starting with the easiest fixes and moving toward the more technical ones.
Table of Contents
Why WordPress Image Upload Issues Occur
Before we get into the fixes, it helps to understand what could be causing the problem. Image upload errors usually fall into one of four categories.
1. File-Related Issues
The image might be too large, have a filename with special characters, or be in a format WordPress doesn’t allow by default. These are the easiest to fix because they have nothing to do with your server.
2. Server Resource Issues
Your hosting plan might be running low on memory, disk space, or inodes. WordPress needs a certain amount of resources to process and store images, and if those resources are tight, uploads will fail.
3. File Permission Issues
If the /wp-content/uploads/ folder doesn’t have correct permissions, WordPress can’t upload images.
4. Plugin or Theme Conflicts
A misbehaving plugin can interfere with the upload process, sometimes after a recent update or after you installed something new.
Most upload errors fall into one of these four categories. The trick is figuring out which one applies to your situation, and the fixes below will help you do that.
10 Ways to Fix WordPress Image Upload Issues
The solutions below are ordered from quickest and easiest to more involved. Work through them in order. In most cases, you won’t need to try more than two or three before the issue is resolved.
1. Retry the Upload or Use the Browser Uploader
The very first thing to try is uploading the image again. WordPress occasionally throws a generic HTTP error that’s caused by a temporary network hiccup or a brief spike in server load. If you wait a minute and try again, it often works.

If the same error keeps coming back, try the browser uploader instead. This is a more basic upload method built into WordPress that bypasses the standard drag-and-drop interface.
To use it, go to Media > Add Media File in your WordPress dashboard. At the bottom of the upload area, click the link labeled “Try browser uploader instead.” Then click Choose Files, select the image from your computer, and click Upload.
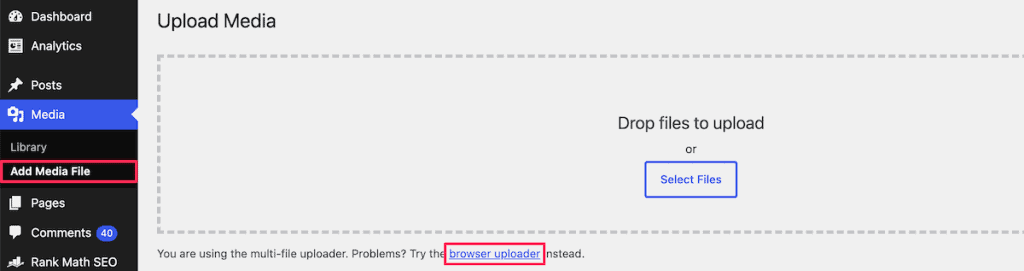
The browser uploader lacks drag-and-drop and only uploads one file at a time, but it serves as a useful workaround and helps determine if the issue lies with WordPress or the file itself.
If the browser uploader works and the standard one doesn’t, a plugin conflict may be the cause.
2. Rename the Image File
Sometimes the issue is as simple as the filename. WordPress doesn’t always handle special characters well, and certain symbols can cause uploads to fail.
The characters to watch out for include ?, *, $, #, @, !, &, and %. Accented letters like á, é, ñ, and ü can also cause problems, depending on how your server is configured.
If your filename contains any of these, rename the file on your computer before uploading. Stick to letters, numbers, hyphens, and underscores. So instead of Vacation Photo (1).jpg, use something like vacation-photo-1.jpg.
This is also a good SEO habit. Clean, descriptive filenames help search engines understand what your images are about, which can help with image search rankings.
3. Compress or Resize the Image Before Uploading
One of the most common image upload errors states that the file exceeds the site’s maximum upload size. This means your image is too large for WordPress to handle.

To check your current upload limit, go to Media > Add Media File and look at the line labeled “Maximum upload file size.” On most hosts, this is set to a value between 8MB and 128MB.
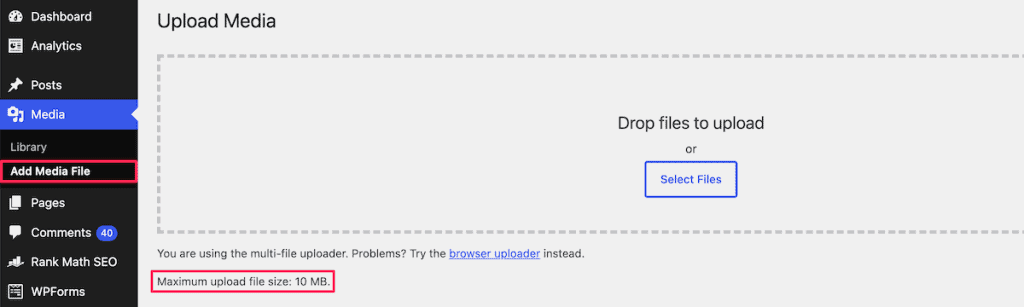
You have two options when the file is too big.
The first is to compress or resize the image before uploading. Tools like TinyPNG and Optimizilla can reduce file size by 50% or more without any visible loss in quality. If your image is too large in pixel dimensions, you can resize it in an image editor before compressing.

The second is to raise the upload limit on your server. If you have access to the php.ini file or your hosting control panel offers a PHP settings tool, you can increase the limit there. The values to look for are:
upload_max_filesize = 128Mpost_max_size = 128Mmax_execution_time = 300
Keep in mind, images larger than 2560 pixels are auto-scaled. Larger files might show ‘scaled’ in the filename.
But sometimes WordPress can’t process the image at all, and you’ll see an error that says “The server cannot process the image“. This usually means the image is too large in dimensions, or your server doesn’t have enough memory to handle it. The fix is to resize the image to something under 2560 pixels on the longest side before uploading.
4. Change the Image File Format
WordPress is selective about which file types it allows you to upload. The most common allowed formats are JPG, PNG, GIF, WebP, and ICO. Some formats are blocked by default for security reasons, with SVG being the most well-known example.
If you try to upload a file in an unsupported format, you’ll see an error that says “Sorry, you are not allowed to upload this file type“.
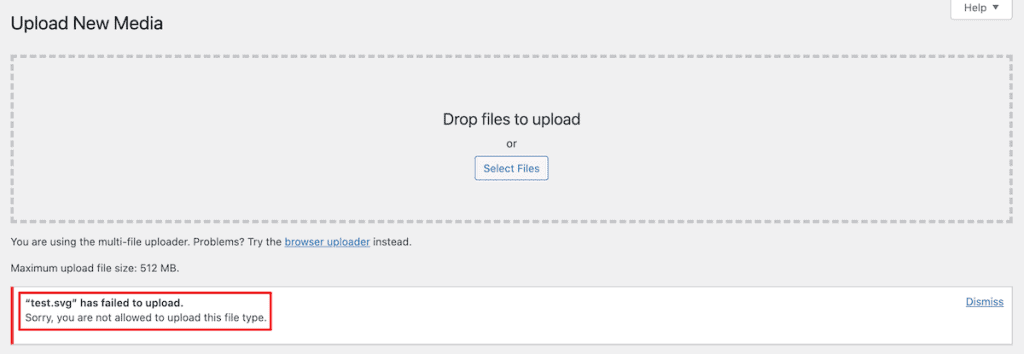
You have two options here.
The simplest is to convert the file to a supported format. If you have an SVG, you can export it as a PNG using a tool like Canva’s converter. For most use cases, PNG works just as well as SVG.
If you really need to upload SVGs or other restricted formats, you can change your WordPress settings to allow them. The quick way is to add this line to your wp-config.php file:
define('ALLOW_UNFILTERED_UPLOADS', true);
A word of caution. Allowing all file types opens up a security risk because SVG files can contain malicious code. If you do need to upload SVGs, a safer approach is to use a plugin like Safe SVG, which sanitizes the files before they’re added to your library.
5. Check Folder Permissions
WordPress stores all your uploaded images in the /wp-content/uploads/ folder. For this to work, the folder needs to have the right permissions set on the server.
If permissions are wrong, you’ll often see an error that says something like Unable to create directory wp-content/uploads/2025/09. Is its parent directory writable by the server?.
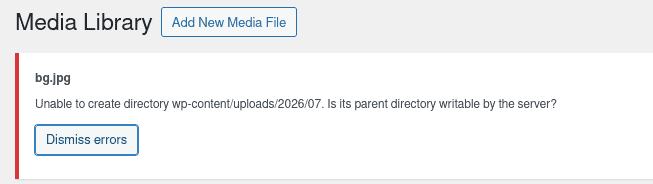
The correct permissions for WordPress are 755 for folders and 644 for files. You can check and change permissions in two ways.
The first is through your hosting control panel. If you’re using cPanel, open the File Manager, navigate to /wp-content/, right-click the uploads folder, and select Change Permissions. Set the value to 755 and click Change Permissions to save.

The second is through an FTP client like FileZilla or Cyberduck. Connect to your server, navigate to the uploads folder, right-click it, and select File Permissions. Set the numeric value to 755 and apply the change to all subdirectories.
Fixing permissions also resolves a related issue where images upload successfully but don’t display in the media library.
6. Increase the PHP Memory Limit
When WordPress processes an image, it uses PHP memory to handle the upload, generate thumbnails, and save the file to your server. If your PHP memory limit is too low, uploads can fail with a generic HTTP error or a message about the server not being able to process the image.
If you’re on SupportHost, you can change the memory limit yourself in just a few steps. Log in to cPanel and open the Select PHP Version tool. Click the Options tab, find the memory_limit setting, and increase it (going from 256M to 512M usually resolves the issue). Then, save your changes.

For other hosts that don’t offer this tool, you can add the following line to your wp-config.php file:
define('WP_MEMORY_LIMIT', '512M');
Just make sure to add this above the line that says “That’s all, stop editing! Happy blogging.”
If you want to dig deeper into this topic, we have a full guide on how to increase the WordPress memory limit that walks through several different methods.
7. Check Available Disk Space
If you’ve been running your site for a while and never paid attention to disk usage, this is worth checking. Once you fill up your allotted disk space, you can’t upload anything new, including images.
To check your disk usage in cPanel, log in to your hosting control panel and look at the Statistics panel on the cPanel home page. Find the Disk Usage value to see how much space you’ve used.

For a more detailed breakdown, open the Disk Usage tool under the Files section in cPanel. This shows you which folders are taking up the most space, which makes it easy to see where you can free things up.

A few common space hogs to look for:
- Old backups stored on the server. If you’ve been creating manual backups or using a backup plugin that saves locally, these files add up fast.
- Staging sites you set up for testing and forgot about.
- Unused images in your media library that you’ve never actually inserted into a post.
- Large email attachments if you host email on the same account.
- High-resolution images that could be compressed or replaced with smaller versions.
If you clean up what you can and you’re still running tight, it might be time to upgrade your plan. On SupportHost, you can switch to a higher plan at any time, and you only pay the difference between the two plans for the remainder of your billing period.
8. Check Your Inode Limit
This one catches people off guard because most hosting providers don’t talk about it much. An inode is essentially a record of a file or folder on your server. Every image, plugin file, theme file, and even empty folder counts as one inode.
A lot of shared hosting providers cap the number of inodes per account. The cap is usually high enough that most sites never hit it, but if you have a large media library, thousands of cached files, or you’ve been running the site for years, you can run into the limit without realizing it.
When you hit the inode limit, file uploads start failing in ways that look like other errors. You might see permission errors, generic upload failures, or strange behavior in the media library.
To check whether inodes are the issue, log in to your hosting control panel and look for an Inode Usage value, usually shown alongside disk usage. Compare your current usage to the limit shown.
If you’re close to the limit, you can clean up files (the same approach as the disk space section above) or look into upgrading. If your host has aggressive inode limits and you regularly bump up against them, switching hosts can solve the problem permanently.
Note: SupportHost does not set a limit on the number of inodes you can use across any plan.
9. Adjust Imagick Settings
This fix sounds technical, but it’s actually pretty straightforward once you understand what’s happening.
WordPress uses one of two libraries to process images on your server, either the GD Library or Imagick. Imagick is generally faster because it can process images using multiple threads at once. The problem is that some shared hosts limit how many threads each account can use, which causes Imagick to fail with an HTTP error.
The fix is to tell Imagick to only use one thread. You do this by adding a line to your .htaccess file.
Connect to your server via FTP or open the File Manager in cPanel, then navigate to your public_html folder or wherever your WordPress is installed. If you can’t see the .htaccess file, enable hidden files in your file manager settings. Next, open the file.

Then, add this line at the end of the file:
SetEnv MAGICK_THREAD_LIMIT 1
Save the file and try uploading your image again.
If you’re not comfortable editing .htaccess directly, you can also do this through the Rank Math SEO plugin, which has a built-in .htaccess editor in its settings. We have a full guide on working with the .htaccess file if you want more details.
10. Deactivate Plugins to Find Conflicts
If you’ve tried everything above and the issue persists, a plugin conflict is the most likely cause. Plugins that deal with images, optimization, security, or backups are the usual suspects, but sometimes it’s a plugin you’d never expect.
Here’s how to track down the culprit. Go to Plugins > Installed Plugins in your WordPress dashboard. Select all plugins by clicking the checkbox at the top. From the Bulk Actions dropdown, choose Deactivate and click Apply. Then try uploading an image.

If the upload works after deactivating all plugins, you’ve confirmed it’s a plugin conflict. Now you need to find which one. Reactivate plugins one at a time, testing the image upload after each one. When the error comes back, the last plugin you activated is the culprit.
Once you’ve identified the problematic plugin, you have a few options:
- Check whether there’s an update available. The issue might already be fixed in a newer version.
- Look at the plugin’s support forum to see if other users are reporting the same problem.
- Reach out to the developer directly to ask about a fix.
- Look for an alternative plugin if the issue isn’t going to be resolved.
Most popular plugins have several competitors that do the same thing, so finding a replacement is usually less painful than it sounds.
Before deactivating plugins, it’s a good idea to create a backup just in case something goes sideways during reactivation.
WordPress Image Upload Issues at a Glance
If you’re not sure where to start, this table maps common error messages to their most likely causes and fixes.
Error Message | Likely Cause | First Fix to Try |
|---|---|---|
Generic HTTP error | Temporary issue or memory limit | Retry the upload, then increase memory limit |
The server cannot process the image | Image too large or memory limit | Resize image under 2560 pixels |
Exceeds the maximum upload size | File size limit too low | Compress the image or raise the limit |
You are not allowed to upload this file type | Format not supported | Convert to JPG, PNG, or WebP |
Unable to create directory | Folder permissions wrong | Set uploads folder to 755 |
Disk space exceeded | Hosting plan full | Free up space or upgrade plan |
No specific error, just fails | Plugin conflict | Deactivate plugins one by one |
This isn’t an exhaustive list, but it covers the errors most WordPress users run into.
WordPress Image Upload Issues FAQs
What’s the maximum image upload size in WordPress?
WordPress itself doesn’t impose a hard maximum on image upload size. The actual limit comes from your hosting provider’s PHP settings, specifically the upload_max_filesize and post_max_size values. Most hosts set this somewhere between 8MB and 128MB by default.
Why does WordPress say “the server cannot process the image”?
This error usually means one of two things. Either the image exceeds the 2560 pixel maximum that WordPress enforces by default, or your server doesn’t have enough PHP memory to process the file. Try resizing the image to under 2560 pixels first. If that doesn’t work, increase your PHP memory limit.
How do I upload SVG files to WordPress?
WordPress blocks SVG uploads by default because SVG files can contain malicious code. The safest way to allow them is to install a plugin like Safe SVG, which sanitizes the files before adding them to your library. You can also allow them by adding define('ALLOW_UNFILTERED_UPLOADS', true); to your wp-config.php file, but this comes with security risks.
Why am I getting an HTTP error when uploading images?
HTTP errors are vague and can have several causes. The most common are insufficient PHP memory, a multi-threading conflict with Imagick on shared hosting, a plugin conflict, or a temporary network issue. Start by retrying the upload, then work through increasing your memory limit, adjusting Imagick settings, and deactivating plugins until you find the cause.
Should I optimize images before or after uploading?
Both, ideally. Before uploading, use a tool like TinyPNG or Optimizilla to compress images so they upload smoothly and don’t waste server space. After uploading, you can use a WordPress plugin like ShortPixel or Imagify to handle ongoing optimization, including generating WebP versions and serving them automatically.
Closing Thoughts: Fixing Image Upload Problems in WordPress
Going though WordPress Image upload issues is annoying, but they almost always come down to one of a handful of causes. Once you know what to look for, troubleshooting becomes a lot less intimidating.
The best approach is to work through the fixes in order, starting with the simplest ones like renaming the file, compressing the image, or checking your upload limit. Plugin conflicts are usually the last thing to check, since they take the most time to diagnose.
If you’re consistently running into problems with image uploads, that might also be a sign that you’ve outgrown your current hosting plan. A quality WordPress host gives you more memory, more disk space, and fewer restrictions on things like inode limits and Imagick threading, which prevents a lot of these issues from happening in the first place.
If you’re considering a move, take a look at our WordPress hosting plans at SupportHost. We include free migration with every plan, so you don’t have to worry about handling the technical side yourself.
Now over to you. Which solution worked to fix your image upload problem? Let us know in the comments below.
Ready to build your WordPress site?
Try our service free for 14 days. No obligation, no credit card required.


