

phpMyAdmin allows us to interact with a MySQL database without having to do it through the command line. Thanks to a convenient interface, phpMyAdmin enables us to manage our MySQL database in a very simple way.
In this article, phpMyAdmin: the definite guide, we will see all the operations that can be useful in managing the database. We’ll see how to create a new database, add or modify tables and search for specific fields in it.
We will also discover how to import and export databases from one server to another and how to create a backup copy of the database directly from phpMyAdmin. First, let’s see how to access phpMyAdmin and what its home page looks like.
Table of Contents
Login to phpMyAdmin
First, we need to access phpMyAdmin, if you have a hosting service you can access the application directly from cPanel. If you are developing the site locally, you can make use of the fact that platforms like XAMPP or MAMP allow you to use phpMyAdmin for database management.
How to access phpMyAdmin if you use XAMPP
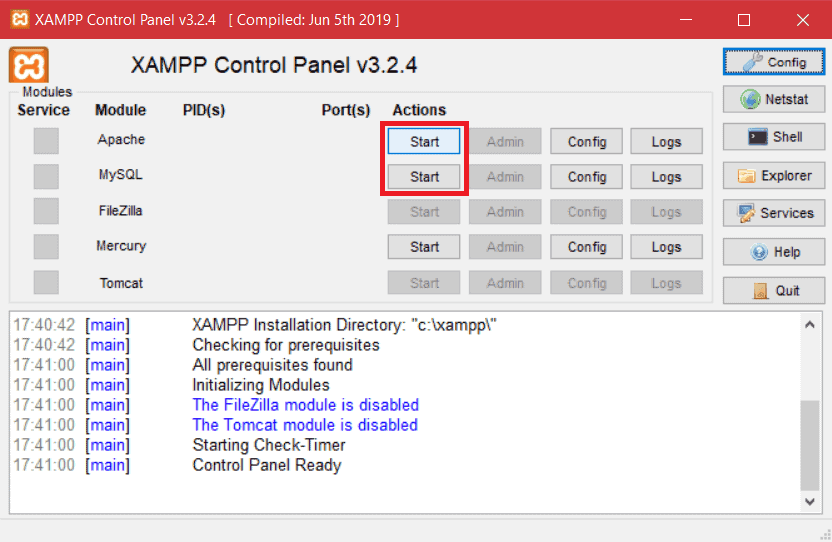
With XAMPP all you have to do is connect to this address http://localhost/phpMyAdmin/ after activating the necessary modules for the webserver (Apache and MySQL).
How to access phpMyAdmin from cPanel
For all our plans including shared hosting and WordPress press, phpMyAdmin is available, ready to use.
In order to access it from the control panel, after loging in to cPanel with your login details, scroll down to the Database section and click on phpMyAdmin.

In both cases, you’ll find the main page of the application, so let’s go see what it looks like.

In the left section, you can see a list of all the databases on the server. You can see it highlighted in the screenshot below as an example.

By clicking on the name of one of the databases you can access the structure and see the tables it contains.
In the middle section, we have the settings that allow us to change language, theme and manage the size of the font used in the interface. On the right side, we can see among the information about the server, the encoding of the fonts used, the current PHP version and the version of phpMyAdmin we are using.
Let’s see how to use phpMyAdmin starting from the basic options and then we’ll see how to create a database.
Create a database with phpMyAdmin
As we said phpMyAdmin allows you to manage databases, one of its functions is the possibility to create new databases, let’s see how to do it.
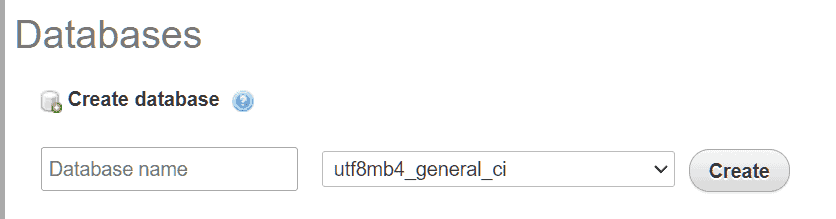
On the main screen of the application, we can see several tabs, the one that interests us is the first one: Database.
This tab allows us to create a new database: all we need to do is fill in the database name field and choose the character encoding to be used, then click the Create button.
The database created will appear in the list on the left along with other existing databases if there are already others.
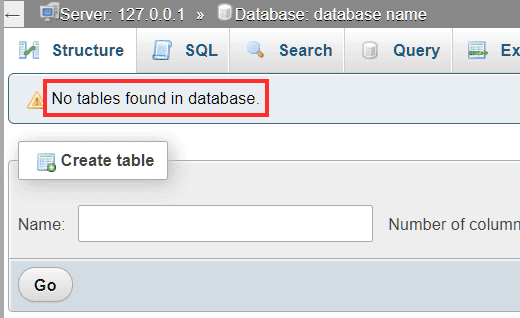
At this point the created database is empty and there are no tables inside it yet. If, in fact, after selecting the database we click on the Structure tab we can see a warning similar to this one:
Create Tables
To create a new table we simply need to open the Structure tab of the database we are interested in. Then we will have to fill in two fields: the name of the table and decide the number of columns we want to insert. After that, we click on Go and the table will be added to the database.

We will have to insert the fields that will make up the table. For each field we will have to insert:

Name: the name to give to each column in the table
Type: the type of data that can be inserted in that column, for example, INT for integers or DATE to insert a date.
Length/Values: This field is not mandatory, but allows us to set a maximum length such as a character limit.
Default: allows us to choose how to fill the entries in that column when no value is entered. By choosing the As defined option we can enter a string or a value to be used in the field that appears below.
Character encoding: we can set a specific encoding for each column of the table.
A_I: means Auto increment, we can check the box when we want to assign a value that will increase automatically. You can use it for example to generate a unique numeric ID.
After filling in all the fields, just click on Save to generate the table.
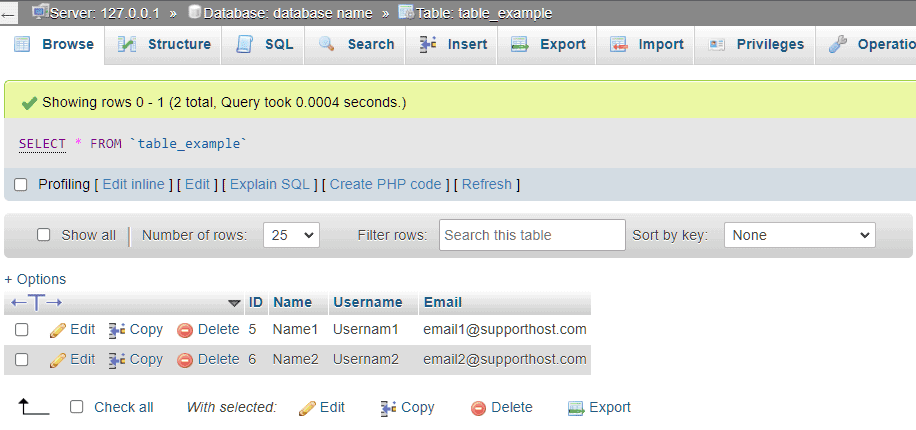
After creating our table we can view it by clicking on its name from the list on the left where we have all the databases. If we have just created the table there will be no data in it yet. In this case in the Browse tab of our table we will see a warning message like this one:

We will, in fact, see our table, but without any values inside.
Insert data into the table
At this point, we can create the records of the table we have just made. After selecting the table from the menu on the left, click on the Insert tab.
We will then see the fields of the table we have created and an empty field next to each of them under the heading Value, in this field we need to enter the content for each column. This will create the rows of our table.
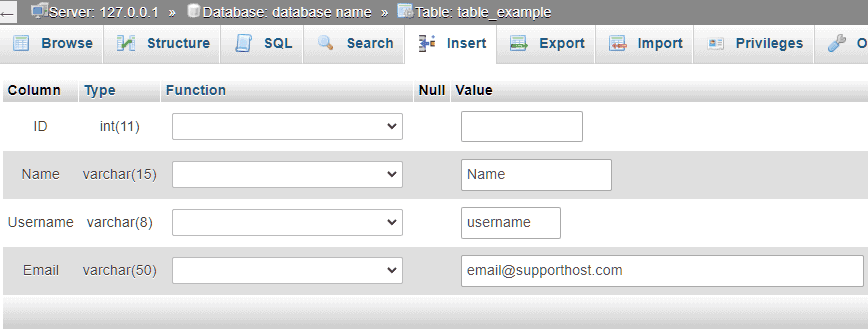
In our case, we are going to leave the ID column empty since we have set the auto-increment and the values will be inserted automatically, as you can see in this example.
We do not necessarily have to insert one record at a time, but we can also insert multiple rows at once. By default, we will be shown two rows, but we can increase the number by changing the value in the box you see as shown in this screenshot:

Edit table
When we first saw how to create the table, we had to set the number of columns we wanted to use. In any case, we can modify our table with phpMyAdmin even later by adding or removing some columns.
Before you modify the tables and risk losing the data they hold, it is always better to create a backup of the entire database. In our case, you can also restore the database from an automatic backup.
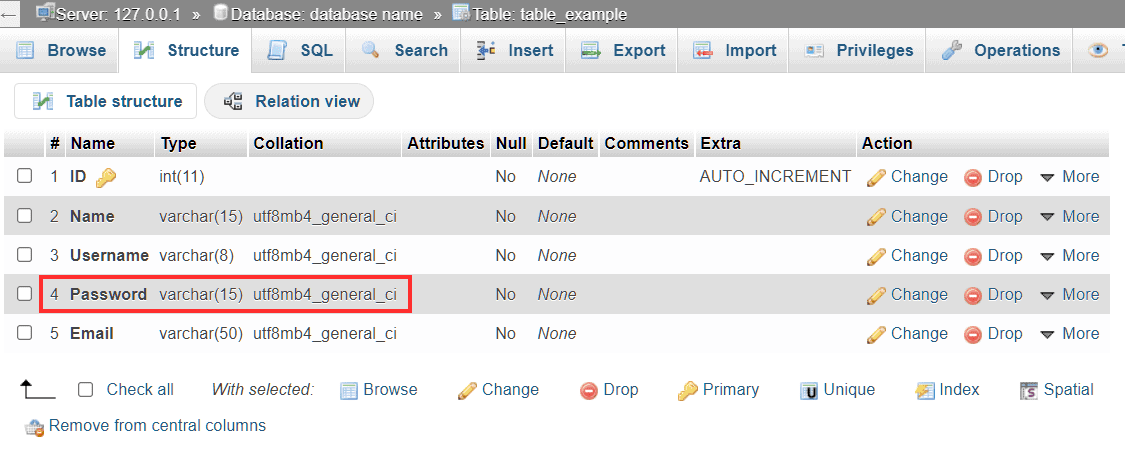
Let’s click on the table we are interested in modifying and open the Structure tab. At the bottom, we can see a row like this one that allows us to add one or more fields and allows us to choose which field to insert them after. Let’s take the example of wanting to insert a Password column after the Username column, select the option from the drop-down menu and click on Go.

To add the new column we’ll need to specify the name, type and other parameters as we have seen before.

Let’s click on Save and our new column will be added to the table.
From the Structure tab we can also edit the columns we have already created. To do this we just need to check the box next to the column and then click edit, as you can see in this screenshot:
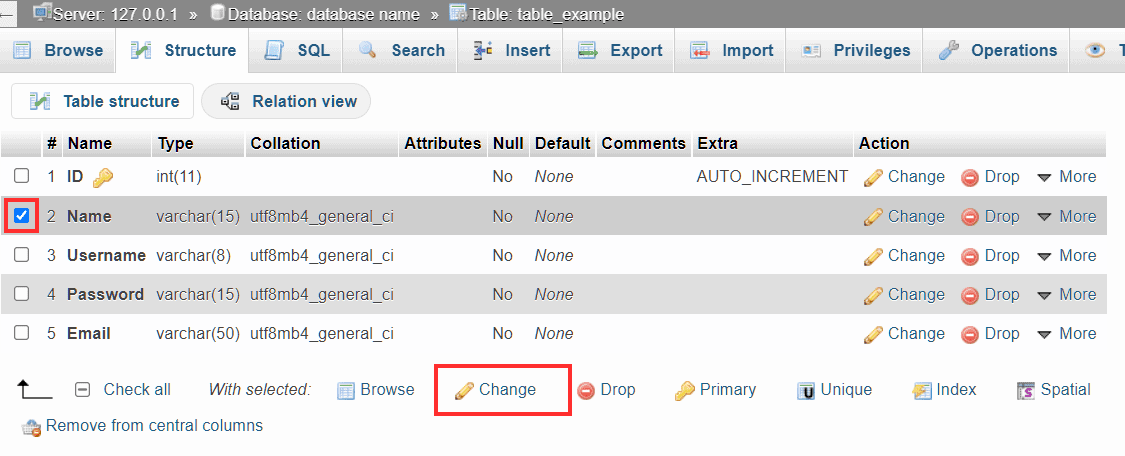
This function allows us to edit multiple columns at the same time.
Manage the database with phpMyAdmin
As we have seen while creating a new database when we select a database the tabs available at the top of phpMyAdmin change to let us show the database structure, make queries and perform other operations like renaming the database or copying it. Let’s see what you can do from each of these tabs.
From the Structure tab, we can create new tables, as we saw in one of the previous paragraphs. From here we can also edit existing tables by acting on the action buttons you see below.

The star-shaped symbol: allows us to add the table to the favorites. To access the favorites we just need to hover with the mouse over Favourites in the side menu as seen below:

Show: This allows us to open a specific table and view its contents.
Structure: This gives us access to the structure tab of the table. From here we can edit a single table and add or delete columns, as seen in the section related to table modifications.
Search: This allows us to carry out a search in that specific table. We will go into the search function and its various options in the next section.
Insert: go to the Insert tab of the table where it is possible to add a new record or more records at once.
Empty: deletes the data contained in the table (the rows), maintaining its structure.
Delete: completely deletes the table (both data and structure).
Using the search function
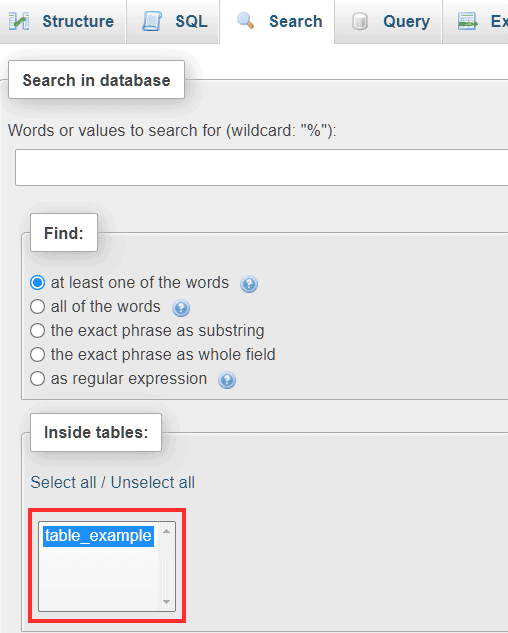
If we select a database we can switch to the Search tab to do a search on the entire database or in specific tables.
To search the entire database, just enter one or more terms to be searched, click on Select All in the In Tables section and then click on the Run button at the bottom.

If we want to restrict the search to specific tables, then we just have to select them from the list, as you can see in this screenshot.
The default option (at least one of the words) performs the search and returns the results if at least one of the words we typed is present in the database. We can also search using the whole phrase, in this case, the whole phrase will be searched as such:
- the exact phrase as a substring: it will show us the results even if there is no correspondence on the whole field.
- the exact phrase as a complete field: it will search the exact matches in the field.
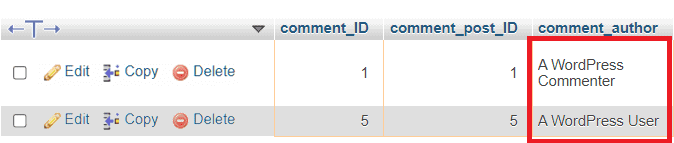
Here’s a practical example. In this case, we want to search the database for the phrase “A WordPress“.
If we run the search by setting the exact phrase as a substring option we will have two results as you see in this screenshot.
Repeating the search with the exact phrase option as a complete field has no results.

This happens because our complete fields were composed of a third word after the string we searched for.
Search in a table
If we want to search within a single table, we can select the database we are interested in and open the Structure tab. From here we just click on the Search button next to the desired table as in this example:

Searching in tables allows us to restrict the search to specific fields.
In the search, we can use the operator = if we want the match between the searched terms and the entered values to be exact. By using LIKE as an operator we will also select partial matches.
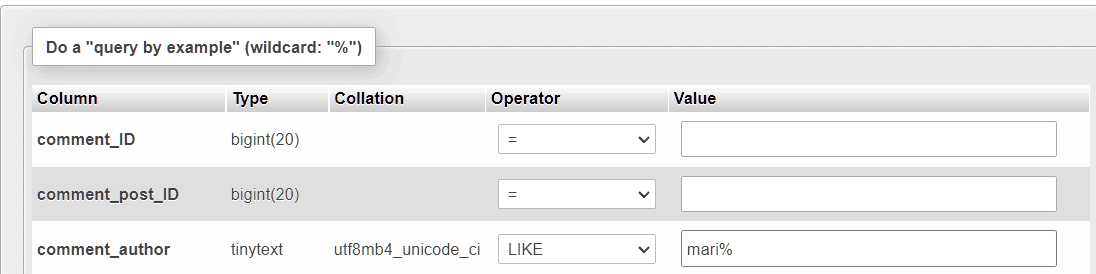
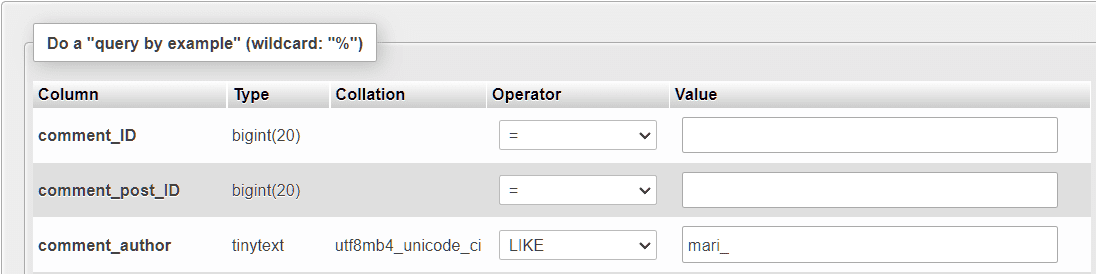
To better understand the difference, let’s take an example in our case with the authors of the comments. In case we want to find comments of users named Mario or Maria we can use wildcards and the operator like.
Using % as a wildcard will include all user names that begin with ‘Mari’ and continue with any number of characters, so Mario, Maria, but also Marianna.
By using _ as a wildcard we can, instead, search for usernames that begin with ‘Mari’ and that contain only one other character. A search of this type would yield ‘Mario’ and ‘Maria’ in the results, but not ‘Marianna’.
Database operations with phpMyAdmin
After selecting a database from the left side menu click on the Operations tab. The first thing we can do is create a new table to add to our database.
Create a new table
phpMyAdmin allows us to create tables both from the Structure tab and from the Operations tab.
In any case, the procedure is the same as we saw before: we enter the name we want to give to the table, set the number of fields it must have and click on Go.

Rename the database
From the Operations tab, we can rename our database. All we need to do is enter the new name to be given to the database and click on Go.

The warning message that appears asks us to confirm the operation and tells us that a new database will be created with the new name we have indicated and the contents of the existing database will be copied into the new one.
Create a copy of the database with phpMyAdmin
In addition to the export function that we will see later and which allows us to create a copy of the database to be saved locally and then allow us to import it on a new server, there is another method that allows us to create a copy of our database. In this case, we are going to see how to create a copy of the database to keep as a backup so we can restore it in case of problems.
We can always do this through the Operations tab. All we have to do is enter the name we want to give to the copy of the database we are creating and click on Go.

The options you see allow us to copy only the structure, without the data. However, if we want to create a copy of the database that can be restored in case of errors, we leave the default option Structure and data.
Change character encoding
The last section of the Operations tab allows us to change the character encoding of the database. All we need to do is select the encoding from the drop-down menu and click on Go.

In this way, the encoding will be applied to the new tables. If, on the other hand, we want the change to be applied to existing tables as well, we will have to use the option at the bottom to change all tables collations.
Table operations with phpMyAdmin
Just as we have just seen for the entire database, we can also access the Operations tab after selecting a single table. Let’s see which is possible to accomplish from here.
Move a table
From this section you can move the table to another database:

To do this, select the database from the drop-down menu and choose the destination database. We can also change the name of the table by changing the value in the field next to it.
Rename a table
The selected table can also be renamed by changing the name directly from the table options section.

From here we can also add a comment to the table or change the character encoding.
Copy a table
With phpMyAdmin we can create a copy of the table in the same database or in a different one. To change the database, all we need to do is click on the drop-down menu.

We can make a copy of the whole table (structure and data) or only copy the structure.
Table administration
Note that the operations accessible from this section can also be performed from the Structure tab of phpMyAdmin directly on several tables. In that case, we just need to select the tables and then click on the dropdown menu as shown in this screenshot:
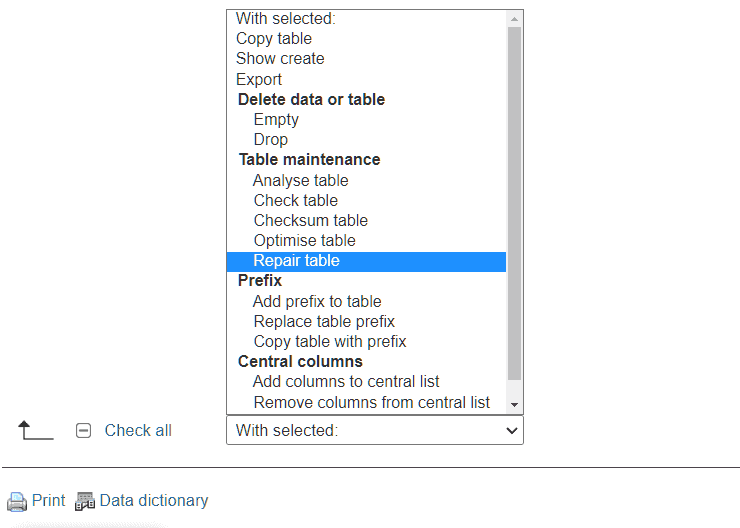
Repair or optimization can also be performed on the entire database, in this case, we simply need to select all tables.
From the Operations section you can:
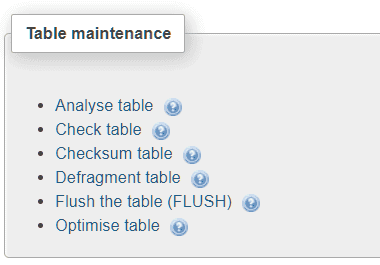
analyze the table: to obtain information on the status
check the table: to search for the presence of errors
repair the table: to repair the table if it is corrupted
optimize the table: allows you to recover the space occupied and reduces the time needed to access the table. It is convenient to perform this action when adding, modifying or deleting a large number of records in the table.
reload the table (flush): clears the cache and reloads the table.
Eliminate or empty the table
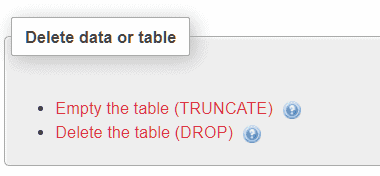
In the last section of the Operations tab, it is possible to
empty the table (truncate): this operation deletes the data contained in the table but maintains the structure.
delete the table (drop): this deletes the entire table, both the data inside and the entire structure.
Interrogate the database with phpMyAdmin
As you may have noticed while creating tables or inserting data into them, after clicking Run phpMyAdmin you are always redirected to the SQL tab.
Here you are shown the current process, all operations that are performed on the database through the interface and are actually translatable into SQL commands. In this example, you can see the insertion of data in the fields of a table.

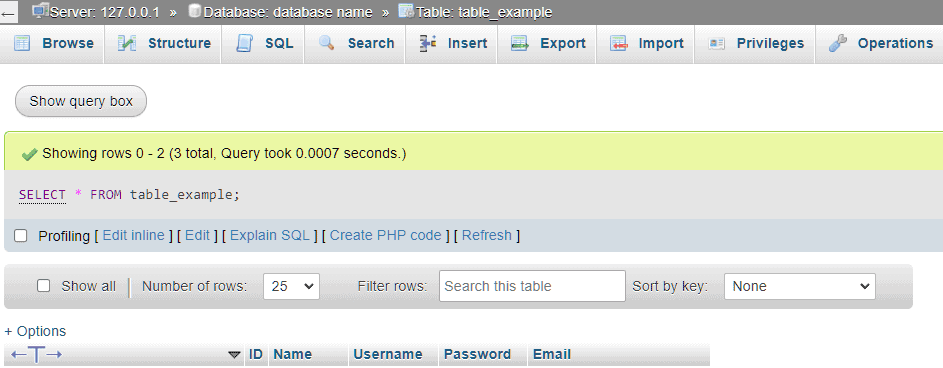
From the SQL tab, you can run one or more queries on the table or database. Here is an example with a query that shows us a column in a specific table.

The essential commands you can use for queries are:
SELECT: This allows you to retrieve data from a table, showing only one column for example, or inserting specific conditions using clauses such as WHERE.
INSERT: This allows you to insert data in the table, as we saw in the example I showed you before.
UPDATE: This is used to update the values inside a table already created and populated.
DELETE: This allows you to delete records from a specific table.
By using the tab Query by example we can generate queries in an easier way. In fact, the screen allows us to choose the table columns we are interested in and specify the criteria.
In this example, we want to show all records of the comments table whose author corresponds to Mario.

As you can see in the bottom pane, SQL-query, the query we have created through the grid will be shown in written form.
Import and export a database with phpMyAdmin
We can create a database from scratch or import an existing database. This feature of phpMyAdmin comes in handy when we want to transfer the site or for example when after installing WordPress locally we want to bring the site online.
In these cases, it is essential to export the database and import it on the online site, or on the destination server in the case of transfer, let’s see how to do it.
In the specific case of WordPress the import and export of the database can also be done using WP-CLI. In this regard, if you want to learn more about database management check out our guide to using phpMyAdmin for WordPress.
Export a database
The Export function of phpMyAdmin can also be used to create a backup copy of our database.
Let’s select from the list on the left of the database we want to export and then click on the Export tab.
With the quick export method, we simply choose the format (we usually leave SQL) and click Go to export our database.

If we select Custom as the export method, we can access other options as well. For example, we can choose which tables to export, selecting only those that interest us. Or we can export only the structure and not the data.

In the example I am going to show you, we will export only the structure of the database we created following the previous steps.
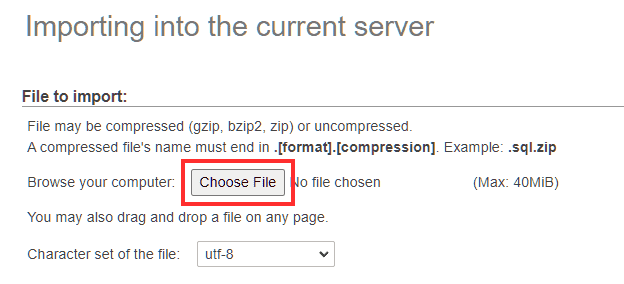
Import a database
To import a database we must first create a database. You can follow the steps described at the beginning of this guide.
Let’s select the newly created database (which is still empty) and click on the Import tab. Through this section, we can import a database that we have previously saved on the computer.
Let’s click on Choose File, load the file and then click on Go found at the bottom.
At the end of the process, if the import was successful we will see an alert message like this one here:
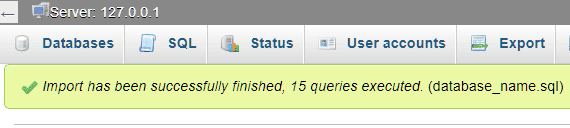
Now we can make sure that the database has been imported correctly, in our case we have exported only the structure and we are waiting to have the table with the fields created before, but without values in it. Our table will be just like this:
Conclusion
In this article, phpMyAdmin: the definite guide, we have seen how to use phpMyAdmin to create a new database, generate tables and populate them with data. We then focused on database management discovering how to search within a database or a specific table and rename databases and tables.
We also saw how to use queries, optimize tables, how to create a backup copy of our databases, and how to use the import and export functions. Let me know in the comments if there’s anything you’d like to learn more about or any steps you’re unclear about.


Leave a Reply