In this article, we will see how to speed up WordPress in a few simple steps and optimize the performance of our website.
A fast site is important to ensure a good user experience (user experience).
We will see that installing a cache plugin or a plugin that contains the word optimizer in its name is not enough to speed up your website.
Obviously, there are many plugins to speed up WordPress, in this guide and we will analyze some of them that will help us optimize WordPress.
Table of Contents
How to test the speed of WordPress
During the different steps, we will use GTmetrix the free testing tool. We’ll use this tool to test the speed of our site several times so that we can evaluate the improvements (or deteriorations) with each change we make to the site.
I suggest that you register for an account so that we can change the location of the test server, since both servers and clients are located in Europe we will be testing from London (the closest location) in order to get the most accurate results.
The account is completely free and it allows you among other things to see a history of the tests, so you can check if the performance of your website has improved or not compared to previous tests, that is before making the various optimizations to speed up WordPress.
Alternative tools to test the performance of your website
There are even tools to perform a speed test of a WordPress site. The three that we consider the best are:
- PingDom: this is an excellent tool, just like GTmetrix it is free. This tool gives us less information about the optimizations we can perform on our site and tends to show lower loading times than GTmetrix.
- Webpagetest: it is one of the best tools for testing the speed of your WordPress site, a favorite among many. Personally I prefer GTmetrix for the clarity of the information it provides about page optimization and the ease with which you read the waterfall.
- PageSpeed Insights: this is the official Google tool and tends to provide very precise and detailed information. If you want to use this tool, you can read our guide to PageSpeed Insights.
In this guide, we will use GTmetrix since it provides us with precise indications and a reliable measurement of the loading time of our pages.
Running the test with GTmetrix
When running a test with GTmetrix you should choose the location of the test server to be as close as possible to the server you want to test. If your site is on SupportHost you should choose London. To get this option you need to create a free account on GTmetrix.

Make sure you use the right protocol (http or https) for the test. This is to avoid a redirect, which would affect the result of the measurement.
Also, make sure that your url contains a slash (/) at the end to avoid a redirect that as in the previous case could affect the test result.
In this manner:

What is waterfall and how to read it
When you test a website with GTmetrix you can see a waterfall. This tool allows you to see all the resources loaded to display your web page and how long it takes each one to load.
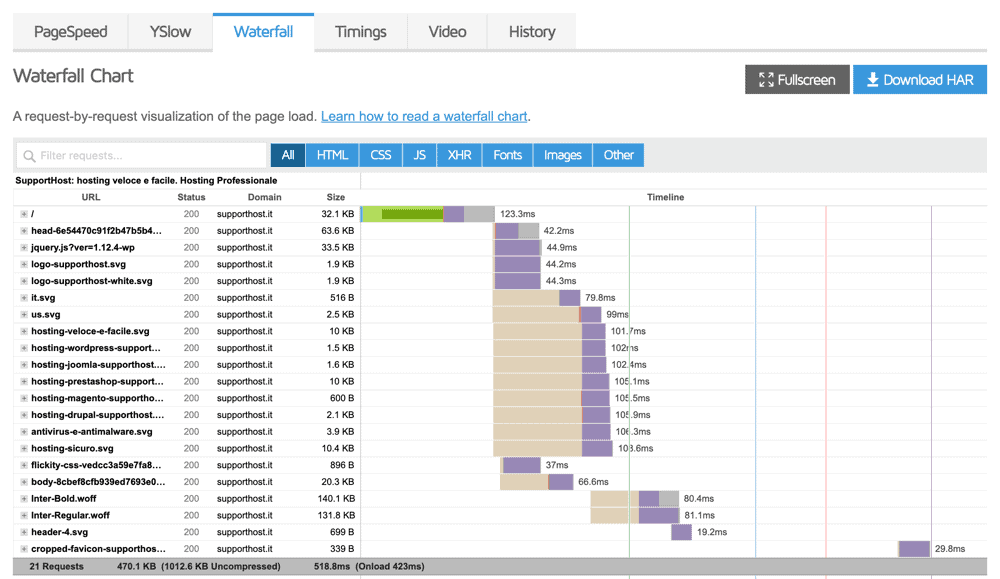
Starting with this list, let’s start making our changes in order to improve the speed of our WordPress site.
For example, many plugins load stylesheets and JavaScripts on all pages, even when they are needed only on some pages. This is the classic case of Contact Form 7 that loads a JavaScript and a CSS file in all pages even though these are only needed in the pages that contain the post.
Many builders and themes in the same way create load CSS and js files that are not used and are large.
Once in the waterfall tab, we can divide the files by type, or sort them by size. This allows us to analyze all the files and understand what can be removed and what must remain for the correct functioning of the page.
What to take into consideration when you want to speed up WordPress
The goal of this guide is to improve the loading time of your website by dropping below the 2 second time limit. And thereby transform a slow WordPress site into a fast one.
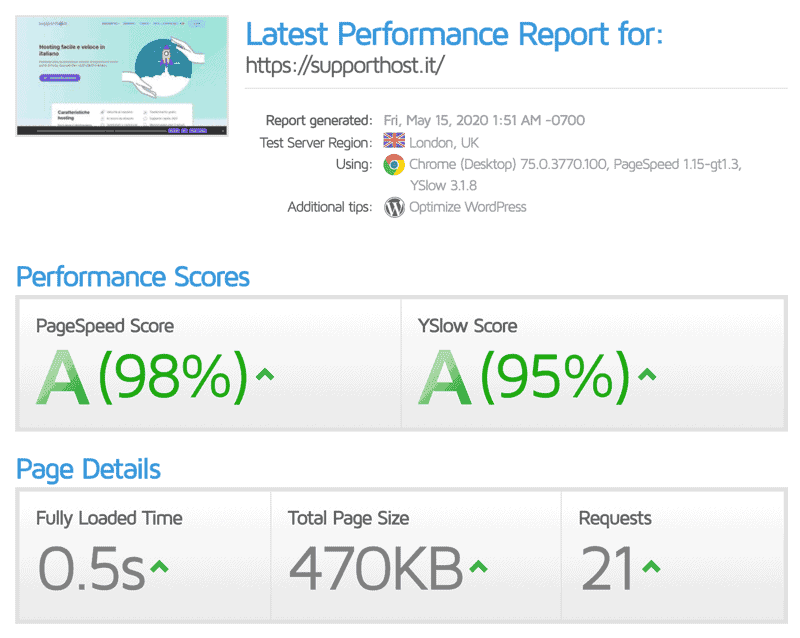
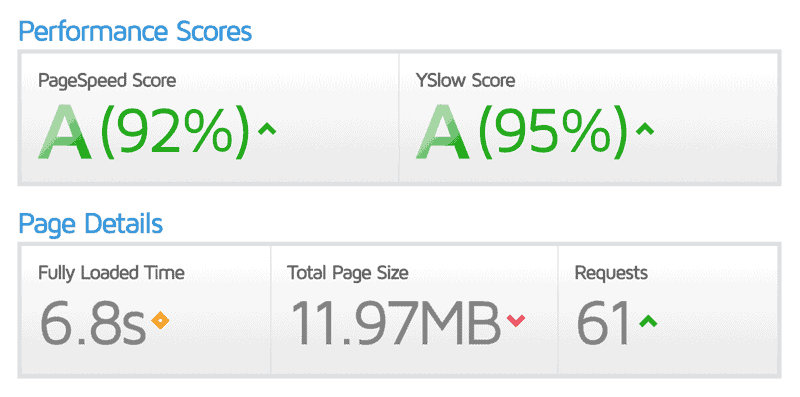
We often tend to focus on the score indicated by the various tools. As far as user experience is concerned, the score is irrelevant. Moreover, a good score does not indicate a fast site, and not all websites that load in less than 2 seconds have a good score.
Our focus will therefore be on the loading time, not on the score (which will however improve as a result of the optimizations we will perform in this guide).
In this example, we will see how there is no direct comparison between loading time and score:
Why is site speed important?
Google has stated that speed is one of the ranking factors. That is to say, if your site is very slow it could be penalized and consequently not make it to the first page.
In addition, a slow WordPress site literally makes your visitors run away.
40% of people abandon a website that takes more than 3 seconds to load.
Neil Patel
Google’s statistics also confirm these numbers for us regarding a slow site:
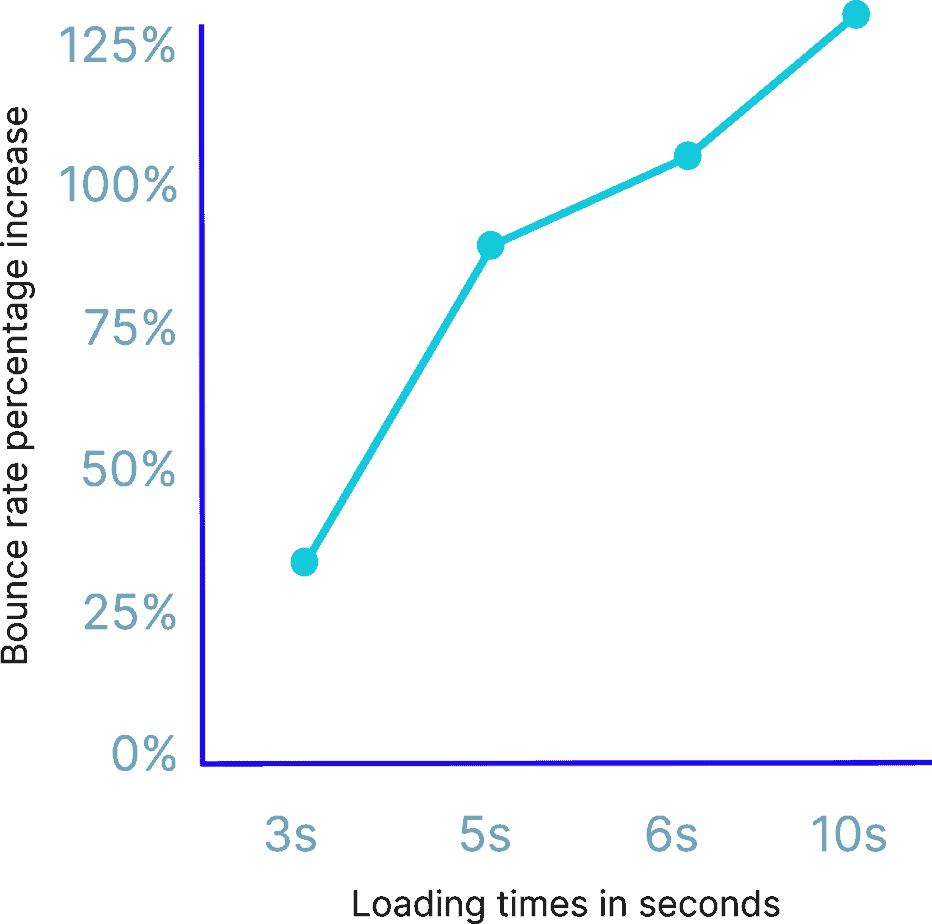
You can therefore decrease the bounce rate simply by improving the performance of your website.
As the importance of loading speed in the user experience is so high, Google Analytics has a section dedicated to the speed of your website.
A workflow example for the optimization of a WordPress site
Once you have done the test with GTmetrix we are going to make some considerations.
Firstly, we should disable any plugin cache and any plugin that make the merge and minify resources. If we skip this step we will see a faulty result in the waterfall.
It’s easy to understand that the file /wp-content/plugins/plugin-name/plugin.css is the css of a plugin and to understand if we need that css on the page or not. It’s impossible to understand which css is included on the page if we have a unique css named head-24262833.css
Let’s eliminate the useless items
First of all, let’s do some cleanup. Go to the plugins page and check how many plugins you have installed. Which of these can we delete?
Often there are plugins that are active but not used.
Or plugins that are only used for one basic functionality, in this case, we can disable the plugin and create a function in the functions.php file in order not to lose the functionality.
In other cases, I saw two different plugins doing the same thing, for example, two different contact forms with two different plugins.
So the first step, even before testing, is to do a good cleanup.
After we’ve deactivated all the unnecessary plugins, we can deactivate the ones that aren’t very useful. Are there any features you could remove without it changing much?
Only now can we start optimizing WordPress for speed.
Number of requests
If our site has more than fifty requests, we need to reduce the number of files. It is true that with HTTP/2 requests are not a limiting factor, but the more files we have the larger the page size will be.
And the bigger the size of the page, the more time is needed to load it.
To do this we will use Asset CleanUp, which I will talk about later in this article, and which I will show in the video, to eliminate the resources we don’t need from the whole site or just from some pages.
Page size
If we’ve done a good job deleting assets and the page is still larger than 1-2MB the problem is almost certainly fonts, images or videos.
My advice is to use only one font, using 400 and 700 (normal and bold) as weight fonts. If you use more than one font, or if you use more than one font-weight, make sure you check your pages and adjust them to respect this simple rule.
Regarding images, if you don’t have particular needs, you can reduce the size, in my experience images heavier than 200Kb don’t make sense on the web, most images can be under 100Kb without losing quality, especially if you use the jpg format.
Don’t forget that we use jpg for photos, png for illustrations and svg for icons and logos.
Videos really shouldn’t be included. If you want to use a video on your page you should use an external service like YouTube or Vimeo. Not only to save traffic but to prevent it from affecting the performance too much and making your WordPress site slow.
Test all the time
Every time you make changes (which should be done in staging) check that your site is working, run a new test and check the waterfall.
As soon as you think you’re done, check the waterfall and the page load time. Is your site fast enough? Do you notice anything slowing down in the waterfall?
Often some plugins load external resources that slow down your website. Can you delete that plugin or do something else?
A client was using a Messenger chat plugin on their site that was loading resources from Facebook and slowing everything down. We eliminated the plugin and put a link to the Messenger page and the performance changed completely.
The final step
As soon as you’re happy with the result, you can install a plugin to do the merge and minify (the same Asset CleanUp is fine), a caching plugin and then do one last test.
Now that you have a workflow in mind, let’s see in detail how to speed up WordPress in the best possible way and make the pages of our site load in less than a second.
How to speed up WordPress in 10 steps
Now that we’ve seen the workflow to follow in order to improve the loading time of a slow WordPress site, we’re ready to get into the heart of our guide.
Here is a summary of the steps we will follow to speed up WordPress:
- Choosing a performing hosting
- How to choose the perfect theme
- The truth about WordPress plugins
- Reducing page size
- Merge and minify
- Optimize images
- Optimize your database
- GTmetrix tips
- Activate a cache plugin
- Use a CDN.
Choose a high performing hosting
We often follow discussions on WordPress Facebook groups.
The most striking case we saw was of a user who had a site with a page that was less than 1MB and took more than 10 seconds to load.
If you want to have good performance you need to start with a good hosting service. Often the difference between a slow WordPress site and a fast one is the hosting itself.
We ran a test on a new installation on a trial WordPress hosting plan and we got the following results:
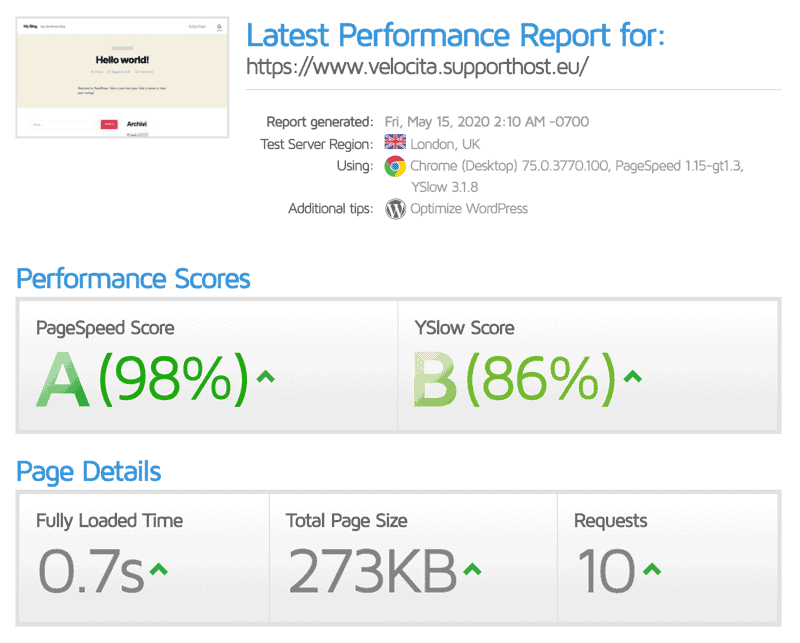
A picture is worth more than 1000 words.
The choice of server location is important for website performance. If your users are mostly in Italy the server must physically reside in Europe.
For this reason, we opted for a, datacenter in Germany and Finland, a central location with excellent connectivity to offer maximum performance.
keep in mind that you should choose the datacenter depending on where the majority of your users are located. When you order one of our plans you can pick the datacenter, choosing USA.
PHP version
New versions of PHP are improved not only in terms of security but also in terms of performance.
The performance jump from version 5.6 to version 7 of PHP has been enormous, so much so that it has been detected in the speed tests of a site. You have to try it to believe!
We suggest you activate the latest version of PHP right away.
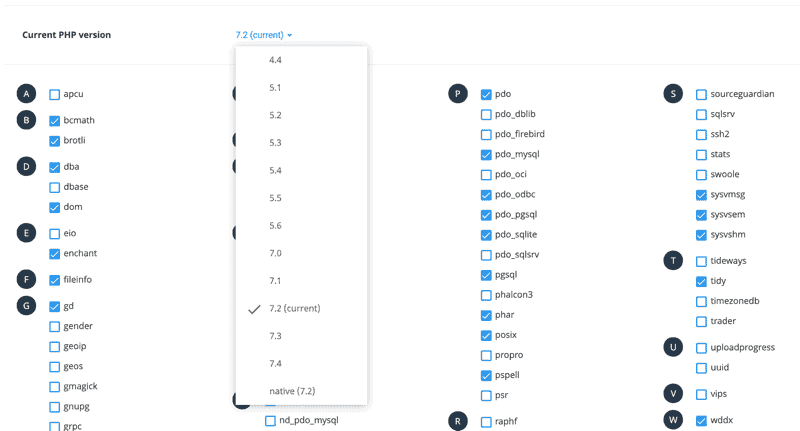
With SupportHost all accounts have gzip enabled and the latest php version is set by default on all accounts.
Enable gzip compression
On SupportHost the gzip compressor is active by default.
This allows you to send your site’s content in a compressed format to your users, thus reducing page size and consequently loading time.
The GTmetrix site speed test shows you whether the gzip compression on your WordPress site is enabled or not.

Activate the HTTPS connection
There’s been a lot of discussion about a secure connection via the HTTPS protocol in recent years. Besides the fact that various browsers display an alert if you don’t use a secure connection, you have a performance advantage.
If your site uploads via the HTTPS secure connection you can use HTTP/2, a faster protocol as it allows simultaneous downloading of files. On SupportHost HTTP/2 is active by default on all accounts.
With SupportHost the SSL certificate is active for free on all accounts, so you only need to configure your CMS to use it correctly.
If you have a WordPress site and you’re still not using https connection check our guide to move from http to https with WordPress.
How to choose the perfect theme
The theme in use is one reason for a slow WordPress site and we often tend to choose the wrong theme.
Let’s say you want to create a site for a restaurant. In most cases you go to ThemeForest and do a search for restaurant themes, choose the one you like the most and buy it, without inspecting it much.
The problem with most WordPress themes is that they are created in such a way that they can be used for a wide variety of functions. That is, you use the theme for a restaurant site while another user uses it for a web app.
This involves the creation of many different elements. For example, a pricing table that you’ll never use on your restaurant website and a form to create a menu that you’ll never use on the website for the web app.

On top of that, there are other features in the theme that you might never use, such as a sticky menu feature that you don’t like and keep disabled.
Each of these elements needs lines of CSS and in some cases JavaScript as well. These lines of code add up to all the others creating in some cases huge style sheets and JavaScripts.
Some default themes have almost 1MB of resources, which take some time to download.
How to choose the theme?
My opinion is to perform a search for the most fast WordPress themes and choose among them the ones we like the most.
As soon as we have a list of themes that we like and that are supposed to be fast we go looking for demos and run a test on gtmetrix on each of the demos.
At this stage we are not interested in loading time but in the waterfall, number of requests and page size.
Since we don’t know if the images are optimized or not in the demo, let’s check the waterfall, selecting all the resources except the images.
At the bottom we see the page size and the number of resources. The idea is to choose themes that have a maximum size of 500kb and less than 20 requests, excluding images.
Obviously, these are only approximate data.
We performed an analysis of one of the most popular themes: oceanwp which has a free and a paid version.

Are there other options available?
Depending on your skills (or budget) it is possible to create an ad hoc theme for your site. Given the amount of work involved, this is a very expensive option, but one that allows you to achieve maximum performance.
Alternatively, you can use a builder that is having a lot of success recently: Oxygen Builder. This builder has the particularity of including only the bare minimum when it comes to JavaScript and stylesheets, guaranteeing a mind-boggling performance.
The only drawback of this builder is that it’s not really suitable for the inexperienced user, whereas builders like Elementor or Divi are.
The truth about sitebuilders
Sitebuilders help the average user in creating a website in a very big way.
By using elementor or divi almost anyone can create a site in a professional way.
The issue with these builders is the resources that they load on every page in order to show the various graphic elements.
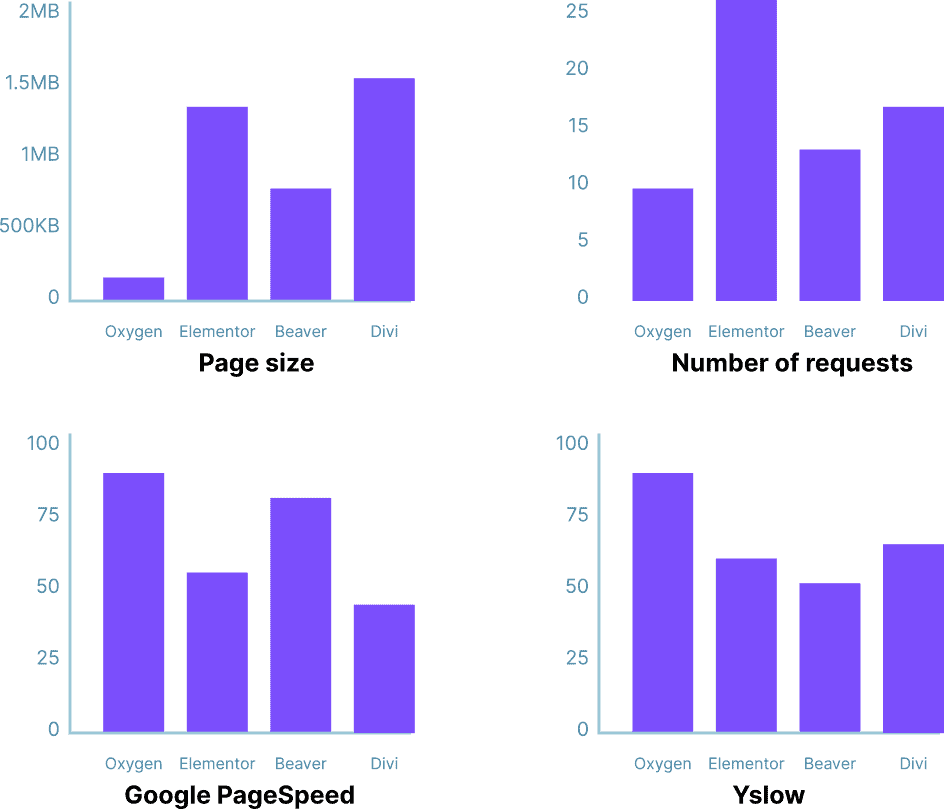
For this reason, we don’t recommend you to use these builders, while we think that Oxygen Builder is a good choice. We don’t have any kind of partnership or affiliation with Oxygen, it is a great product that we recommend whenever possible.
The truth about WordPress plugins
You may have heard that too many plugins slow down your site. While this is true in some cases it is not always true.
It’s not the number of plugins that slow down WordPress.
As of today, there are more than 59,000 WordPress plugins, and we’re talking about the official archive only. To this number, we have to add all the premium plugins that are sold elsewhere.
Anyone can write a plugin and make it available to the general public. Some of these plugins are written in such a way that they perform tasks that slow down your website.
In other cases, the operations that a plugin has to perform are well programmed, but the number of calculations that have to be done makes the plugin “heavy”.
Some plugins are known to be slow or to make your website slow. For example a lot of people say that if you go above a certain number of products, Woocoommerce starts to be slow. That is why I did some tests and reported them on the Woocommerce performances article.
Plugins’ traces
Another problem with plugins is the “traces” they leave on the database.
When we install a plugin, tables are created (not for all plugins) and rows are added to the wp_options table for the plugin options.
You can find the size for your installation by running this query:
SELECT SUM(LENGTH(option_value)) as autoload_size FROM wp_options WHERE autoload = 'yes'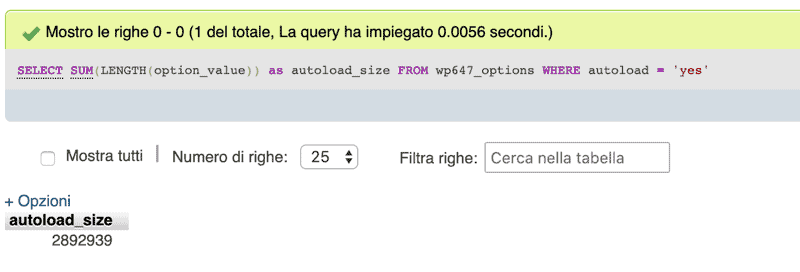
When we go to delete the plugin, this data is not always deleted from the database.
In some cases it is a programming error, in other cases, the plugin author does not want you to lose the settings in case you decide to reinstall it in the future. In other cases, the plugin author didn’t think about the impact on performance.
We will explain how to optimize the database in another chapter of this guide.
Do you need all those plugins?
In some cases we have found client sites full of plugins and many of them are useless.
It can happen that over time various webmasters (or even worse, unskilled people) take turns and new plugins are added without checking what is already installed.
In some cases we found 2 form plugins and neither was being used because the WordPress theme had its own contact form.
Another time we found woocommerce and Easy Digital Downloads on the same site, but they had never even been set up. They have been installed, activated and forgot.
Beyond these obvious cases, we recommend going through all plugins, and asking yourself what functions you are using them for.
In many cases you can do without that feature. In other cases a heavy plugin is used for a single function, in this case you can create a “site specific plugin” with that specific function and disable the plugin.
The first step is to delete all those plugins you can do without. Or follow our guide Plugins that slow down WordPress and replace the heaviest plugins with others that affect the performance of your WordPress site less.
Reduce the size of your pages
When a site has a high number of requests or a page size that is too big, one of the causes of the problem (along with images and fonts) are scripts and style sheets.
As we said many of the themes you buy are made to be used by everyone and for sites that have a wide variety of functions.
This means that whoever sells the theme must take into consideration all the possibilities when creating the theme.

Some plugins and the WordPress core include completely useless stylesheets and scripts.
Other plugins, on the other hand, insert their stylesheets and scripts into every page of your site.
As we said before a classic example is Contact Form 7 which adds a CSS and JavaScript to all pages of the site, but only uses them on the contact page and any other pages that use a contact form.
In the previous paragraph about WordPress plugins, we have discussed that the first thing to do is to eliminate unnecessary plugins. After doing that we can still optimize the plugins that you actually need on the site, but which are not useful on all pages.
So let’s see how to remove unused resources from pages that don’t need them to improve web page loading speed.
Eliminate useless resources where they are not needed
Let’s go and install the “Asset CleanUp” plugin, which will allow us to disable some of these resources where we don’t need them.
Note that you can perform this same operation with a simple function in your theme’s functions.php file or by creating a “site specific plugin”. However, we want anyone to be able to follow this guide, so we opted for a plugin.
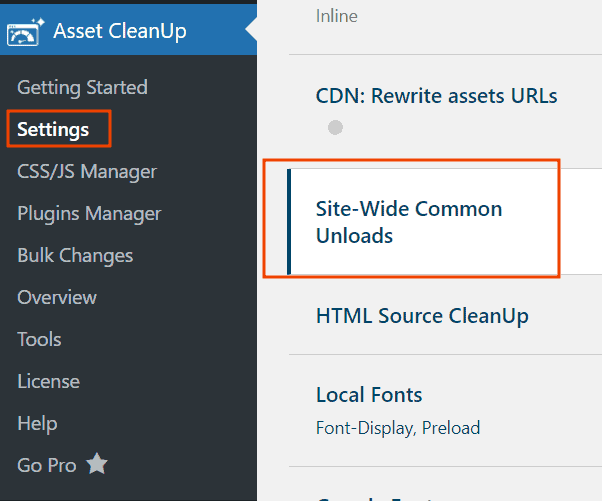
Once the plugin is installed we go to the settings from the menu on the left in “Asset cleanup -> Settings”. Click on the tab “Site-WIde Common Unloads” and disable what we don’t need. Under each item, we see a description of the asset.
For example, if you don’t use emojis in your WordPress site you can disable the script.
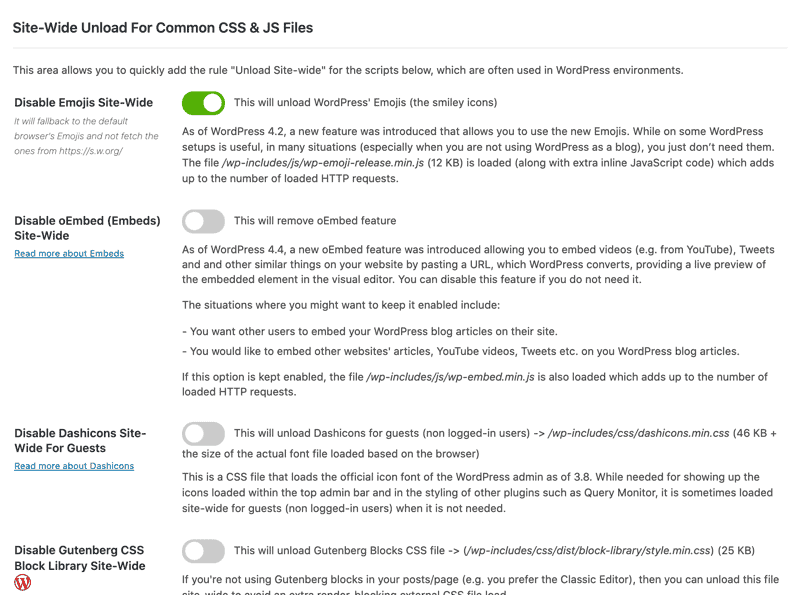
Keep in mind that these settings apply broadly across the entire site.
Now let’s go delete those resources that we only need on certain pages of the site.
For example let’s go to our contact page, which contains the contact form of Contact Form 7.
On this page we will need the Contact Form 7 stylesheets and scripts, but not on the other pages.
Under the editor in the contact page, we see the “Asset cleanUp” box from which we can go and remove the Contact Form 7 scripts and stylesheets and leave them active only on this page.
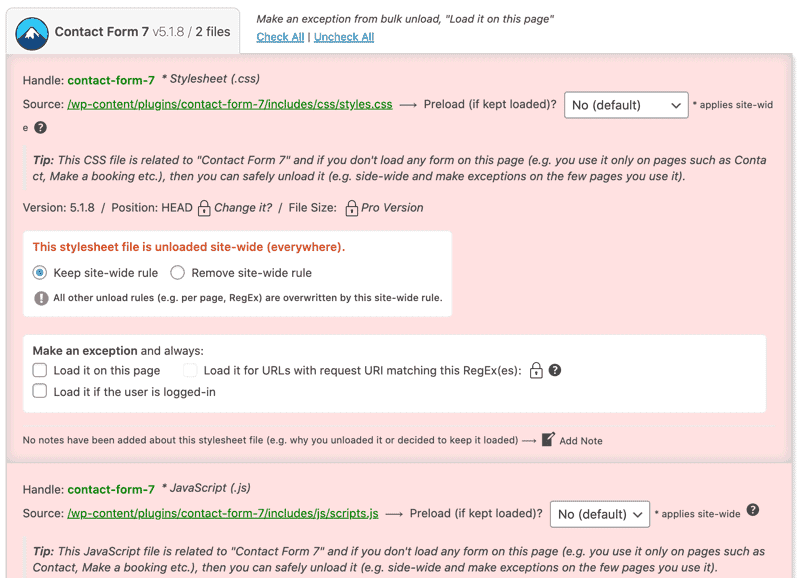
In this case, we have seen the example with Contact Form 7, but you can repeat the same process for all other resources.
Keep in mind that if you remove a necessary resource, you may encounter errors on the site. For this reason, after deactivating the resources, always check that the site is working correctly. To assess the impact on performance, run a test with GTmetrix before and after the removal of the resources.
Deleting unnecessary fonts
In some cases, such as in the theme we use on our website, some fonts were loaded that were absolutely useless.
In our case, we had a font that was loaded only for one title. We decided to use another font for that title and eliminate the loading of an additional resource.
In this way, we saved one resource and 80Kb.
If our goal is to speed up WordPress we need to eliminate all unnecessary things.
The elimination of a single resource will not make a difference, but all the operations put together will lead us to have a site that loads in less than 1-2 seconds.
Also for icons, 2 different icon fonts were loaded in addition to font awesome.
We ran an overhaul of each page replacing all the icons with fotnawesome ones, thus eliminating the loading of 2 other fonts.
This saved us 2 resources and 287Kb in total.

In other cases, the same font is loaded several times for bold, italic, etc. …
Also in this case it is appropriate to question if we can do in another way in order to reduce the resources necessary for the loading of the page.
The deletion of fonts depends on the builder you are using and on the theme, so we cannot give guidelines that are always valid for this type of operation.
Merge and minify: reduce as much as possible
At this point, we have eliminated all unnecessary resources.
We can still reduce the size of the page and the number of requests to speed up WordPress.
This process is called merge and minify.
Merge means to join. We’re going to merge the CSS files in order to have a smaller number of files. Then we will merge the js files that contain the scripts to reduce the number of requests.
We also have the possibility to reduce their size by performing an action called minify.
The minification of a file consists of the elimination of unnecessary characters (for example line breaks) and the elimination of comments.
A minified file will be difficult to read if you want to make changes, but it is useful because it allows us to reduce the final size of the file.
This process is handled automatically by a plugin. You can use the plugin we installed earlier (Asset CleanUp) to minify and merge files, or an additional plugin such as Fast Velocity Minify. Let’s see how to use these two plugins.
Merge and minify with Asset CleanUp
If you want to use this Asset CleanUp feature you have to go to the plugin settings, and under the “Combine CSS & JS Files” tab check the options.
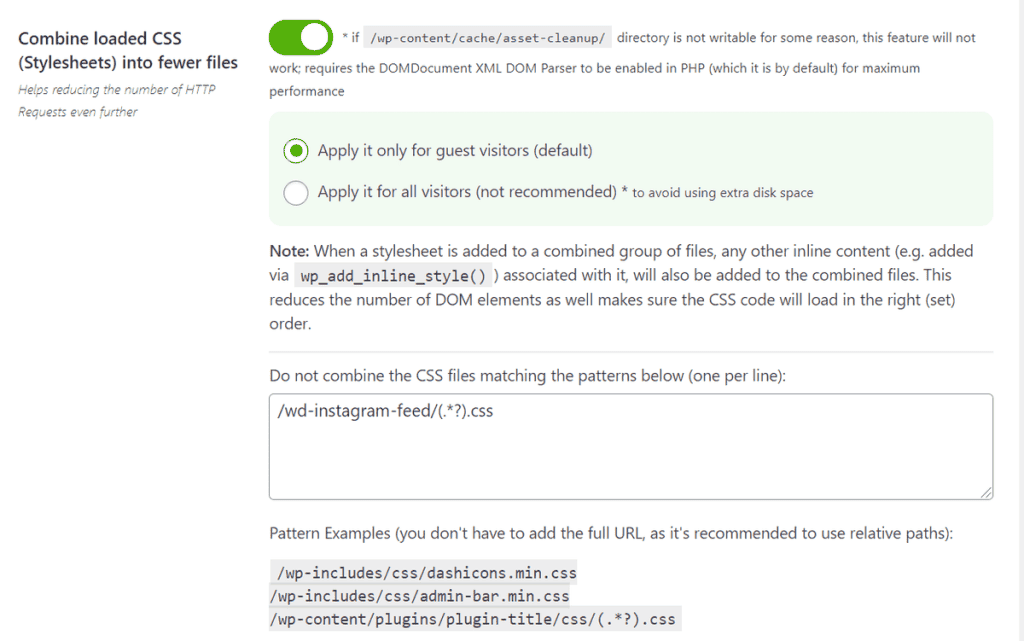
Once you have saved the settings clean your browser cache and visit the site to see if this operation has created any problems.
If it did you need to find the CSS or JavaScript that creates the problem when combined with others and exclude it.
Once we have set the plugin to merge and merged all the files we can do another test. Surely we will notice a further reduction in the number of requests and the size of the page.
At this point, we can go to the tab “Minify CSS & JS Files” and set it to perform the minification of files. Also in this case we empty the browser cache and check the site for problems.
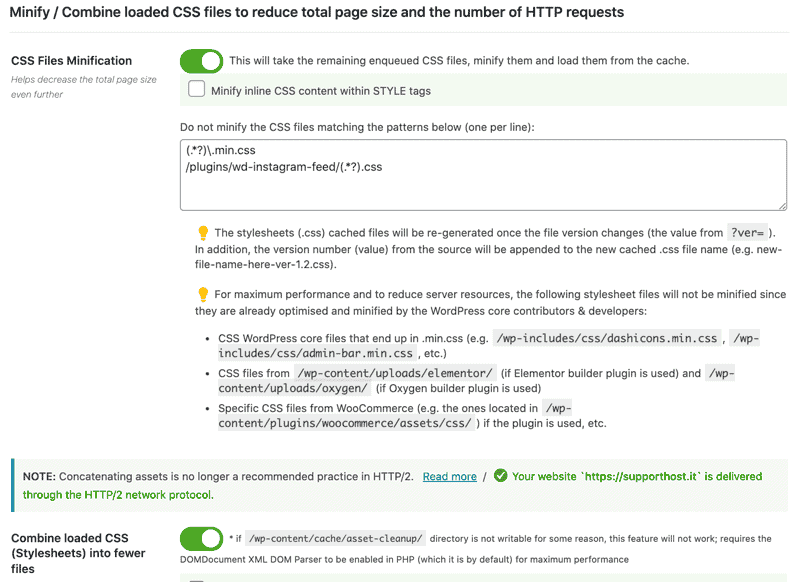
If everything is ok we run another test with GTmetrix to see if there has been an improvement and also quantify it.
Searching for problems on the website will not be complicated. If after saving the settings you have a problem, it will be glaring.
For example, you might see part of the graphics completely missing or site functions not working. No need to turn into Sherlock Holmes with a magnifying glass, don’t worry.
It’s possible that if you use a basic WordPress theme or a builder like Oxygen Builder there won’t be much difference before and after these operations, while in other cases the differences will be huge, for example in those cases of themes that create many different CSS for each page.
Merge and minify with FVM
Fast Velocity Minify is a plugin that serves only to merge and minify assets to increase the speed of WordPress.
We recommend using Asset CleanUp for its user-friendliness, but for special cases, you can use an alternative.
For example, on SupportHost we had a complex situation.
We disabled assets on some pages directly via a custom feature in the theme, so we weren’t using Asset CleanUp.
Also, we needed to set higher deadlines for minified files and synchronize them with WP Super Cache files, so we preferred to use this plugin for more customization options.
In 99% of the cases, the simple use of Asset CleanUp is more than enough.
Image optimization
I’ve written a post that explains everything related to image optimization with WordPress, if you want to optimize your images in the best way I suggest you to check it out.
Let’s now go to image optimization. Open the waterfall tab on GTmetrix and select only the images.

If you have never optimized the images of your website it is possible that a large part of the size of your web pages depends precisely on the images.
Images are precisely one of the factors that make a WordPress site slow, so if we want to speed up WordPress it is of utmost importance to optimize images.
Particularly in blogs, we tend to upload images without thinking about the consequences for performance, then in wrong formats or exaggerated sizes.
Filtering images in this way we see the total size of all images, and their number.
This allows us to identify images with excessive size and understand what to do to reduce their weight.
Image sizes
In some cases, we saw images that were 3000 or 5000px wide and a few MB in size, which were then resized by the browser.
You will rarely need images larger than 1600px on your website.
In many cases, these are images that are uploaded within blog articles.
Most themes set a maximum width for the text column, which usually ranges between 700px and 980px. i.e. any image wider will be resized by the browser.
You should therefore resize your images before uploading them (or do it automatically as we will see in a bit).
We can use the WordPress feature to change the size of the images, directly from the admin area to the media section.
Changing image type
Png images have higher definition and are often used for logos and icons, where transparency is needed.
Some sites have a lot of png images within their posts. This is often the case with screenshots, which are created in this format.
If it is a photo it is convenient to use jpg format. If you have images in png format within your posts, it is advisable to convert them except in a few special cases.
Compressing images
We recommend buying ShortPixel, a plugin that allows automatic compression of images.
After installation ShortPixel will perform compression (and if we like to resize as well) it will automatically do so.
This first operation will take some time. Then it will perform the compression automatically with every upload. This is how we set up ShortPixel:
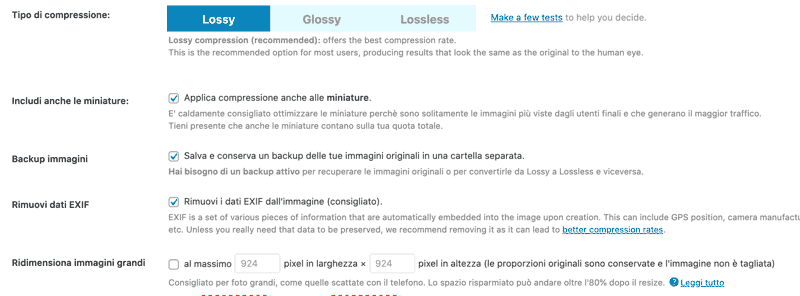
As an alternative to this plugin to compress images you can also use online image optimizers, such as Optimizilla.
Automatic image resizing
In many instances, there are several authors on blogs, and it would be very difficult to check that all of them optimize images correctly.
It often happens that an author uploads images that are too large or in the wrong format.
In this case, a free plugin comes to our rescue. It is a free plugin released by ShortPixel that checks images when they are uploaded and automatically resizes them.
Here we can set up a maximum image size.

This plugin also allows you to recompress images in jpg format, choosing the new compression, which in this example we have set to 90:
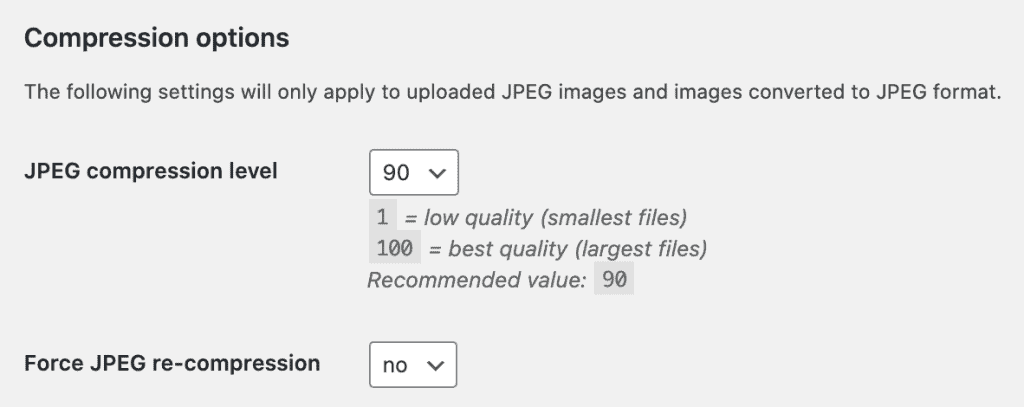
Moreover, if we want we can check the option to convert images from png to jpg.
Using images in WebP format
Normally, images in jpg, png or gif format are used for the web.
Google has recently introduced a new format: WebP.
According to Google’s data, WebP format is 26% smaller than png format, while the image size is reduced from 25% to 34% when compared to jpg.
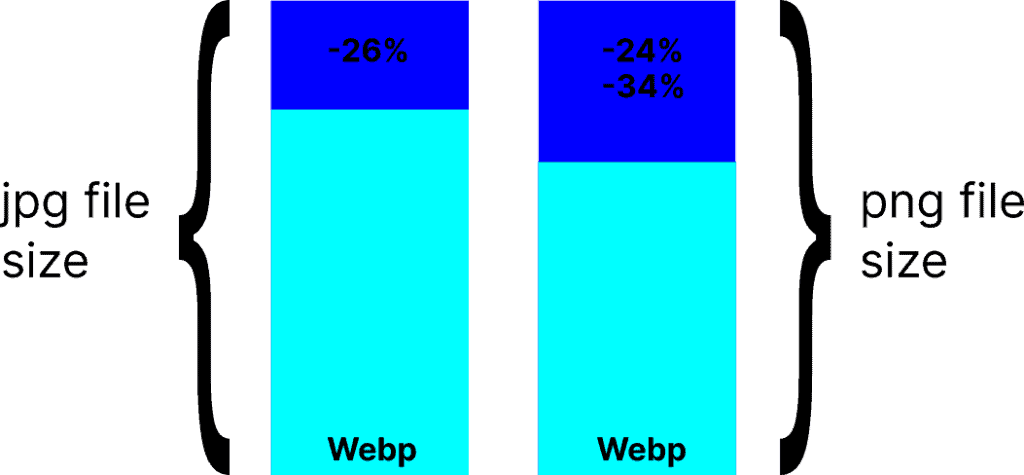
We can see the difference in quality and size in Google’s WebP gallery.
Pros and cons of the WebP format
This format does an excellent job of reducing file size while maintaining image quality.
As is the case with the png format, WebP images support transparency. This is a very important feature for web images.
The WebP format is not yet supported by all browsers. Here is a list of browsers that support webp and their market share:
Here is a list of browsers that do not support WebP and their market share.
Fortunately, it is possible to use a jpg or png image as a backup for browsers that do not yet support this new format.
ShortPixel takes care of everything, let’s see how to do it in the next section.
How to use WebP on WordPress
At the moment, WordPress doesn’t support WebP, but as usual, we can solve this problem with a plugin.
You can use ShortPixel to create images in WebP and provide them to browsers that support them easily and automatically.

Check out our updated guide on using WebP images with WordPress.
Boost performance further with Lazy Load
Lazy Load consists of not downloading images when not necessary.
This allows you to download only the images “above the fold”, i.e. in the part of the page that is visible before you start scrolling down.
The rest of the images will be downloaded as the user scrolls down the page.
This method is great for speeding up WordPress especially if your site has a lot of images.
To add this feature to our WordPress site we recommend using a3 Lazy Load.
This plugin has been used on over 200,000 different WordPress installations and it is constantly kept up to date.
The plugin is super easy to use and works great with basic settings.
Optimizing the WordPress database
Unless you are using a caching plugin, for every page that gets visited WordPress accesses the database to grab the data and generate the page code.
The larger the size of the database the longer it will take to retrieve the necessary information. This is true even if all tables have indexes.
If we really want to speed up WordPress we need to make sure that the information is found as quickly as possible in the database.
Therefore, our goal is to clean up the database.
In many cases, it is recommended to use WP-Optimize, which is certainly a good choice for the novice user.
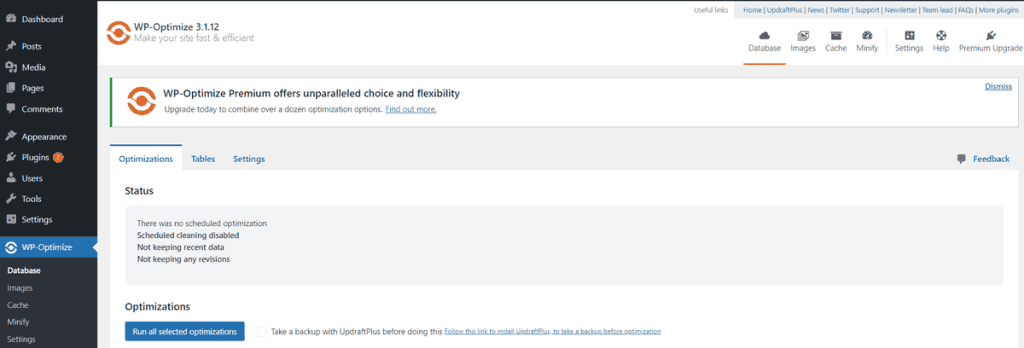
You can perform the cleanup directly by using phpMyAdmin.
Delete useless tables
The first check we are going to perform is to look for unused tables.
Some plugins during their installation add tables to the database, and as we said before they don’t delete them when they are uninstalled.
So it is possible that in your database some tables have been there unused for a long time.
It is advisable to delete them, of course always after a backup.
Reduce the size of wp_options
One table that tends to have an enormous size is the wp_options table, which contains WordPress and plugin options.
The problem here is that some of the options are saved with the autoload option, sometimes even when not needed.
Again, a lot of this data belongs to plugins that we used in the past and are no longer active.
You can search the database and analyze the tables one by one deleting the useless ones.
Optimize wp_posts
WordPress stores all data about posts, pages, and other content types in the wp_posts table.
In addition, revisions are stored for each post.
All these data increase the size of our table.
As the first thing, we can delete WordPress revisions, an operation that we can do with a plugin like wp rocket, or directly through PhpMyAdmin. Obviously with due precautions.

The next step is to limit or avoid the number of revisions that are maintained on the WordPress database.
To do this we are going to add a constant in the WordPress configuration file. We are talking about the file wp-config.php
define('WP_POST_REVISIONS', 3);
Alternatively, we can disable WordPress revisions completely.

Clean up the wp_postmeta table
This table contains additional data for each post. Many plugins use this table to add metadata to posts.
In some cases, it can happen that when deleting posts there are orphan rows left. These rows are not related to any post and so they are completely useless.
We can find and delete them with a simple query.

GTmetrix Tips
At this point, we have eliminated all those unnecessary files and plugins that slowed down the loading and optimized what we need.
Surely you have noticed a reduction in page size and a reduction in the number of requests. So we are well on our way to solving the problem of our WordPress site slow to load.
Now it’s time to check GTmetrix recommendations, so you can make the final adjustments.
Detecting problems at this stage is very easy since GTmetrix puts the problems you find listed in the “Structure” tab at the top.
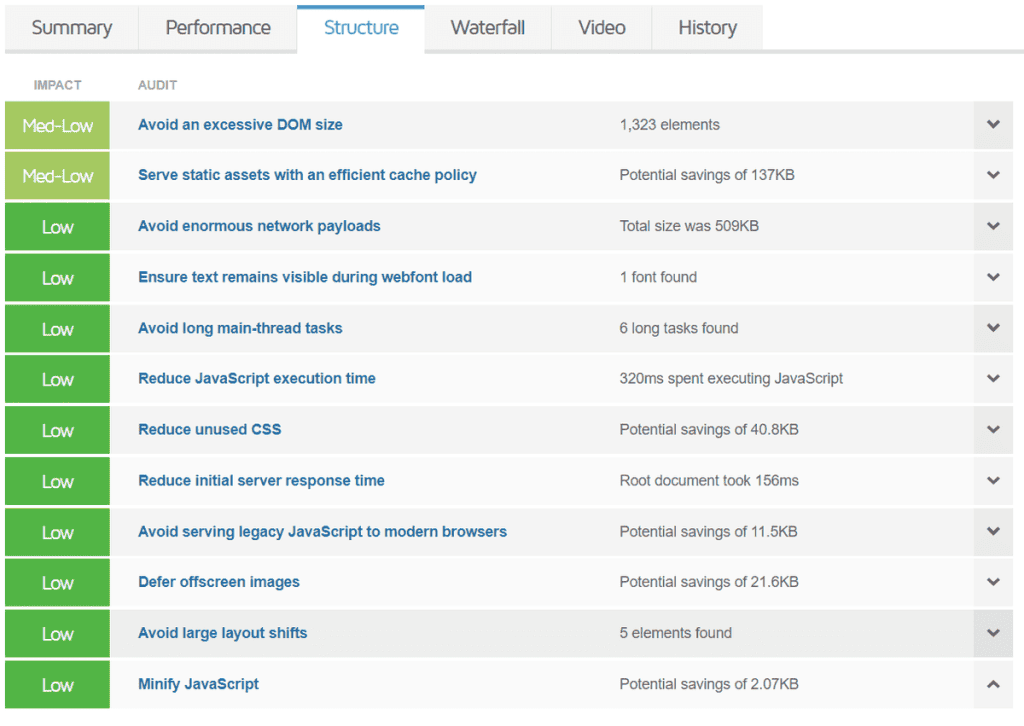
These recommendations are obviously different for each website and GTmetrix provides an explanation and a solution for each one.
Activating a cache plugin to speed up WordPress
The last step in optimization that allows us to speed up WordPress is activating a caching plugin.
A caching plugin creates static html files for each page of your site so you don’t have to generate page code every time. This reduces the number of calculations the server has to perform on each visit, thus reducing website loading time.There are various caching plugins that you can use, among all of them we recommend WP Super Cache. Note that if you have WordPress hosting or semi-dedicated hosting you have Litespeed with LSCache, you can then use a server-side cache.
We do not recommend the use of W3 Total Cache, on several groups where tests have been performed and in all cases, it is not recommended to use the plugin.
Once you have installed WP Super Cache go to the settings page.
The default settings are designed to work best in most cases.
We suggest activating the expert mode in the advanced tab because it allows more performance.
The “expert” mode in fact uses mod_rewrite to provide the visitor in cached files, while the “simple” method performs php calls before providing the static file.
Using a CDN
An additional step to speed up WordPress is to activate a CDN (Content Delivery Network). Once your website is well optimized a CDN can further improve performance.
Activating a CDN regardless of whether you have a slow WordPress site may not make sense, or it could even be harmful. Let’s look at it in detail.
What does a CDN do?
To understand how using a Content Delivery Network helps us in improving the performance of our website we must first understand how it works.
This network allows us to deliver the static parts of the page (e.g. images) from a server located as close as possible to the user.
For example, with our hosting service, your website physically resides in Germany. Your customers in Europe will have fast loading times, but users visiting your site from Asia, Oceania or America will have longer loading times due to the distance from the server.
A Content Delivery Network provides loading from another server in their network, the one that is closest to the user.
When to use a CDN
From our tests, we found that using a CDN like CloudFlare if all your users are in Europe is not only unnecessary but harmful because you waste a few tenths of a second.
If instead, you have users all over the world the loss of a few milliseconds for users in Europe means you’ve gained 1 or even 2 seconds for users further away, so in this case, it turns out to be a good choice.
Conclusion
If you’ve followed the steps I’ve outlined in this guide you’ve surely managed to speed up WordPress.
What kind of improvement did you get?
In how many seconds did it load before and in how many seconds does your site load now?
Was any step unclear or did you fail to perform it for some reason?
Let me know in the comments below.


Leave a Reply