In this article, Sitemap: the definitive guide, we will see what a sitemap is and how it can be useful in terms of SEO. We will understand how search engines use these maps to analyze the content of a site and we will go over the different types of sitemaps that exist.
So, we’ll see which sites need a map and which ones can do without one, and then we are going to focus on creating the sitemap using different methods.
Table of Contents
What’s a sitemap

The sitemap of a website is a file within which information about the site’s pages and other media files are listed. This list is organized in such a way that it also provides information about the links between pages and files.
Besides the organization of these elements, the sitemap also includes other data about the pages. For example, the date when the last changes were made, the multimedia elements present within the page and, if they are present, information about the versions in various languages.
As a matter of fact, for multimedia elements, there can also be separate sitemaps dedicated to videos and images, but we will see later on what they are.
Now let’s try to understand the use of this map inside a site.
What is the sitemap used for
Sitemaps are used by Google and other search engines to analyze a website. Every search engine has crawlers, sometimes also defined as spiders or robots, which are programs that have the task of scanning the contents of the sites.
The scans take place in the absence of a sitemap, but it becomes more difficult for the bot to do its job. The sitemap, therefore, is like a real map that guides the program between the pages of the site and between the files.
Try to think of your site as a building, where each page represents a room. Each one is connected to one or more other rooms, just as pages are connected by links. In a small site with few links, it won’t be difficult for the bot to find its way around.
On the other hand, when the site is more complex, it’s as if the crawler were in front of a maze: without a map, it would run the risk of never reaching some pages or some files. This means that some sections of your site would be likely to be excluded and, consequently, not indexed.
The importance of the sitemap for Google and SEO
The presence of a sitemap allows Google’s bots to extract important information from the individual pages within it. This ensures that when the crawler crawls the site, it doesn’t risk skipping pages or other important content.
However, it is worth underlining that the presence of a sitemap does not guarantee in absolute terms the indexation of the pages. It is necessary, in fact, to keep in mind that we do not know all the background on the action mechanisms of the search engines.
What is certain is that its presence within a site can only bring advantages. Perhaps it will not translate directly into tangible results, but it will never be a drawback for the positioning.
How are sitemaps created?
Google’s first approach to the creation of sitemaps started in 2005. Within a year, a real dedicated protocol was developed and released under the Attribution-ShareAlike Creative Commons License.
The protocol has been adopted not only by Google but also by Microsoft and Yahoo! Later, in 2007, Ask also joined this standard.
Sitemap: the formats
Sitemaps mainly use two formats. There are the HTML sitemaps and the XML ones. In the majority of cases today XML sitemaps are used.
This happens because XML is the format used specifically to create sitemaps readable by crawlers. Not surprisingly, XML is the format that is used in the protocol adopted by search engines.
HTML, on the other hand, is mostly used to make user-side navigation easier. The presence of a map, in fact, is not only useful for search engines but is also useful for site visitors.
Sites in which the sitemap should not be missing
As I explained, the mere presence of a sitemap does not guarantee that your site will be indexed. But in its absence, the content may not even be taken into account by the crawler.
There are also other situations in which the sitemap is essential, for example in sites with numerous pages. In this case, in fact, both recent and updated pages could go unnoticed by search engines.
The sitemap is also useful when the site has few internal links. In fact, with this type of map, you make sure that no page is left out, even if it has few or no links with the rest of your site.
It is recommended to use the sitemap also in sites where multimedia contents are abundant, so if you have many images and/or videos on your site you should use it. This is provided that you want these files to be included in search results, if not you can also avoid using them.
Finally, Google suggests using it even if you have a site that appears among the search results in Google News.
Sites that can do without a sitemap
In some circumstances, it is not necessary to use a sitemap, for example, if the site is quite small, or if the internal links are sufficient.
There are also special cases, if your site is hosted on Blogger or Google Sites, it is likely that this file is created automatically. In these cases, therefore, it will not be necessary to create another one.
How to create a sitemap: preliminary notes
The sitemap of a site can be created in different ways. Before understanding how to create a sitemap you must have a very clear idea of the pages of your site that need to be indexed, in order to know which URLs to insert.
Once you have identified the pages that interest you, you can choose how to proceed. If you want, you can also create a sitemap manually with a simple text file.
The quickest option, however, is to create the file automatically, again you have several alternatives. You could use a sitemap generator or CMS-specific tools.
For example, if you have a site with PrestaShop you can use the Google Sitemap module that allows you to create an XML sitemap for your site. Similarly, for Drupal, there is an additional module that automatically generates the sitemap.
If you use WordPress there are plugin that allow you to create the sitemap quickly, as I will show you later in this guide.
In addition to the tools of each CMS you can also use other methods to create a sitemap, let’s see how to create an XML sitemap and how to create one from a common text file.
Create an XML sitemap with a generator
If you have a complex site with hundreds of URLs, it is impossible to group the addresses manually. That’s why there are tools that allow you to acquire the addresses directly from your site.
These are the automatic generators as I mentioned earlier. One of them is SEO Spider by ScreamingFrog that allows you to generate an XML sitemap.
This tool is free if your site has less than 500 URLs, otherwise, you will need to purchase an annual license to use it.
It is extremely simple to use: you’ll have to download the program to your computer, launch it and then enter the address of your site and click Start to start scanning.
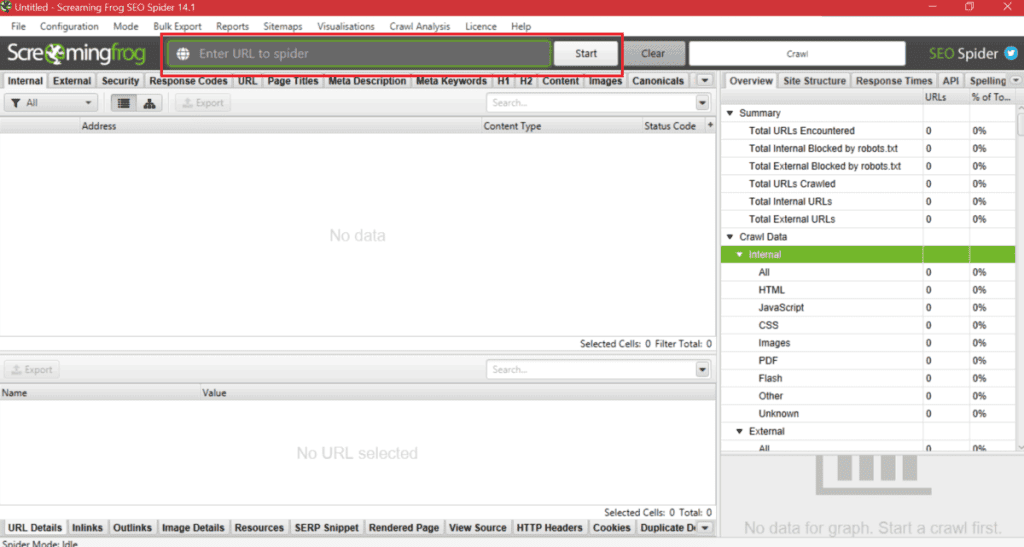
As soon as the crawl is complete, all the pages of your site will be collected and you can generate the XML file.
Click on the Sitemaps menu and then on XML Sitemap to open the settings.
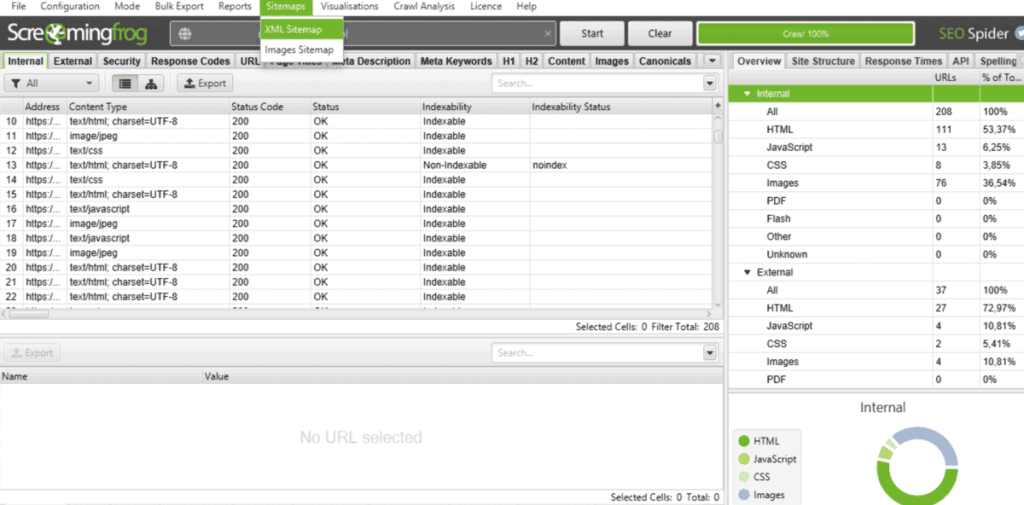
From here you can choose the pages that should be included within the map. You can also leave the default settings if you have no special requests.
In this case, some addresses will be excluded automatically, such as pages marked as noindex or not to be included in the indexing.
After you have your list you can further edit it, to do so just select the URLs to be excluded and remove them from the list, as you see in the screenshot below:
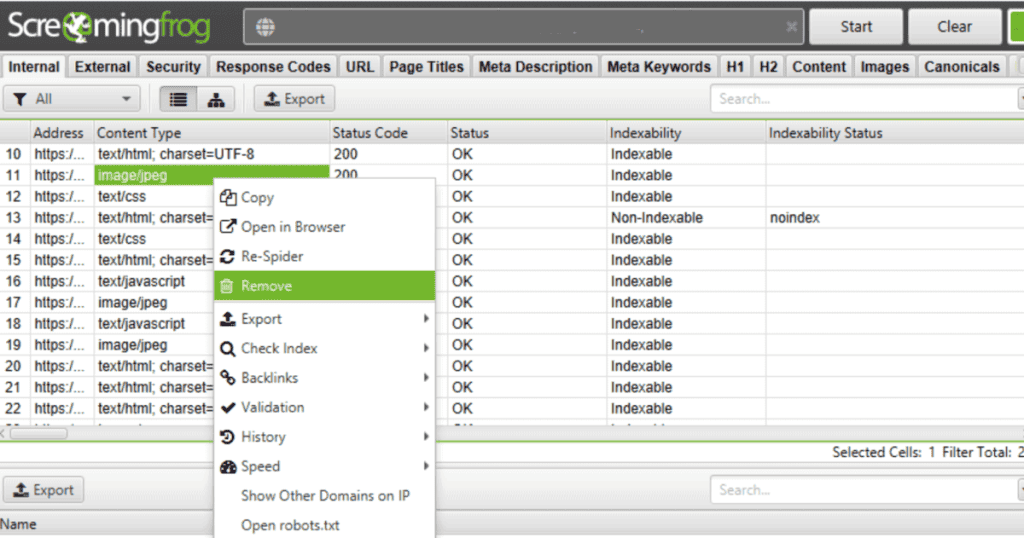
Before generating the sitemap file you can also choose to set other parameters, such as the modification date by choosing whether to use a default date or to pull it from the server.
You can also set a priority to URLs. This is also an optional parameter that you can include in XML sitemaps, whether you decide to create it manually or by using an automatic generator.
The priority is indicated with a value ranging from 0.0 up to 1.0. By default, a higher priority is assigned to the starting pages, such as the home page, and gradually decreasing priority, based on the depth of the page, basically taking into account the distance from the homepage.
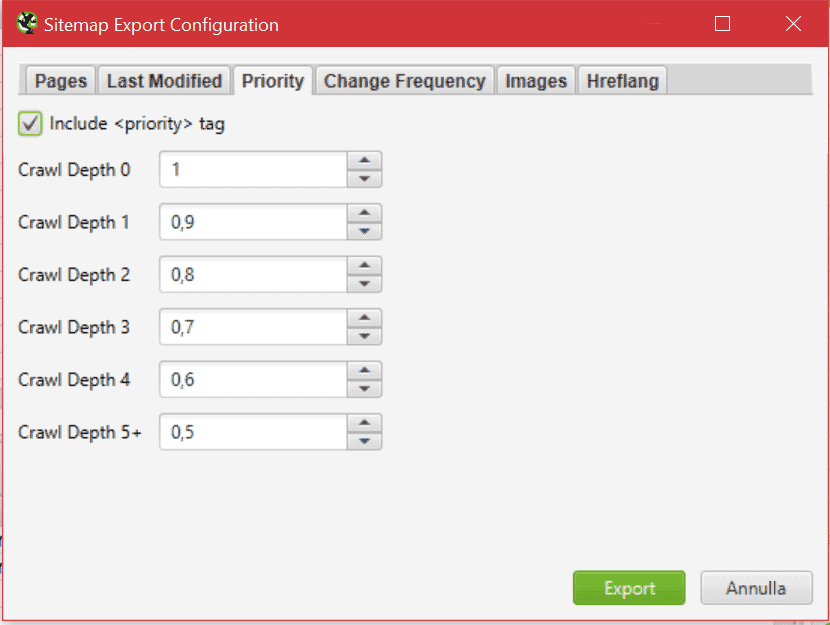
You can also change these values or choose not to include priority, just uncheck the box next to the Include priority tag.
Therefore, priority allows you to signal to search engines the pages that you consider to be the most important ones on your site. However, this parameter does not have an impact on ranking, at least not directly.
Priority might be taken into account by search engines when choosing to select one page over another, but only if they are pages of the same site. So if you choose to use this parameter, do it with some reasoning.
For example, it would not make sense to assign top priority to all pages, because it would be like not assigning it at all. What you can do is to take advantage of the parameter for those contents that you consider really important.
When you are satisfied with the settings you have selected you can click on Export to export the file.
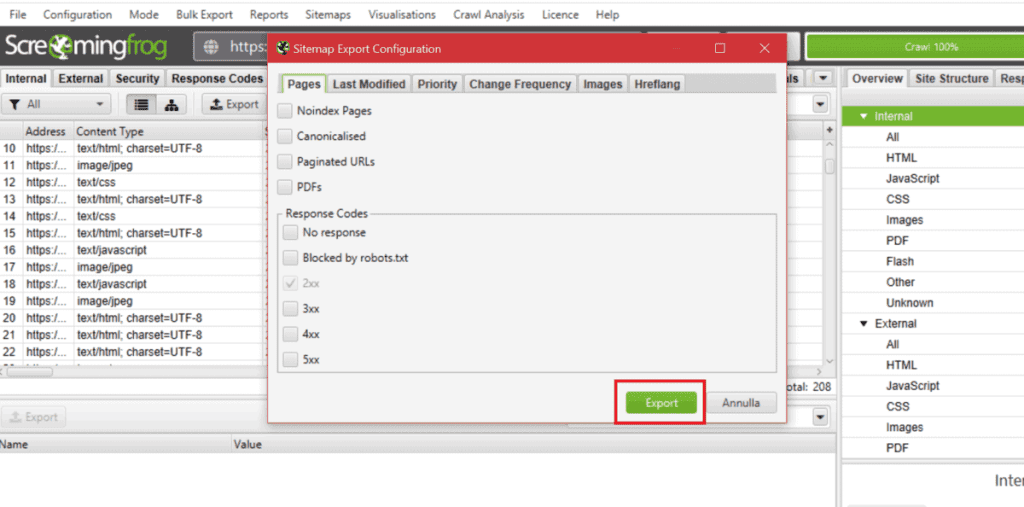
A window will appear allowing you to choose where to save the file on your computer, click on Save and you will have created your sitemap in XML format.
The content of your XML sitemap will be similar to the one in this example:
<?xml version="1.0" encoding="UTF-8"?>
 <urlset xmlns="http://www.sitemaps.org/schemas/sitemap/0.9"
    <url>
       <loc>http://www.mywebsite.com/</loc>
       <lastmod>2021-02-04</lastmod>
       <priority>1.0</priority>
    </url>
    <url>
       <loc>http://www.mywebsite.com/page1.html</loc>
       <lastmod>2021-02-04</lastmod>
       <priority>0.5</priority>
    </url>
 </urlset>
Now all you have to do is upload the map to your site and submit it to search engines. I’ll explain how to do that further down in this article. Now let’s see, instead, how to create a map with a text file.
Create a sitemap manually
The sitemap of your site can be a simple text file. In this case, you just have to insert the URLs of the pages of your site, one address for each line.
In the text file, compared to the XML sitemap, there will be less information. In this case, as a matter of fact, what you will communicate to the crawler will be only a list of the addresses of the contents of your site.
In order to create a sitemap with a text file, it is enough to simply insert the URLs, but you have to follow some precautions so that the file is readable.
In the file that you are going to create you will have to insert only the list of all the URLs that you want to include, without any other information. The addresses you enter must be complete and must be in this format: http://www.samplesite.com/ or https://www.samplesite.com/
Don’t forget to put http / https before the address and remember to only enter one version, even if your site has both http and https versions of URLs.
The file you create must not exceed 50 MB and you can insert a maximum of 50 thousand URLs, if you need to insert more you will have to create more than one file. If you need to create more than one file you will have to group them into a single file, the sitemap index.
When you are going to submit your sitemap to the search engines you only need to send the index file.
If instead, you need to reduce the size you can compress the text file before uploading it, in order to keep it within the limit of 50 MB. You can use gzip for compression.
After completing your list you will need to save the file using UTF-8 encoding. You can create the file with Windows Notepad and choose the encoding to use from the options when saving the file as you see in this screenshot.

The filename is your choice, it can also be simply sitemap.txt. After creating the file you will need to upload it to your site to allow search engines to access it, let’s see how to do that.
Where to insert the sitemap
Now that you have created your sitemap, it’s time to upload it to the server that hosts your site. You could upload it directly in the main folder, however, the important thing is that it is in a folder of a higher level than the URLs that you have inserted in it.
To upload the file on your site you can use an FTP client like Filezilla that allows you to upload files on your PC. If you don’t know how to use it you can check our Filezilla that allows you to upload files on your PC. If you don’t know how to use it you can check our Filezilla guide to know how to connect to your site and upload files.
Alternatively, you can also use your hosting panel’s file manager to upload the file. If you have a plan with SupportHost such as WordPress hosting or a dedicated server you can use the cPanel file manager.
How to create a sitemap with WordPress
If you have a site with WordPress and you don’t want to create your sitemap using third party programs you can utilize a plugin. In this way, you can easily create a sitemap by having it created directly by the plugin. In the end, all you have to do is communicate its location to search engines.
Creating sitemaps with Yoast SEO
One of the plugins you can use is Yoast SEO, surely you have already heard about it or maybe you are already using it to improve the ranking of your articles.
But you might not know that Yoast SEO also allows you to create a sitemap. Just install the plugin, activate it and then open the Features tab. From here you’ll need to make sure that the XML Sitemaps setting is ON as you see in this screenshot:
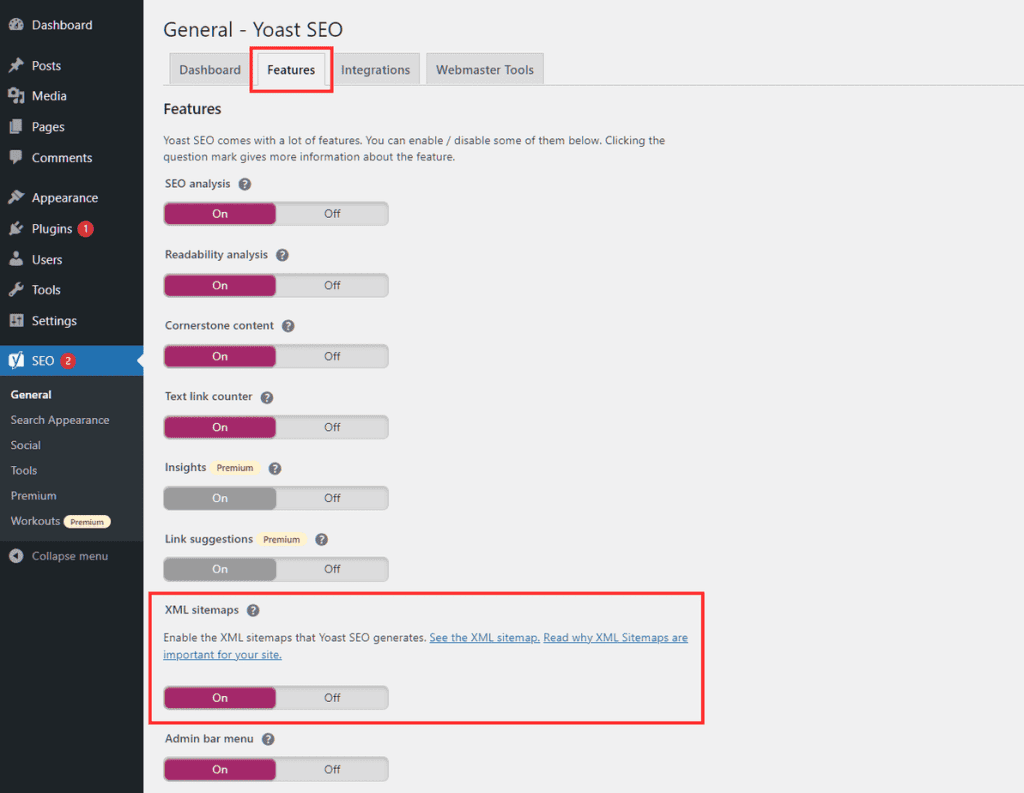
By clicking on the icon with the question mark and then on “View XML sitemap” you can access the sitemap of your site.
In this way, you will also know the URL of your sitemap and you can make a note of it and send it to search engines.
Create sitemap with Rank Math SEO
Another plugin that you can use to create your sitemap is Rank Math SEO, again this is a plugin designed to optimize the content of your site for search engines.
After installing and activating the plugin just click on the dashboard to access all the options. The one we are interested in is Sitemap, you can activate it and manage its options by clicking on Settings.
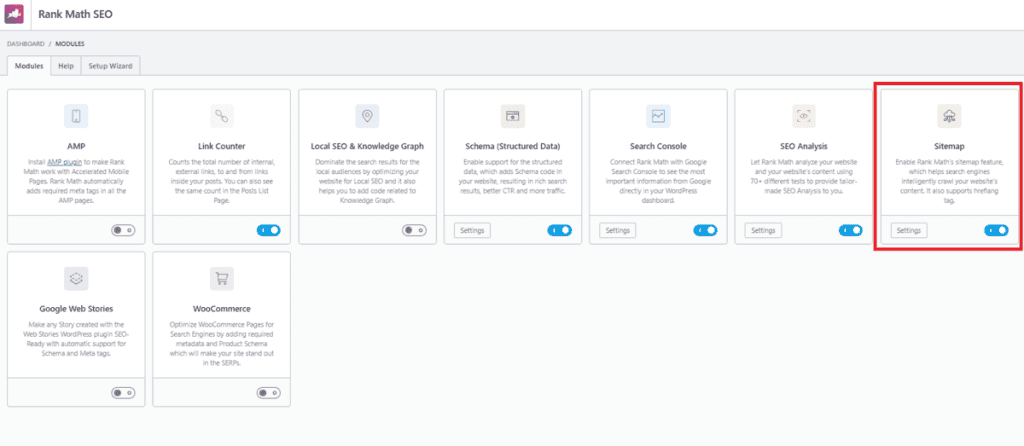
From settings you can choose if you want to include images, moreover here you can find also the map URL.
Now that you have the address of your map let’s see how to send it to make it available to crawlers. The methods I will describe are valid regardless of how you created the sitemap.
How to submit the sitemap
At this point, you have to make sure that the sitemap of your site is sent to search engines.
Generally speaking, search engines are able to locate the sitemap by themselves, but as we also explained in our article on how to perform an SEO analysis of the site, it is always better to report the map.
You can proceed in different ways, let’s see them one by one.
Submit the sitemap through search engine tools
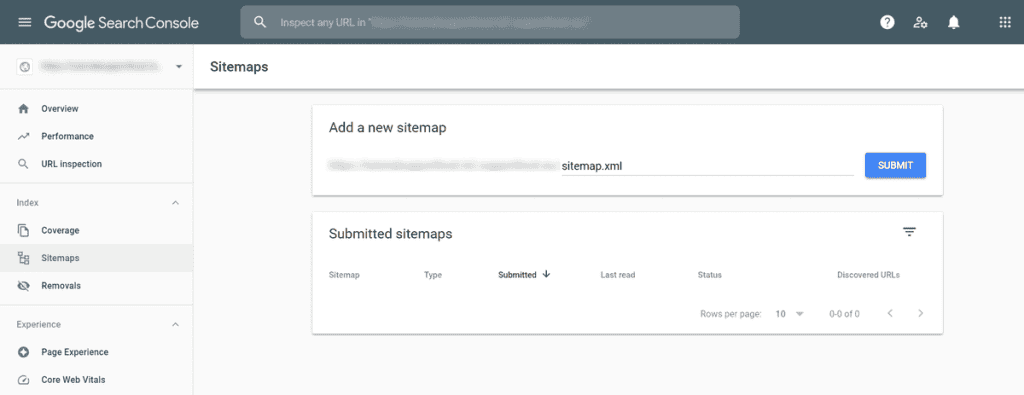
The first one is to use the tools made available by search engines. For Google, you can use Search Console to report the location of the file directly from there.
If it’s your first time accessing Google Search Console, the first thing you’ll need to do is to add and verify the ownership of the site. After that from the sitemap report you will have to enter the URL corresponding to your sitemap and submit it as you see in the screenshot below.
On Bing, you will have to log in to Webmaster Tools. In this case, if you have already verified the site with Search Console, you don’t have to verify it again, but you can proceed quickly.
Access Bing Webmaster Tools and click on add site. Among the methods to add the site, you will see “Import sites from Google Search Console” and you will have to click on Import.
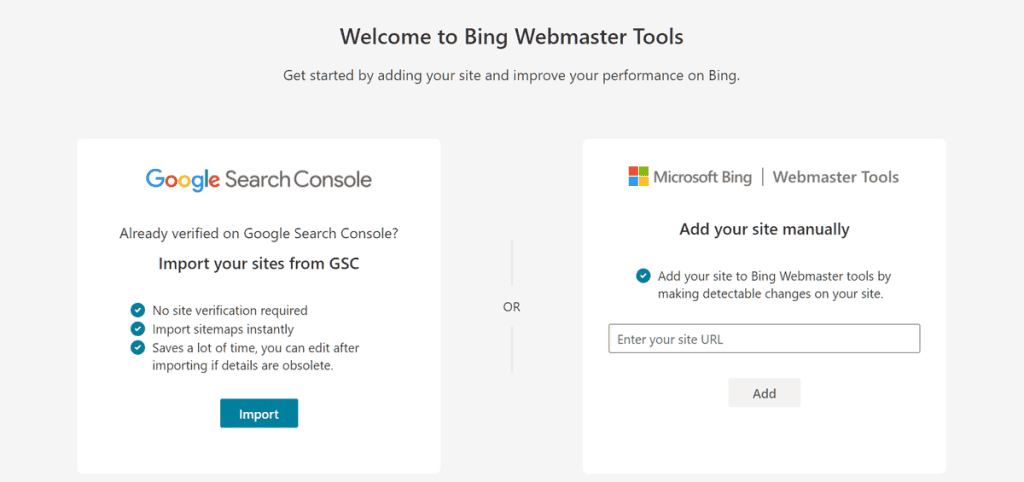
The next screen will show you the data that will be imported, click Continue to proceed. Sign in with your Google account that you registered with Search Console and allow Bing access.
At this point, you will see the list of sites added to Search Console and you can choose whether to import all of them or just some. Click on Import to confirm.
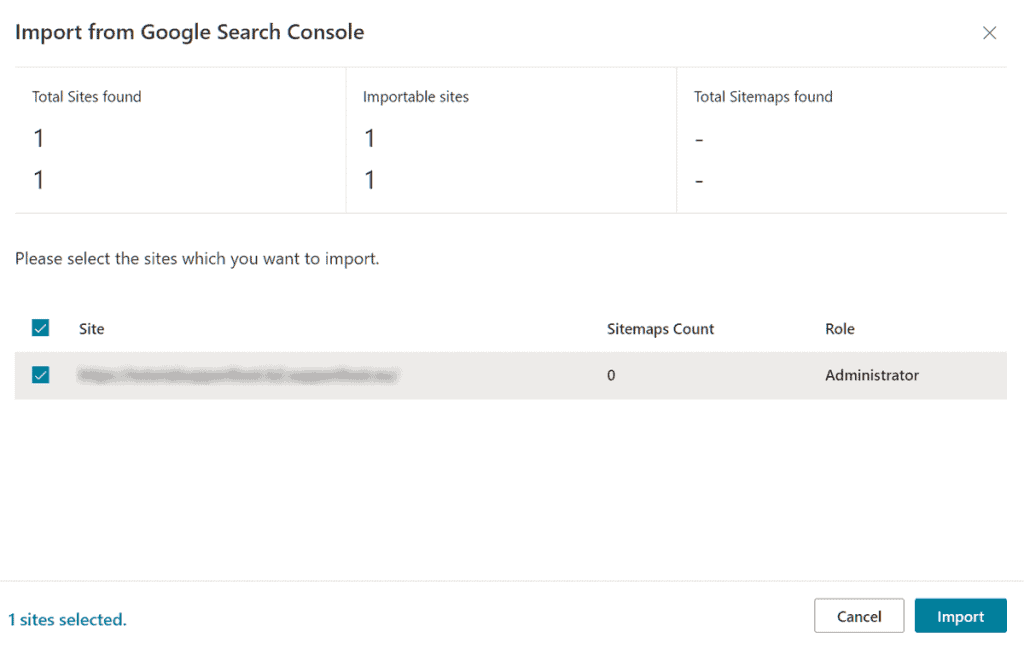
Finally, a message will notify you that the site has been added to your profile.

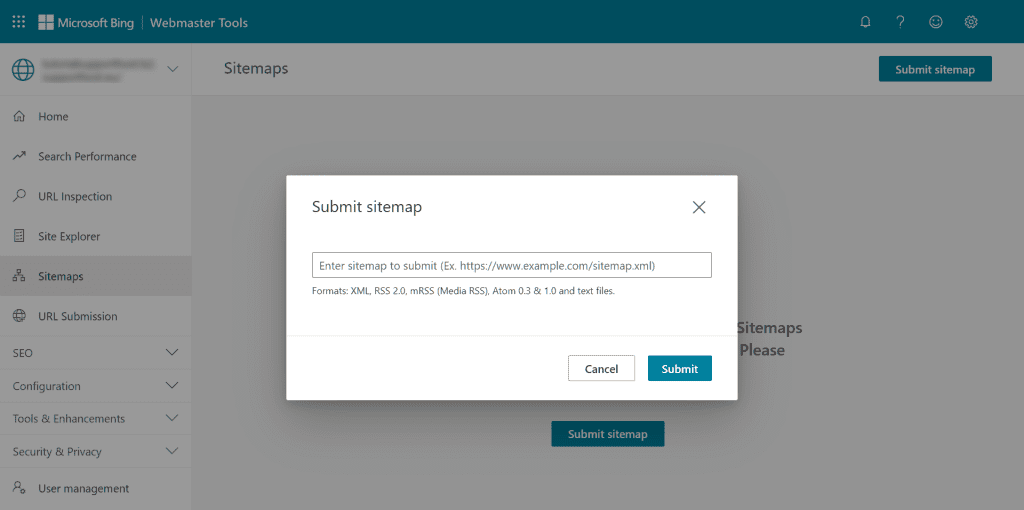
Now that you have added the site you can see on the left side the item related to Site Maps. From this section you can send the sitemap entering the address and clicking on Send, as you see here:
Insert the sitemap in the robots.txt file
Alternatively, you can insert the sitemap address into your site’s robots.txt file.You just need to insert it as follows:
Sitemap: http://mywebsite.com/sitemap.xmlThe point of the file where you insert this line is not significant, so you can just write it where you want. If you have created more than one sitemap file, you have to insert them all, one per line, in the same format.
Send sitemap with an HTTP request
Another possible way to send the sitemap and make it available to search engines is to use HTTP requests. Through the HTTP protocol, it is in fact possible to send and receive data.
All you have to do in this case is to send a ping, that is a request to the search engine. For example, with Google you just need to send a GET request of this type:
http://www.google.com/ping?sitemap=http://mywebsite.com/sitemap.xmlYou have to insert instead of http://mywebsite.com/sitemap.xml the path that corresponds to the sitemap of your site. Of course, this method is also valid with other search engines, you just have to replace in the address section, the search engine to which you want to send the sitemap.
If the request is successful you’ll receive an HTTP 200 code, but if you see some error in the answer you’ll have to try to send the ping again.
Check that you have submitted the sitemap correctly
Remember that search engines go to recheck the sitemap every time they crawl.
In case you need to update the sitemap or change it, it is useful to inform the search engine that there have been changes, you can do this through an HTTP request.
For example, it could be useful to submit the new sitemap if you decided to change the WordPress domain. It is not, however, necessary to send the request several times if you have not updated the map.
If you want to verify that you have managed to submit the sitemap correctly, you can do so by accessing the tools of the individual search engines. On Google, you just have to check the Sitemap Report, under Status a value will appear according to the sitemap condition.
If the submission was completed without problems and there are no errors in the sitemap, at the item Status you will see written Success, as in this screenshot:
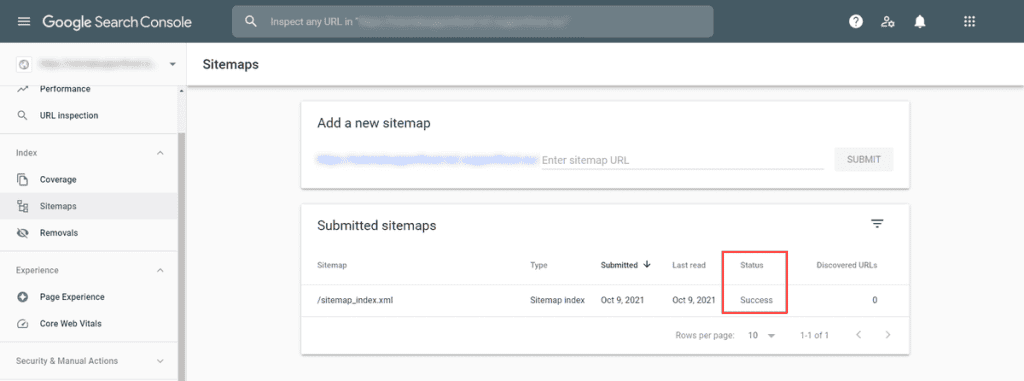
In the report, you can also check the number of URLs present in it.
In some cases, it may happen that there are problems during the submission or in the structure of the file itself. You may then see the status code Couldn’t fetch in case there are problems in the file you submitted.
Unable to recover is another item that should attract your attention, in this case, you should check what went wrong. You can always do this with the tools provided by the Search Console through URL verification.
If you haven’t submitted the file yet, you will be warned that “the sitemap is not present in the report“. If this is the case, you can proceed with the submission following one of the ways we have seen before.
Delete the sitemap of the site
If necessary, you can delete the sitemap you sent to search engines. Through the Google Search Console you just have to select the one you sent, click on the icon with the three dots and then on Remove Sitemap as you see here:
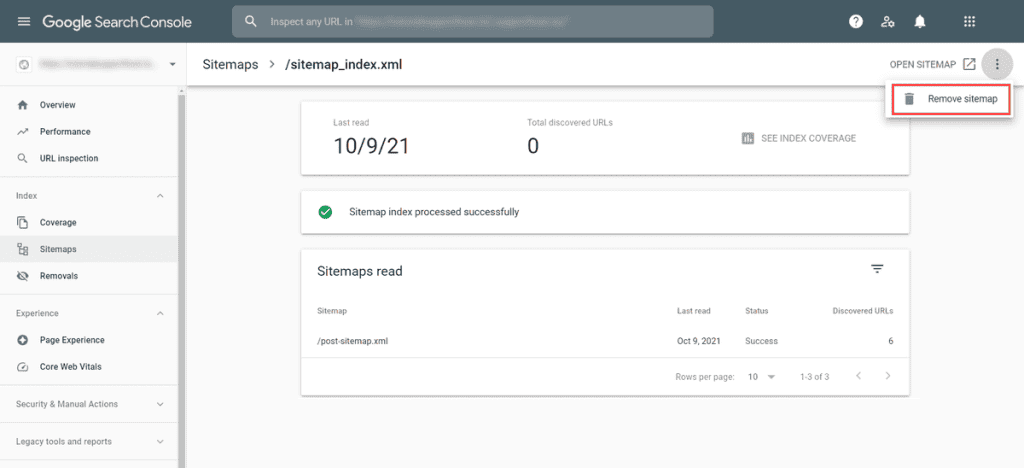
In this way, however, the crawlers will still have access to the sitemap, if you want them to be blocked from accessing it you can insert a command in the robots.txt file that prevents access to search engines. Otherwise, you can delete the file completely from the site.
Common errors in sitemaps
As we mentioned earlier there are cases where some errors prevent crawlers from accessing the sitemap correctly.
Error in URLs
Among the most common errors in the creation of sitemaps, you might happen to insert URLs that the search engine can’t access. Or in other cases, the address you entered is involved in a series of redirects and crawlers can’t reach the page you entered.
To solve this problem you should use permanent redirects for your pages.
In still other cases, you may have formally entered the wrong addresses, i.e. you may have entered incomplete links. Be sure to check the URLs to see what the problem is.
When we talked about where to put the map, we saw that it’s best to upload the file to the root directory of your site. This way, you can include within it all the addresses that are in the lower levels than the location of the map itself.
If you try to include an address that is at a higher level than the sitemap, the crawler will not be able to follow that address and it will be invalid.
Errors in the file
We have seen that the sitemap files can be compressed before being uploaded, but if the compression is not done correctly, the file might be unreadable. In these cases, the only thing to do is to repeat the compression and reload the file, and then communicate the change to the search engines through a new submission.
Other possible errors can involve the structure of the XML file, for example, the presence of repeated tags, or the absence of necessary tags. Also, pay attention to the XML Sitemap header and the entire structure if you wrote it manually.
Another thing that can happen is the insertion of the wrong quotes, in the file can be present both double and single quotes. However, make sure that they are of this type ‘ or ” instead of curves (“) or they may generate errors.
Additionally, in the XML file to insert some symbols such as & you have to use escape notation. So, if there are special characters, in the URLs you insert in the sitemap, you have to replace them with the corresponding escape code. For example & becomes & and so on.
If you have used a program to generate URLs you should not have this problem because the conversion is done automatically. You should only pay attention to this rule if you entered the addresses manually.
Other types of sitemaps
Your site may have multiple types of sitemaps, one for the textual content of your site, and separate maps for the multimedia content. It is not always necessary to create a dedicated map for images or videos, but it can be useful if you have a lot of multimedia content on your site. Let’s take a look at these other types of sitemaps one by one.
Sitemap of images
There are cases when you might need to create a separate sitemap for your site for images. Along with the other strategies you can put in place to optimize images for SEO, the sitemap can also come in handy, especially if your site has a lot of images.
In an image sitemap, some necessary information is included, namely the URL of the image, and other optional additional information. In the same way, as we saw with the sitemap that links to pages on the site where you could enter additional parameters such as priority.
For images, on the other hand, there are specific tags that you can use to insert the caption, image title, license, geolocation, and so on.
Video sitemaps
You can use an additional sitemap extension to create a separate map where you can list the video assets on your site.
Again, in addition to the mandatory tags where you define the location of the video, you will also need to include a thumbnail of the video, i.e. thumbnail, video title and description. Other optional parameters that you can specify are the duration, the number of views, the date it was published and any restrictions for certain countries or for SafeSearch in the case of explicit content.
Sitemap for Google News
If your site appears in Google News, Google recommends that you use a sitemap to facilitate page crawling.
As it happens also for the other cases, having a sitemap doesn’t guarantee you a better result in terms of positioning, but its presence can help the search engine to locate your content more easily.
A sitemap for Google News must contain the date of publication, the title and the language of the article.
Conclusion
In this article, Sitemap: the definitive guide, we have seen what the sitemap is for, and why its presence on a website is important for search engines. We have seen in which sites it should not be missing and in which cases it is necessary to have specific sitemaps for images and other content.
In the guide, we have also focused on how to create a sitemap and we have seen the different methods we have available to create it automatically on WordPress and other CMS or using third-party programs.
Were you able to create your sitemap or is there something that isn’t clear yet? Let me know in the comments below.


Leave a Reply