

When someone opens your site in a browser, the first thing they see isn’t your homepage. It’s a tiny icon in the tab bar. That’s your WordPress favicon, and if you haven’t set one up yet, WordPress is currently showing its own logo there instead of yours.
It’s a small thing, but it matters. A site with a custom favicon looks more finished. It also helps visitors find your tab quickly when they have a dozen things open. And when someone bookmarks your site or saves it as a shortcut on their phone, that icon is what shows up.
Below, you’ll learn what a favicon is, how to make one if you don’t have one, and five different ways to add or change it in WordPress.
Table of Contents
What Is a Favicon?
A favicon is the small square image that appears next to your page title in a browser tab. You’ll also see it in browser bookmarks, in your browser’s history list, and on a mobile device’s home screen when someone saves a shortcut to your site.

WordPress refers to it as a Site Icon in the dashboard. The terms are used interchangeably, and they mean the same thing.
The recommended size is 512 x 512 pixels at a minimum, and the image should be perfectly square. PNG is the best format to use since it supports transparent backgrounds and holds up well at small sizes. JPG, ICO, and GIF are also accepted by WordPress, but PNG is the safe default for most situations.
Creating a Favicon Before You Upload
If you already have a logo, you may be able to use it directly. The main thing to check is whether it’s still readable when it’s small. A logo with fine text or a lot of detail can become hard to make out at the size of a browser tab. In that case, it’s worth cropping it down to just the icon portion or using a simplified version.
If you don’t have anything ready, Favicon.io is a free tool that’s worth using. You can upload an existing image, and it generates the favicon in both PNG and ICO format.
It also gives you a text-based option where you can type in one or two letters and choose a Google Font, which works well for a clean typographic result. Once you’ve downloaded the files, keep them somewhere accessible since you’ll be uploading them shortly.

Which Method Should You Use?
The right method depends on your theme and how comfortable you are working with your site files. Here’s a quick way to decide before reading through all five options.
If you’re using a classic theme, the WordPress customizer is the easiest starting point and works in a couple of minutes. If you’re on a block theme and the Customizer isn’t available in your dashboard, then using your General Settings or Full Site Editor is the equivalent option.
The plugin method is worth using if you want more control over how the favicon looks on different platforms, particularly mobile home screens and browser-specific formats.
The manual method is for users who are comfortable accessing their hosting account and working with site files. It takes a bit more effort, but it doesn’t require any ongoing plugin to stay active.
Method 1: Add a Favicon Using the WordPress Customizer
This is the built-in option for classic themes and the quickest way to get a favicon set up. No plugins required.
In your WordPress dashboard, go to Appearance > Customize. In the left panel, click on Site Identity. This section contains your site title, tagline, logo, and, further down the page, the Site Icon setting.
Scroll down until you see Site Icon, then click Select site icon. The media library will open. You can either pick an image you’ve already uploaded or click Upload Files to add one from your computer.

Once you’ve selected the image, click the Select button in the bottom right corner. If the image is larger than 512 x 512 pixels, WordPress will offer a cropping tool so you can frame it the way you want. Once the crop looks right, click Crop Image to confirm.
Back in the Customizer, click Publish to save the change. Open your site in a new tab and check the browser tab to confirm the favicon is showing. If nothing appears, try opening the site in a private or incognito window first, since your browser may be showing a cached version.

Note: If you’re using a block theme and Appearance > Customize doesn’t appear in your dashboard, skip ahead to Method 2.
Method 2: Add a Favicon Using the Full Site Editor
Block themes handle customization through the Full Site Editor rather than the Customizer (although some themes still give you access to the customizer as well). The process takes a few more clicks, but the end result is the same.
In your dashboard, go to Appearance > Editor. In the left panel, click Patterns. Scroll down, and you’ll see a list of template parts, including Header, Footer, and General. Click on the Header, then click the Header entry again to open it for editing.

Inside the editor, click the block inserter button (the + icon) and search for Logo. Or, if supported by your theme click on the block where the logo will be added and select Choose logo.
Add the block to your header layout and position it where you want it. With the block in place, click the upload icon inside it to open the media library, then select or upload your favicon image.

After choosing the image, look at the Block settings panel on the right side of the screen. You’ll see a toggle labeled Use as Site Icon. Turn that on. This is the step that sets the image as your favicon across the whole site, not just the header.

Once you’re finished, click Save in the top right corner. A confirmation prompt will appear, noting that this affects the entire site. Make sure the Icon checkbox is ticked, then click Save again to confirm.
Method 3: Add a Favicon Using General Settings
On some WordPress setups, particularly newer installations, the site icon option shows up in Settings > General rather than the Customizer. If you don’t see the Customizer option, this is worth checking first.
In your WordPress dashboard, go to Settings > General and scroll down the page until you see the Site Icon section. Click Choose a Site Icon and the media library will open. You can either select an image you’ve already uploaded or click Upload Files to add one from your computer.

Once you’ve selected your image, click Select. If the image isn’t perfectly square, WordPress will show a cropping tool so you can frame it correctly before confirming. Once the crop looks right, click Crop Image.

After that, scroll to the bottom of the General Settings page and click Save Changes to apply the update.
The favicon should be visible right away. If the old icon is still showing, it’s almost always a caching issue rather than anything going wrong with the upload. Try opening your site in a private window to confirm the new icon is live.
Method 4: Add a Favicon Using a Plugin
If you want the favicon to render correctly across a wider range of devices and browsers, the Favicon by RealFaviconGenerator plugin gives you options that the built-in WordPress tools don’t.
The main advantage is that it connects to the RealFaviconGenerator service, which lets you preview and adjust exactly how the icon looks on iOS, Android, Windows Metro tiles, and macOS Safari. If you’ve ever saved a website shortcut to an iPhone home screen and noticed the icon looked odd, this is the kind of thing that the plugin handles.
To install the plugin, go to Plugins > Add New in your dashboard, search for Favicon, and install and activate the Favicon by RealFaviconGenerator plugin.

Once it’s active, go to Appearance > Favicon in the left panel. Then, click Select from the Media Library to choose your image. The plugin recommends a square image at least 260 x 260 pixels, though larger is better. After selecting the image, click Generate favicon.
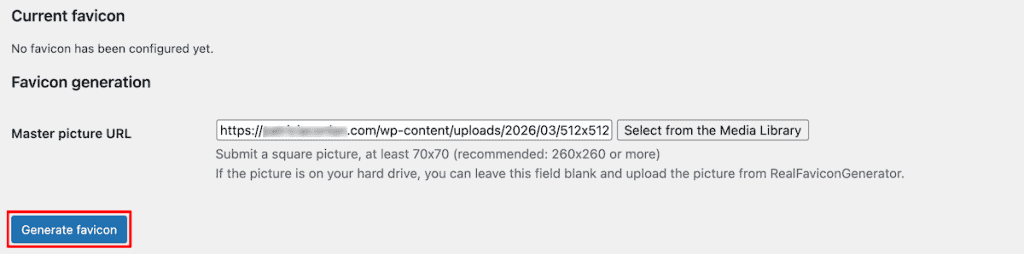
This sends you to the RealFaviconGenerator website, where you can customize how the favicon appears in each context. You can adjust background colors, preview the result on different devices, and set a version number if your site previously used a different favicon. The version number tells browsers to load the updated icon instead of showing a cached version to returning visitors.

Once everything looks right, click Generate your Favicons and HTML code. The plugin handles the rest, and your favicon will be live.
One important thing to keep in mind. The plugin needs to stay active for the favicon to continue working. If you deactivate it, the favicon will stop appearing.
Method 5: Add a Favicon Manually via cPanel
This method takes a bit more work, but it doesn’t rely on any plugin staying active after setup. If you’re comfortable logging into your hosting account and working with files, it’s a solid approach.
The process involves two parts. First, uploading the favicon files to your server, then adding a small piece of code to your site’s header.
Upload the Favicon Files
If you haven’t already, generate your favicon files at Favicon.io. Download the zip file and keep that browser tab open since you’ll need the HTML code it generates.
Now you need to upload the contents of that zip file to the root directory of your WordPress site. The root directory is typically the folder called public_html on your server.
The easiest way to do this is through your hosting account’s File Manager. Log in to cPanel and open File Manager from the dashboard. Then, navigate to the public_html folder, which is where your core WordPress files live.

Click Upload and select the favicon files from the zip you downloaded. Once they’re uploaded, you’ll see files like favicon.ico and favicon.png sitting alongside your WordPress folders.
If you prefer using FTP, connect to your server with an FTP client like FileZilla or Cyberduck, navigate to the root directory, and upload the files there. Either approach works fine.
Add the Code to Your Site Header
With the files uploaded, the next step is telling browsers where to find them. The cleanest way to do this without editing your theme files directly is to use a plugin like Code Snippets. It lets you add code to your site’s header safely, and crucially, the change stays active even if you update or switch your theme later.
Go to Plugins > Add New, search for Code Snippets, and install and activate the free version. Once it’s active, go to Snippets > Add New in your dashboard.
Now, go back to the Favicon.io tab and copy the HTML code it generated. It will contain several link tags referencing your favicon files.

Paste that code into the Snippet Content section.

Before saving, look through the code and find each href attribute. These will currently show just the filename on its own, like favicon.ico. Update each one to include the full URL to the file on your server, for example, https://yoursite.com/favicon.ico. Make sure to leave the quotation marks intact when making those edits.
Once that’s done, click Save Changes. Open your site in a browser and check the tab to confirm the favicon is showing correctly.
Favicon Not Showing? Here’s What to Check
It’s very common to upload a favicon and not see it appear straight away. In most cases, the favicon is there, you just can’t see it yet.
The first thing to try is opening your site in a private or incognito window. If the favicon shows up there, the issue is your browser cache. You can clear it through your browser settings under History or Privacy, depending on your browser.
If you’re using a caching plugin like WP Rocket or W3 Total Cache, clear the cache through the plugin’s settings or the admin toolbar. If your site runs through a CDN, log in to the CDN dashboard and purge the cache there as well.
If the favicon still isn’t showing after clearing caches, check the image itself. It should be square, in a supported format, and at least 512 x 512 pixels. WordPress may not accept an image that doesn’t meet the size or format requirements.
Some WordPress themes also have their own favicon setting that can override what’s set in WordPress. If you’ve tried everything else, check your active theme’s settings panel to see if there’s a separate site icon option there.
How to Change an Existing WordPress Favicon
Changing a favicon you’ve already set up follows the same steps as adding one for the first time. Go back to whichever method you used originally, upload a new image, and save the change.
The one thing to watch for is caching. Even after you’ve updated the favicon, browsers tend to hold onto the old one for a while. Opening your site in a private window is the quickest way to confirm the new icon is actually live, without waiting for your regular browser cache to refresh.
WordPress Favicon FAQs
What is the best format for a WordPress favicon?
PNG is the best choice for most situations. It supports transparent backgrounds, scales well, and is accepted by every major browser. JPG works too, but doesn’t support transparency. ICO is the traditional favicon format and is still widely used, but PNG is simpler to work with and gives you the same result.
What size should a WordPress favicon be?
WordPress recommends a square image of at least 512 x 512 pixels. It will automatically generate smaller versions from that file for use in browser tabs and bookmarks. If your image is smaller than 512 x 512, it may still work, but you risk it looking blurry on higher resolution screens.
Do favicons affect SEO?
Not directly. A favicon won’t improve your rankings on its own. That said, it does appear next to your site name in browser tabs and bookmarks, which makes your site easier to identify and return to. That kind of recognition can have a small indirect effect on engagement over time.
Why does my favicon look blurry?
The most common reason is that the original image is too small. Start with a square image of at least 512 x 512 pixels, and WordPress will handle the resizing. A blurry result usually means the source file was already low resolution before it was scaled down further.
Can I use a different favicon on different pages?
Not with the standard WordPress site icon setting, which applies the same favicon across your entire site. If you need page-specific favicons, you would need a custom code solution or a plugin that supports that level of control. For most sites, a single favicon across all pages is the right approach.
Closing Thoughts: How to Add a WordPress Favicon to Your Site
Adding a favicon to WordPress isn’t something that takes long, but it’s one of those finishing touches that makes a real difference to how polished your site looks. For most people, the Customizer method gets it done in a couple of minutes. Block theme users have the same option available through the Full Site Editor.
If you want the favicon to look right across mobile home screens and different browser formats, the RealFaviconGenerator plugin is worth the extra setup. And if you’d rather handle it without any ongoing plugin dependency, uploading the files through cPanel and adding the code with WPCode gives you full control.
Pick the method that fits how you work, get the favicon in place, and move on. It’s a small update, but a site that looks finished in every detail is a better reflection of the work you’ve put into it.
Now it’s your turn. Have you set up a favicon on your WordPress site? Which method worked best for you? Share your experience in the comments below.
Ready to build your WordPress site?
Try our service free for 14 days. No obligation, no credit card required.


