
Would you like to learn the basics of creating a website with Joomla and manage it? This article, Joomla tutorial: learn fast and create a website, contains everything you need to know about the functions of the CMS.
We’ll start with the installation and basic configuration before focusing on every aspect of the site. You’ll learn how to create content, manage media on your site, create new users, and install templates and extensions. In the end, you’ll have a complete overview of how to use Joomla on your own.
To get started, all you need is hosting with Joomla pre-installed, so you can get started right away. Otherwise, follow the article/guide on how to install Joomla if you need to proceed with the installation first.
Table of Contents

Joomla Tutorial: Installation
The first thing to do to start using Joomla is to begin with the installation. There are several methods for installing the CMS.
First, you need to choose whether to:
- Install Joomla locally on your computer.
- Choose a hosting service.
In the second scenario, depending on the service you choose, you may have the CMS already installed and ready to use.
Bonus: With our hosting plans for Joomla, you always have the domain included, even upon renewal which also includes fixed prices and automatic backups. You can activate a 14-day free trial right away.
The other methods involve proceeding with manual installation or using an auto-installer.
We’ve covered all of these methods in the guide How to install Joomla, available on our blog.
When it’s time to update to the new version, you can follow all the steps in the Joomla update guide.
Joomla Manual: Accessing the Back End
In this step-by-step Joomla guide, you will learn how to use the CMS in practice. We will use the latest version of Joomla (Joomla 4.2.4.) available at the time when this guide was written.
Update: The latest stable version of Joomla is 4.3.2. The updates have resolved some bugs, but the management remains the same.
After installing Joomla, you can access the back end of your site, which is the administration panel.
How do you do it?
Once you’ve completed the installation, you will be shown the address to access the administration area. In any case, to log in to the back end, simply log on to:
https://nameofsite.com/administrator/Just replace “nameofsite.com” with the domain you chose during the installation process.
You will be automatically directed to a page like this, and all you need to do is enter your login information.

Editing Joomla’s General Settings and Language
One of the first tasks we’ll show you in this Joomla guide is how to modify the site’s basic settings.
Typically, these basic configurations are set during the installation phase, but you may need to make changes.
After logging into the back end, you can click on “Global Configuration” under the “System” section of the dashboard, as shown here:

Global configurations take you to the “Site” tab, as shown here:

Through the Site tab, you can do various things, the most important ones are listed below:
- Change the site’s name.
- Set the site to maintenance mode, making it inaccessible to visitors (the “Site offline” shown in the screenshot above).
- Change the default editor (it’s TinyMCE by default).
- Add the site’s meta description.
- Modify URL structure settings (SEO-friendly URLs are already enabled by default).
For URL structure and other tips, you can refer to our guide on how to optimize Joomla for SEO.
Through the “Server” tab, you can access server settings. From here, you can enable Gzip compression or modify the time zone settings.

From the “Permissions” tab, you can view settings for user groups. If you’re not sure how to modify them, it’s suggested to leave the default settings.
Changing the Site Language
If you want to change the language of your Joomla installation, simply open the System section and then click on “Languages” in the Manage column, as shown here:

From this area, you can see the complete list of languages installed on the site and add a new language by clicking on the Install Languages button at the top.

Now, all that’s left is to search for the language you want to install and click the Install button:

By doing this, you will have installed a new language package. Let’s go back to the previous section, System > Manage. In the list, you will see a star in the Default column next to the default language of your Joomla site.
From here, you can set a new language as the default language. Here’s an example where we’ve set Italian as the default language for Joomla:

Note: The settings we’ve just seen pertain to the site’s default language. Each individual user can change their language (this change will only apply to that user’s back end and not the entire site).
To change the language for a single user, you need to go into the profile settings, as described in the next section.
Changing Language for Individual Users
As mentioned, each user can choose their preferred language.
To do this, simply go to User menu > Edit Account:

Open the Basic Settings tab and set the back-end and front-end language from their respective dropdown menus, then click Save.

Changing Language for the Administrator
In addition to changing settings for individual users’ languages, we can also modify those for the site administrator.
Change the dropdown menu option from Site to Administrator and set the default language from the list, as shown here:

Joomla Tutorial: Creating Pages, Articles, and Categories
In the Joomla ecosystem, the content of our site, such as pages and articles, can be managed from a single section of the administration panel: articles.
This feature sets Joomla apart from CMSs like WordPress, where the management of pages and articles is separate. If you’re switching from Joomla to WordPress, you’ll need to get used to this change in how content is managed.
The process of creating a page or an article with Joomla is identical. In this chapter of the Joomla guide, we’ll learn how to create pages that we will then link to the site’s menu in the following sections.
Creating a Page or an Article
To access the management of pages and articles, simply click on Content > Articles.
If your section is empty, you will see a screen with the message “No articles have been created yet” (as shown below). In this case, to add a new element, click on the New button at the top.

The creation of pages and articles is structured in three sections:
- Title
- Main tabs (content, where we see the editor, images, options, publication, configuration, and permissions)
- Publishing options in the right sidebar.

First, we have the “Title” bar, which is mandatory and allows us to choose the title for the page or article.
The central section of the editor allows us to define the content and options and consists of 6 tabs:
- Content
- Images and links
- Options
- Publications
- Edit screen configuration
- Permissions
By default, the Content tab is set to open. This allows us to create the actual page.
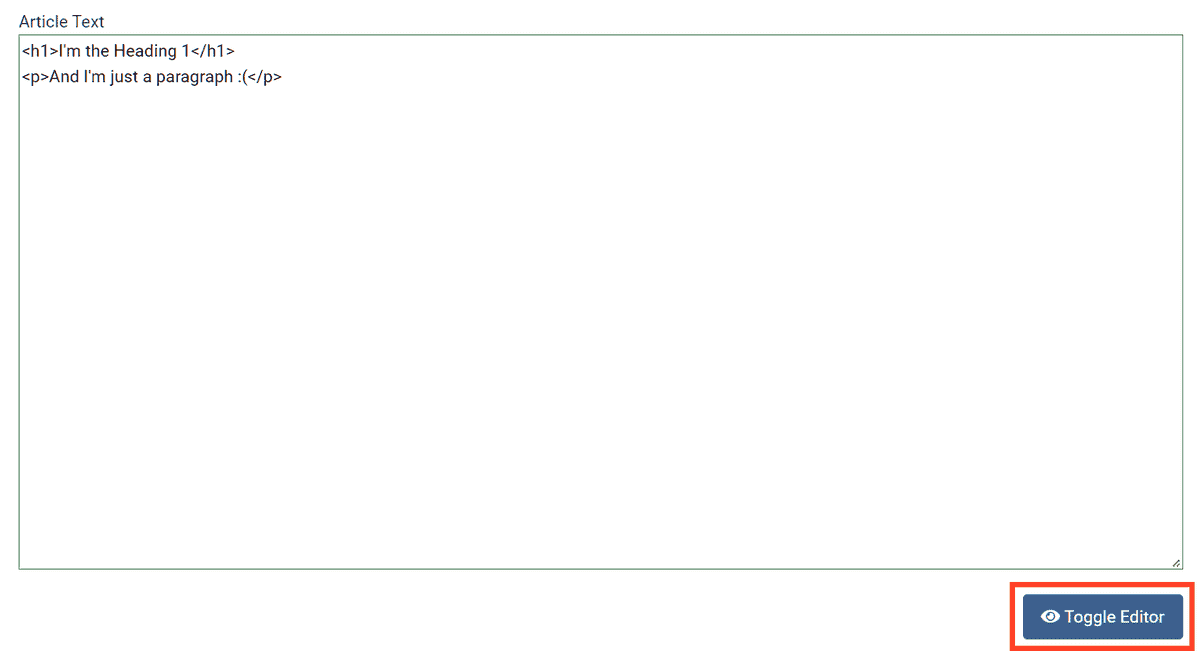
Through this section, we can insert the page’s content and format it using the WYSIWYG editor, which allows us to see the formatting in real-time.
We can deactivate the editor and display the HTML code by clicking on the Editor Yes/No button.
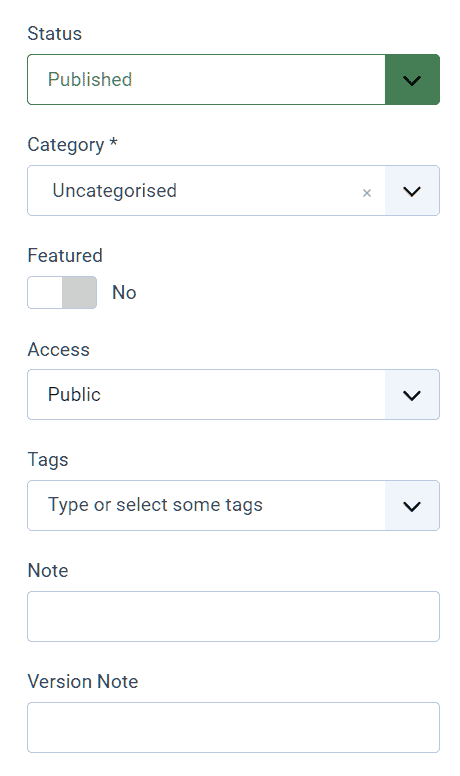
Through the options on the right, we can set the status of the page (published, unpublished, archived, or trashed), and the category, choose whether to highlight the page or article, change the visibility of the page, insert tags, and add notes.
From the central section, we can open all tabs to access advanced settings:
Content: This is the tab we just saw, with the editor for creating pages and articles.
Images and links: From this tab, we can set a featured image and change link settings.
Options: From here, we can modify the layout and settings related to titles, tags, categories, dates, authors, and the number of visits.
Publication: We can schedule the page’s publication for a specific period and set the meta description.
Edit screen configuration: Allows us to change display and publication options.
Permissions: From here, we can choose which users can edit the page.
Now that we understand how to do it, we can follow the same steps we just saw for creating the site’s pages and articles.
Now let’s move on to see how to create categories that allow us to group articles and pages.
Creating Categories
The pages and articles on our Joomla site can be grouped into categories. By default, until we create any categories, all content will be grouped in the default category as “Uncategorised.”
To create a category with Joomla, go to Content > Categories. Here, you will see the list of categories already present, and you can create a new one by clicking the New button, as shown here:

Creating a category is similar to creating pages. All you have to do is just enter a title and description, then click Save & Close to return to the list of categories.

In addition to categories, Joomla allows us to create subcategories as well.
Joomla lets us create both categories and subcategories.
Creating a subcategory is easy:
- Follow the same steps for creating a category.
- Set the Parent Category from the sidebar. This will serve as the parent for your subcategory.
In the following example, we’ve created a subcategory and set “Category 1” as the parent category.

How to Use Joomla: Creating the Main Menu
Now that we’ve seen how to create pages and categories for your site, let’s explore how to use Joomla to create the site’s menu.
Let’s use the side menu in the back end to go to Menu > Main Menu. The main menu of the site is automatically generated and contains the link to the homepage.

By clicking on one of the items in the list, we can edit it.

From here, you can change the title that will be displayed in the menu, the link to the page, and the link’s options. You can also create nested items using the Parent Item option.
Returning to the previous screen, you can add new items to the menu. To do this, click on New:

Now, you just need to fill in the required fields. For example, you can create a menu item that links to the About Us page, as shown in this example:

Here’s how the menu appears on the front end of the site after adding three items:

Managing Media with Joomla
When creating content for your Joomla site, you can insert media files into pages and articles. In this section of the Joomla guide, we’ll see how to manage media from the library and how to insert them into your content.
Joomla’s Media Library
In Joomla, files are organized in the media library, which you can access by going to Content > Media.
Here, you’ll find all the files you’ve uploaded, and you can manage and organize them.

One of Joomla’s features is the ability to organize media files into folders. You can navigate between folders using the tree on the left and create new folders by clicking on the Create New Folder button at the top, as shown in this screenshot:

By clicking the Upload button, you can upload new media files to the site.
Inserting Media into Articles
When creating an article, you can insert media files directly through the editor. To do this, click on Content > Media as shown here:

A modal window with the media library will open. Choose which file to insert if it’s already in the library. Alternatively, you can click Upload and upload the file directly from your computer.

Joomla Guide: Managing Users
With Joomla, as administrators, we can create accounts for new users who will have access to the site.
To access the list of all users, go to Registered Users > Manage. Here, you will see the list of registered users along with details about their registration date and last access.

Adding a New User
If you want to create a new user, click on the button at the top that says New as shown here:

In the tab that opens, you can enter the necessary information: name, username, password, and email (it’s important to enter a valid email).

Through the Assigned User Groups tab, you can manage the user’s permissions by choosing their group, such as Author, Editor, or Administrator.
You can read our tips for Joomla security for an in-depth description of the permissions assigned to each user.
After creating the account, the system will send an email to the specified address, which will contain the login link. The user who receives the email can then log in and change their password after the first login.
Deleting a User
Access the user list by going to Registered Users > Manage, then select one or more users from the list. Next, from the Actions menu at the top, click Delete as shown here:

You will be asked to confirm the action before deleting a user.
Managing Extensions with Joomla
Extensions in Joomla are additional components that allow you to activate new functions, such as creating contact forms, modifying the content editor, managing sliders, and more.
This section will focus on managing extensions.
Installing a New Extension
Adding an extension to Joomla is straightforward, and here are the steps to follow.
1. Click on System and then Extensions (under the Manage section).

2. This allows us to see the list of all the extensions present. In this case, to add a new one, use the Install Extensions button.

3. You will access the extension installation menu. From here, you can either upload extensions you’ve previously downloaded or install from a folder or URL. To search for the extension directly in the directory, click on the Install from Web tab.
4. Search for the extension you’re interested in, for example, ARK Editor, and click on it.

5. The extension’s tab will open with links to the directory and the developer’s website. From this section, we can install the components by clicking Install.

6. You will be taken back to the bottom of the page, where you will need to click Install again to confirm the installation.
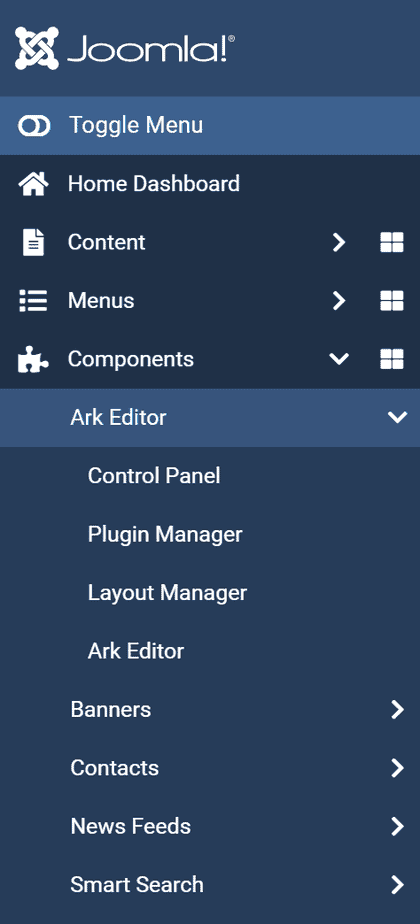
After installing an extension, you can access its configuration through the side panel by clicking on Components > Extension Name.
For example, after activating “Ark editor,” you will see the new item appear in this menu.
Uninstalling or Disabling Extensions
To uninstall Joomla extensions, follow these steps. Open the extensions section by going to System > Extensions. Select the extensions and then click Uninstall as shown here:

Alternatively, you can disable an extension without uninstalling it, making it easy for you to re-enable it later. To do this, select the ones you’re interested in and then click on Disable.

Default Joomla Components
With the installation of Joomla, we have access to integrated functions accessible from the Components menu.
Let’s see what these components are used for:
Banners: Allows us to create banners to display on the site’s front end. The module also allows us to track views for each banner.
Contacts: With this integrated function, we can easily create a contact form to place on the site.
Search engine: This module allows users to perform searches within the site.
News Feed: Allows us to manage RSS feeds.
Tags: Through this module, we can add tags to content for classification.
Managing Joomla Templates
You can modify the appearance of your site by installing new Joomla templates. These themes, also known as site templates, allow you to change the front-end look.
Note that the CMS also includes administrator templates, which allow you to change the appearance of the administration panel. To see the full list, go to System > Administrator Templates.

Let’s dive into the Joomla guide to see how to manage your website’s templates.
Accessing the List of Installed Templates
To view the list of templates, go to System > Site Templates.

The template management panel will open, and you can see the installed templates. If only the default template is there, which is called Cassiopeia, you will see a screen like this:

Installing a New Template
Installing a template in Joomla is similar to installing an extension.
Go to System > Extensions and then click Install Extensions following the same steps we saw earlier.

After that, you can upload the zip file in case of a premium template you purchased on a marketplace.
Modifying the Site Logo
Even the default template, Cassiopeia, can be customized with your logo. To do this, go to System > Site Templates and then click Styles. Click on the default style to edit it, as shown here:

With advanced settings, you can insert the logo, as shown in this example:
Conclusion
You now have a step-by-step guide on how to approach the creation and management of your website.
After going through various methods for installation in this article, Joomla tutorial: learn fast and create a website, we explored how to access the platform and modify general settings. We then delved into content management (articles, pages, categories, menus, and media) and users. It’s also important to know how to change the site’s appearance and add new functions, which is why we took a look at managing extensions and templates.
We’ve created a comprehensive guide to provide you with a solid foundation. Remember that you can always refer to the official Joomla 4 documentation if you have any specific doubts or questions.
Was this guide helpful? Would you like more information on a particular aspect of managing a Joomla site? Let us know in the comments below.
This article was last updated with additional details on June 12, 2023.
Ready to build your WordPress site?
Try our service free for 14 days. No obligation, no credit card required.


