
Joomla is a very flexible CMS that can be used to build basically any kind of website you desire.
But, one of the first steps to building your website is knowing how to login to Joomla. Once you login to Joomla, you’ll be taken to the admin area, which is where you’ll be able to customize and build your side, along with create and upload content.
Below, you’ll learn how to login to Joomla, how you can customize your login page, and some tips for troubleshooting any login issues you might experience.
Table of Contents
How to Login to Joomla
Once Joomla is installed, the admin area and URL will automatically be created. The standard URL is your website address followed by “/administrator”, so something like “https://yoursite.com/administrator”. You’ll need to replace “yoursite.com” with your website URL.
Then, all you need to do is enter your username and password and click the “Log in” button. Once you do that, you’ll be taken to the admin area of your website.

If adding “administrator” to the end of your site URL doesn’t take you to the login screen, then your login page might have been installed at a different location.
To find it, you’ll need to log in to your cPanel account. All Joomla hosting plans on SupportHost give you access to cPanel.
Then, in the backend of your dashboard, navigate to the “Software” section and click on the “Softaculous Apps Installer” app.

Next, click on the “Installations” button to bring up your list of active installations.

This will bring up a list of active installations. Locate the website you want to edit, then click on the “Pencil” icon next to the domain name.

This will take you to a screen that has all of the information about your website and installation. Towards the bottom, there is an “Info” section that will show you the “Admin URL”. You can click this link, and it’ll automatically take you to the Joomla login screen for your Joomla website.

After that, you can log in normally.
How to Customize the Joomla Login Page
Joomla doesn’t offer many login page customization options, but you can change the logo, background, and style to better match your brand.
Once you’re inside your Joomla admin panel, navigate to System > Templates > Administrator Template Styles.

After that, click on the style that’s currently active.

This brings you to a screen where you can adjust your login page style. You can change the color of the page by clicking the “Colour Settings” menu option. Here you can change the background, text, and link colors.

If you want to upload your company logo to the login page, then click the “Image Settings” menu option. Then, you can upload your logo as you would any other image.
There are a few different logo variations for different parts of the screen. The “Login Logo” is displayed in the middle of your login page. The “Brand Large” logo is displayed at the top left-hand corner of the login page. The “Brand Small” logo appears on admin pages when logged in on a mobile device.
How to Add Login to Website Navigation
One way to add a login link to your site is by adding it to your website navigation. That makes it easier for users to log in to your site instead of having to use the standard login URL.
To do this, click on the “Menus” drop-down, then click the “Plus” button next to the “Main Menu” option.

After that, give the login link a title and click the “Select” button.

Then, click on “Users” and select the “Login Form” option.

There are some additional options to customize the link including adding an image, description text, redirects, and where you want it displayed. Once you’re finished, make sure to click the “Save” button.
Now, when you visit your site you’ll see a login link in your website navigation. When you click it, it’ll take you to a login form.

Displaying a Login Form on Your Site
By default, the standard Joomla template and installation will include a login form that’s present on all of your website pages. In case this isn’t enabled, go to your main admin dashboard and click on “Modules”.

Next, click on the “Login Form” module.

On this screen, you can toggle the title on and off, choose where to display the login form, add text, add redirections after login, and decide which pages you want to display the form.

Here’s how the form looks on your site:

How to Reset Your Joomla Username or Password
If you’ve forgotten your password, then all you need to do is navigate to your website and click on any of the login links you’ve created.
Then, click the “Forgot your password” or “Forget your username” links.

Next, enter the email that’s associated with your account, and you’ll be emailed a link to change your username or password.

Note: you can’t reset your admin password from the main admin login URL. You’ll need to reset it using the steps below.
Another way to reset your password on your admin account is to use cPanel. To do this, you’ll need to log in to your cPanel account.
Then, in the backend of your dashboard, navigate to the “Software” section and click on the “Softaculous Apps Installer” app.
Next, click on the “Installations” button to bring up your list of active installations.
This will bring up a list of active installations. Locate the website you want to edit, then click on the “Pencil” icon next to the domain name.
This will take you to a screen that has all of the information about your website and installation. Towards the bottom, there is an “Admin Account” section.
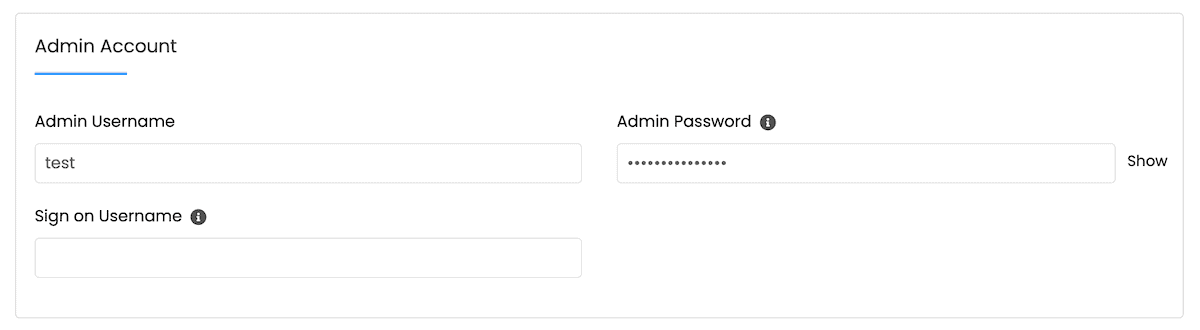
Here, you’ll need to add your current admin username and then enter a new password. After that, click “Save Installation Details” at the bottom of the screen. Now, you can log in using your new password.
How to Make Joomla Login More Secure
Once you’re comfortable logging into Joomla, we recommend taking a few steps to make your Joomla login more secure. This helps to protect your admin area from hackers and bots trying to force their way into your site.
Make Your Admin Panel URL More Secure
Since the default login URL for Joomla is the same across all sites, this makes it susceptible to a brute-force attack. Luckily, you can make your Joomla login URL nearly impossible to guess with the help of a Joomla extension.
The AdminExile extension will add a secret key to the end of your login URL. That way, the only way to reach your login URL is to know this secret key.
First, download the extension, then navigate to “System > Extensions” in your dashboard.

Then, click the “Install Extensions” button, and upload the extension. After that, open up the plugin settings and add your own key. This is what will display after the “/administrator” portion of your login URL.

Once you’re finished, change the “Status” to enabled, and your login URL will be changed to a more secure version like “yoursite.com/administrator/?adminexile”.
Your old login link without the secret key will no longer take you or any website traffic to the login page.
Enable Two-Factor/Multi-Factor Authentication
Another thing you can do is enable two-factor or multi-factor authentication. This makes it so you need to provide multiple forms of authentication to login to the backend of your website.
Yes, it’s an extra step for you. But it’s also an additional step for anyone trying to gain access to your site.
To enable two-factor authentication, navigate to “System > Plugins”.

Then, search for “Factor”. This brings up a list of all the two-factor authentication options available for your site. You can enable or disable the options that you want available for you and your users, whether that’s using an authentication app like Google Authenticator or sending a login code via email.

Login to Joomla FAQs
What is the default login link for Joomla?
To login to your Joomla website, navigate to “yourwebsite.com/administrator”, replacing “yoursite.com” with your website URL. On this page, there’s a login screen where you can enter the username and password you created during the installation process.
What is the default Joomla login?
When you install Joomla, the default username is “admin”. There is no default password, you’ll create a password during the installation process. If you can’t remember your username, then try out the “admin” username.
What is a Joomla admin page?
Once you login to Joomla, you’ll be taken to the Joomla admin panel or the backend of your site. This is where you can manage your content, customize your site, install plugins and extensions, and manage your users.
Closing Thoughts
Knowing how to login to Joomla is a crucial first step to building and managing your new Joomla website.
Whether you’re using the default administrator URL or using the built-in login module, or navigation menu login, you’ll have multuiple ways to login to your Joomla website.
You may also want to customize your admin login page to provide a better brand experience and improve the security of your login by hardening the login URL and enabling multi-factor authentication for your site logins.
Now over to you. Were you able to login to Joomla? Or did you make any customizations to your login page? Please share your thoughts and experience in the comments below.
Ready to build your WordPress site?
Try our service free for 14 days. No obligation, no credit card required.


