Are you currently experiencing a WordPress memory limit error? This error occurs when your site needs more memory to execute a task, and you’ve currently hit your PHP memory limit. The good news is this is a quick fix and doesn’t require heavy tech skills.
Keep reading to learn why the WordPress memory limit occurs, how to check your current limit and how you can increase WordPress memory limit using a few different methods.
Table of Contents
Understanding the WordPress Memory Limit
The WordPress memory limit has a few different names: WordPress PHP memory limit, PHP memory limit, or WordPress exhausted memory error. Your PHP memory limit sets the maximum amount of memory that any script can use on your website. If your website struggles to perform certain tasks, then you might be having issues with your PHP memory limit.
WordPress allocates a certain amount of memory to run different applications and programs on your site. If a specific WordPress script is executing and it requires more memory than what’s allocated, then you’ll get an error message. If your site runs out of memory, you’ll not only get an error message, but it’ll impact loading speeds and even make your site not load at all.
There are a lot of reasons this could happen, but here are some of the most common:
- You have a lot of large media files on your site, like images and videos
- You have a lot of inactive plugins installed
- You have plugins and themes that are very resource-heavy
- You’re experiencing a huge spike in website traffic
- You’re hitting the limits of your current hosting plan
- You’re running an outdated version of PHP on your server.
How to Check Memory Limit in WordPress
Before you learn how to change PHP memory limit WordPress, you’ll want to see what your current memory limit is. Often, a common cause of the memory limit error is because your site is set to a default value instead of the maximum memory limit available.
You can also do this after using one of the methods below to ensure you actually increased your memory limit.
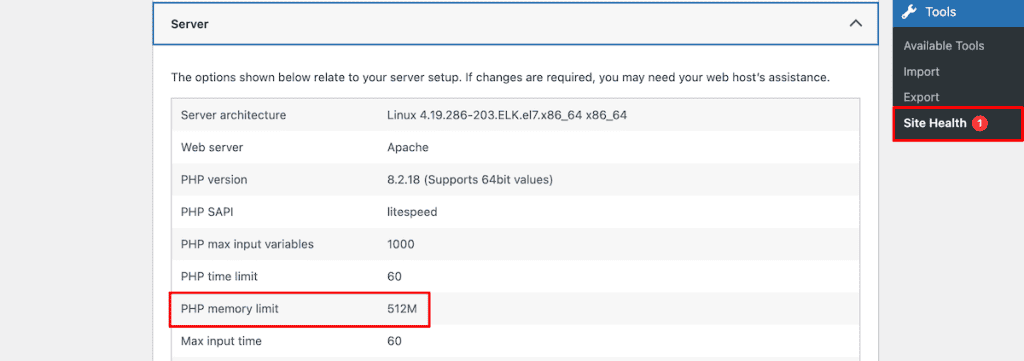
First, go to your WordPress dashboard and navigate to Tools > Site Health. Then, in the Info tab, click on the Server drop-down. Then, scroll through your server settings until you see the PHP memory limit.

How to Increase WordPress Memory Limit
There are several different ways you can increase your memory limit in WordPress. Depending on your hosting provider, you may not be able to use every method highlighted below. However, we’ll offer a few different methods, so hopefully, one of them works for your site.
1. Contact Your WordPress Hosting Provider to Increase WordPress Memory Limit
If you don’t want to mess around with any code or core website files, then the quickest and easiest way is to get in touch with your hosting provider.
Simply reach out to the support team at your current hosting platform and see if they can increase the memory limit. A lot of times, they can handle this for you, and you’ll be able to quickly resolve the error.
2. Edit the wp-config.php File to Increase WordPress Memory Limit
The first file we can modify to increase your WordPress memory limit is the wp-config.php file. This file is very important to your site and has settings that help WordPress connect to your database.
Since this is a core WordPress file, you might want to backup your website before making changes.
To modify this file, you’ll need to open up File Manager in your hosting dashboard or connect to your website via FTP using a tool like FileZilla or Cyberduck. Then, navigate to your public_html folder or root directory for your site and locate the wp_config.php file.
Then, see if there’s an existing line of code that says:
define('WP_MEMORY_LIMIT', '512M');If the line of code isn’t present, then you can add the code above the line that says “That’s all, stop editing! Happy blogging”. Make sure you change the 512M to your preferred memory limit.
After that, make sure you save the file and upload it back to your server. Now, when you visit your site, the memory limit error should be resolved.
3. Edit the .htaccess File to Increase WordPress Memory Limit
Another way to increase the WordPress memory limit is by editing your .htaccess file. Before you modify this file, it’s a good idea to back up your core WordPress files. That way, you can restore them to a previous version if you need to.
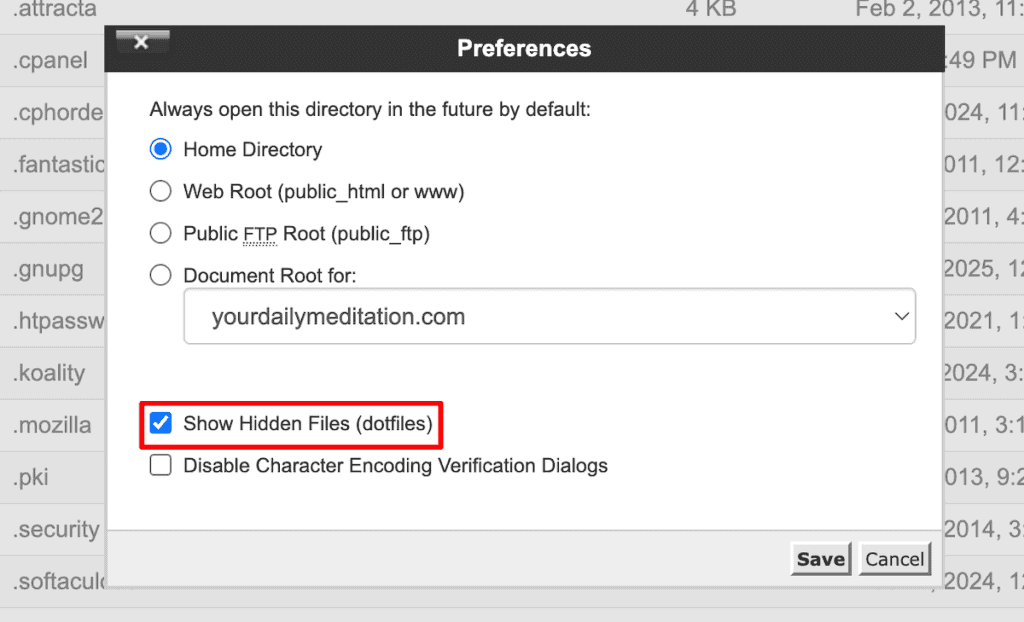
First, you might need to make this file visible by changing a setting in your hosting dashboard. To do this, navigate to File Manager > Settings, and then make sure the Show Hidden Files checkbox is checked.

Now, you’ll have the ability to edit your .htaccess file. You can edit this file via File Manager, or use a tool like FileZilla, which we highlighted above. Once you’ve opened your .htaccess file, you need to add the following line of code. If you don’t see the code present in the file, then you’ll need to add it.
If you’re adding the code to your .htaccess file, then make sure you add it before the line that says:
##END WordPress
php_value memory_limit 256MThis code will tell WordPress to increase the memory limit to 256MB. Make sure you change the memory limit to your own preferences. After that, make sure you save your changes and upload the file back to your server. Now, when you visit your site, you should see that the memory error has disappeared.
3. Check your php.ini File to Increase WordPress Memory Limit
The final method involves making changes to your php.ini file. We’ll be making the same changes that we did above. There are two ways to do this: the first is through using cPanel, and the second involves making direct changes to your php.ini file through a tool like FileZilla.
First, log in to cPanel and then search for MultiPHP INI Editor. It’s located in the software section of your dashboard.

After that, you can make changes to your file using two different methods: Basic mode or Editor mode. You can use either method. However, you only need to use one method to make the changes.
Use Basic Mode
First, go to the Select a location section and select your domain name from the drop-down. Then, all you need to do is adjust the memory_limit. In the example below, the memory limit is set at 512M. Then, click Apply to save your changes.
Here’s how it looks:

Use Editor Mode
Making changes to the file with editor mode will be similar.
First, select your domain from the drop-down. Then, all you need to do is adjust the memory_limit and click the Save button.
Changing the php.ini File Directly
The final way you can make changes to the php.ini file is by making changes to it directly instead of going through cPanel. If your web host doesn’t support cPanel, then this gives you a way to still make changes to the file directly.
Once again, if you jumped directly to this method, you’ll want to make sure you backup your core website files before moving forward.
To modify this file, you’ll need to connect to your server via a tool like FileZilla or Cyberduck, navigate to your public_html folder, and locate the php.ini file.
Then, all you have to do is modify the following line of code (make sure you add your preferred memory limit):
memory_limit = 256M
4. Upgrade Your WordPress Hosting for a Higher Memory Limit
If you increase the memory to the highest amount allowed by your host and you’re still experiencing an issue, then it might mean that you’ve outgrown your current hosting resources.
As your website grows, the number of files, scripts, the size of the database, and more also increases. Or, you have an expansive media library, or have large plugins and themes installed on your site.
Hosting providers allocate a certain amount of server resources per hosting plan. When you were first getting started online, you may have selected a hosting plan with fewer resources and limited RAM to save money. But, if you’ve tried the methods above, then you could be hitting against the maximum memory limits your hosting plan allows.
If you’re looking to upgrade your hosting, we recommend checking out our WordPress hosting plans here at SupportHost. They’re fast, high performing, and secure, and migrating is incredibly easy.
5. Use a WordPress Plugin to Increase WordPress Memory Limit
If you don’t feel comfortable modifying website files yourself, your hosting provider is unable to increase your memory limit, or your hosting provider doesn’t let you make changes to your core website files, then, you can use a WordPress plugin to increase your memory limit.
It’s also important to note that you need to keep this plugin active and installed for the memory limit increase to stay active. If you uninstall and delete the plugin, then your memory limit will revert back to the original setting.
There aren’t very many plugins that allow you to increase the WordPress memory limit. Most of the existing plugins have poor reviews and multiple users reporting the plugin didn’t actually increase their memory limit.
However, we did find a plugin called WP Tools Increase Maximum Limits, Repair, Server PHP Info, Javascript errors, File Permissions, Transients, Error Log. This plugin only has 2,000 active installations but nearly a five-star rating, and it’s been updated recently.
Some users have reported issues with the plugin years ago, but we tested the plugin on two different WordPress sites and it worked fine and helped to increase the memory limit.
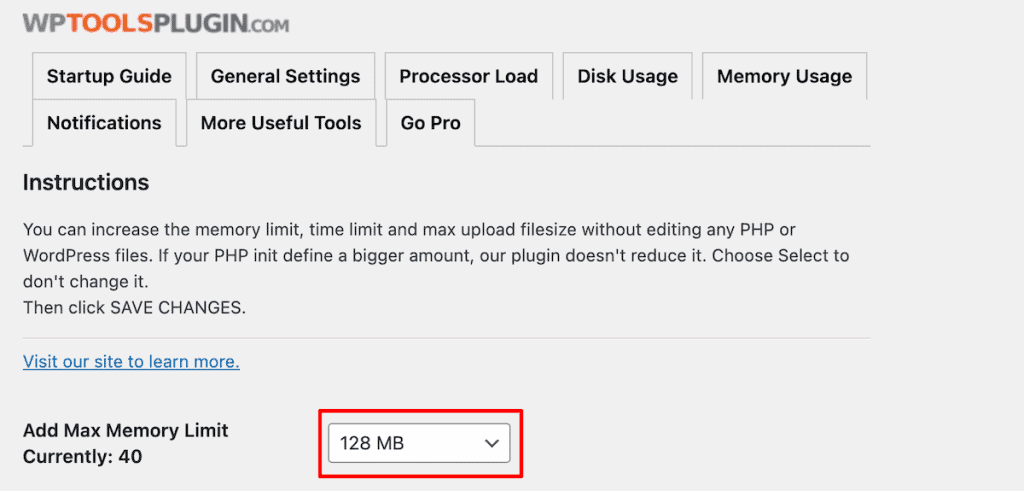
If you want to use this plugin, the first thing you need to do is install and activate it. After that, navigate to WP Tools > Settings and then click General Settings.
Here you can change the memory limit in the Add Max Memory Limit drop-down. Note that you’re limited to increasing the memory limit to 128MB on the free version. Once you’re happy with your changes, click Save Changes at the bottom of the screen.

Increase WordPress Memory Limit FAQs
What’s the max allowed memory size for WordPress?
The maximum memory limit for WordPress is usually 512MB. But this maximum can vary based on your hosting provider and WordPress settings. Most sites can function well within a 128MB to 256MB memory limit. If your site is more resource intensive, like an eCommerce store, then you might need to increase this limit to 512MB. Of course, you can always go higher as long as it’s supported by your hosting provider.
How do I increase the max memory limit in WordPress?
To increase the WordPress memory limit, you can edit the wp-config.php file, .htaccess file, or php.ini file. If you don’t want to modify any WordPress files directly, then you can contact your hosting provider.
Does WordPress have a storage limit?
WordPress doesn’t have a storage limit. Instead, this is limited by your hosting plan. However, your website storage isn’t the same thing as your PHP memory.
How to fix WordPress memory exhausted error?
To fix the memory exhaustion error, you need to increase the PHP memory limit. You can do this by adjusting the memory limit in your wp-config.php, .htaccess, and php.ini files. Alternatively, you can see if your hosting provider can increase the limit for you.
In Closing: How to to Increase WordPress Memory Limit
By now, you should have a better understanding of how you can increase your memory limit in WordPress. The method you choose depends on the level of server access you have and how comfortable you feel modifying core WordPress files.
Here’s an overview of the different methods you can use:
- See if your hosting provider can increase the memory limit for you
- Increase your memory limit by modifying your wp-config.php file
- Modify your .htaccess file to increase your memory limit
- Edit your php.ini file to increase your memory limit
- Use a WordPress plugin to increase your memory limit.
Hopefully, one of the methods above has helped you increase your WordPress memory limit and resolve any WordPress memory limit errors you’re experiencing.
Now it’s your turn. Which of the above solutions did you use to increase the memory limit on your site? Please share your experience in the comments below.


Leave a Reply