
Your WordPress cache plays a vital role in speeding up your site and improving the user experience. It helps your site load faster without overloading your server. However, outdated cache files can cause issues like broken layouts or old content appearing. In this guide, we’ll provide simple steps to clear WordPress cache so your site runs smoothly and displays the latest updates.
Table of Contents
What is the WordPress Cache?
The WordPress cache is a temporary storage system that saves copies of your website’s content to speed things up. According to Cloudflare, caching can reduce website bandwidth usage by up to 60% and improve load times by more than 50%.
When someone visits your site, WordPress usually has to fetch data from a database and process it before showing the page. This can take time, especially if your site is busy or has a lot of visitors.
Caching solves this by storing pre-processed versions of your site’s pages and posts. When a visitor comes to your site, they get a quick, pre-saved version instead of waiting for WordPress to build the page from scratch.
This makes your site load faster, which is crucial. Studies show that 53% of users abandon a site if it takes longer than three seconds to load. Faster loading times can also improve your SEO rankings because search engines prioritize speed.
However, cached versions can sometimes get outdated, which is why clearing your cache regularly is important. This ensures visitors see the most up-to-date version of your site.
This caching diagram from NitroPack shows how it works. The first user requests the site from the server. The server fulfils the request and loads the site into the cache. Subsequent users are served the site from the cache (which may not accurately represent the site as it exists on the server until the cache is cleared).

The Different Types of Cache
Before we dive into how to clear your cache in your WordPress website, it’s important to understand the different types of caching. Caching happens at several levels. Understanding the differences can help you troubleshoot and manage your site. Here are the most common types of cache.
WordPress Cache
This is managed directly by your WordPress site, often through caching plugins. WordPress caching focuses on optimizing your content by saving static versions of your pages and posts to reduce server requests and speed up load times.
Server Cache
Your web hosting provider may use server-side caching to store data from your website. This happens before your WordPress site even processes a request. Types of server cache include:
- Opcode Cache: Speeds up PHP execution by storing precompiled code.
- Object Cache: Saves database queries to reduce repetitive requests.
- Page Cache: Stores entire pages for faster delivery.
Server caching works automatically in many cases, but sometimes you need to clear it manually through your hosting dashboard.
Browser Cache
This happens on the visitor’s side. A browser like Chrome or Firefox stores website files—like images, CSS, and JavaScript—on the user’s device. This way, returning visitors don’t have to download the same files repeatedly.
Browser caching speeds up page loading for the user, but it might mean they see outdated versions of your website. You can’t force a user to clear their entire browser cache, but you can send a request to their browser to clear the cache of just your site’s files using a specific HTTP header called “Clear-Site-Data.”
Proxy Cache
A proxy cache is managed by external networks like content delivery networks (CDNs), such as Cloudflare or Akamai. These services save cached versions of your site on servers all over the world. When a user accesses their site, they visit a cached version that’s stored close to their location. This reduces the time it takes for your site to load.
If you’re using a CDN, you may need to clear its cache separately to push updates. Contact your CDN provider for steps.
What Does it Mean to Clear WordPress Cache?
Clearing a cache means deleting the temporary stored files that your website uses to load faster. When you clear WordPress cache, you’re essentially telling your site to stop using outdated files and create new ones based on your latest updates.
This is important if you’ve recently made changes to your site, like editing a page, updating a plugin, or changing your theme. Without clearing the cache, visitors might still see the old version of your site instead of the new one.
Clearing the cache is also a great troubleshooting step. If your site isn’t displaying correctly or is loading slowly, an outdated cache could be the culprit. In fact, clearing the cache can often fix common issues like broken layouts or missing images. It makes sure that your visitors get the best possible experience.
Why You Should Clear WordPress Cache
The user experience of your site is just as important as the content. It’s important to make your site load quickly and properly so users can visit more pages. A good website experience improves your brand reputation and your Google search rankings.
Caching your website (or components of your website) is a great way to make it load quickly, but it comes with one big disadvantage: Users might see an old version of your website if they visit before the cache is updated.
So whenever you make a substantial update to your site, it’s smart to clear the WordPress cache (and any cache you can access) so users can see those changes immediately.
This is especially important if your changes fixed critical errors, like pages displaying incorrectly, substantially slow loading times, or security vulnerabilities.
Important note: If you plan to make a lot of changes to your site, we strongly recommend creating a WordPress backup so you can restore the original version if something goes wrong. There are several WordPress backup plugins that make this simple.
How to Clear WordPress Cache with a Plugin
Using a plugin is the easiest way to clear WordPress cache. If this is your first time using plugins, visit our guide on installing a WordPress plugin. (It’s simple and easy.)
Let’s walk through several of the most popular WordPress caching plugins.
1. Clear WordPress Cache with LiteSpeed Cache

With more than six million active installations, LiteSpeed Cache is one of the most popular WordPress caching plugins. It’s an all-in-one solution with lots of great features, but it’s still simple to use. With SupportHost’s LiteSpeed hosting plans, you can take full advantage of the LiteSpeed Cache plugin and have server-side caching thanks to the LiteSpeed server.
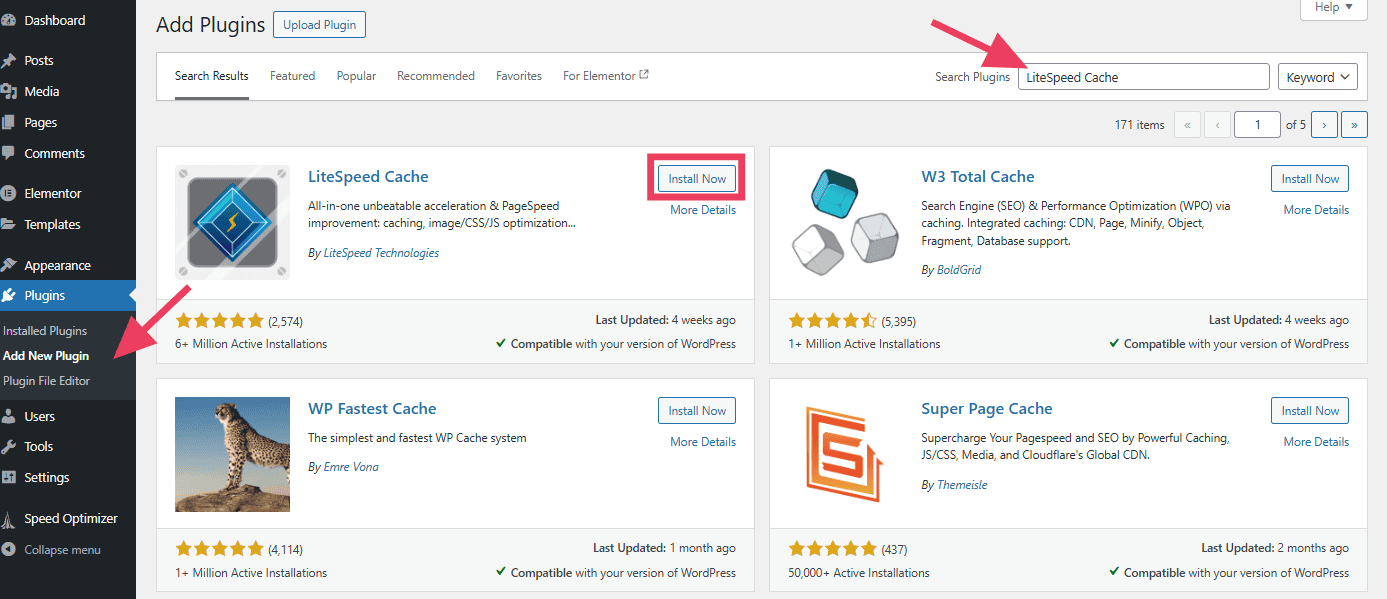
Visit Plugins > Add Plugins in your WordPress dashboard. Enter “LiteSpeed Cache” in the search bar. Click Install and then Activate.
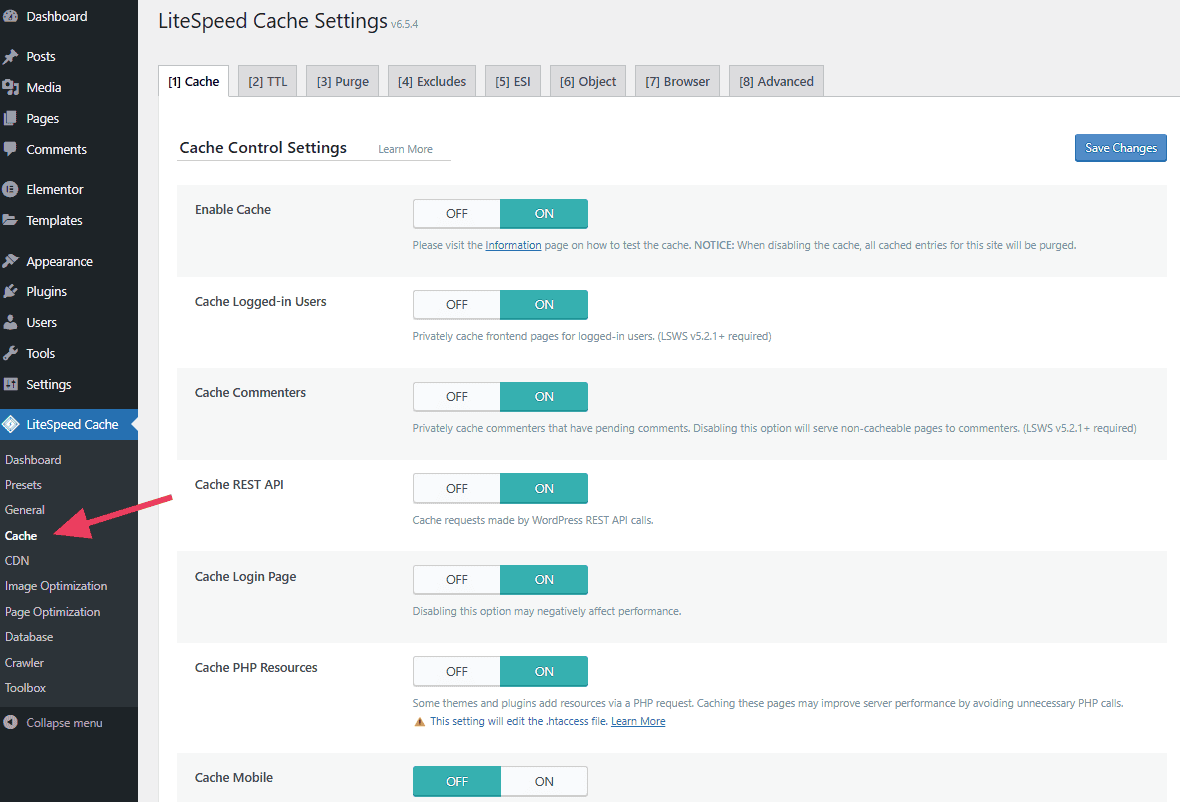
Once the plugin is installed, visit LiteSpeed Cache > Cache to adjust the caching settings. You’ll notice that caching is enabled by default, but you can turn it off at any time. Here you can also determine what gets cached and what doesn’t.
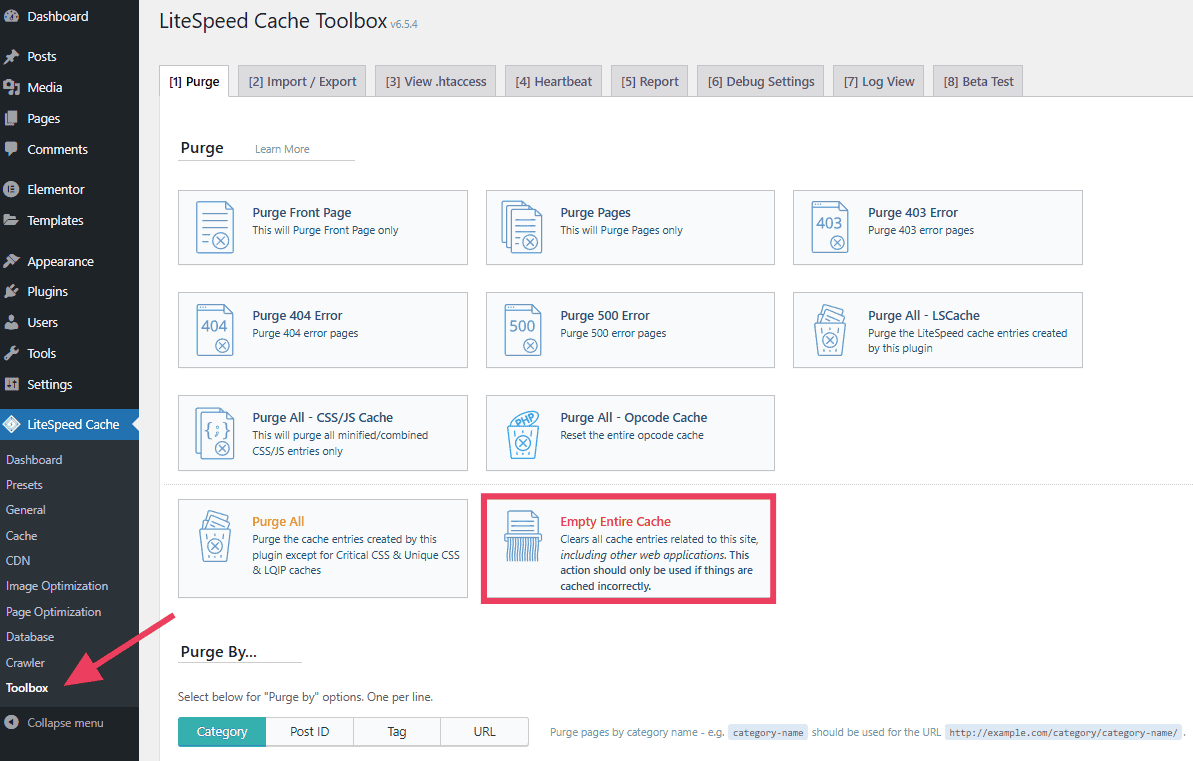
To clear the WordPress cache, navigate to LiteSpeed Cache > Toolbox. You’ll see several options to selectively purge the cache. To purge everything, click the Purge Entire Cache button.
For a more detailed look into this plugin, check out our full guide on using LiteSpeed Cache and the comparison between LS Cache vs. WP Rocket.
2. Clear WordPress Cache with W3 Total Cache

W3 Total Cache is another powerful caching plugin. In fact, it’s the only web host agnostic Web Performance Optimization (WPO) framework. That means it can function across different web hosting providers without relying on the features of any specific host.
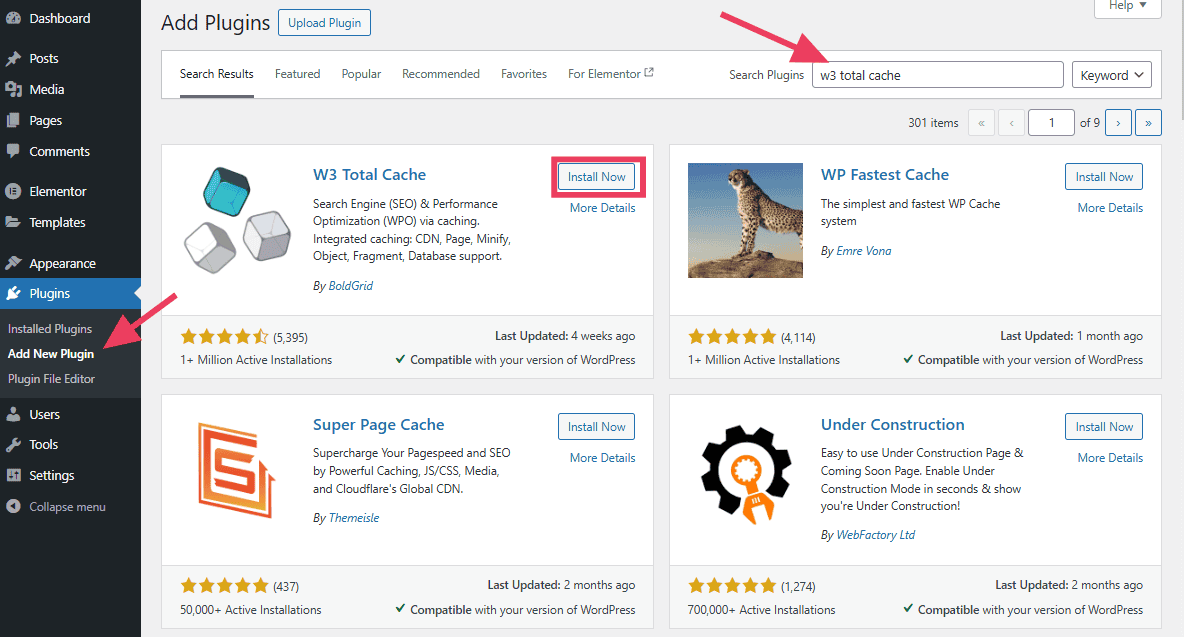
Visit Plugins > Add Plugins in your WordPress dashboard. Enter “W3 Total Cache” in the search bar. Click Install and then Activate.
To enable caching, visit Performance > General Settings and select Enable next to Page Cache.
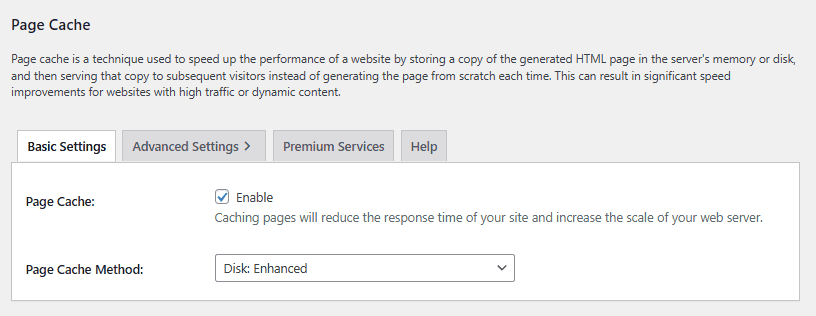
If you want some granular control over your caching, explore more options on the General Settings page. Here you can tweak your cache settings to your exact needs. Here are a few specific settings you should explore:
- Opcode Cache: Stores PHP scripts in memory to avoid reprocessing them for every request. This improves server speed.
- Database Cache: Caches frequently accessed database queries to reduce load on the database and improve performance.
- Object Cache: Temporarily stores database query results to prevent repeated queries. This makes your dynamic content load faster.
- Purge via WP Cron: Automatically clears cached files at scheduled intervals using WordPress’s built-in task scheduler (WP Cron).
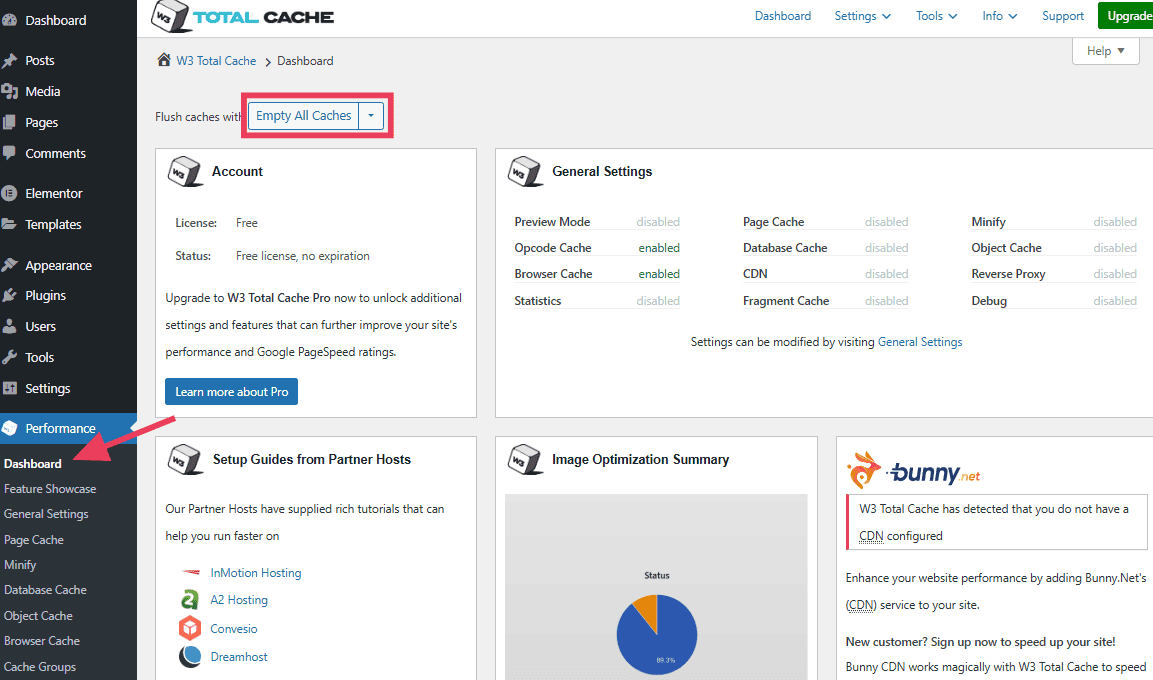
To clear your cache, visit Performance > Dashboard. At the top of the page, you’ll see a dropdown with a few options for different caches. In most cases, you’ll want to flush everything, so click Empty All Caches.
For a more detailed look into this plugin, check out our full guide on using W3 Total Cache.
3. Clear WordPress Cache with WP Fastest Cache

WP Fastest Cache is more than just a caching plugin. It includes a full suite of web optimization tools. It’s known for achieving better page speed scores than other plugins.
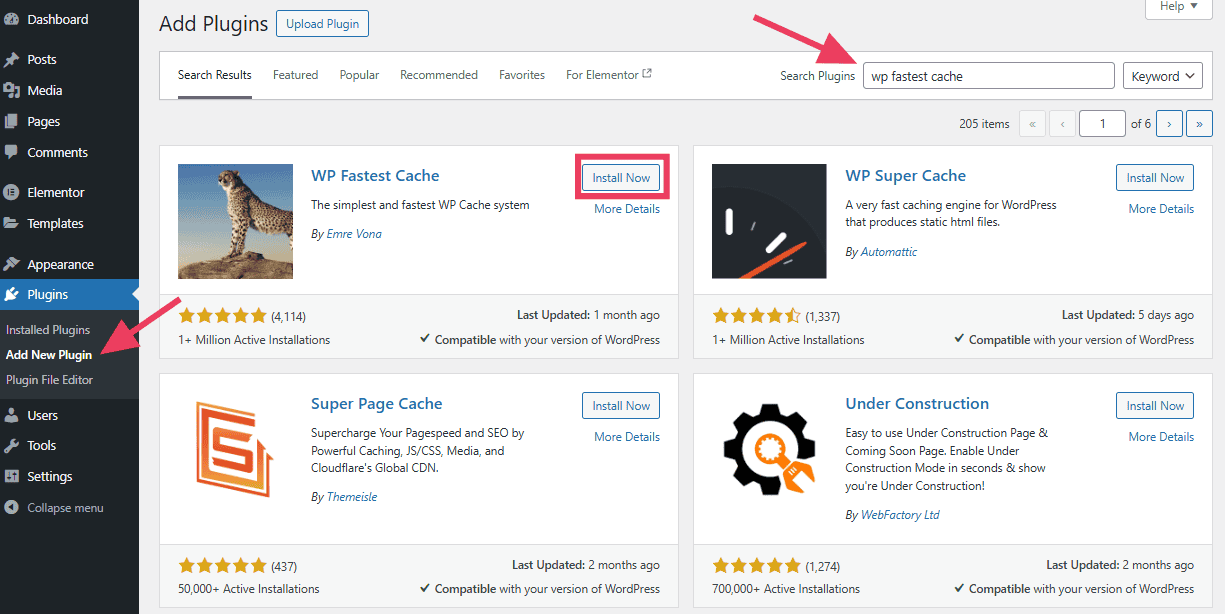
Visit Plugins > Add Plugins in your WordPress dashboard. Enter “WP Fastest Cache” in the search bar. Click Install and then Activate.
Navigate to WP Fastest Cache in your WordPress dashboard. Click Enable next to Cache System to start the cache running. Click Submit to save the settings.
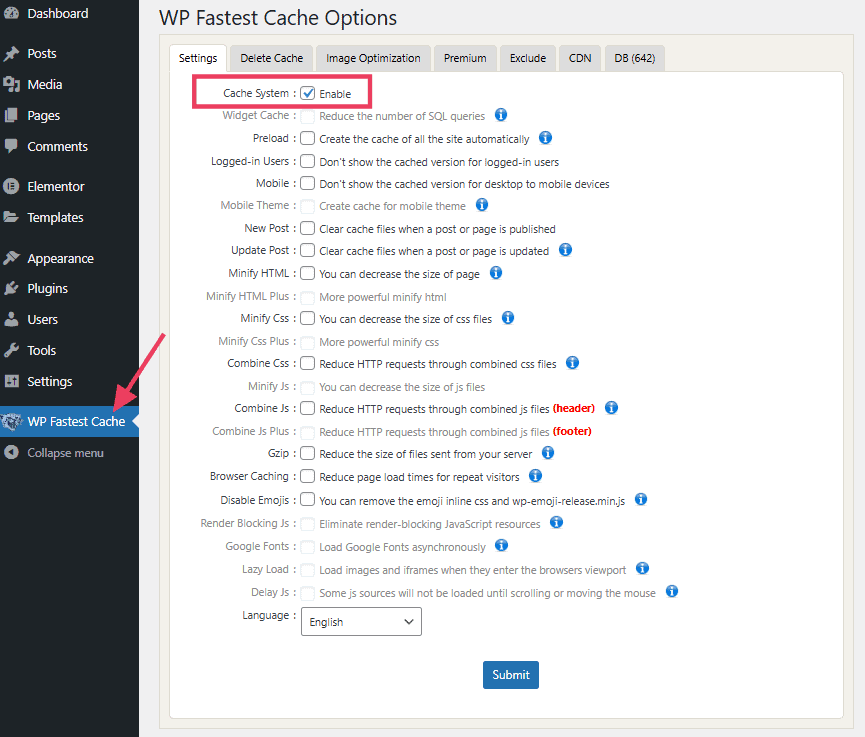
Next, go through the settings and make any necessary adjustments for your needs. For instance, you might decide to not show the cached version to logged in users. Or you might use the preload option to create a new cached version of your entire site periodically, not just when a user accesses it. Click Submit to save the settings.
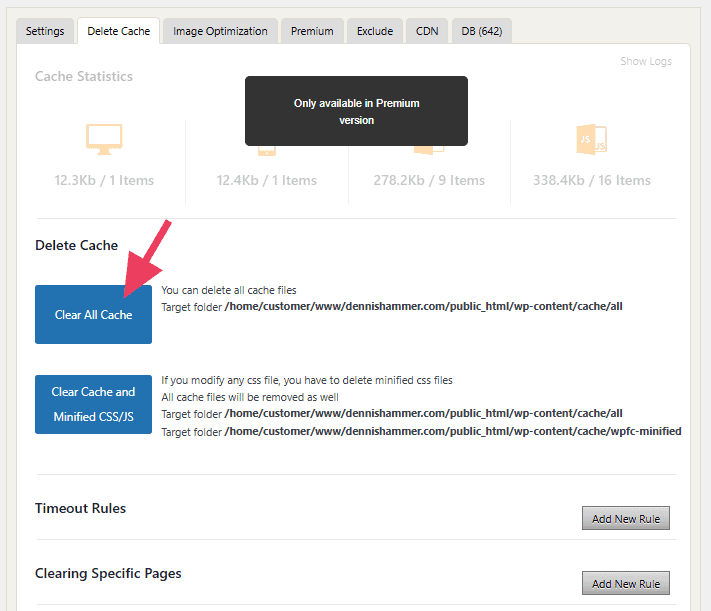
To clear the cache, visit the Delete Cache tab and click Clear All Cache.
4. Clear WordPress Cache with WP Super Cache
WP Super Cache is known as one of the easiest caching plugins to set up. It also integrates well with the Jetpack suite of tools, which many users find convenient.
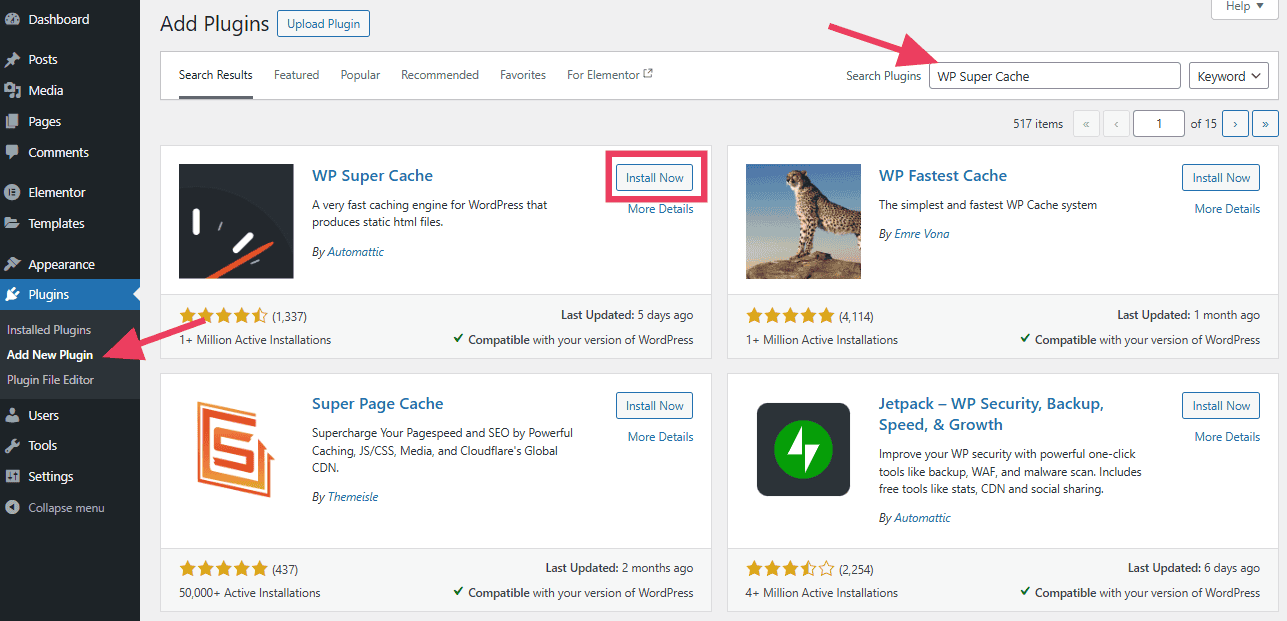
Visit Plugins > Add Plugins in your WordPress dashboard. Enter “WP Super Cache” in the search bar. Click Install and then Activate.
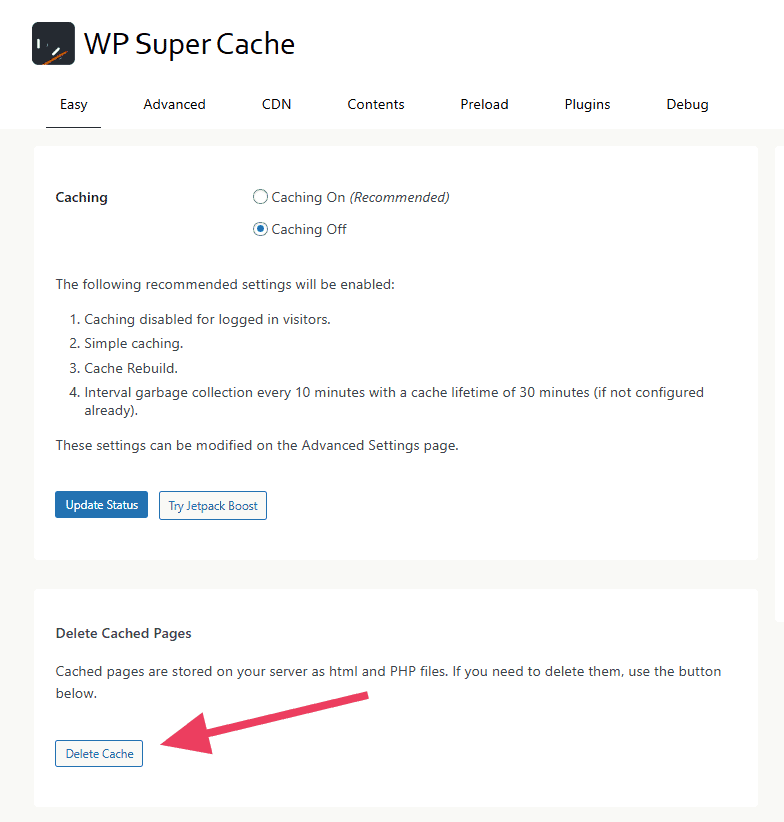
To enable caching, visit Settings > WP Super Cache and toggle the Caching to On.

Take a moment to explore the settings, specifically the caching restrictions, mobile support, and dynamic caching.

To delete the cache, simply click the Delete Cache button on the settings page.
How to Clear WordPress Cache without a Plugin
If you don’t want to install a plugin, it’s still possible to clear your cache in WordPress. You’ll have to delete some files manually from your web host. You can do this through FTP or your host’s cPanel.
Important note: Always backup your website before making changes. Check out our list of backup plugins to simplify this process.
How to Clear the WordPress Cache Manually
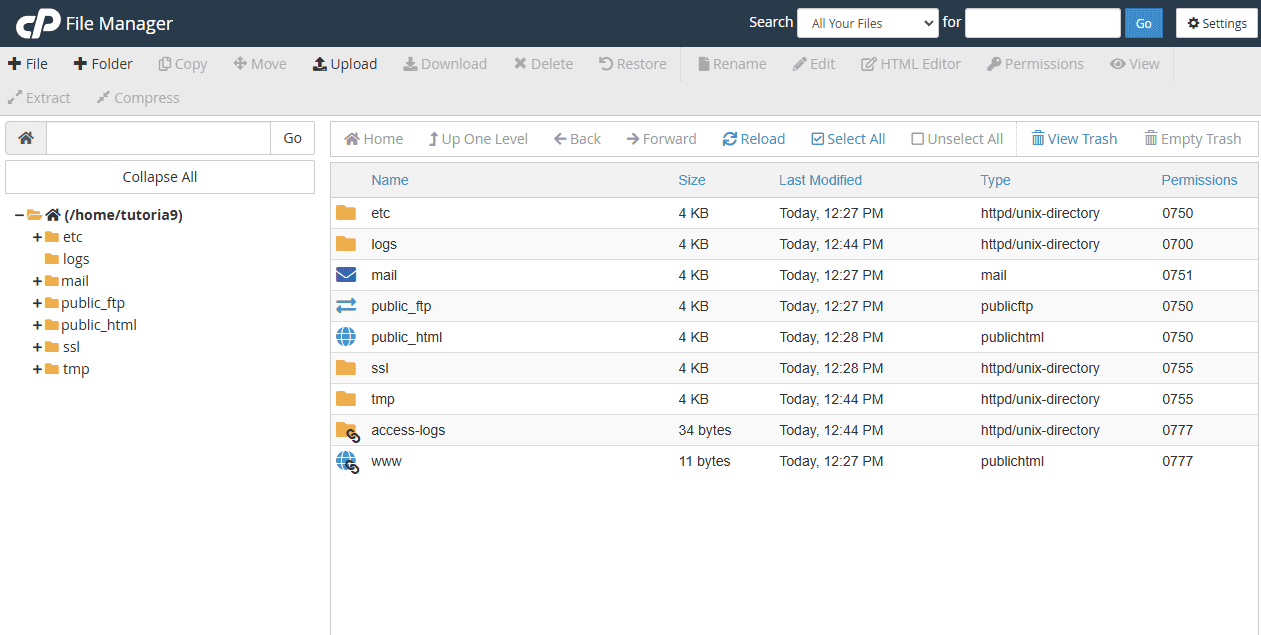
Connect to your website using an FTP client like FileZilla. Alternatively, you can log into your web host and find your cPanel or other file manager tool. It should look something like this:
Navigate to the wp-content/cache/ directory. Inside, you’ll find subfolders with cached files.
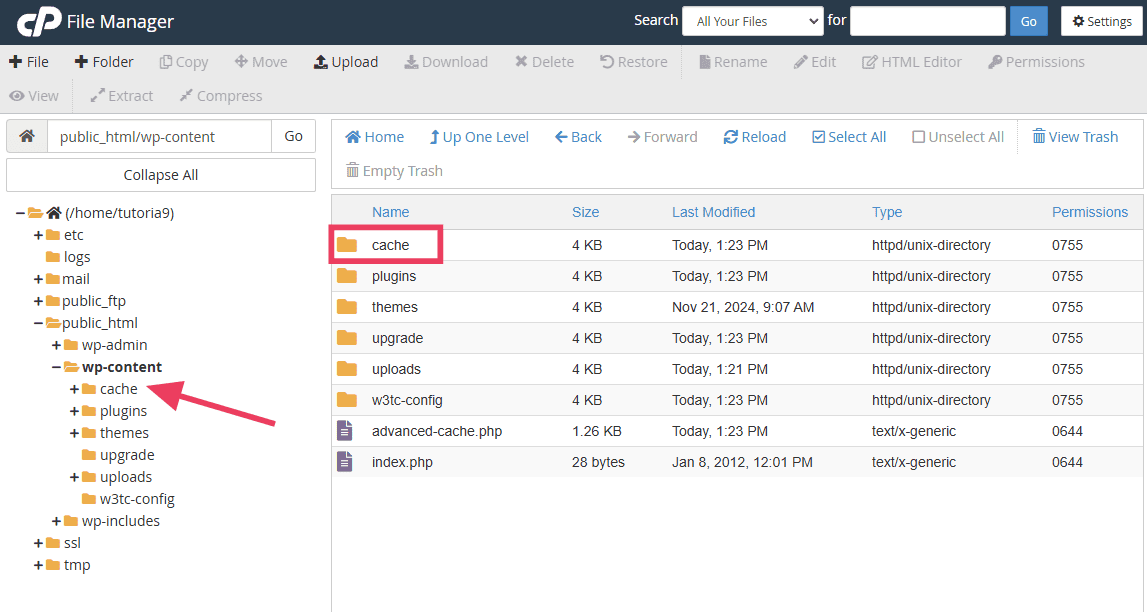
Delete all the files and folders in this folder. Once cleared, check your website to confirm it loads fresh content.
You can also clear your cache with WP-CLI, which is the command-line interface for WordPress.
To use WP-CLI, you’ll need to log in via Secure Shell (SSH). SSH is a protocol that provides remote, command-line access to your hosting account. Basically, you can directly access the server and run text commands. SSH is available on all SupportHost plans (even shared hosting plans).
Once you’re logged in, navigate to your site’s home directory with this command.
cd ~/sites/example.comThen run this WP-CLI command to flush your cache:
wp cache flushHow to Disable WordPress Caching Manually
If you intend to make a lot of changes to your website over a period of time, you might decide to disable WordPress caching entirely for that period. With caching disabled, your site will show a current version to every visitor, every time. The downside to this, however, is that your website will load more slowly.
In order to disable caching manually, you’ll need to modify your WordPress configuration file.
Locate the wp-config.php file in the root directory of your WordPress installation.
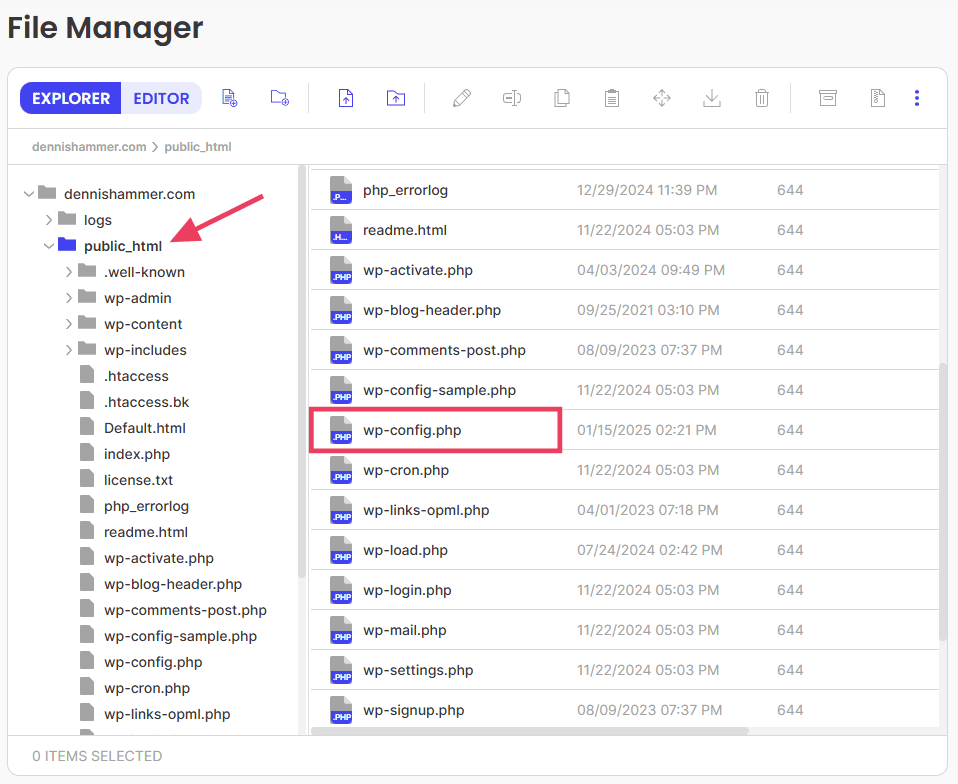
Download a copy of the file for backup purposes. Put this in a safe location in case you make a mistake that breaks your site.
Open the wp-config.php file in your file manager. If you’re using FTP, download the file and open it in a text editor.
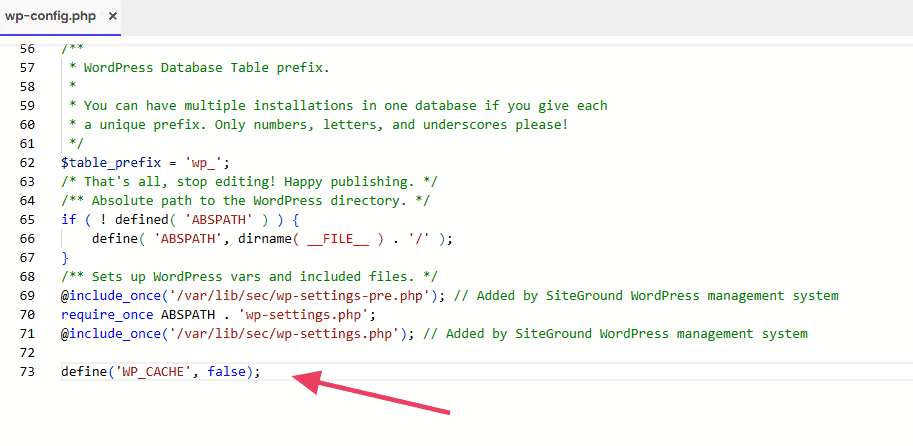
Add the following line of code to the end:
define('WP_CACHE', false);That code should look like this in the wp-config.php file:
If you’re using cPanel or another file manager, simply save the file. It will update immediately. If you’re using FTP, save the file and upload it to the public_html folder, overwriting the original version.
Test your site to ensure it’s working correctly. You’ll notice that your site doesn’t load as quickly as usual, but it will display all new changes immediately.
Clear WordPress Cache FAQs
Here are some common questions people ask about the WordPress cache.
What is Caching in WordPress?
Caching in WordPress is a process where temporary files of your website’s content are stored to speed up loading times. This reduces the time and resources needed to serve your pages to visitors.
Why Should I Clear My WordPress Cache?
Clearing your cache forces your visitors to see the latest updates to your site. It also helps fix common issues like broken layouts and missing content caused by outdated cached files.
Does Clearing the WordPress Cache Affect Performance?
Yes, but in a good way. Clearing outdated cache can resolve errors so your site performs optimally by using fresh, updated files.
How Often Should I Clear Cache in WordPress?
You should clear WordPress cache whenever you make significant updates to your site, like adding new content, changing themes, or updating plugins. Generally speaking, clearing it every couple of weeks is good practice.
Can Clearing the Cache Break My Website?
No, clearing the cache doesn’t break your website. It simply removes outdated files. Your site will generate fresh ones the next time someone visits.
What Happens After I Clear WordPress Cache?
After clearing your cache, your site may take a little longer to load the first time as new cached files are created. Once this is done, your site will return to normal speed or faster.
Is Clearing the Cache the Same as Deleting Cookies?
No, clearing the cache removes temporary files stored by your site to improve performance, while deleting cookies removes data saved by the browser, like login details and preferences.
Clear WordPress Cache Regularly
Clearing your WordPress cache is a simple but powerful step to boost your site’s performance and keep your visitors happy. Whether you use a plugin, your hosting dashboard, or manual methods, the key is to regularly clear WordPress cache so users always see your latest content and enjoy a seamless experience.
Ready to build your WordPress site?
Try our service free for 14 days. No obligation, no credit card required.


