Have you heard of canonical rel tags, but don’t know exactly what they are for or how they fit in?
In this in-depth guide we will find out what their function is and how to insert them correctly on the pages of the site.
Are you afraid of making mistakes? Don’t worry, there’s an entire section of the guide devoted to best practices to follow and how to make sure you’ve set the attribute correctly.
Let’s begin!
Table of Contents
What is a canonical rel tag?
The rel=canonical tag is used to communicate important information to search engines such as Google.
In simple terms, this attribute marks the canonical URL of a page.
You need to know, in fact, that a single web page can have multiple versions. This situation occurs especially when filters are applied within a page, such as those used to sort a list of products by ascending price order.
But having multiple versions of a page isn’t just about ecommerce.
For this reason, in any situation where there are multiple versions of a single web page, it can be useful to indicate the canonical URL using this attribute.
When the rel=canonical tag was born
The canonical rel attribute can also be called a canonical tag, canonical URL, or canonical link.
However, it is a webpage tag that was introduced by search engines: Google, Yahoo and Bing in February 2009.
In Matt Cutts’ blog we find a short news that explains the introduction of this tag in very simple words and that we report here:
A URL like http://www.example.com/page.html?sid=asdf314159265 can have this piece of text in the HEAD section of the document:
<link rel="canonical" href="http://example.com/page.html"/>which tells search engines that the preferred (“canonical”) location of this URL is http://example.com/page.html and not http://www.example.com/page.html?sid=asdf314159265.
How do I recognize the canonical rel tag?
What does this attribute look like in practice?
This is the portion of code we saw earlier:
<link rel="canonical" href="https://esempio.com/pagina/" />Let’s analyze what it means.

The rel=”canonical” link portion is the tag that allows us to say “I want the canonical version of the page to be this”.
The URL indicated here href=”https://example.com/page/” is the address of the canonical page.
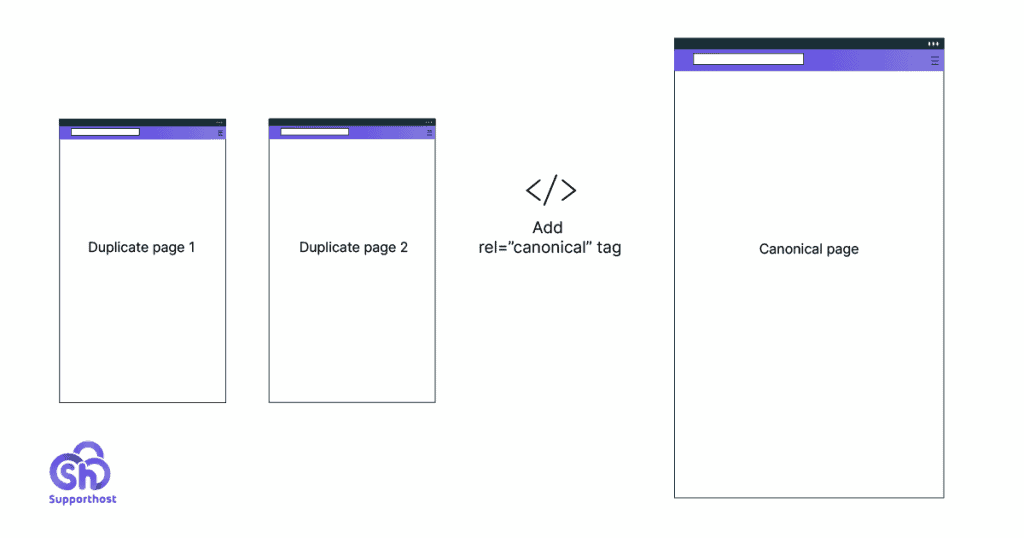
By going to insert this tag on the duplicate page or pages (or alternate versions of the original page), we are telling search engines to refer to another URL as a canonical version.
When do we need to use the rel canonical tag?
We figured out what the canonical link is, but what exactly is it for? To understand this, we must first see how Google and other search engines understand what the canonical URL is.
For Google, the canonical URL and therefore the one to be shown preferentially, is the one that corresponds to the page considered to be the most complete. To make this choice, the search engine analyzes various factors including the protocol used, giving precedence to the HTTPS version of the pages.
If you haven’t switched to secure protocol yet, find out how to switch from HTTP to HTTPS with WordPress.
Inserting the rel canonical attribute serves us precisely to “help” Google to recognize the correct page as canonical.
Always keep in mind that search engines may still choose to show another page. They are in fact able to independently choose the canonical URL to show.
However, there are cases where you may want to use this attribute to ensure that a specific version of a URL is shown. Let’s see why you might want to do this.
In other cases, remember that you can always let the search engine make this choice.
Rel canonical and SEO: why is this tag so important?
There are several reasons for wanting to use the canonical tag.
1. It allows us to choose which URL to show on search results pages.
Let’s assume there are two URLs pointing to the same page, showing two slightly different versions.
The first URL is this:
https://example.com/shirts?color=redThe second one:
https://example.com/shirtsUsing the rel canonical attribute we can choose to indicate the second URL as a canonical URL. In this way we can make sure that the version of the page that is displayed is the one without the filter to select only a single color (in our example red).
2. It helps us avoid duplicate content and save crawl budgets.
The example we have just seen can happen especially when you create an ecommerce site where you use parameters to show, for example, the sizes or colors of the products.

However, the same situation can also occur on other sites and blogs, not just ecommerce.
For example, you may have created a blog with several categories and placed your articles in multiple categories. This may have resulted in multiple URLs being present for each single post.
Imagine you have the article “Guide to using WordPress”, have placed it in two categories and find yourself having two URLs that lead back to it:
https://myblog.com/guide/how-to-use-wordpress/
https://myblog.com/wordpress/how-to-use-wordpress/
When two pages are identical as in this case, or very similar to each other, as in the ecommerce example, we speak of duplicate content.
The problem of duplicate content can therefore depend on several reasons, including:
Presence of parameters that generate multiple URLs but show the same content for example:
https://mystore.com/product.html
https://mystore.com/prodotto.html?product=1
https://mystore.com/prodotto.html?product=2
Problems with the protocol where the “http” and “https” or “www” and “non www” versions are treated as separate URLs, for example:
https://mystore.com/clothes
http://mystore.com/clothes
https://www.mystore.com/clothes
Versions of a page accessible from more than one URL, for example due to an incorrect CMS setting. Such as the case we saw before the blog post:
https://myblog.com/guide/how-to-use-wordpress/
https://myblog.com/wordpress/how-to-use-wordpress/
In all these cases duplicate content is generated. Search engines cannot include all resources on the web in their indexes. For this reason, when multiple URLs are found that have practically the same content they are treated as “duplicates”.
This means that only one of the versions of the page, if relevant, will be able to position itself.
But which?
As we said, Google determines the canonical version of the URLs following different parameters.
What we can do to help him choose the correct versions is to use the rel canonical attribute.
In addition, by indicating what the canonical version of the page is, we will ensure that search engines do not use the entire crawl budget to analyze irrelevant pages. This way, we will prevent multiple versions of the same page from being scanned, for example.
Instead of crawling the same content multiple times, search engine crawlers will be able to increase the crawl rate of really important pages – for example, new pages added to the site or recently updated ones.
Using the rel canonical tag: How do I mark a page as canonical?
Now that we’ve seen what this attribute is for, let’s see how to use it.
There are several methods for setting up canonical links:
- use the rel canonical link tag in the head;
- simplify the process with a plugin (if we are using a CMS like WordPress for example);
- use rel=canonical in the HTTP header;
- indicate the canonical URL in the sitemap;
- use 301 redirects instead of the canonical rel tag.
Use the canonical link rel tag
The first way to tell search engines which of the different pages available should be considered canonical is to add the “rel=canonical” attribute.
To do this we need to add this code to the “<head>” section of the duplicate pages:
<link rel="canonical" href="https://example.com/page/" />We will have to replace the text in quotes https://example.com/page/ with the URL of the canonical page.
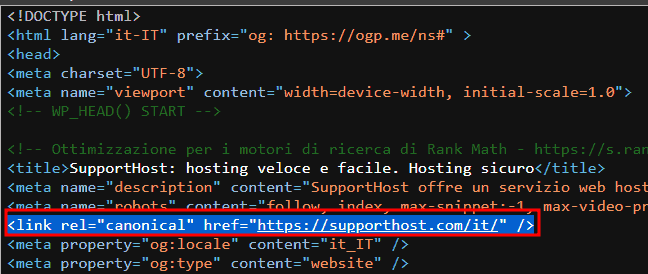
Make sure you add the tag in the <head> section. If you add the rel canonical attribute in the <body> section, it will not be considered by search engines.
Use a plugin to set the canonical tag in WordPress
With WordPress we can use a plugin to set the rel=canonical tag.
The plugins will do nothing but insert the attribute in the <head> section of the pages, avoiding us having to insert the attribute manually on the pages.
Two plugins that allow us to do this are Rank Math SEO and Yoast SEO, let’s see how to use them.


Use Rank Math SEO to set canonical URLs
With the Rank Math SEO plugin, we can set the canonical tag directly from the duplicate page or article and therefore not canonical.
We just need to edit the page, open the Rank Math settings and click on the “Advanced” tab.
Here we will see a box that says “canonical URL” in which we will have to enter the URL of the corresponding canonical page, like this:
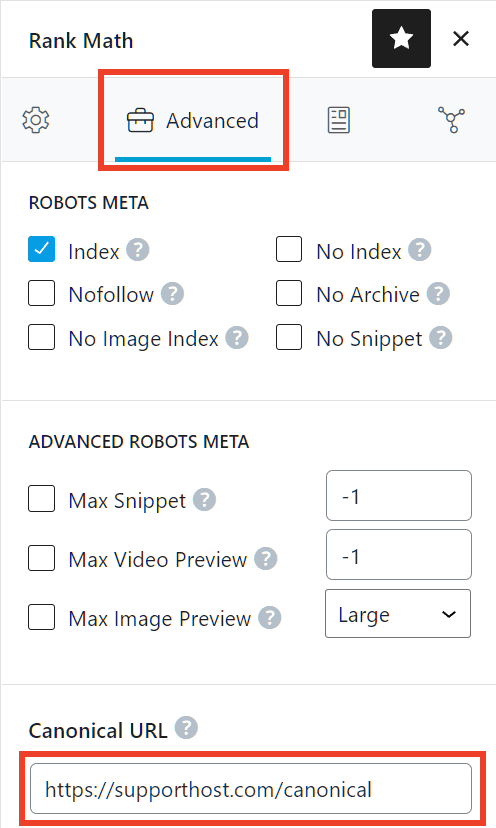
Then we just have to save the page if it is in the drafts or update it if it has already been published.
Use Yoast SEO to set up canonical pages
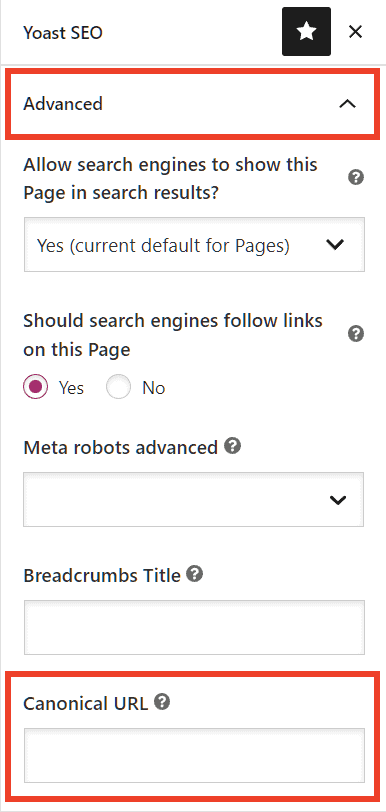
If we are using Yoast SEO, we can set the canonical URL from the page or article.
From the list of WordPress pages (or articles), click on Edit corresponding to the page to be edited.
Then from the Yoast SEO plugin box we expand the Advanced tab. We will find a “canonical URL” field where we can enter the URL of the canonical page, as I show you here:
Use rel=canonical in the HTTP header
The method we have just seen of inserting the rel canonical link tag in the head section of the pages has limitations.
In particular, this system is valid only for HTML pages, but it is not valid for files. One situation where you might want to define a canonical page is in the case of a URL that points to a file, for example a document or PDF.
In these cases, you can go and insert the rel=”canonical” tag in the HTTP header of the page.
In the case of a file, for example a PDF, you could use the .htaccess file to add this directive:
<Files "file-name.pdf">
Header add Link "< http://www.mywebsite.com/page/ >; rel=\"canonical\""
</Files>
For more guidance on how to insert the canonical tag into the HTTP header of your pages, check out this Moz guide.
Indicate the canonical URL in the sitemap
When we create the sitemap of our site, we go to insert the canonical pages and make sure to exclude all duplicate pages from the list.
Inserting the pages that we want to consider as canonical within the sitemap and sending it to search engines can therefore be an alternative to inserting the rel canonical tag.
However, it is important to remember that:
Google does not guarantee that it will treat sitemap URLs as canonical.
With the indications for webmasters, Google therefore suggests that we use this method for large sites where it would be complex to set canonical tags on all pages.
Rel canonical or 301?
In some cases, instead of using the canonical attribute, it may be necessary to use 301 redirects.
This method is not a real alternative to using the canonical tag. To figure out whether to use the rel=canonical tag or a 301 redirect, you need to ask yourself whether the duplicate page makes sense to exist or not.
If the duplicate page is not to be present and you want to delete it then you should use a 301 redirect.
Otherwise, you can use the canonical tag to indicate which of the two is the canonical version.
Let’s clarify it better with an example.
If you use a redirect from “page 1” to “page 2”, visitors who try to reach “page 1” will find themselves directly on “page 2”.
When, on the other hand, “page 2” is set as a canonical page, the search engines will know that it is the page that should be shown preferentially. In any case, visitors to your site will also be able to view the contents of “page 1”.
Canonical URL and guidelines to follow
We have seen the different methods we can use to set the canonical rel tag. However, there are some precautions to keep in mind when establishing the canonical version of a page.
To avoid making mistakes, you should always keep these 6 tips in mind.
Beware of relative paths
When you use the rel canonical tag to indicate the canonical reference page you will enter the path to the canonical page.
In doing so it would be best to make sure that you are using the absolute URL and not a relative path. Doing so ensures that the page is found correctly.
You should then indicate the attribute like this, entering the full path:
<link rel="canonical" href="https://example.com/page/" />Instead of the relative path, such as:
<link rel="canonical" href="/page/" />URL structure: uppercase, lowercase and domain versions
It is a good rule to check the server settings regarding URL structure and the use of upper and lower case.
You should make sure that there is no distinction between uppercase and lowercase letters and that all URLs are treated as lowercase. Otherwise, Google might consider the URLs to be duplicates.
Generally, the easiest way is to use the same method throughout the site, for example using only lowercase in URLs.
You can also force the use of lowercase with a rule in the .htaccess file, as explained here.
When entering the canonical page URL, be sure to specify the correct protocol, HTTP or HTTPS, based on the one in use on your site.
Avoid conflicts with multiple canonical rel tags
For each page you must use only one canonical relational tag.
If search engines like Google find multiple rel canonical attributes that link to different URLs, they won’t consider any of those attributes. Consequently, it will be as if you have not specified any canonical pages in that case.
In the next paragraphs we will see how to verify that you have correctly inserted the tag on the pages.
Also pay particular attention to using different methods to define canonical pages. One mistake you might make is to use the canonical rel tag for the same page to indicate a URL and indicate a different URL in the sitemap.
Robots.txt file, noindex directive and canonical URLs
If you’re using robots.txt to prevent Google crawlers from crawling your pages, you should be especially careful.
To make sure crawlers can read the rel canonical attribute, pages must not be blocked via robots.txt file or it will be like not having entered any attributes.
Similarly, be careful when using the “noindex” directive. The noindex tag used in the <head> section of the page is to tell search engines not to index that page.
Instead, the rel canonical tag serves us to communicate which URL should be considered as a canonical page and therefore shown with preference. These are two different tags that go at odds. So make sure you use the tags according to the purpose you want to achieve.
Use hreflang tags correctly
We use hreflang tags to define variants in different languages of the same page or versions of the same page intended for different geographical areas.
When using hreflang tags, Google recommends that we follow this rule:
Designates a canonical page in the same language or in the best replacement language, if there is no canonical page for the same language.
Canonical URLs and pagination
In some cases it may be necessary to divide the same content into multiple web pages. This process is called pagination.
To indicate this type of page, Google initially allowed the use of rel=”next” and rel=”prev” tags, like this:
<link rel="next" href="...">
<link rel="prev" href="...">
However, Google no longer supports the use of these tags for pagination. Some search engines, such as Bing, continue to support these tags on a case-by-case basis.
What is important to know in the case of Google?
1. Each page must have its own URL and Google suggests using for example a search parameter like ?Page=n.
2. You don’t have to set the first page of those involved in pagination as a canonical page. The correct solution is to assign the canonical “self-referential” URL to each page, ie to set each page as the canonical version of itself.
Check the canonical pages
After setting up the canonical pages or when performing an SEO analysis of the site, it is good to check that you have correctly set the rel canonical tag on the pages.
You should make sure that:
- duplicate pages have the rel canonical tag to indicate the corresponding canonical page;
- the URL of the rel canonical tags you have entered is correct and does not link to 404 error pages, other errors or to a URL that has been redirected to another page;
- the pages are not blocked with noindex tags or robots.txt files, as we have seen before.
If you want to check for the presence of the rel=canonical tag on a single page, you can use several methods.
View the page source
Open the page you want to verify from the browser and view the source code. In Chrome, just right click on the page and click on View page source.
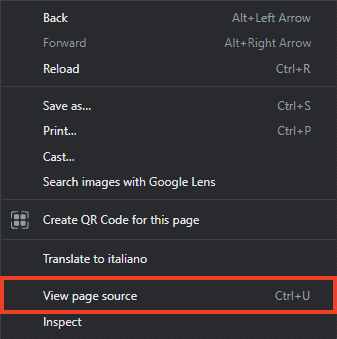
Check for the rel=”canonical” link tag in the <head> section of the page and make sure the URL indicated is correct.

Use the Google URL checking tool
Google provides the URL Inspection tool to check if pages have been indexed, send the crawl request, and so on.
This tool can also be used to figure out which version of the page is considered canonical.
From Search Console we just type the URL in the Inspect any URL in “…” field and then expand the Page Indexing section.
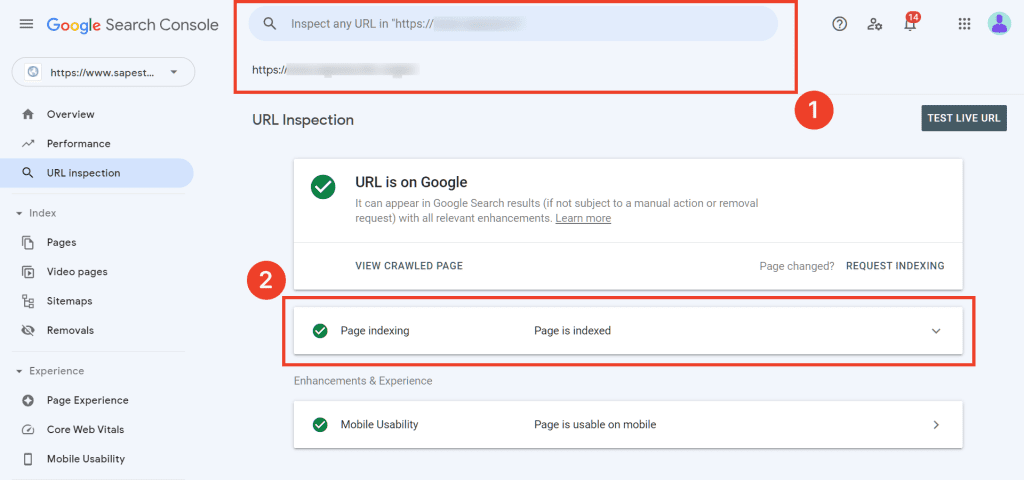
In this section, under Canonical User Declared Content, we will see the URL set as canonical.

Conclusion
Telling search engines which page to consider canonical using the rel canonical tag is quite simple. However, there are several aspects to consider in order not to make mistakes and frustrate the work done.
In this article we have seen in which situations it can be useful to specify the canonical URL and how to insert in practice the rel=canonical attribute that allows us to do so. We have seen which mistakes to avoid and answered a series of doubts including:
- the difference between rel canonical and 301 redirect
- the correct use of pagination and canonical url
- possible conflicts between the canonical attribute and the use of the noindex tag or the robots.
You should now be able to use the tag correctly on your site. Is there something that is not clear to you? Let us know here in the comments.


Leave a Reply