
In this guide, I will show you how to migrate PrestaShop step by step.
If you are moving the site to another server or transferring it from local to remote, you will find all the correct procedures you need to follow to avoid errors.
Don’t want to take care of the transfer yourself? If you choose one of our servers for PrestaShop, you will be able to request a free migration.
Simply order the plan and then open a ticket to request the migration. After that, you can arrange and organize with our support team the most suitable time to start the transfer without any disruptions to the site.
If you want to proceed independently, I will explain two cases:
- how to move a PrestaShop site while keeping the same domain;
- how to migrate and change the domain of the site.
Initially, the procedure is identical for both situations.
Let’s start with the first step.
Table of Contents

Preparing for PrestaShop migration
Before you start migrating your PrestaShop store, you need to check a few things.
In its official documentation, PrestaShop recommends migrating from one server to another only after upgrading the store to the latest version.
If you don’t know how to proceed, you can follow our PrestaShop update step-by-step guide.
In this guide, you will see the steps for version 1.7.X, we used version 1.7.8.7 to be specific.
Putting your shop into maintenance mode
When you change hosting, before you transfer your site, it is advisable to activate maintenance mode.
This is an important step especially in the case of an e-commerce. By putting your store under maintenance, you don’t risk losing customer orders during the migration process.
We recommend that you plan your migration in advance and choose a day and time when you expect there will be fewer orders.
To activate maintenance mode, do this:
- click on Shop Settings > General;
- click on the Maintenance tab;
- set the “Enable shop” option to “No”;
- click on “Save”.

As an optional step, you can enter your IP address to continue monitoring the shop even if it is in maintenance mode. You can also customize the text users will see until your shop is available again.
Backing up your files
The time has come for the most important step of the PrestaShop site migration. Create a backup.
The first thing we need to do is download a backup of all the files on our PrestaShop site.
There are several methods to do this, for example:
- you can use an FTP client to download the files to your pc;
- you can create a zip file with all site files directly from the cPanel file manager.
For the purposes of this guide, let’s see how to do it by connecting to the server with an FTP client like FileZilla.
Keep in mind that to do this you will need the following data:
- hostname;
- FTP account username;
- password;
- FTP port.
If your provider uses cPanel you can find this data in the FTP Accounts section. If you haven’t created an FTP account yet, you’ll need to do so before proceeding.
After connecting to the server with FileZilla, we just need to find the folder that contains the site’s files and download all its contents to our computer. Make sure you select all.

Remember that if you have installed PrestaShop in the root of the domain, the folder containing the files will be “public_html”. If you used a subdomain or subfolder instead, you’ll need to locate the correct folder.
In this way, we download a backup of the files from the source server to our computer. Now it’s time to move on to the database.
Pro Tip: With the SSH access you get with all our plans, including unManaged VPS cloud hosting, you can move files using LFTP (an FTP client you can use from a terminal). In this way, you connect to both servers and move files faster. You must have SSH access on both the source and destination servers.
Exporting the database
We have to create a copy of the database from the current server and then import it later on the new server where we are migrating the PrestaShop store.
The procedure depends on the system used by the provider to manage the database. In most cases you will be able to do this with phpMyAdmin.
This tool allows us to make changes to the database, but also to export and import entire databases.
Important Note: If you see more than one database when you access phpMyAdmin, you need to make sure you export the correct one.
To find the name of the database, consult the “parameters.php” file found in app/config/. You will find this information on the “database_name” line.
From phpMyAdmin, select the database and click on the “Export” tab. Then you just export the database with the default export options, using the SQL format.

How to migrate PrestaShop to another server
To recap: we created a copy of our PrestaShop site files and exported the entire database.
Now we need to copy files and databases to the new server and then edit the configuration files needed to make everything work properly.
Importing the database to the new server
To migrate PrestaShop to another server, we need to import the database.
First, we need to create a new database on the new server.
On cPanel, the procedure is very simple. If you don’t know how to do it, you can use the “MySQL database wizard” option, which will guide you step-by-step in creating the database and user.

After creating the database, open phpMyAdmin, click the list on the left, on the name of the database we created. As you can see, the database is still empty. Now click on the “Import” tab.

From here, we have to click on “Choose file” and then select from our computer the .sql file containing the database we downloaded in the previous step. The file will be named “database_name.sql” or “database_name.sql.zip”.

After selecting it, scroll to the bottom of the page to click on the “Import” button.
A warning will confirm that the PrestaShop database has been imported.

Editing configuration files
Now that we have imported the PrestaShop database to the new server, we need to get the shop associated with the correct database.
Let’s open the folder where we downloaded the backup of the PrestaShop files.
The file we need to edit is here: app/config/parameters.php
We can edit it with an editor such as Windows “notepad”.
In the file, we must insert the information regarding the new database. Let’s see which rows we need to modify.
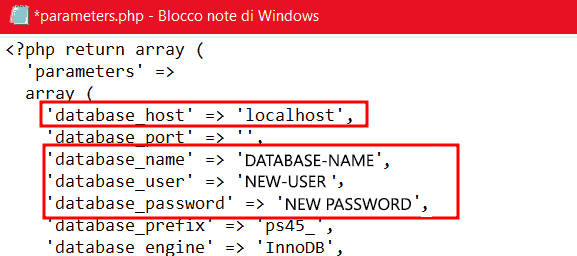
'database_host' => 'localhost',Refer to your hosting provider’s directions, if you are migrating to SupportHost you will need to use “localhost” as the database host.
'database_name' => 'DATABASE-NAME',Replace “DATABASE-NAME” with the name of the database you created on the new server.
'database_user' => 'NOME-NUOVO-UTENTE',As in the previous line, enter the username associated with the database you created.
'database_password' => 'NEW-PASSWORD',Enter the password of the user associated with the database.
After entering all the correct data, you can save the file.
Upload the files to the destination server
After following all the above steps, you will be able to upload all files and folders to the new server.
You can use the same method we’ve seen before: connect to the new server via FTP using a client like FileZilla.
This time, you will have to do the reverse process: select all site files and folders from your computer and upload them to the server.
So select the files from the “Local site” section of FileZilla, open the destination folder in the “Remote site” section (for example, public_html to upload them to the root), and then upload them (right-click> Upload).

Note: if you want your shop to be reachable from an address such as “www.yourdomain.com/shop” just create the “shop” folder in public_html and upload your files to it.
If you want to use a subdomain, just open public_html and then select the folder corresponding to the subdomain you want to use, for example “shop.yourdomain.com”.
Final steps to complete the transfer
Now that we’ve completed the migration, there are two possible cases.
Situation 1: You have decided to migrate your PrestaShop site and use the same domain on the new server.
In this case, you will need to change the domain pointer.
Situation 2: You want to migrate the server and change the domain.
You will need to edit the store configuration settings to change the domain to the new one.
Let’s see how to do both.
Complete PrestaShop migration (without domain change)
In this case, we have to change the domain pointer to ensure that when we visit the “domain.com”, the site is connected to the new server and no longer to the old one.
Before doing so, however, I suggest you verify that the migration was successful and that your e-commerce is working properly.
How do we visit the site if the domain still points to the old server?
We just use the hosts file.
The hosts file in our computer allows us to map the IP address to the domain. All we have to do is add a line with our domain and the IP address of the new server.
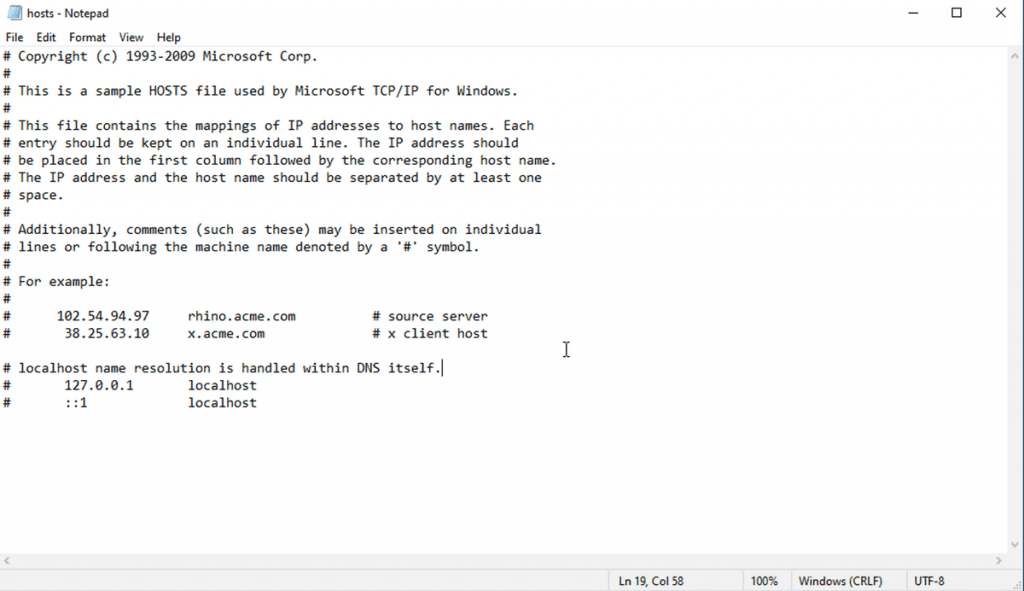
After completing this procedure, when we connect to the site through our web browser, we are directed to the one on the new server. We can then check that the site is working properly.
After that, we can proceed to change the domain pointer and wait for the changes to be applied (it usually takes a few hours).
How to migrate PrestaShop and change domain
If, in addition to transferring the PrestaShop site from one server to another, we would also like to change the domain, we need to change the site settings.
We can make this change from the database.
Firstly, we open phpMyAdmin to access the database on the new server.
Modify the ps_configuration table
We search the database for the “ps_configuration” table.
Note that the prefix of the table name might be different. In the example shown, the prefix is “ps45”.

In the table, we need to look for:
PS_SHOP_DOMAINPS_SHOP_DOMAIN_SSLIn correspondence with these lines, in the value section, we will see the address of the old domain. We need to edit that section by inserting the new domain, which you need to enter as “domain.com” without including “https:/”.

Modifying the ps_shop_url table
Keep in mind that even in this case, the prefix may not be “ps” but something else (just like in the example).

Let’s open it to edit it.
Inside, we will see three values:
- domain;
- domain_ssl;
- physical_uri.
If we have uploaded the site files inside the root of the new domain, we have to change the values as follows:
- enter the new domain in the domain and domain _ssl sections;
- enter “/” in the physical_uri section.
Here’s an example where the new domain is “domain.com”.

If you have uploaded the files in a subfolder, do this:
- enter the new domain in the domain and domains_ssl sections;
- enter the folder name in the physical_uri section (e.g.,“/store”).
For example, if your site is located at domain.com/shop, you’ll need to change the values as shown here:

Disabling maintenance mode
After we have verified that everything is working properly, we can bring our site back online by disabling maintenance mode.
From the back office, we can click on “Maintenance Mode“, as shown here:

Then set the Enable shop option to “Yes” and click “Save”.
If your site isn’t working properly, follow the methods in the next section to resolve common errors after site transfer.
Solving common problems after PrestaShop migration
Here are the solutions to solve some of the most common problems that occur after transferring PrestaShop from one server to another.
It is not possible to access the back office
In some cases, after migration of the site, trying to access it results in a 500 error message or a blank page.
If you are unable to access the PrestaShop admin area after transferring your site, there are a few things to check.
- First, make sure you have edited the parameters.php file and entered the correct data for the new database.
- If the data is correct and you continue to see the error, try renaming the .htaccess file, for example, “.htaccess-deactivated”.
- If you still can’t log in this way, you can activate PrestaShop’s debug mode.
How to enable PrestaShop debug mode
Open the “config” folder and edit the “defines.inc.php“.
Find the following line:
define('_PS_MODE_DEV_', false);
And change it to this:
define('_PS_MODE_DEV_', true);Try to access the PrestaShop back office again to see if it works.
Having activated the debug mode, if there are errors, you will see them displayed on the screen.
Remember that after finding the error you will need to turn off debug mode again.
The site only works in debug mode
If you are unable to view the site correctly when PrestShop’s debug mode is disabled, you could try deleting the cache.
In this situation, you can clear the site cache manually.
To do this, open the folder “var/cache”. Inside, you will find the folders “prod” and “dev“. Delete them (or simply rename them) to see if it solves the problem.
Pages or images are not visible
After migrating the PrestaShop site, some pages or some images might not appear correctly.

If when visiting some of the pages on your site you see an error such as “Page Not Found” or “Not Found The Requested URL”, here is what you can do.
Log in to PrestaShop back office and go to Shop Settings > Traffic & SEO. From here, scroll down until you find the ‘Set URL’ section, then change the Friendly url option to ‘No’ and save.
Repeat the operation and re-enable the Friendly url setting (set it to “Yes” and save). By doing this, PrestaShop will regenerate the .htaccess file and you should solve the problems you are having.
The pages are visible but have errors
If the pages of your PrestaShop store are reachable after the migration but don’t load correctly, you can try clearing the cache.
To do this, simply access your store’s Back Office and go to Advanced parameters > Performance. From there, you can click on the “Clear cache” button as shown here:

Conclusion
We have looked at how to migrate PrestaShop from one server to another in detail. You can also follow this same guide to transfer a locally developed PrestaShop site to a server.
Remember that after transferring your files and database, you still have one last step to do:
- if the domain has remained the same, you need to change the domain pointer.
- if you have changed the domain, you need to modify the database to associate it with the new domain.
At the end of this guide, I have listed some of the most common errors that can occur after a transfer.
Were you able to migrate your site successfully or did you experience some difficulties? Let us know in the comments.
Ready to build your WordPress site?
Try our service free for 14 days. No obligation, no credit card required.


