Updating Joomla is a delicate and important operation. You must remember to always do a full backup before starting and there are other intermediate steps that should not be underestimated.
With this guide you will discover why it is important to keep the CMS updated and how many types of updates there are. But more importantly, you will see how to upgrade Joomla version with step-by-step explanation.
First of all, let’s see: what are the updates for?
Table of Contents
Why is it important to update Joomla?
As we saw in the how to update WordPress guide, keeping your CMS up to date is important for several reasons.
The first and most important is the one concerning safety. CMS updates often contain fixes and security patches that allow you to resolve the holes found thanks to the active work of the community.
You should also know that CMS versions are not supported forever, for example support for Joomla version 3.10.X will cease on August 16, 2023.
On the other hand, updates also have another utility, namely that of introducing new features, such as additional or updated functions.
The fact that updating Joomla is important does not mean that you should update your system immediately after the release of the new version.
In fact, it is important to know the differences between the different types of updates.
Furthermore, it is also good to remember that unlike CMSs such as WordPress which allow for a simplified update procedure, for Joomla the situation is decidedly more complex and requires preliminary steps.
Let’s start by seeing what types of updates there are, and then move on to the preliminary and important things to do before, during, and after the update.
Joomla update types
In the Joomla ecosystem we can recognize three types of updates: patch, minor and major.

Joomla patches
Patches or bug fixes are minor updates from one version to another, for example from version 4.1.3 to 4.1.4.
Specifically, the Joomla update to version 4.1.4 includes some improvements and corrects known bugs, as you can read in the release news published on the Italian site dedicated to the CMS.
Upgrading from one version to the next patch is the simplest type of upgrade, for example from version 4.1.3 to 4.1.4. Indeed, in this case there will be no compatibility problems with templates or Joomla extensions.
As we will see later in this guide, however, there are some checks and operations to be carried out before upgrading.
Minor version of Joomla
The minor version or minor release indicates an update that involves changes in functionality. An example is the upgrade from version 4.0.6 to version 4.1.0.
Staying within the same major release, there should be no compatibility issues with extensions and templates.
However, in this case it is recommended to test locally or create a site staging environment to test the update before actually taking the site into production.
We will return to this point later in this guide and we will see specifically what kind of checks to do to update Joomla safely.
Major version of Joomla
Updates that include a major version change refer to major changes at the code level.
An example can be given by the upgrade from version 2.5 to version 3 of Joomla.
In this case, it is not a simple update, but the transition from one major version of Joomla to another can be compared to a real migration.
It is, therefore, the most complex update to carry out and the procedure depends on each case.
Indeed, in some situations there is no backwards compatibility between versions and it is necessary to resort to the adaptation of extensions and templates or to contact a developer capable of doing so.
Upgrading Joomla from 3.x to 4.x
As I’m writing the article, the current version of Joomla is 4.1.5, released in June 2022. Since many sites are still at version 3.X, in this guide we will see how to upgrade Joomla from 3.X to 4.X.
As you will see there are some preliminary steps and you can’t do a direct upgrade from one major version to another, but you need to upgrade first to Joomla version 3.10.
Updating Joomla from 3 to 4: what to know before starting
The correct operation to update Joomla from version 3 to 4, therefore the transition from one major to another, is to upgrade from version 3.10 to 4.X.
This move from 3.10 to 4.X is considered a “mini-migration“.
What does it mean?

Since this is a migration, albeit a small one, it will be possible to update the core with the one-click update, however it will be necessary to evaluate the individual extensions to understand if they are compatible with the update.
Please note that version 3.10.X is a “bridge” version created specifically to facilitate the upgrade from version 3.X to 4 of Joomla.
Therefore, it makes sense to upgrade to version 3.10.X only in case you want to switch to Joomla 4.
Upgrading from Joomla 3.X to 3.10
First you will need to make sure your Joomla site is updated to version 3.10.

Please note that if your Joomla version is older than 3.6.5 you will need to upgrade to this version first and then proceed with the upgrade after 3.10.
In this guide, however, we will see how to update Joomla starting from version 3.9.28 to version 3.10.X, and then proceed by seeing how to update Joomla from 3 to 4.
Preliminary steps
Note that in this paragraph the update process is simplified.
Before any update, for example even in this case when you switch from one minor version to another, you must always follow these preliminary steps:
- Do a complete backup of the site and the database;
- create a local or server-based development environment (subdomain or subfolder);
- restore the site backup in the development environment;
- proceed with the update;
- make sure the update works correctly (in the development environment);
- make a backup of the site in the test environment;
- restore the backup to the production site.

Don’t worry if these steps seem unclear to you now, you can find the step by step explanation in the next sections of this guide, when we will see how to upgrade from Joomla 3.10.X to Joomla 4.
If, on the other hand, you are not sure what you are doing and you are not familiar with managing backups and creating a test environment, it is advisable to delegate the Joomla update operation to a professional.
Upgrade from Joomla 3.X to 3.10
Remember to always proceed and only in a test environment and not to directly update the production site to avoid finding yourself with the down site.
After logging in to the control panel, click on the Components menu and then on Joomla! Update.
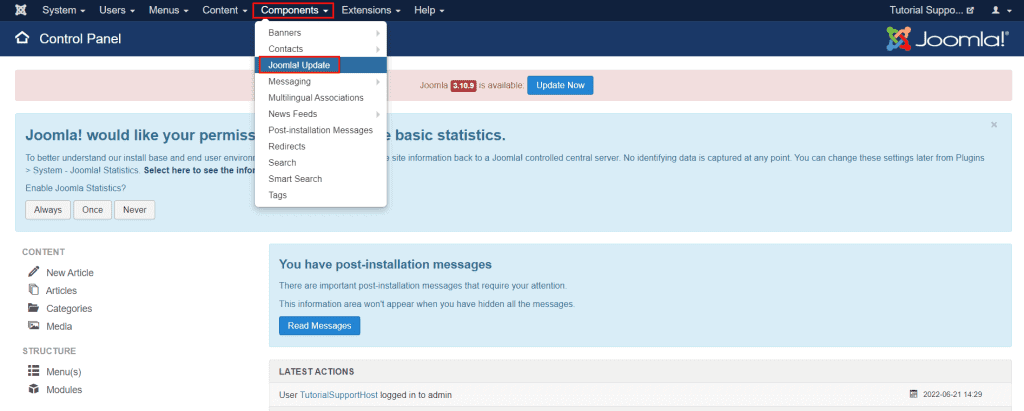
In this section of the Joomla administration panel we find the list of available updates.
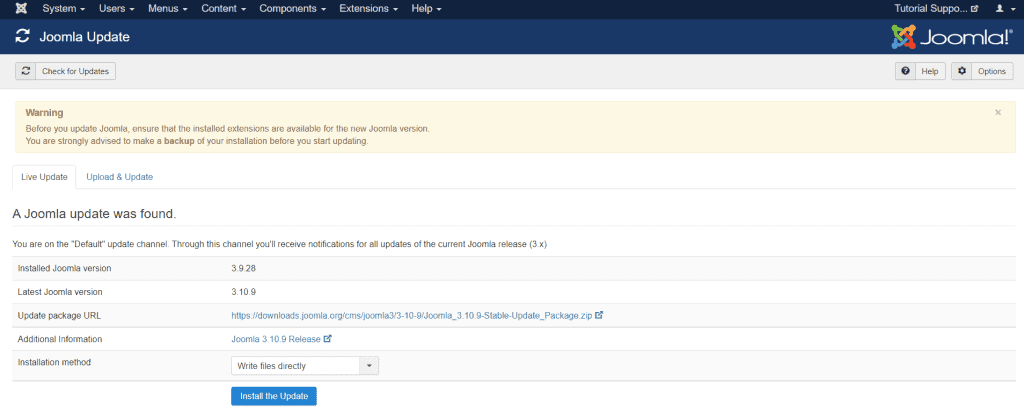
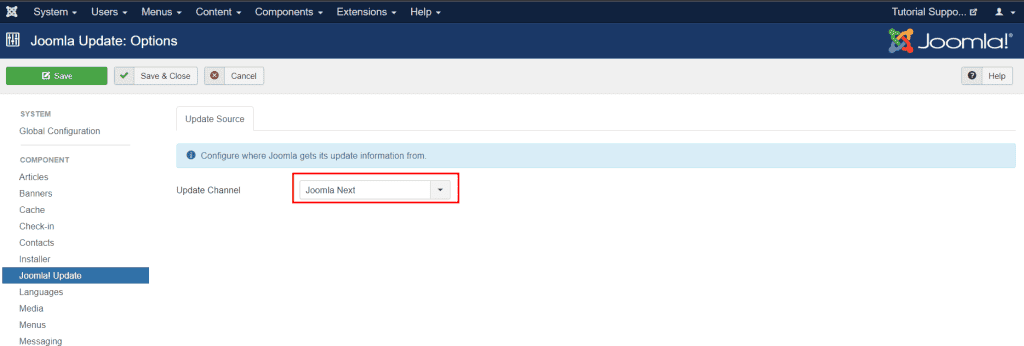
By clicking on Options at the top right we can select the server from which to update. The default option will be “Default“, instead we set “Joomla Next” and click on Save & Close to return to the previous screen.
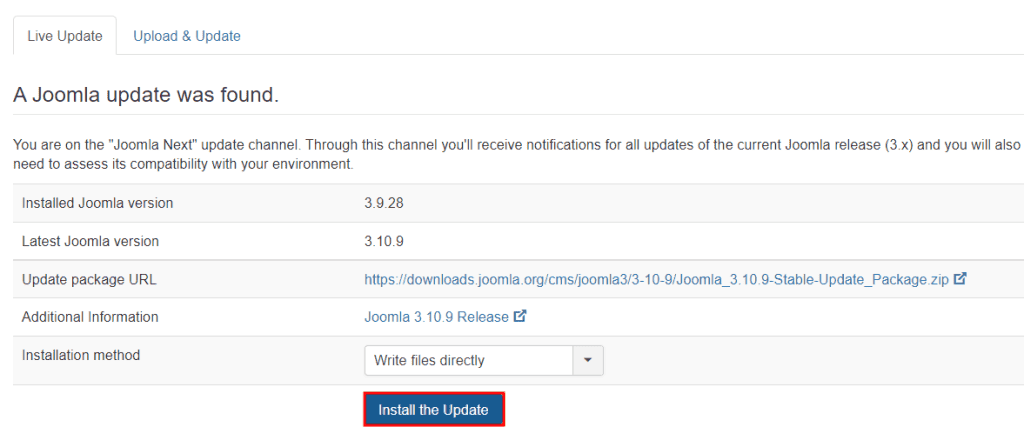
At this point we can click on Install the Update to update to the latest version, in our case the 3.10.9.
At the end of the process we will see a notice like this which informs us that the update was successful.

Upgrading from Joomla 3.10 to 4
To upgrade Joomla from version 3.10 to version 4 it is necessary to repeat again the preliminary steps that we have listed before.
It is always recommended to upgrade in a test environment and never directly to the production site.
For this reason the steps are as follows:
- make sure the current version is 3.10.X;
- make a backup of the site and the database;
- create a development environment;
- verify that the server complies with Joomla 4 requirements;
- check compatibility with extensions;
- back up again;
- upgrade from 3.10.X to Joomla 4.
Only after verifying that the update works correctly in a test environment, you can proceed with the actual update of the site in production.
Keep in mind, therefore, that all the operations illustrated in the following sections will be carried out after having created a development environment, while in the Updating the production site to Joomla 4.x section, we will see how to effectively update the production site after having done all tests.
Let’s proceed, therefore, seeing how to carry out all the updating operations that allow us to pass from the 3.10 version of Joomla to 4.
Check the current version of Joomla
As we said, we need to make sure that the Joomla version currently installed in the test environment is 3.10.X.
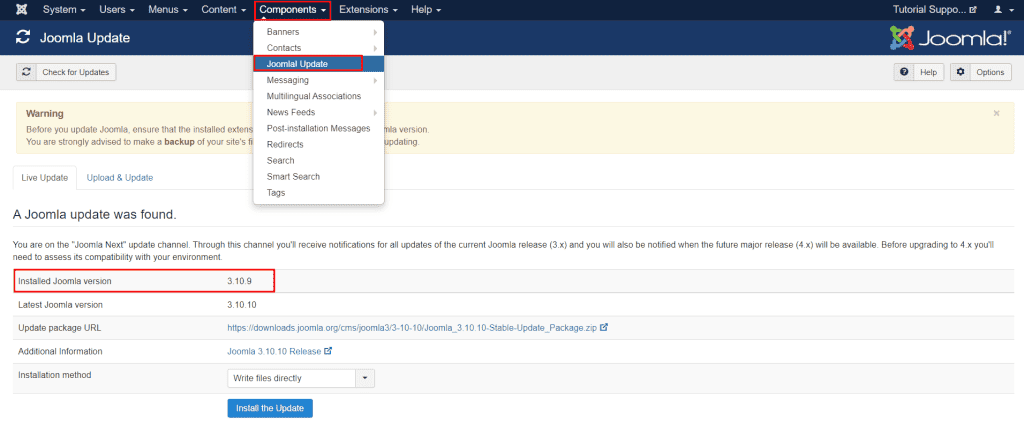
After logging into the Joomla administration area, click on Components > Joomla! Update. In this section we will find the current version in the Installed Joomla version line, in this case, as you can see, the installed version is 3.10.9.
Make a backup
At this point we need to do a full backup of the live site, making sure to create a backup of the site and database.
One option is to make a manual backup. In this case you will need to download:
- a copy of the database with phpMyAdmin;
- a copy of the site files with an FTP client such as FileZilla or Cyberduck.
Alternatively you can use the Akeeba Backup extension, the most common and simplified method.
Making a backup is essential to proceed safely and to be able to restore the site to its previous state in case the update causes some problems.
Create a development environment
To proceed safely we will have to test the update first. To do that you need to create a test environment with a stack like XAMPP, LAMP or MAMP.

Alternatively we can also use a subdomain or subfolder of the server where our website is hosted.
At this point we need to restore the backup copy of the live site, which we created in the previous step.
In this way we will have the exact copy of the site in production in a test environment and we will be able to proceed with the update.
You will also need to create a new database and database user to complete the restore.
After “cloning” our site in a development environment, whether local or on a subdomain of the server, we need to check the Joomla version.
The first thing to do, therefore, is to update to the latest version available, since we are moving from 3.10.X to version 4, the latest will be 3.10.10. You can follow the steps illustrated in the paragraph “Upgrading from Joomla 3.X to 3.10” to upgrade from one minor to another.
After performing the update we must verify that the database has also been updated correctly and correct it if necessary.
Click on Extensions > Manage > Database and make sure there are no alerts in the highlighted area on this screen (number 4).
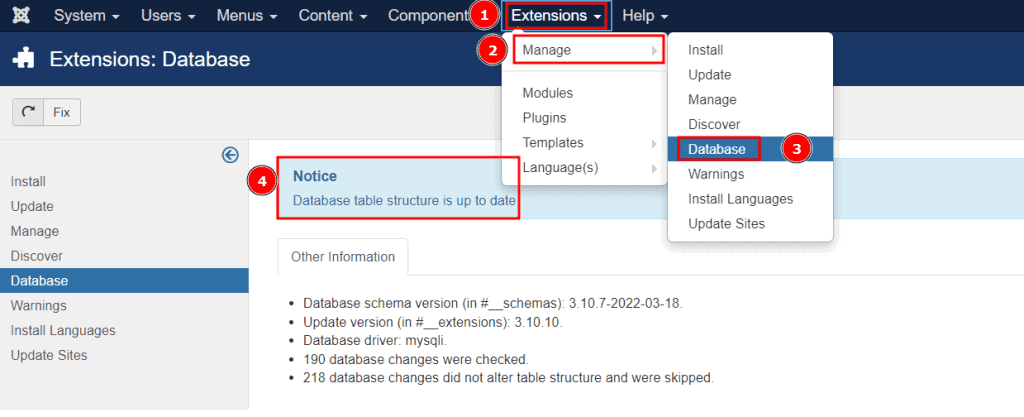
In the event that there should be a “Warning” notice, click on the Fix button at the top left to update the database structure.
After making sure that everything is working properly, we can make another backup.
Check the requirements and compatibility with extensions
From the section Components > Joomla! Update we can check if there are new updates and make sure that the requirements of the server where the site is hosted are compatible with the new update.
To do this we click on the Check for Updates button at the top and we will see a page like this that warns us that we have the latest version installed.
In this case, however, to switch from the current version 3.10.10 to 4 we have to change the settings.
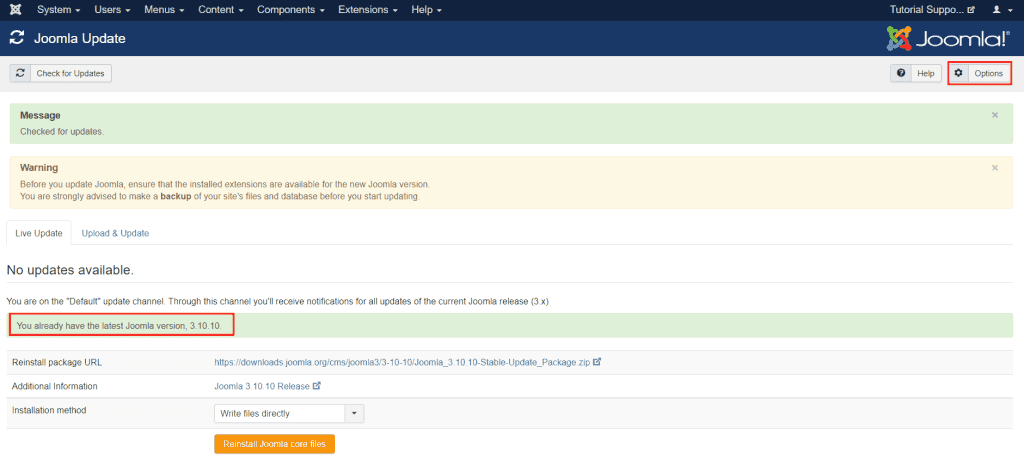
Click on Options at the top right.
From Update Channel select Joomla next as you see in this screenshot, then click on Save & Close.

We will be redirected to the previous page and this time we will see the new version available, Joomla 4.x, in our case Joomla 4.1.5.
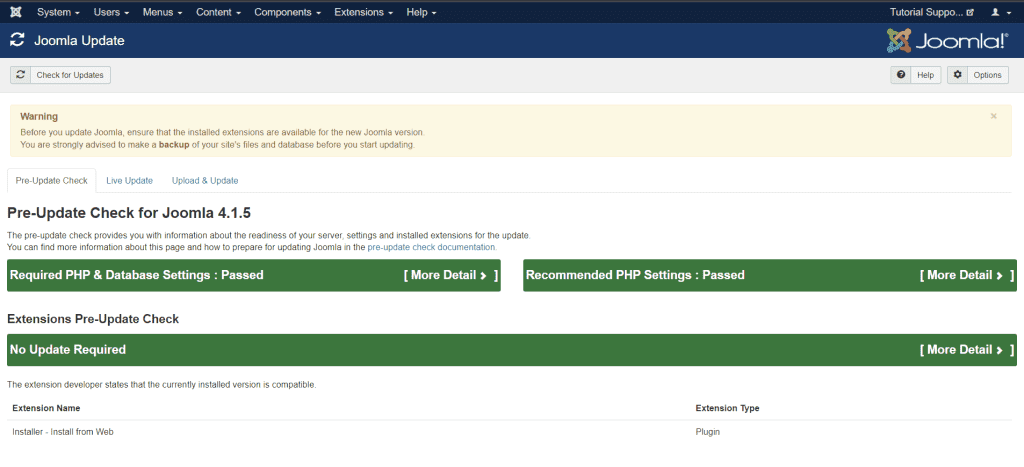
As you can see we will also be shown the pre-update check. From here we will be able to check if the server requirements are sufficient and if there are any extensions that are not compatible with the update in question.
At this point, if there are extensions in the list, you need to write them down to check if they are compatible. To do this, we use the development environment to verify that there are no problems with the installed extensions.
If the extensions are not compatible, we have to uninstall them. We can manage them from Extension > Manage > Manage. From here it is possible to uninstall, by clicking on Uninstall, the extensions that we do not need or that are not compatible with Joomla 4.
Updating to Joomla 4.x
After we have finished verifying all extensions and keeping only those compatible with the new version of Joomla, we can proceed.
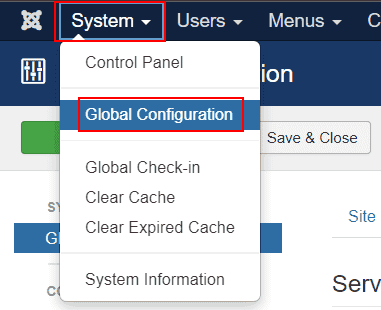
The first thing to do is turn on the error log. Click on System > Global Configuration.
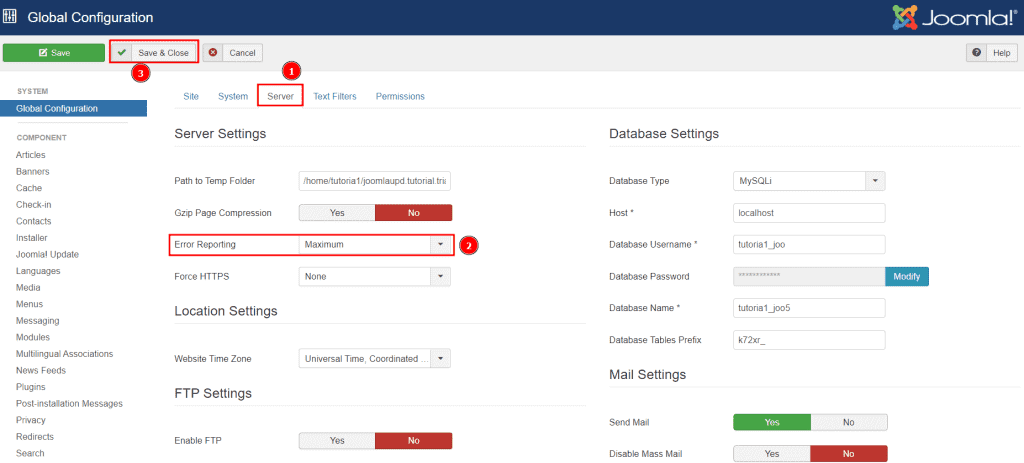
From here we open the Server tab and set Error Reporting to Maximum and then click on Save & Close. You can see the summary of the steps in the following screenshot.
Now it’s time to take another backup before proceeding with the upgrade.
At this point click on Components > Joomla! Update and click on the Live Update tab, from here we can click on Install the Update to proceed with the update.
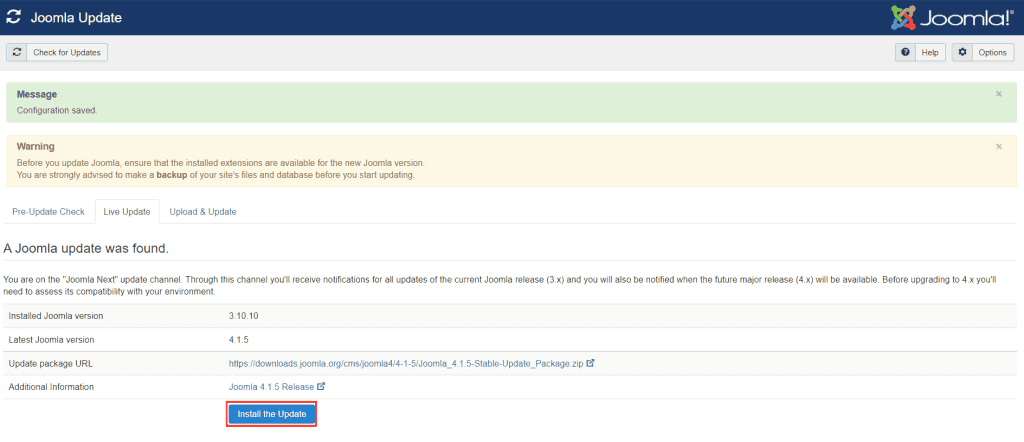
At the end of the update, if everything went well, you will see a notice like this informing you that the update is complete and you will find yourself in the back-end of the site, which has a new look since the Joomla 4.X version.

Post update checks
Immediately after updating we have to verify that everything works correctly.
In particular we will have to:
- verify that the database structure is updated correctly;
- possibly install new templates or extensions to replace the incompatible ones;
- check that there are no “broken” links.
Let’s see how to proceed, step by step.
Check databases and extensions
By clicking on System > Maintenance > Database, we can check if the database has been updated correctly.
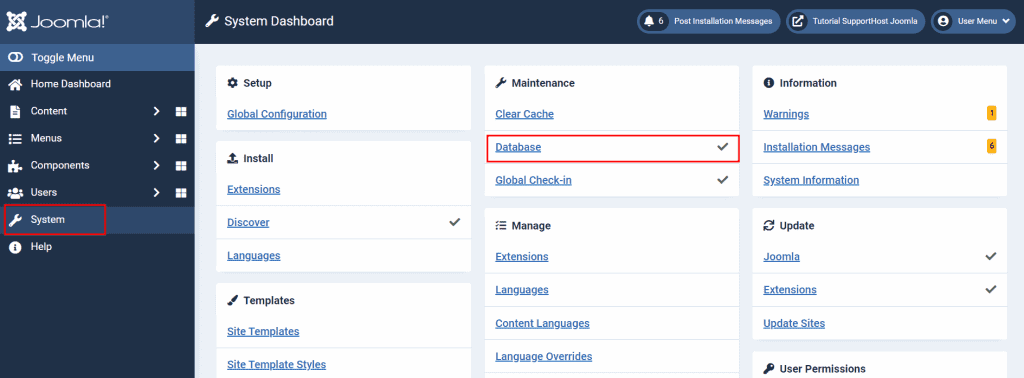
In case there are errors we can use the Update Structure or Fix button at the top left to correct the database structure.
To verify that there are no extensions to install, just click on System > Install > Discover. If everything went correctly on this page we shouldn’t see any extensions that need to be installed.
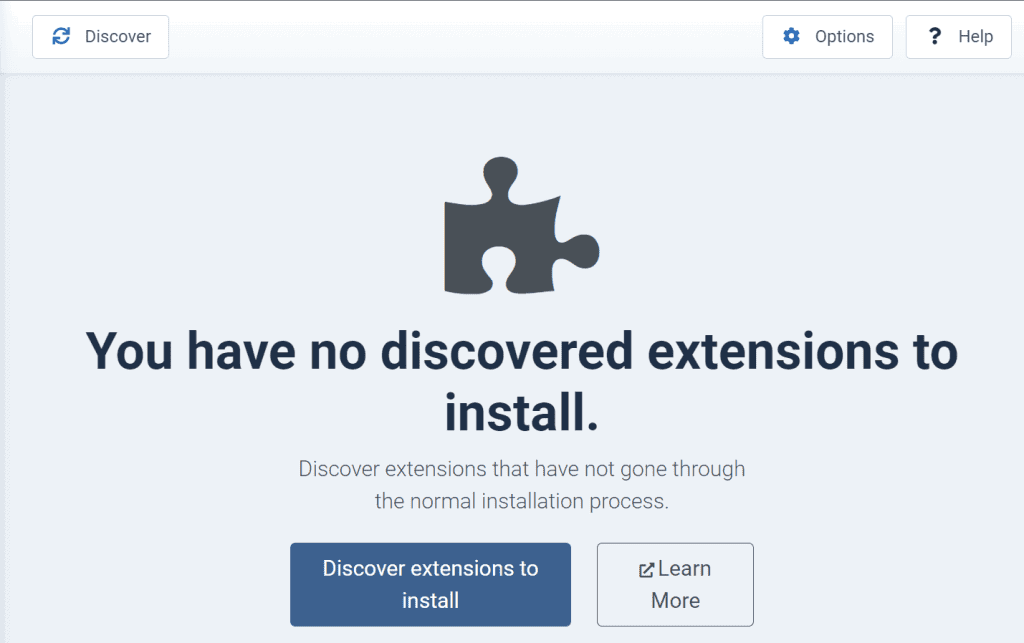
Check front end of site
At this point we open the front end of the site and make sure there are no errors.
In case the site is in maintenance mode, we can log in to view the front end.
After making sure that everything is working properly, to deactivate the site’s “offline” mode, just go to System > Global Configuration and set the Site Offline option to “No“.
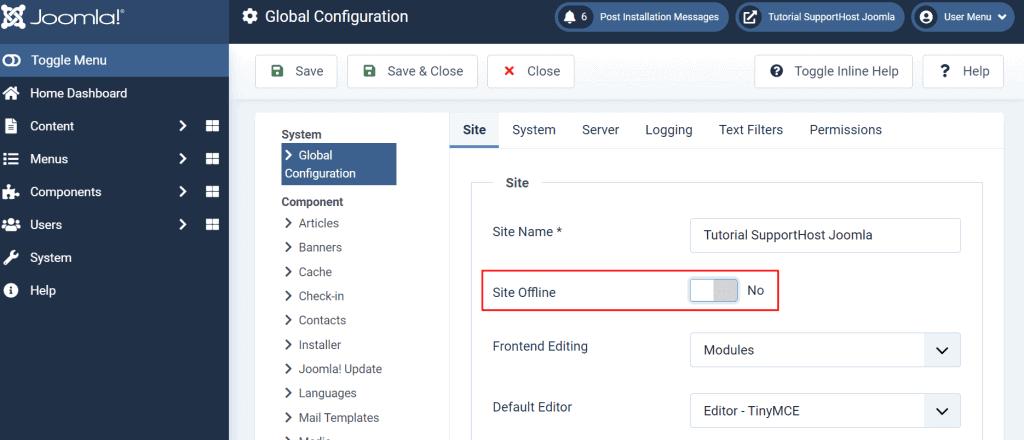
After changing the settings, remember to click on Save & Close for the changes to take effect.
Install templates and extensions
At this point we can run a backup again and then install any extensions or templates compatible with the new version of Joomla.
After configuring them we will have to make a backup again.
Check for broken links
By using a broken link search tool, we can make sure that there are no broken links and correct them if we find them.
For example you can use Ahrefs broken link checker.
After verifying again that everything is correct we can make another backup.
At this point we can turn off the error log. To do this, click on System > Global Configuration.

Open the Server tab and set Error Reporting to “System default“.
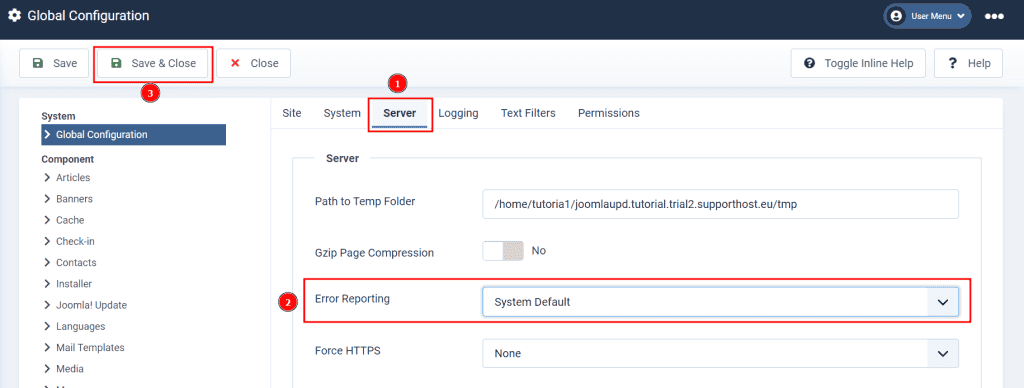
Update production site to Joomla 4.x
Before applying the changes made to the live site, make sure you have a backup of the live site (and database), or do it again.
At this point make a backup of the site that you have updated to Joomla 4.X, i.e. the site that you have created and updated locally or in a subdomain or subfolder.

Restore this backup to the site root.
Verify that everything is working properly.
In case you have made changes to the .htaccess file in the past, you may need to change some lines in the file. Check the official documentation to understand if it is necessary according to your specific case.
After verifying that everything works correctly, you can remove the old installation files and delete the test environment you created. If, on the other hand, you prefer to keep the staging environment for further testing, be sure to keep it updated to avoid security holes.
Common errors after Joomla update
One of the errors that can occur is displaying a white screen when trying to access the site, immediately after updating it.
The error could be due to a Javascript problem or a PHP error.
In these cases, you need to check the error logs located at this path:
sitename/administrators/logs
In this folder you will find a file called “joomla_update.php”, related to the update procedure. From here you will be able to understand if the update was successful or there were errors.

You can also submit the log on the Joomla support forum to ask other community members for help.
If you encounter other errors, I suggest you to consult the CMS official documentation for the list of the most common problems that occur in the transition from Joomla 3.10.X to 4.X.
Conclusion
Updating Joomla from one version to another can be quite complicated. Especially when it comes to moving from one major version to another, since it is almost a real migration.
However, if you follow all the steps we have shown you and remember to do the backups correctly, you shouldn’t have a hitch.
Have you ever tried to update Joomla? Did you encounter any problems during the process? Let us know here in the comments.


Leave a Reply