
In this guide we will see how to use Contact Form 7 from basic to advanced features. We are talking about one of the top 5 most used WordPress plugins.
We’re going to see how to create a contact form to allow your users to write to you by email without having to indicate your email address and thus limit spam. You’ll be able to easily insert the form in the WordPress contact page.
Table of Contents
What is Contact Form 7
Contact Form 7 is a free WordPress plugin that allows you to create email sending forms to insert on your website.
A contact form is nothing more than a form that a user can fill out to contact you, The contact form on our site was created with Contact Form 7.

This is a very flexible contact form plugin that allows you to create WordPress forms of any type, and insert them in any page via a shortcode, a simple code to insert the form inside a post or a page, as we will see in this guide.
It is one of the most used plugins for WordPress with more than 5 million active installations.

Besides that, you can add functionality to Contact Form 7, via other plugins, as we will see later in this guide.
There are other WordPress plugins that can be used to create contact forms, including WPForms, Gravity Forms and Ninja Forms.
Pros and cons of a contact form
Having a contact form on your site has advantages and disadvantages. The question you need to ask yourself is, do I want to be contacted or do I not?
For example, if you run a personal blog where you tell about your adventures and keep it for your family, you may not want a stranger to write to you. If, on the other hand, you sell a product or service through your blog then the situation changes.
Benefits of contact forms
- Give users the opportunity to write to you. This is useful if you sell a service and a potential customer wants to get in touch with you before buying to ask for clarification.
- Seeing a contact form gives confidence to your users, who may buy before contacting you, but know that if they have a problem I can use that form.
Disadvantages of contact forms
- You may start receiving spam. In fact, you’ll almost certainly receive spam if you don’t protect your form as I indicate in this guide.
- You may get a lot of requests, even non-themed ones, at which point you should handle them somehow.
Tips for a better contact form
If you put a contact form on your site, you want your users to fill it out and get in touch with you. If your form doesn’t follow certain rules you will reduce the number of people who fill out your form.
- Use as few fields as possible. The more fields you ask for in your form, the less people will fill it out. Human beings are lazy, try to make life easy for your users.
- Don’t ask for the phone number, or at least don’t make it mandatory. Many people are reluctant to leave their phone number, which is very personal information.
- Customize your submit button text. Try testing different versions of your button text based on what you offer with your form.
Install Contact Form 7
Installing Contact Form 7 is super easy. Log in to your WordPress dashboard and in the left sidebar click on Plugins -> Add New (or Add New).
You can search for the plugin using the search box on the right, or click above to see the most popular plugins. As you can see Contact Form 7 is the first plugin in the list.

Click on the install now button to install the plugin. Once the installation is finished the button will change the text, becoming “Activate”.

Click on activate to activate the plugin and we’re done. Easy no?
Now the fun part begins, creating the form and adding it to our contact page.
Create a basic contact form
Now that the plugin is installed, we see a new entry in the sidebar:

Clicking on contact we see the various forms created, since we have just installed the plugin we don’t have any form, but we see the example form that Contact Form 7 creates during the installation.

This module is already good to be used as is. But we’re going to modify it to better understand how the plugin works and to customize the module according to our needs.
Click on the module name to edit it.

Below the title, which we can edit to our liking, we see the shortcode to add the form to our contact page, inside a light blue box.
Below we see 4 tabs, through which we can customize our contact form.
The Form tab: let’s edit the form
Let’s start with the Form tab, which allows us to edit the HTML code of the form. From here we can add or edit the form fields and modify their text.

As you can see this is the form code, a mixture of HTML and shortcodes.
With the default Contact Form 7 form you ask your users for their name, email, subject and message text. Then they see a button to send the message. In this field you can add HTML and JavaScript.
From this screen we can add the various fields we need. It will be necessary to position the mouse cursor where we want to insert the new field, then click on one of the buttons at the top.
The fields we can enter are:
- Text: Adds a one-line text field to request a piece of data such as first and last name.
- Email: Adds a one-line field for an email (checks that the email is valid).
- Url: Adds a one line field to request a url and checks that it is a valid url.
- Phone: Adds a field for the phone number.
- Number: Adds a field for a number, checks that it is a number and there are no other characters.
- Date: Adds a field to select a date from a calendar.
- Text Area: Adds a multi-line text area, this is the field commonly used for the body of the message.
- Drop-down menu: Adds a select field with predefined options.
- Checkboxes: Adds checkboxes for a yes/no selection.
- Radio buttons: Adds HTML radio buttons, the user can select an option.
- Acceptance: Adds a box for acceptance.
- Quiz: Adds questions with answers predefined by us.
- File: Adds a section for uploading a file.
- Submit: Adds a button to fill out and submit the form.
Let’s look at them one by one.
Text field
By clicking on text a window will appear where we can customize this section of the form. If we want to create for example the “name” input field we can use the settings shown below.

With the settings we have chosen we will have this shortcode:
[text* text-169 id:name class:name placeholder "Your name"].
The email field allows us to set up a box in which users will enter their email address. Compared to the classic text field, this will serve to verify that the email is written in the correct format.

Here is the shortcode obtained with our settings:
[email* email-475 id:email class:email placeholder "Your email"]
Url
Again, compared to the text field, using the url field will cause a check to occur to verify that the format of the address entered is the correct one.

In this case there is no need to set the field as mandatory. Here is the shortcode we get:
[url url-527 id:site class:site placeholder "Your website"]
Phone
Just as in the previous fields, it is better to use the specific field for phone numbers instead of simply the text field.

As I told you before, it’s best not to make this field mandatory, because not everyone will be willing to enter their number.
Our shortcode with the settings you see in the screenshot above: this is it:
[tel tel-423 id:phone class:phone placeholder "Your phone number"]
Number
With this field you can make sure that the entered character is a number and therefore no different characters are entered.

You can also choose to set a range within which the number should be included. For example in our case we used the range 1-100. Here is the shortcode:
[number number-767 min:1 max:100 placeholder "Insert a number"]
Date
This field can be useful in case we want to give the user the possibility to set an appointment or a date in which to be contacted again. In this case we can also set a date range, as you see below:

Here’s the shortcode we get:
[date date-453 min:2020-12-07 max:2020-12-12 id:date class:date "Make an appointment"]
If we want to add some text to make the user understand what he/she has to do, we can add a label. In this case, all we need to do in the form is to add <label> Make an appointment </label> to achieve this result:

As you can see in this case the month and year are already fixed because we have chosen a narrow date range, but of course you can choose the range you decide.
Text area
Through the text field your users will only be able to enter one line of text. If you need more lines, for example to add a message or a request the field you have to use is just the text field.

Our shortcode:
[textarea textarea-283 id:message class:message "Your message"]
Drop-down menu
Among the fields you might also choose to include a drop-down menu with default options. In this case we have created a drop-down menu to show three options. You can choose the number yourself, it depends on the number of lines you write: each line corresponds to an option in the menu.

The shortcode we get with the example above is this:
[select menu-405 id:menu class:menu multiple "Option 1" "Option 2" "Option 3"]
Checkboxes
An alternative to the drop-down menu options can be to use checkboxes. For example, you could put ‘Yes’ and ‘No’ checkboxes in your form.
In this case, in addition to entering the options (which can be more than two) you can choose whether to Make the checkboxes exclusive. As we did in this example:

Here’s our shortcode:
[checkbox checkbox-805 id:box class:box use_label_element exclusive "Yes " "No"]
Option buttons
Compared to the drop-down menus and checkboxes we just saw, if you use Radio Buttons, the user will only be able to choose one of the available options.

In this case we’ve included four different choices, as you can also see in our shortcode:
[radio radio-38 id:options class:options use_label_element default:1 "Option 1" "Option 2" "Option 3" "Option 4"]
Acceptance
This field allows you to enter a box to check, for example to accept the privacy terms, as I will explain later in this guide in the chapter on how to adapt Contact Form 7 to GDPR.

You can choose whether to make the box optional, in the case you see in the example it will be necessary to check the box because it has been set as mandatory. Here, in fact, is the shortcode we get:
[acceptance acceptance-299 id:terms class:terms] Accept terms and conditions [/acceptance].
Quiz
In your form you can also create a small quiz, you just need to specify question and answer, here is an example:

As you can see you have to separate question and answer in this way: Question | Answer. You can also insert more than one question (in our case it’s just one) and here is the shortcode we get:
[quiz quiz-309 id:quiz class:quiz "Do you know which plugin this form was created with? | Contact form 7"]
File
In your contact form you may want to add the ability to attach a file, such as a pdf, or an image, but also audio and video files.
In this case we can choose whether to set a maximum limit for images, which by default is set at 1 MB. And then also the type of file you can upload.
You can also decide not to set any limitations and allow all accepted files by default, i.e.: jpg, jpeg, png, gif, pdf, doc, docx, ppt, pptx, odt, avi, ogg, m4a, mov, mp3, mp4, mpg, wav and wmv.
In our case we left the default limit and chose to allow only jpg, png and pdf files. This means that when the user uploads the file they can only do so if it is in one of these three formats.

Here’s our shortcode:
[file-570 filetypes:jpg|png|pdf id:file class:file].
Send
It simply allows you to set the form submit button with the text you want. You simply enter it in the Label field, as you see in this screenshot:

Here is the shortcode corresponding to the settings you see in the screenshot:
[submit id:submit class:submit "Submit my data"].
Using placeholders and labels
As you may have noticed in the previous paragraphs, in some fields you can insert placeholders. These are nothing more than placeholders with text that will appear in the field before it is filled with the required data.
Here’s what a sample contact form will look like:

You can see how in the different fields where we have used placeholders, text appears that tells you what data to enter. For example “Your name”, “Your email” and so on. The text entered by the user when he will go to fill the different fields, will replace the text used as placeholder.
If, on the other hand, you want to add text that precedes the field and provides directions to the user, you’ll need to add a label.
To do this, just write in the form
<label> Text [shortcode] </label>.
Here’s an example:

In this case we used a label that says ‘Name’ before the corresponding text field, like this:
<label> Name [text* text-645 id:name class:name placeholder "Your name"] </label>
Alternatively, if you want to insert a simple line of text preceding the field to be filled in, just type it directly into the form. Remember that you can also use HTML formatting for boldface, and so on.
Here’s the result you get from inserting a line of bold text, for example:

The Mail tab: customizing the sent mail
Now let’s click on the second tab, the Mail tab.
In this section we can set the text and details of the email that is sent after the form created with Contact Form 7 is filled in.

The section includes various fields, which you can leave as they are or modify as you like. Let’s see them one by one.
Field “A”
In the “To” field you can enter your personal address, if you leave the default value the email will be sent to the address you used to install WordPress. So make sure the email address you used is valid.
“From” field
In the “From” field we recommend using a default email. In the screenshot above you see a cf7.local address because I used local to install WordPress locally. If you use SMTP to send WordPress emails, which I’ll talk about later in this article, you can use another address.
In the Contact Form 7 FAQ we read:
For example, if an email had “your-name@yahoo.com” in the From field, but was actually sent from your web server (not yahoo.com), it would be highly possible for email servers to treat it as a spoofed address. If you use an email address in the same domain as your site, you can reduce the risk of being treated this way.
Obviously if the email is sent from your address, when you click on reply from the mail client you would be replying to yourself. That’s why you have to make sure that you don’t delete this text from the Additional Headers field:
Reply-To: [your-email].
”Subject” field
This will be the object that will be set in the mal you receive. By default the object includes the name of the site and then picks up the information entered in the form, from the your-subject tag.
However, if you edit the form and don’t want to put a field where users enter the object, you can change this setting.
For example, you could make the subject display the name of the person who filled out the form, like this: [_site_title] “[your-name]”.
Remember that between the quotes must be the name of the tag (in this case your-name) that you used in the form. So in this example of ours, we will need to have a field in the form that matches, like this one:
[text* your-name id:name class:name placeholder "Your name"].
Message Body field
The body of the message is what you will receive in the text of the email when one of your users fills out and submits the form.
Again, you must refer to the tags you used in the form. If you have changed the tags from the default ones, in fact, you will need to change them to match.
With our settings we will have for example this:
From: [text-169]<[email-475]>
 Message Body:
 [textarea-283]
 --
 This email was sent from a contact form on [_site_title]([_site_url])
Of course you can pick up the other fields as well based on the ones you request in the form.
If you check at the top the various shortcodes (the codes in the square brackets) are in gray, but [date-885] is in black. This indicates that you are not using this code in any field. If you want, you can copy-paste it into the text of your email to confirm that this checkbox was checked by the user during compilation.
“Attached files” field
If you have also included an option to attach files in your form, you will need to enter the tag you used in this field.
In our case it was file-570 and you will have to, therefore insert it like this:

In this way you will be able to receive by email the attachments uploaded by users during the form filling phase.
Mail option (2)
Scroll down to see the Mail option (2).

If you select this option you can set Contact Form 7 to send a confirmation email to your user, to give them confidence that the form has been filled out correctly.
The Messages tab
In this section you can configure Contact Form 7 by setting up the messages the customer sees when they fill out the form. If you’re creating a contact form you don’t need to change them since they’re pretty accurate, but if you’re using the form for other purposes you may want to revise the words so that they make more sense.
For example, you might want to use the form for a quiz, during which you also ask your user for personal information. In this case instead of displaying a success message that reads:
Thank you for your message. It has been sent.
You may want to change the message to something that references the quiz he just finished completing.
The Additional Settings Tab
This tab is the most advanced one and the one you will most rarely use, but it is no less important.
In this tab you have a text area where you can enter some options. Let’s see what options are available. For a more detailed description check here.
The available settings are as follows:
subscribers_only: true
If you use this option only logged in users will be able to submit the form. Users who are not logged in will receive an error message telling them that they have to login. If you use this option in the form no antispam will be used, since it’s assumed that all registered users can use the form without restrictions.
demo_mode: on
If you use this option no emails will be sent, and if you use an additional plugin like Flamingo, the sent data will not be saved. The user will see the confirmation message normally. It can be useful for testing purposes.
skip_mail: on
Using this option Contact Form 7 won’t send any email but will perform all other actions correctly (for example if you use Flamingo it will save the form data). We have this option active in the form since, as we’ll see in a moment, we send the result of the form via API to our ticket management software.
do_not_store: true
If you use Flamingo, you can use this option to tell Flamingo not to save the data for this form.
on_sent_ok: "alert('sent ok');"
on_submit: "alert('submit');"
If necessary you can insert a JavaScript code. The JavaScript code must be only one line, and it is called in case the form is submitted correctly or when you press the button to submit the form.
Adding the form to the contact page
Now that we have the form ready and hopefully working we can add it to our contact page.
This part is super easy. As I mentioned, on the Contact Form 7 form editing page, in the light blue section we see a code enclosed between two square brackets. This type of code is called a shortcode in WordPress.
We copy this code, including the square brackets, and paste it inside our contact page, at the point where we want to show the form code. We save the page.
Now we can visit the page to see how it looks. If we don’t like it we can edit the HTML code of the form or edit the CSS code, both of which are extended topics that we can’t cover in this guide.
We now have a working form on our contact page. However, anyone could fill it out and send it and fill us with spam. Let’s see how to protect our form.
Protect Contact Form 7 from spam
This is a common problem that we need to protect ourselves from if we don’t want to be inundated with thousands of useless emails.
Using Contact Form7 is easy to protect yourself. In the side menu we go to Contact -> Integration and set the integration with Google reCAPTCHA (one of the most popular CAPTCHA codes).

Create a reCAPTCHA API key
We need to visit google recaptcha and fill out the required fields.

In the label we enter the domain of our site, we choose the version of reCAPTCHA to use, v3 is less annoying and the one I recommend you use. We add the name of our domain(s) and agree to terms.
Let’s scroll down and press enter. On the next screen we see the API keys.

At this point we copy the keys and insert them into the Contact Form 7 integration page and save.
If you now visit your page containing the form in the bottom right corner you will see the logo of Google reCAPTCHA protection v3.

The problem is that we see this on all pages. This is a common problem that also impacts performance, let’s see how to fix it.
Contact Form 7 and performance
In one of my article I talk about how to speed up WordPress and I explain that one of the problems of Contact Form 7 is that it loads a CSS file and d a js file in all the pages.
It’s true that they are only two files, moreover of small size, but the fact remains that if they are of no use we can avoid loading them and improve the performance of our site.
In that article I explain how to avoid this by disabling the loading of those files with a plugin called WP Asset Cleanup. Refer to that article for detailed instructions on how to do that.
By avoiding the loading of the Contact Form 7 JavaScript file you automatically delete on all pages where you don’t need Google reCAPTCHA V3, thus eliminating that icon in the bottom right corner on all pages, except of course the contact page.
There is another, more manual, way to remove such files. You can insert in the functions.php file of your WordPress site this code:
add_action( 'wp_print_scripts', 'deregister_cf7_javascript', 100 );
 function deregister_cf7_javascript() {
   if ( !is_page(array(8,10)) ) {
     wp_deregister_script( 'contact-form-7' );
   }
 }
 add_action( 'wp_print_styles', 'deregister_cf7_styles', 100 );
 function deregister_cf7_styles() {
   if ( !is_page(array(8,10)) ) {
     wp_deregister_style( 'contact-form-7' );
   }
 }
You’ll just have to edit the part where it says array(8,10) by inserting the ids of the pages that contain the form instead of 8,10.
Send emails via SMTP
In some cases it may make sense to send emails through an external SMTP server.
This is helped by another plugin, that I used in other custom projects where I needed to send large volumes of emails without risking to blacklist the server IP.
The plugin is called Post SMTP and you can install it the same way as we installed Contact Form 7 at the beginning of this guide.
This might not make sense if you think you will receive few emails through your form, but if you expect large volumes of contacts then it is advisable to use it, perhaps in conjunction with a professional service like Amazon SES.
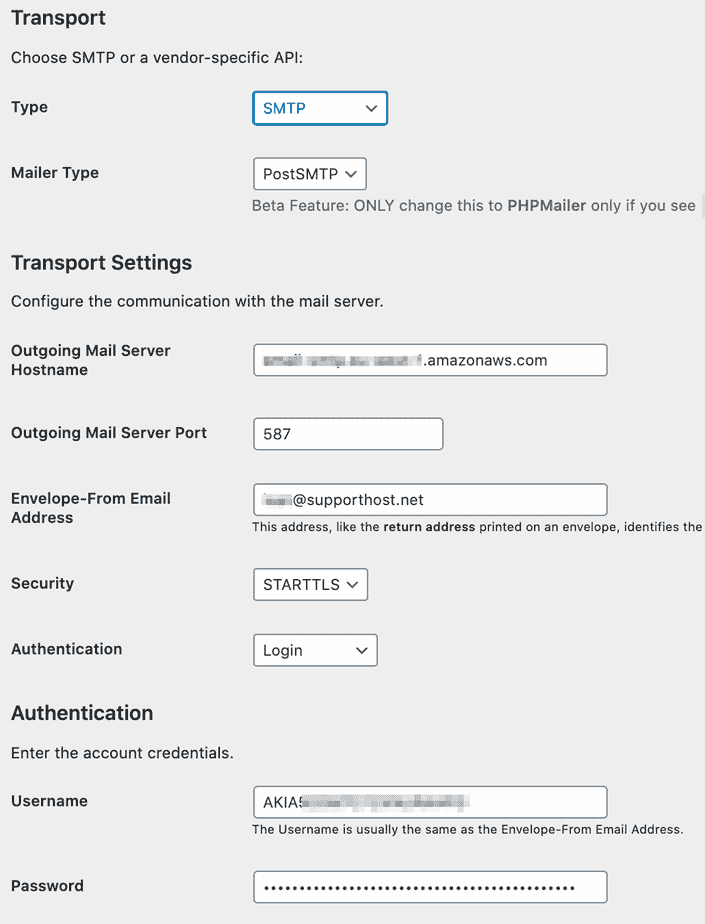
Configuring it is very easy, you just need to set the few required data of your SMTP server and you’re ready to go. It also allows you to send a test email to check that everything is working properly.
Among the many similar plugins available this is the one I like the most because it has another function as well. Which one?
Log emails sent to the database, this can help you troubleshoot problems.
Contact Form 7 does not send mail
Apparently this is a common problem, sometimes Contact Form 7 doesn’t send emails. How can we solve it?
The causes of this problem can be many and I will try to clarify.
You see the confirmation message below the form but you don’t receive the email
The first thing to check in this case is the “Additional Settings” tab of the form you’re using. It could be that you forgot an option that blocks the email from being sent.
If this is not your case install the Post SMTP plugin I mentioned above. After installing and activating it (it doesn’t matter if you configure SMTP yet) fill out and submit the contact form. Then from your WordPress dashboard, in the sidebar click Post SMTP -> Email Log to check the latest emails sent.
Do you find the email sent from the form during your test among those?
If yes, the problem is with your hosting provider, it is possible that the IP of the server is in a blacklist, the email is clearly sent but not received, probably ends up in spam. Contact your hosting provider, or you can simply change hosting. We always keep our IPs reputation clean, and in those rare cases when an IP ends up blacklisted we set up a relay, to send from another IP until the server IP is removed from the blacklist. Whether you choose WordPress hosting or a cheaper plan like shared hosting with us you will never have this problem.
Alternatively, you can configure the Post SMTP settings so that you don’t send your emails with the address of your server but using another service among those available. In this case you solve the problem.
If the email is not in the log you can look for the solution elsewhere. It is almost impossible that Contact Form 7 gives you a confirmation message and does not send the email.
Contact form 7 cannot send the email
If you don’t get an error I recommend following these steps.
- Reloads the page that contains the form.
- Open the JavaScript console and check for errors (if there are any, whether they are related to Contact Form 7 or not find a way to fix them).
- Send a message using the contact form and check for errors in the JavaScript console.
It happened to me several times to see that Contact Form 7 didn’t send the emails, and the problem was due to the fact that the API, which Contact Form 7 needs to send the email, was blocked.
In this case we see the icon continuing to run:

And an error in the JavaScript console:

Which I reproduce below to make it more readable:
Failed to load resource: the server responded with a status of 401 (Unauthorized)

/wp-json/contact-form-7/v1/contact-forms/5/feedback
If this is your case look up who is blocking the WordPress API so you can fix it.
Save form data with Flamingo
I’ve mentioned Flamingo several times, in fact you can’t talk about Contact Form 7 and not talk about Flamingo. The two go hand in hand.
Flamingo does one thing, and it does it well. It stores the data that is submitted via forms (unless you set the form to not store it) and makes it available in the WordPress dashboard.
This plugin could save you in those cases when a problem with emails makes you miss an important communication. With this plugin you will have all of them saved in the database and always available.
Install Flamingo
As you have seen installing a plugin in WordPress is very easy. Let’s go to Plugins -> Add New and in the search box write Flamingo.

Now let’s click on the install now button and then activate, and we’re done. Installing plugins with WordPress is so easy. That’s why you end up abusing them, to the point that I had to write an article about plugins slowing down WordPress.
See saved forms
Once Flamingo is installed (there is nothing to configure) every time a Contact Form 7 form is filled out a record is saved to the database.
You can find Flamingo in the sidebar of the WordPress admin area.

By clicking on Incoming Messages you see all those messages that have been sent via Contact Form 7 from your site.

While clicking on Address Book we see all interactions by user, not only messages sent via Contact Form 7 but also comments and the role they have in WordPress.

Advanced options for customizing Contact Form 7
So far we have seen the basic functions of Contact Form 7, but the versatility of this plugin is unmatched. Some of these operations can be done without additional plugins, for others we need an additional plugin to add a function.
Let’s see what the most common ones are.
Send emails to different recipients
In some cases you may want to give your users the choice of who to contact. For example, you may want to use a drop-down menu (a select field) through which they can choose who to contact or which department of your company to contact.
This way depending on the request the contact email will be sent to the sales or support department. This is super easy to do with Contact Form 7 and you don’t need any additional plugins.
Edit the form and in the Form tab add a drop-down menu field.
Set the field as mandatory and select the option to insert a blank item as the first option.
In the options field enter the options as you see in the image below, then click on Insert Tag.

The form is ready, although we’ll probably need to enter some text to act as a label for that choice.
Now in the Mail tab we have to set correctly.
If you check the image above, in the name field you see menu-141 (you could have changed it to one of your choice but it is not necessary).
In the tab we need to insert in the To field this shortcode:
[menu-141]
In this way:

This way the user can decide who to send the email address to.
Getting visitor’s IP
If for some reason you need to record the IP address of the person filling out the form you can use the shortcode:
[_remote_ip]
You can include it in the text of the email that Contact Form 7 sends.
Getting date and time of sending
Similarly, you can mark in the text of the email you receive the date and time it was sent using these two shortcodes:
[_date]
[_time]
Get the address of the page where the form has been filled out
In some cases you may have included the same form on more than one page and you may need to know which page it was filled in from.
Contact Form 7 provides you with two different shortcodes to get this data:
[_url]
[_post_url]
Redirect the user to another page after submitting the form
In some cases you may want to redirect the user to a different page after the form has been successfully filled out and the email has been sent.
To do this you can use a DOMevent that Contact Form 7 provides: wpcf7mailsent
In the Form tab, at the bottom after the HTML code of the button to submit the form you can paste this JavaScript code:
<script>document.addEventListener( 'wpcf7mailsent', function( event ) {location = 'https://example.com/';}, false);</script>
Obviously you will have to replace https://example.com/ with the address of the page to which you want to send the user.
Track form submissions with Google Analytics
If you use Google Analytics on your site, it might be useful to track every time a Contact Form 7 is submitted to set it as a goal or even just for statistical purposes.
As we did before, we can insert a JavaScript code under the HTML code of the form to track its submission. The code to insert is this:
<script>document.addEventListener( 'wpcf7mailsent', function( event ) {ga('send', 'event', 'Contact Form', 'submit');}, false );</script>
You can edit ‘Contact Form’ and ‘submit’ to your liking to give a different name to the form completion.
Send the form result via API
For this function you need an additional plugin. It is a plugin that is not widely used and is rarely updated, we are using it without any problems.
In fact, if you fill out the form from our site and send it, no email is sent, but a ticket is opened through the API on our ticket system. This allows us greater reliability than email and greater speed in the opening of the ticket.
The plugin you need to install is called Contactform7 TO API + BasicAuth and is located in the WordPress repository. After installing and activating it, when you edit the contact form, you will see a new tab called API integration.
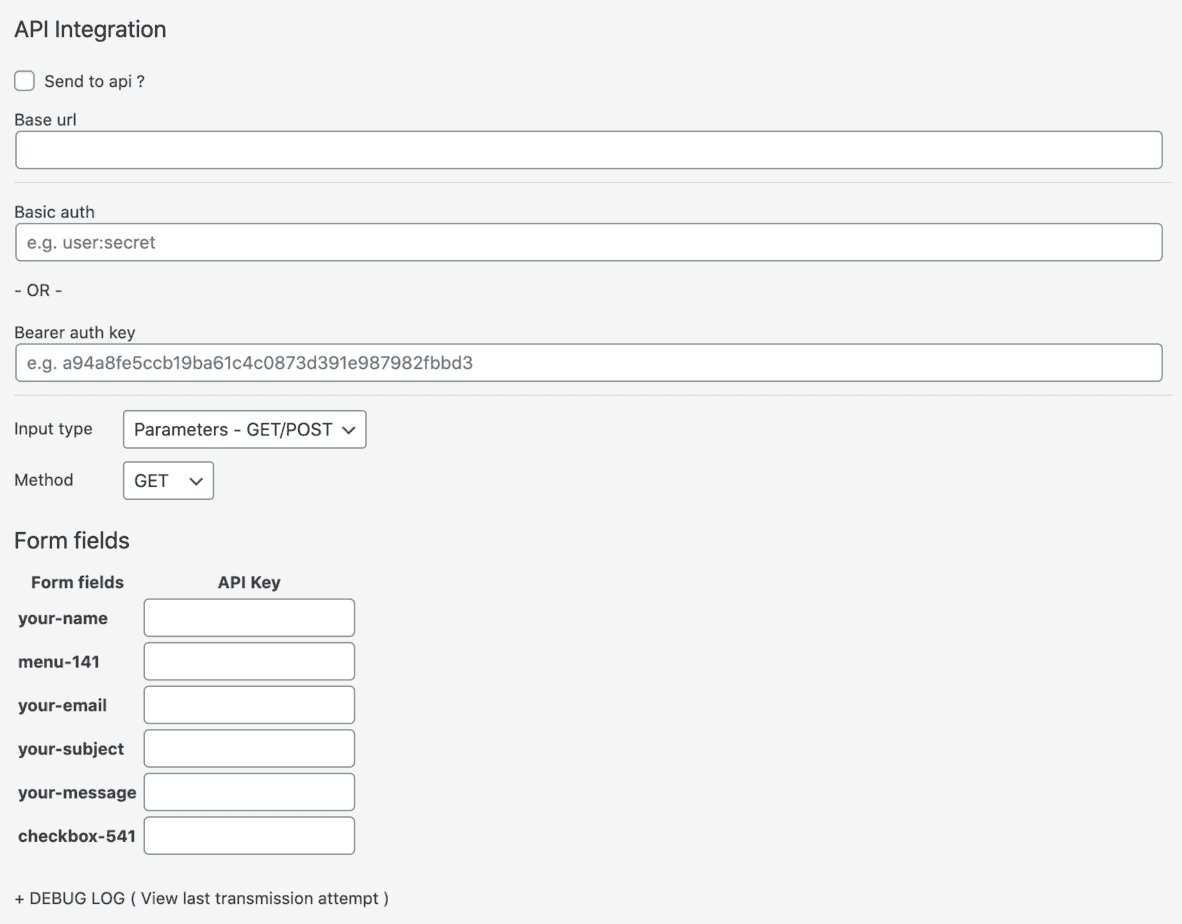
This is where it gets complicated. It is impossible to give guidelines on how to use these fields since it depends on your API. In any case, if you are using the API, you are an advanced user and you will have no problem to set up the fields in order to make the form and the submission to your software work properly.
Very useful is the debug log function that lets us see all the data including the API response and helps us troubleshoot any problems when setting the parameters required by Contact form 7 TO API.
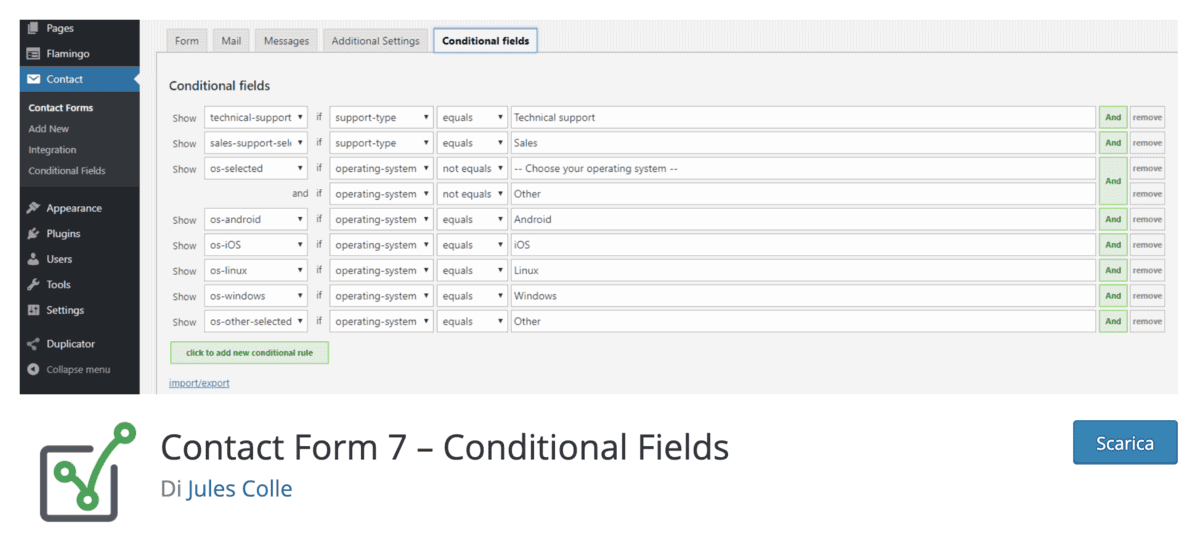
Set conditional fields
In some cases, based on the request you receive you may want to show different fields based on what your user selects. To do this we can use the Contact Form 7 -ConditionalFields plugin.
This plugin is also available in the WordPress repository and we can install it in a few clicks directly from the admin area.
Once installed we’ll have a new entry in the sidebar that allows us to change the settings.

By clicking on the link we can change general settings of the plugin.
When we go to edit the form we see a new tab called Conditional fields.

From there we can set a series of conditions that govern which fields to show and in which situation. For example if someone selects the support department you might want to ask for the order number, while you don’t have to ask for it from someone who wants to contact the sales department.
First, we need to create a new conditional group from the Form tab by clicking on the Conditional Fields Group button.

We name the group and add it. Inside it we add a text field that we will call order number and save.
We then click on the tab to add a condition and the green button to create a new condition.

We then set a rule to show the group, which we select from a dropdown, if the chosen department is Support. Note that the condition is case sensitive, i.e. it sees uppercase letters as different from lowercase letters.

Adapt Contact Form 7 to GDPR
With the coming into force of the GDPR, or the European legislation on protection, you must also adapt your website.
Let’s take a look at what needs to be done regarding the collection of personal data from users via contact forms.
Contact Form 7 allows you to use the “Acceptance” field to create checkboxes. For informed consent, remember that you must also include the link to the privacy policy, which must be on your site.
To create the checkbox you just need to insert the wording on informed consent under Condition, you can directly insert in link that refers to the information with HTML formatting.
In this case, as you see in the screenshot below, the checkbox does not have to be optional, because you always need to have consent in order to process personal data.

With the settings you see above, we got this shortcode:
[acceptance gdpr] I have read the <a href="https://www.miosito.com/privacy-policy/" target="_blank" rel="nofollow noopener">privacy notice</a> and consent to the storage of my data in your records in accordance with the provisions of the European Data Protection Regulation No. 679/2016, GDPR. [/acceptance]
You can also use it directly, but remember to replace the example link placed in quotes “https://www.miosito.com/privacy-policy/” with the address of the page on your site containing the privacy policy.
This is what our contact form looks like with the privacy policy box:

This is with regard to the informed consent on the processing of personal data. If, instead, you want to allow users to subscribe also to your newsletter, or receive other types of communications, you will have to insert a new acceptance box.
It is necessary, in fact, to obtain specific consent for each different purpose. Remember, however, that subscription to the newsletter must be optional.
In this case you can create an acceptance box like we did here:

And you’ll get a shortcode like this:
[acceptance newsletter optional] Yes, I want to subscribe to the newsletter. (optional) [/acceptance].
At this point, add a line of text in the form that precedes the shortcode with acceptance and the end result will look like this here:

To recap, without consent to privacy and the processing of personal data, anyone trying to contact you will not be able to send the request.
Newsletters and other specific consents, however, should be free and never mandatory.
Conclusions
In this guide, we saw how to create a contact form on your WordPress site using Contact Form 7. With this easy-to-use plugin, you can create contact forms that are spam-protected and compliant with privacy regulations (GDPR).
We started with the creation of a contact form and then we went to analyze one by one the settings of this plugin from basic to advanced. We’ve seen how to set it up to protect against spam, what to do in case emails are not sent and how to save communications using Flamingo.
Have you had any problems? Are there any parts that aren’t clear? Let me know in a comment!
Ready to build your WordPress site?
Try our service free for 14 days. No obligation, no credit card required.


