

Picking the right WordPress page builder can feel a little overwhelming. There’s Elementor, Divi, Oxygen, Beaver Builder, and a bunch of others, all promising to help you build a great-looking site without writing code.
Bricks Builder is one of the newer options, and it’s been gaining a lot of attention in the WordPress space. Unlike most builders, Bricks is a theme rather than a plugin, which gives it some advantages when it comes to performance and consistency.
Below, you’ll learn what Bricks Builder is, how it compares to other site builders, how to install it, and how to use it to build a complete WordPress website from header to footer.
Table of Contents
What is Bricks Builder?
Bricks Builder is a visual site builder for WordPress that was first released in 2021. It uses a drag-and-drop interface with live front-end editing, so you can see your changes happen in real time as you work on your site.

The biggest difference between Bricks and most other builders is how it’s structured. Elementor, WPBakery and most page builders are plugins that work alongside your existing WordPress theme. Bricks is a WordPress theme itself, which means it handles every part of your site, including the header, footer, archive pages, single posts, and 404 pages.
That single-tool approach has a few benefits. You don’t need to worry about theme and builder compatibility. The output tends to be cleaner with less wrapper code. All your styling decisions live in one place.
You can usually skip several plugins that other setups require, like a theme builder, popup plugin, or a forms plugin. Bricks also uses smart asset loading, so it only loads the CSS and JS for elements actually on each page.
Bricks supports custom CSS, JavaScript, and PHP, so it works for non-developers as well as developers who want to drop into code when needed.
How Bricks Compares to Other Page Builders
If you’ve used Elementor before, the Bricks interface will feel familiar. You drag elements onto a canvas, click them to edit, and see changes happen instantly.
Where Bricks pulls ahead is in code quality and speed. Most page builders add layers of nested div containers that bloat your HTML and slow down page rendering. Bricks takes a more deliberate approach with cleaner output and a class-based styling system that mirrors how a developer would write CSS by hand.
Here’s a quick rundown of how Bricks stacks up against the major alternatives.
Bricks vs Elementor. Elementor offers a free version and has a larger add-on ecosystem. In contrast, Bricks provides cleaner markup, improved page load speed without extra optimization, and lower overall costs only if you choose its lifetime plan.
While WooCommerce customization is included in Bricks, Elementor requires their Pro plan for this feature. Choose Elementor for ease of use and templates. Go with Bricks if performance, code quality, and cost over time matter most.
Bricks vs Divi. Divi combines a theme and builder but tends to generate heavier, slower pages than Bricks. Divi’s primary strengths are its extensive template library and beginner-oriented interface, while Bricks emphasizes speed and build flexibility.
Bricks may be preferable for advanced users seeking performance.
Bricks vs Oxygen. Both are full-site builders that prioritize code cleanliness and advanced controls, bypassing the WordPress theme system.
Oxygen has a longer track record, but Bricks provides a more updated and modern interface. Opt for Oxygen for experience, Bricks for new UI and fast development.
Here’s a quick side-by-side look at how the major builders compare.
Feature | Bricks | Elementor (PRO) | Divi | Oxygen |
|---|---|---|---|---|
Type | Theme | Plugin | Theme | Plugin |
Free version | No | Yes | No | No |
Lifetime plan | Yes | No | Yes | Yes |
WooCommerce builder | Included | Pro only | Included | Add-on |
Popup builder | Built in | Pro only | Add-on needed | Add-on needed |
Forms | Built in | Pro only | Built in | Add-on needed |
CSS class system | Yes | Limited | No | Yes |
Conditional display | Built in | Pro only | Built in | Built in |
Bricks Builder Pricing
Bricks doesn’t have a free version, but you can test it before paying with the free builder. It’s a hosted WordPress demo that lets you try the full builder in a sandbox environment. All you need to do is create a free account.

Once you get into the paid options, Bricks offers four plans:

- Starter ($79/year, 1 site)
- Business ($149/year, 3 sites)
- Agency ($249/year, unlimited sites)
- Ultimate Lifetime ($599 one-time, unlimited sites with updates included)
Every plan includes the full feature set. The only differences between tiers are the number of sites you can run Bricks on and whether you pay yearly or lifetime access. Local development and staging sites don’t count against your activation limit.
Bricks offers a 60-day money-back guarantee. If you build several sites, the lifetime plan can be more cost-effective than yearly plans over a few years. Make sure you check their site for current pricing.
How to Install Bricks Builder
Installing Bricks works like installing any other WordPress theme, with one extra step for the license.
First, log in to your Bricks account and go to the Licenses section to download the theme zip file. You’ll also find your license key on the same page, so go ahead and copy it.
Next, head to your WordPress dashboard and navigate to Appearance > Themes and click the Add New Theme button. Then, click Upload Theme and select the Bricks zip file you just downloaded. Once the file uploads, click Install Now, then click Activate to switch your site to the Bricks theme.
After Bricks is active, you’ll see a new Bricks menu item in your WordPress sidebar. Go to Bricks > License, paste your license key into the field, and click Activate License.
If you have an existing site, keep in mind that Bricks replaces your current theme. Anything controlled by your old theme, like the header, footer, and page templates, will need to be rebuilt in Bricks. For that reason, it’s worth backing up your site before switching.
A Tour of the Bricks Editor
To open the Bricks editor, create a new page or open an existing one in WordPress, then click the Edit with Bricks button at the top of the screen. This loads the visual builder, which has three main areas you’ll work in. They are the toolbar, the panel, and the canvas.

The Toolbar
The toolbar runs across the top of the editor. From here, you can save your work, preview the page, switch between desktop, tablet, and mobile views, and access global settings. The breakpoint switcher is one of the most useful tools in the toolbar.
As you build, you can quickly check how your design looks on different screen sizes and make adjustments specific to each one.

The Panel
The panel sits on the left side of the screen by default. You can drag it to a different position if you prefer, but most people leave it where it is. In Bricks, the panel is a control area that helps you add and modify different site elements.

When you first open a page, the panel shows the list of available elements you can drag onto the canvas. The canvas is your main work area where you visually build your page. Elements include containers (which act as layout boxes to hold other items), headings, text, images, buttons, forms, and more.
When you click an element on the canvas, the panel switches to show the controls for that element. You’ll see tabs for Content, Style, and Custom CSS. The Content tab is where you set the actual content, like text, image source, or link. The Style tab is where you handle layout, typography, colors, and spacing.

The Canvas
The canvas is the middle portion that takes up the rest of the screen. This is where your page lives. You add elements by dragging them from the panel, and you click any element to edit it.
The canvas updates in real time, so you see exactly how your page will look as you build it. You can also use the structure panel from the toolbar to see the hierarchy of elements on the page, which is helpful when things get nested deeply.
How to Build a Page with Bricks Builder
When you open a new page in Bricks, you start with an empty canvas. You have two main options for filling it. You can build from scratch or start with a template.
If you’re new to Bricks, start with a template. Bricks handles layout differently than other builders, and the easiest way to understand how sections, containers, and elements relate to each other is to look at a working example before trying to build one yourself.
Using a Template
If you don’t want to build everything from scratch, Bricks includes a library of pre-made templates you can use as a starting point. To access them, click the Templates icon in the toolbar.

Browse the templates, preview the ones you like, and click Insert to drop one into your page. You can filter templates with the Template type drop-down or browse all the different template types by scrolling through the collection.

Once it’s inserted, click around inside the template to see how it’s built. You’ll start to notice that everything is nested, with sections holding containers, containers holding more containers (which act as columns), and content elements like headings and buttons living inside those.

After inserting a template, you can edit any part of it the same way you’d edit something you built yourself. Change the text, swap the images, adjust the colors, and rearrange the layout. This is the fastest way to learn how Bricks structures pages.
Building From Scratch
Once you’re comfortable with how Bricks lays things out, you can start building pages from scratch. Drag a Section element from the panel onto the canvas. Sections are the top-level containers in Bricks, and everything else lives inside them.
To add columns inside a section, drag a Container element onto the section. The trick here is that you need to drop it inside the section, not below it. The easiest way to do this is to look at the Structure panel to see how different structural elements are nested.

In Bricks, a container is a box that holds other items and helps organize your design. Bricks supports both flexbox and CSS grid. Flexbox is a layout system that arranges items in rows or columns, while CSS grid lets you create complex, two-dimensional layouts.
Bricks also uses nestable elements, which means containers, sliders, tabs, and accordions can hold any other element, not just a fixed set of items.
Once your structure is in place, drag in your content elements like headings, text, images, and buttons. Click each one to set its content and style.

Every single element on the page can be customized further via the Content and Style tabs too. It takes a little getting used to, but once it clicks, the flexibility is one of the things that makes Bricks powerful.

Working with Templates in Bricks
Templates in Bricks are reusable pieces of design. You can build a template once and apply it to many pages at the same time, which is the main reason Bricks scales well as your site grows. Templates can be a small piece, like a header or a section, or they can be a full layout, like a single blog post template or a product page template.
Creating a Template
To create a new template, navigate to Bricks > Templates in your WordPress dashboard and click Add New.

Then, give your template a name and choose its type from the dropdown. Options include Section, Header, Footer, Single, Archive, Search Results, Error Page, and Popup.

Once you’ve named it and set the type, click Publish, then click Edit with Bricks to open the visual builder. From here, you can build your template the same way you’d build a page, then save your changes when you’re done.
Setting Template Conditions
Once a template is built, you tell Bricks where it should be used by setting template conditions. To do this, open the template settings using the gear icon in the toolbar, then go to Template Settings.

After that, click Conditions. Then, click the Add Condition button to add a new condition for the template.

For example, if you’ve built a Single template for blog posts, set the condition to apply to Post type Posts. Now every blog post on your site will use that template automatically.
Conditions can also be more specific. You can apply a template only to posts in a certain category, only to pages with certain IDs, or only to certain custom post types. This is how you build templated sites that still feel custom.
Building a Header and Footer
Most WordPress sites need a header and a footer that appear on every page. In Bricks, these are templates with their own conditions.
To build a header, navigate to Bricks > Templates and click the + Create New button. Set the template type to Header, then click Create Template to open the visual builder.
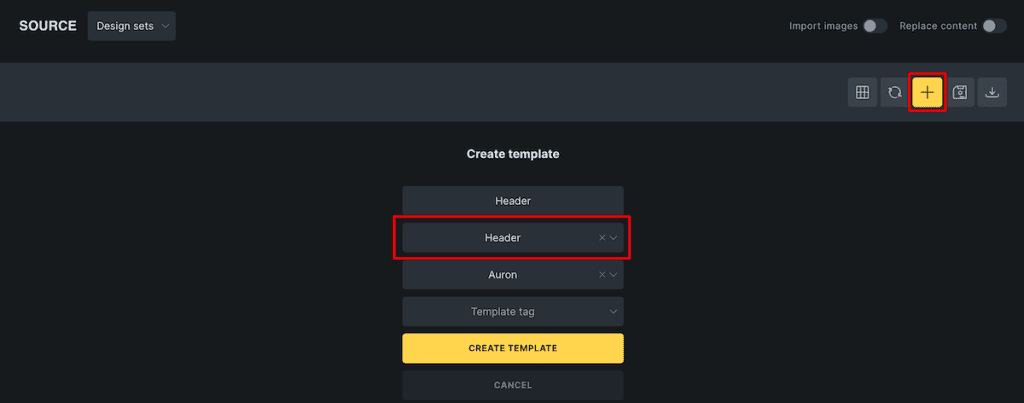
From here, you can build out your header with a logo, menu, and any other elements you want.

Once you’re happy with the design, go to Template Settings > Conditions and add the condition Entire Website.
Now your header will show on every page automatically. You build a footer the same way, just with the type set to Footer. The Bricks menu element supports nested menus, mega menus, and mobile menus out of the box, so you can build a complex multi-level menu without needing a separate menu plugin.
Working with Dynamic Data
Static content gets you only so far. For blog posts, custom post types, or anything that pulls from your database, you need dynamic content.
Dynamic data in Bricks works through tags. When you’re editing a text element, you can type a curly brace, and a list of available data tags will appear.

Common tags include {post_title} for the post title, {post_content} for the main content, {post_excerpt} for the excerpt, {featured_image} for the featured image, {post_date} for the publish date, and {author_name} for the author.
This is how you build templates that work for every post or product on your site. Build a single post template once with {post_title} and {post_content}, and every blog post on your site will populate that template automatically with its own data.
Bricks also works with Advanced Custom Fields and other custom field plugins, so if you’re building something more complex, like a real estate listing or a directory site, you can pull in custom field data the same way.
Adding Interactions to Your Pages
Most WordPress sites need some kind of interactivity beyond static content. Maybe you want a button that opens a pop-up, an element that fades in when scrolled into view, or a tab system that switches content based on clicks. Most page builders rely on third-party animation plugins or custom JavaScript for this. Bricks has it built in through a feature called Interactions.
Interactions work by pairing a trigger with an action. The trigger is what causes the interaction to fire, and the action is what happens when it does.
First, click on an element of your page you want to be the trigger. Then, click the Interactions icon and then click the + button. After that, select the trigger from the drop-down, then select the Action that will occur from the drop-down. In this case, we’ll have the title bounce when it’s hovered over.

There are a lot of different triggers available like:
- Clicking on the element
- Mouse enter or mouse leave
- Page load
- Scrolling into view
- Specified delay
You also have a lot of different actions available, including:
- Showing or hiding another element
- Toggling a CSS class on another element
- Opening a pop-up
- Scrolling to an element on the page
- Playing and pausing a video
For example, you can build a custom mobile menu by setting a click trigger on a hamburger icon that toggles a “menu-open” class on the navigation container. Or you can create a fade-in effect by adding an interaction that adds an animation class when an element scrolls into view. You access interactions from the panel when an element is selected.
Showing Content Conditionally
Bricks also lets you set conditions on individual elements, not just templates. This means you can show or hide any element on your site based on rules you define.
To set up conditional display, select an element and click the Conditions toggle in the panel. Turn it on, then add the conditions you want to apply.
For example, here’s what it would look like if you want to restrict content to logged-in users only.

Some examples of what you can do with element conditions:
- Show a “Welcome back” message only to logged-in users
- Hide a CTA from users who have already subscribed
- Show different content based on user role, like admin, editor, or subscriber
- Display a sale banner only between certain dates
- Show or hide elements based on URL parameters
- Change content based on custom field values
When the conditions aren’t met, the element doesn’t render at all. It’s not just hidden with CSS, it’s actually removed from the page output. That’s better for performance and also means hidden content doesn’t accidentally leak into your HTML for someone to find.
Using Bricks with WooCommerce
If you’re building an online store, Bricks has solid WooCommerce support built in. After installing and activating WooCommerce on your site, Bricks gives you a set of WooCommerce-specific elements you can use in your templates.
These include Product Title, Product Price, Product Image with gallery support, Add to Cart button, Product Description, Product Reviews, and Related Products.
You can build templates for every part of your store, including the shop page, single product pages, cart, checkout, and account pages. Set the template conditions correctly, and you can fully customize how products look without touching any WooCommerce CSS.

This is a big deal because WooCommerce sites usually require a separate WooCommerce theme or a paid extension to control product page styling. With Bricks, it’s just part of the builder, included in every license tier.
The Query Loop Builder
Query loops are how Bricks displays lists of dynamic content. If you want to show a list of recent posts, a grid of products, a team page that pulls from a custom post type, or a list of testimonials, you’ll use the query loop.
To create a query loop, drag a Container element onto your page. In the panel, find the Query Loop toggle and turn it on. Then click the infinity icon to open the query control panel, where you can set your query parameters like post type, number of posts, ordering, and taxonomy filters.

Bricks repeats the elements in the container once for each item that matches your query. You can also build pagination, infinite scroll, or load more buttons that work with your query loop. For more complex needs, Bricks lets you write a custom PHP query, though most users will never need this.
Forms and Popups in Bricks
Bricks includes a native form element, which means you can usually skip a separate WordPress forms plugin.
To build a form, drag the Form element onto your canvas, then add fields like text inputs, text areas, dropdowns, checkboxes, and a submit button.

Once your fields are set, click into the form’s Actions settings to tell Bricks what to do when someone submits. The most common option is Email, which sends the submission to whatever address you set.

You can also choose store entries in your WordPress database, or use Webhooks to send the data to a third-party service like Zapier or Mailchimp. You can use more than one action at the same time, so a single submission can both email you and save to the database.
Beyond that, you can also create simple form popups too. All you have to do is create a new template and select Popup as the template type.
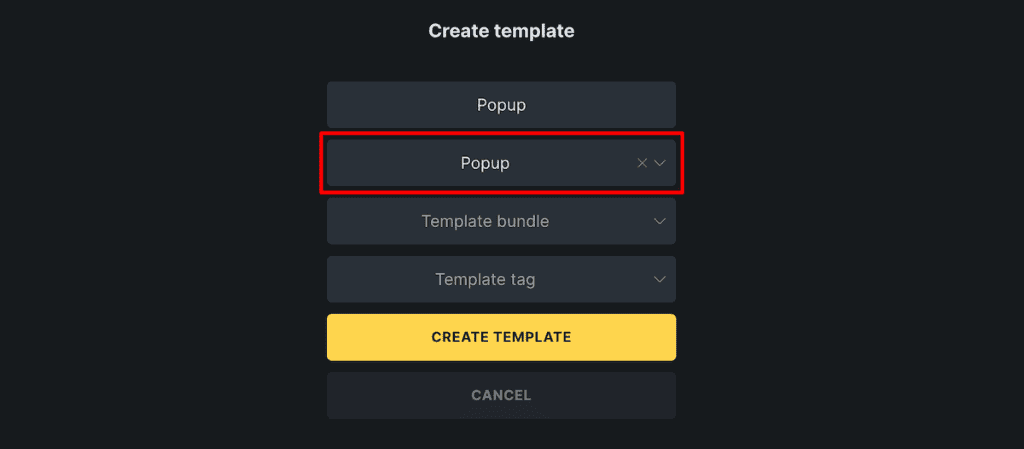
Then, add a form and customize it like you did above.

Once you’re happy with how your popup looks, then you can either trigger a popup with interactions (like page load timers or exit intent), or set a condition for it to display on certain pages. This means you don’t need a separate pop-up plugin for most common use cases.

Making Your Site Responsive
Modern websites have to work well on phones, tablets, and desktops. Bricks handles responsive design through breakpoints, and you can set up unlimited custom breakpoints if the defaults don’t fit your needs.
To switch between breakpoints while editing, use the device icons in the toolbar. Switch to mobile, then make any adjustments you want for that screen size. Those changes will only apply at that breakpoint and below.

For example, you might have a hero section with three columns on desktop. On a tablet, you might want two columns, and on mobile, you’d want a single column. You can set these up by switching breakpoints and changing the column count for each one. Bricks also supports hiding elements at specific breakpoints, which is helpful when a decorative image doesn’t work well on mobile.
Bricks Builder FAQs
Does Bricks Builder have a free version?
No, Bricks doesn’t offer a free plan. You can test the full builder for free at try.bricksbuilder.io, which is a hosted demo environment, but you can’t run Bricks on your own site without buying a license.
Is Bricks Builder good for beginners?
Bricks is approachable but has a steeper learning curve than something like Elementor or Divi. The class-based styling system rewards users who understand a bit about CSS. If you’ve never used a page builder before, expect to spend a few days getting comfortable with how Bricks handles layout and styling.
Can I migrate from Elementor or Divi to Bricks?
There’s no automatic migration tool. Page builders use shortcodes that stop rendering when their parent plugin is deactivated, so you’ll need to rebuild your pages in Bricks. Plan for a redesign rather than a direct migration.
Does Bricks work with WooCommerce?
Yes. Bricks has built-in WooCommerce support with dedicated elements and template types for shop pages, product pages, cart, checkout, and account pages. The WooCommerce builder is included in every license tier, not gated behind a higher plan.
Is Bricks faster than Elementor?
Bricks produces cleaner HTML with fewer wrapper divs, and it doesn’t load as many scripts and stylesheets by default. It also uses smart asset loading, only including the CSS and JS for elements actually present on each page. If page speed is a priority, Bricks usually scores better on Core Web Vitals tests.
Do I need a separate theme with Bricks?
No. Bricks is the theme. You install it as a theme in WordPress, and it handles everything from header to footer.
Closing Thoughts: Is Bricks Builder Right for You?
Bricks Builder is one of the more interesting WordPress site builders to come out in the last few years. It combines the visual editing of Elementor with the cleaner output and theme-replacement approach of Oxygen, and it does both well.
The biggest advantages are clean code, fast performance, built-in WooCommerce support, native forms and popups, a real CSS class system, and conditional display rules that are part of the core builder rather than paid add-ons. The biggest drawbacks are the lack of a free version and a steeper learning curve if you’re new to page builders.
If you want to dig deeper into any specific feature, the official Bricks Academy has detailed tutorials, written guides, and video walkthroughs for everything covered in this article. It’s one of the better documentation sites for any page builder.
If you’re starting a new WordPress site and you want something that won’t slow down your pages or trap you in a messy plugin ecosystem, Bricks is worth a serious look. The lifetime plan also makes it cost-effective for anyone planning to build more than a couple of sites.
Now over to you. Have you tried Bricks Builder, or are you still using a different page builder for your WordPress sites? Let us know in the comments below.
Ready to build your WordPress site?
Try our service free for 14 days. No obligation, no credit card required.


