Have you ever heard of A/B testing, but do not know how it works or how to do one?
In this article we will guide you step-by-step through the creation of a test: from the basics to know, up to the fields of application of these experiments. In addition, you will find a detailed tutorial on how to A/B testing web pages.
Let’s start!
Table of Contents
What is an A/B test?
An A/B test starts by creating two variations of a page, an email, or an advertisement, called A and B. The goal of the test is to determine which of the two is more effective.
This test is also called:
- A/B test;
- experiment A/B;
- split-run testing;
- split test;
- bucket testing.
Let’s take a practical example of A/B testing to immediately understand what it is.
Imagine creating two versions of a web page whose difference is only one element: the color of a button.
Here is a specific case: let’s create two versions of our free hosting page for trial.
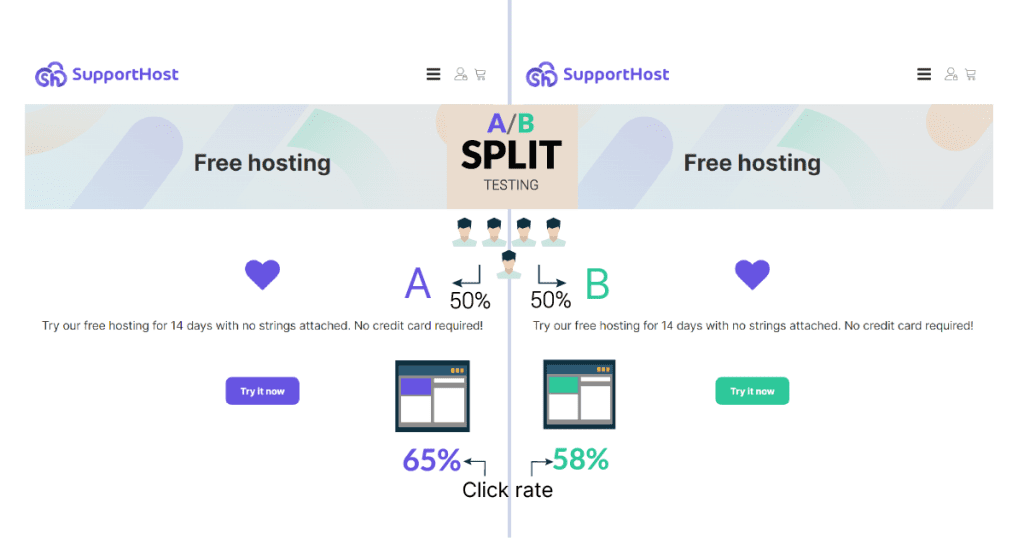
Version “A” of the page has a purple button, while version “B” has a green button. All other elements on the page remain unchanged.
Now we need to submit the page to visitors: 50% of the audience will see version A and the remaining 50% will see version B of the page. The goal in this case is to understand if the color of the button affects the number of clicks.
Are people who visit the page more tempted to click the purple button? The green one? Or is there no difference?
Through A/B testing we can answer these questions.
In the example above I will show you briefly how an A/B test is conducted:
- We create two versions of the page: version A has a purple button, version B has a green button.
- We submit the page to the public: half of users will see version A, the other half will see B.
- At the end of the test we collect data on the number of clicks on the button: the number of clicks for version A was 65%, while for version B it was 58%.
- At this point we need to understand if the test we conducted is significant or not.
We will come back to the concept of significance later, but first let’s see in which situations it can be useful to do an A/B test.
Why use an A/B test?
Now that we have seen what an A/B test is, let’s move on to a more practical aspect by looking at other use cases. Under what circumstances can it be useful to apply it?
An A/B test can be applied in various fields of web marketing. The example we saw earlier was about web design, but there are many other applications.
Let’s look at some of them and for each one let’s find specific examples of A/B testing.
Email testing
A/B tests are widely used in email marketing. The most common case is to use these tests to understand how email open rates vary.
For example, you can do an A/B test by creating two variants of emails that have a different subject.

The goal is to understand which type of communication works best. The variations can affect both the style of the text and the formatting. Think for example using special characters, emoticons or capital letters.
An A/B test on emails can cover not only the subject but also the content of the email itself. For example, you could test the effectiveness of the email and the clicks on the Call to Action, also making changes here:
- in the writing style used;
- in the formatting of the email text;
- in the use of buttons with different colors or styles for the Call to Action.
There are many factors that can be acted upon and the ones we have seen are just some of the possible examples.
A/B testing for web pages
As in the example we saw earlier, another situation where A/B testing is useful is in creating a website and optimizing pages.
The tests can be those of the product pages of eCommerce sites, landing pages intended for the sale of products or the promotion of newsletters and much more.
In this guide, in the section dedicated to A/B testing with Google Optimize, we will see just how to test two versions of a web page.
Now let’s see what elements we can go to test in this case.
The texts of the pages
As we said before regarding the testing of emails, even for web pages you can perform A/B tests by modifying the textual content of the page.
Specifically, we can modify the main titles and subtitles or create two variants by modifying the central text of the page.

Here, too, the changes may concern various aspects on the basis of specific cases.
For example, you might want to test whether putting more in-depth, detailed information on a product page or blog post could lead visitors to find the page more interesting.
In this case you could do an A/B test to understand how the bounce rate varies:
- Does more in-depth content push the user to stay on the page? (lowest bounce rate)
- or maybe what the user was looking for was a quick answer or then he left the site? (higher bounce rate).
The test results, in this example, can help you write a blog post by choosing the format that works best for visitors.
The layout and design of the pages
We can also conduct an A/B test by modifying the appearance of the pages and the layout of the elements themselves.
An example would be to insert multiple images or videos on a product sales page and figure out if adding images increases sales.

Or again we could do an A/B test on a contact or registration form in order to understand how the arrangement of the elements affects the registration by users.
The elements involved could be: buttons, site navigation menus, images and so on. The variations are not only about actual changes (for example yellow or red button), but also the layout itself is not to be underestimated.
A/B testing for advertisements
Split testing can also be used for advertising campaigns. We talk about A/B test for Facebook and Instagram in reference to sponsored posts on social media, but also think about ads with Google ADS.

For example, you can create two variations of an advertisement by varying:
- the text accompanying the announcement;
- the image or video used;
- the call to action used;
- the period in which the ad is shown;
- audience segmentation.
These are just examples because even in this case we can do many different tests based on the element and the metrics we want to measure.
How A/B tests work
We have seen the fields of application of this type of test and understood that this type of analysis can meet us in many web and digital marketing activities.
But what is the basis of the test?
What must be done to put A/B testing into practice?
Before we begin: what is the basis of an A/B test?
Performing an A/B test essentially means creating a hypothesis test. In the field of statistics this type of test is very common, but what does it mean in Layman’s terms?
In practice, the test consists of:
- formulate a hypothesis;
- do the test;
- observe the results;
- confirm or deny the hypothesis.
Let’s see specifically how to proceed.
How to do an A/B test: the steps to follow
At the base of an A/B testing there will be an analysis work and the individual steps that we will follow may vary and will have to adapt to the specific case.
In any case, the guidelines to follow to create an A/B test are the ones we have summarized here:
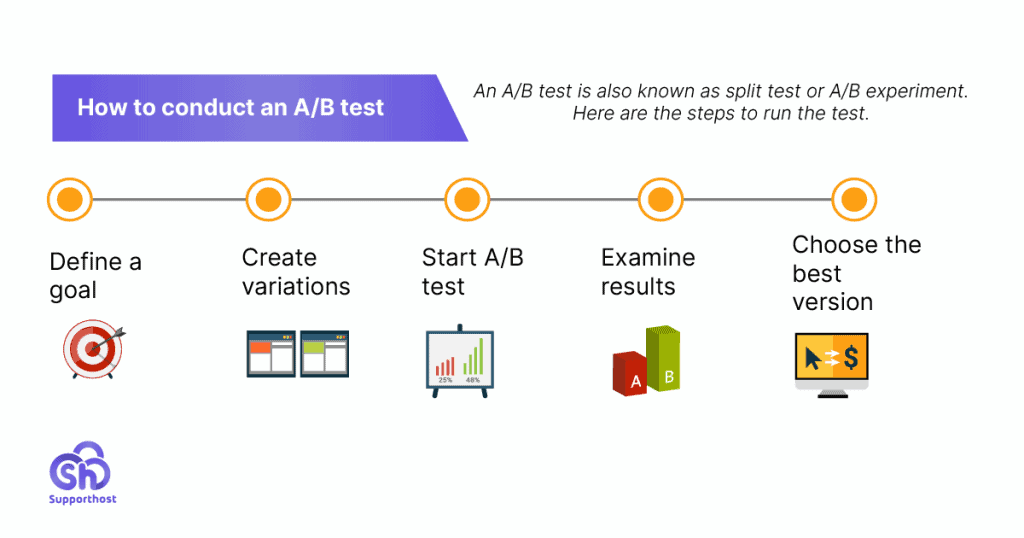
Let’s go and see these phases one by one.
1. Choose a variable to test
The first thing to do will be to choose a single element that we want to be the object of our analysis. For example, the color of a button or the subject of an email.
You can refer to the examples we saw earlier for more ideas. In any case, however, remember that generally the A/B tests refer only to one element.
Two versions are created to be tested, for example two emails that vary only for the subject and the experiment is conducted.
When you use multiple variables and then modify multiple elements, for example both the subject and the body of the email, we speak of multivariate test or multivariate test (MVT).
2. Define a goal
Before doing our A/B test we need to have a clear idea of the goal of our experiment. What do we want to measure?
Let’s take an example. We are creating two variations of an email in which we have:
- email A with subject A;
- email B with subject B.
We may want to measure the email open rate and figure out which of the two versions is more effective.
In this phase, therefore, we can define our hypothesis in order to understand then, at the end of the test, whether it is confirmed or not.
3. Create the variants
The next step is to create the two variants that we will submit to the public. Generally speaking, we talk about creating a control and a variant.
Let’s see how to do it with an example.
We have an existing landing page and we want to create an alternative version to understand if the number of clicks on the Call to Action (CTA) increases.
Our guess is that by changing the CTA text, we will have an increase in the number of clicks.
In this case our already existing landing page will be the control, we could call it version A.
The alternative version that we will create, and which we can call variant, will be version B.
To do the A/B test we will therefore have to create an alternative version of the landing page, modifying only one element: the text.
4. Define your target audience
Now that we’ve created our two variants, we need to choose which audience will be.
This is an important step, because if we want to have reliable results we have to divide the audience correctly.
It is important, in fact, to present the two variants to random audiences so that the characteristics of the audience do not influence the result.
Ideally, our audience is divided, for example the total number of subscribers to our newsletter into two subgroups.

The two subgroups must be created randomly in order to maintain the characteristics of the starting group (age, gender, and so on).
For example, a sub-group, comprising half the audience, will receive version A of the email. The second subgroup, the other half of the audience, will receive version B.
5. Start the test and determine its duration
After launching our experiment, how long should we let the test last?
The answer depends from case to case, in general we have to make the A/B test last the time necessary to collect enough data.
For example, if the A/B test is on a landing page, you will need to make sure that the page has been seen by a sufficient number of visitors. If your site is not getting a lot of traffic, you will need to extend the test until you have enough data.
6. Review the results
Finally, it is time to review the results we have gathered.
To understand what results we need to focus on, we need to refer to the goal we set ourselves: what did we want to measure? What results have we had?

In one of the examples we did, we wanted to measure the open rate of emails.
At the end of the test, we can see which of the two versions of the emails we sent gave the best results.
This allows us to understand which version, in this case of emails, is the most effective.
7. Sum it up
In reality, the final step of A/B testing is not just examining the results and defining the best version.
Our analysis calls for a further question: is the data we collected significant?
To be sure that we have conducted the split test properly and, therefore, before putting the changes into practice by adopting one of the two versions, we must do another test.
This further analysis will allow us to understand if the A/B test we have done has statistical significance or not, in other words if it is reliable or not.
When we go to analyze the results, we will have to do so taking into account the statistical significance of our test. As we will see in this guide, there are tools (even free) that allow us to calculate the level of significance of our test.
To see them now, skip ahead to the section of this guide: Measuring the significance of the A/B test.
How to run an A/B test with WordPress using Google Optimize
One of the ways to A/B test with WordPress is to use the Google Optimize tool.
Google Optimize was formerly known as Google Content Experiments and is a tool that allows us to do A/B testing on our site.

Specifically, Optmize is ideal for creating two or (even more) variations of a web page.
There are two versions:
Optimize: the free version with limited functions that allows us to perform up to 5 tests simultaneously.
Optimize 360: the paid version with more functions for multivariate tests and which allows us to do more than 100 tests at the same time.
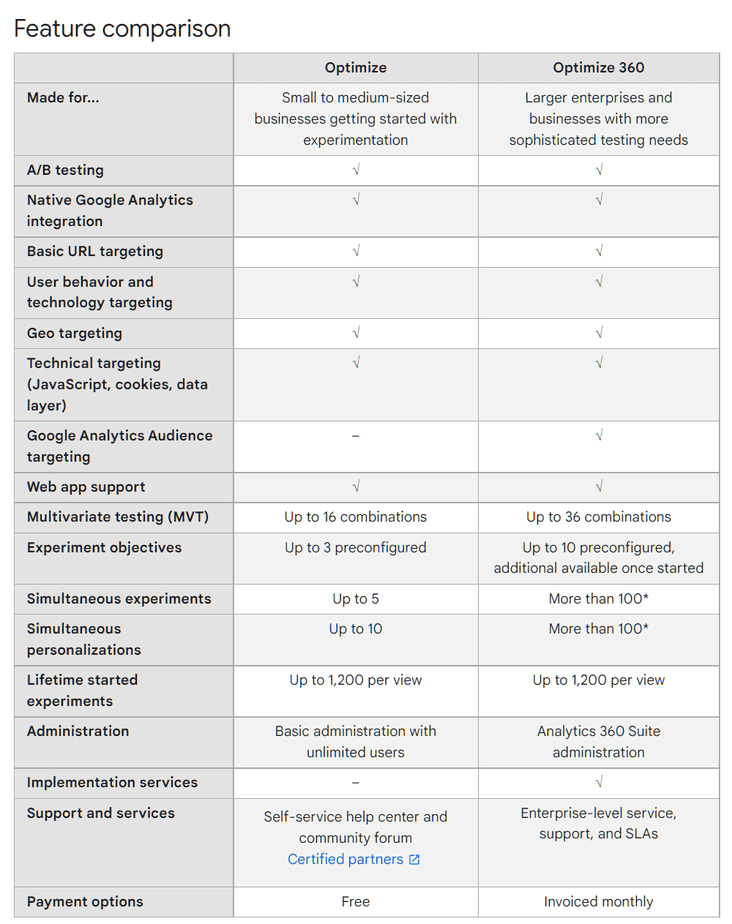
Before you begin: how does Google Optimize work?
Optimize is an A/B testing tool that allows us to create two versions of a web page and show them to the sample of visitors we have chosen for our test.
As we will see in this section of the guide, this tool allows us to choose the portion of visitors to be involved in the test: all the traffic that reaches the site or part of it.
After setting up our experiment, we just have to start it and wait for the results.
What can we use Google Optimize for?
- Conduct an A/B test of a landing page;
- Do A/B testing of any page by modifying elements of your choice of our site or ecommerce: color of buttons, texts and so on.
- Create a multivariate test that allows us to test multiple combinations of variations and thus understand which is the most performing.
- Run a redirect test (or split URL test) that allows us to evaluate two different pages (with distinct URLs). It can be useful when we want to compare, for example, two landing pages that differ a lot from each other.
In this part of our guide we will see how to use the free version of Optmize to do an A/B test. In any case, the procedure is the same even if you are using the paid version, only in that case you will have access to more functions.
Once you are familiar with Optimize, you will see that the process is very similar if you want to create a multivariate test (MTV), only in that case you will have to create multiple combinations of elements and not two variations that differ for only one element.
Creating a Google Optimize account and setting it up
Firstly, we need to create a Google Optimize account: we just need to connect to the Google MarketingPlatform hub and click on Start for free.
We will be redirected to the Optimize site and will be able to log in with a Google account. If we have already logged in, we can change the account we logged in with through the menu at the top right.

Since Optimize is associated with Google Analytics, it is better to use the same account in order to associate the Analytics property more quickly.
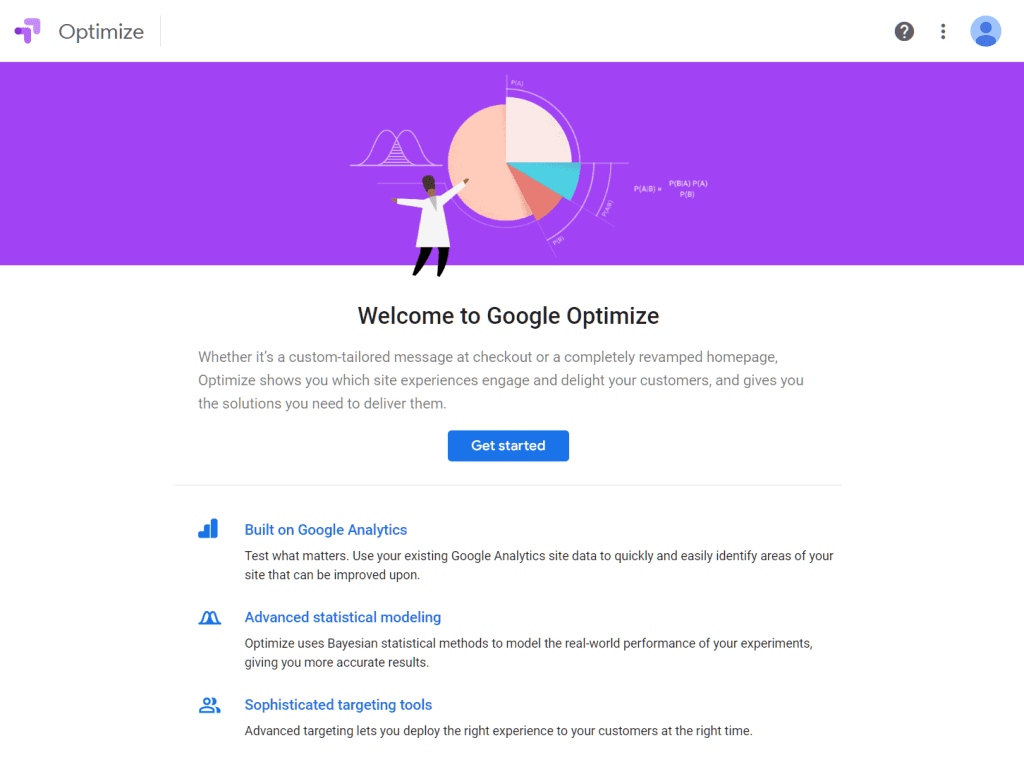
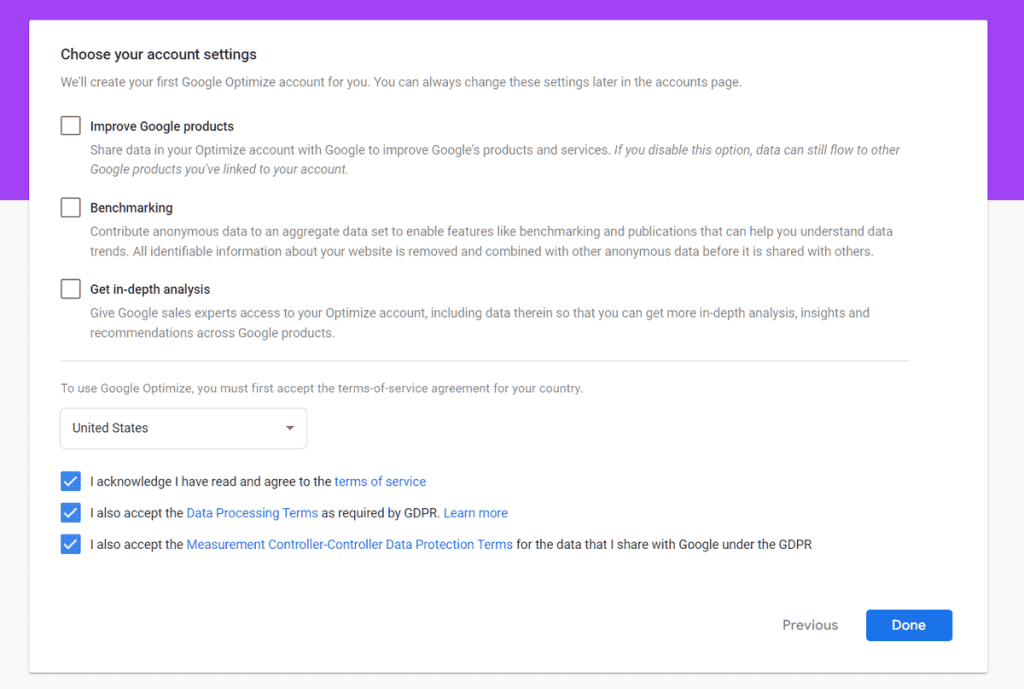
Click on How to start to start the registration procedure. By doing so we will be able to choose the settings for notifications and accept the terms of service.
The main page that will be shown to us will be the Personal Container which was created automatically. At this point we can access the settings to link our Analytics account.
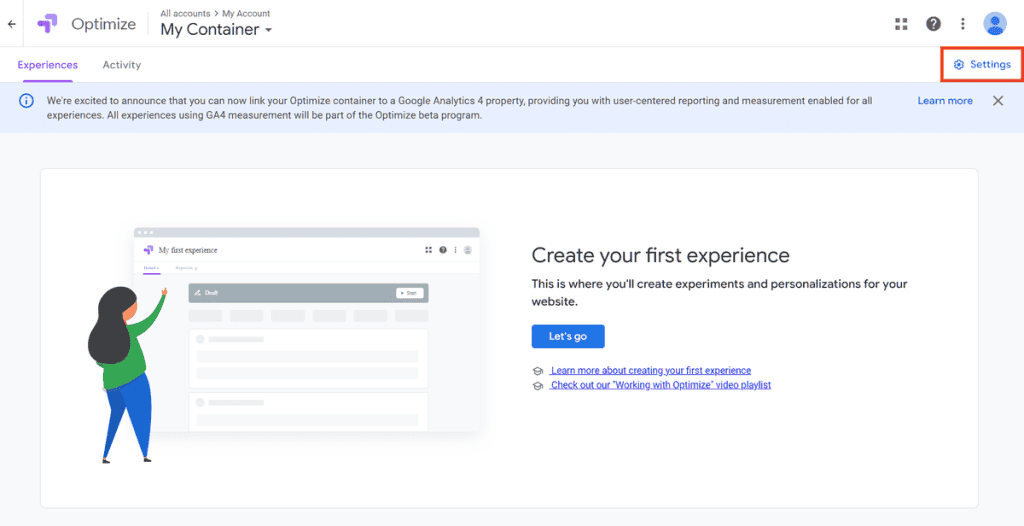
Let’s click on Link to Analytics.
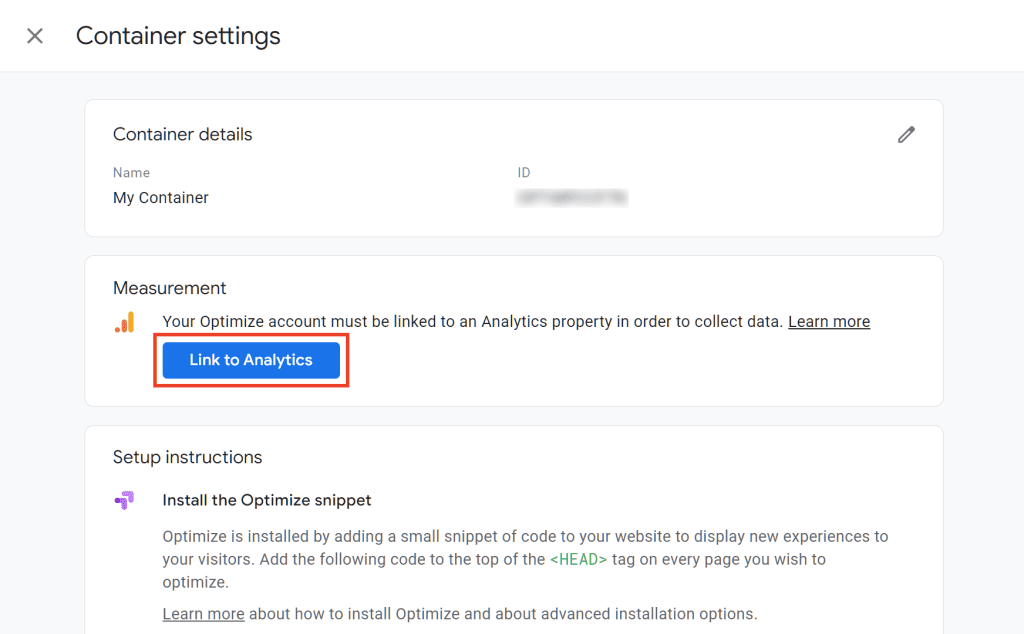
We then select the property we want to link from the drop-down menu.
Enter your Optimize code into WordPress
Now is the time to connect your site to Optimize, there are several ways to do this.
To do this we need to add the snippet that is shown to us in the configuration instructions to the site. This code must be inserted inside the <HEAD> tag of the pages.
With WordPress we can simplify the process with a plugin.
For example, if we are using a plugin like Google Tag Manager for WordPress, we can go to the plugin settings and then to Integration> Google Optimize. From here we can enter the ID of the container that we create with Optimize.
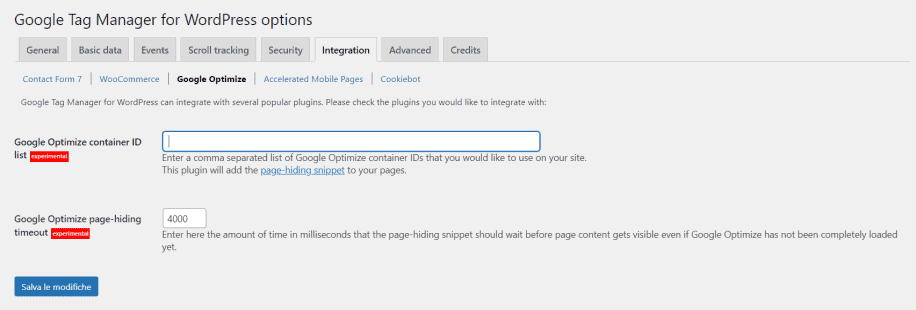
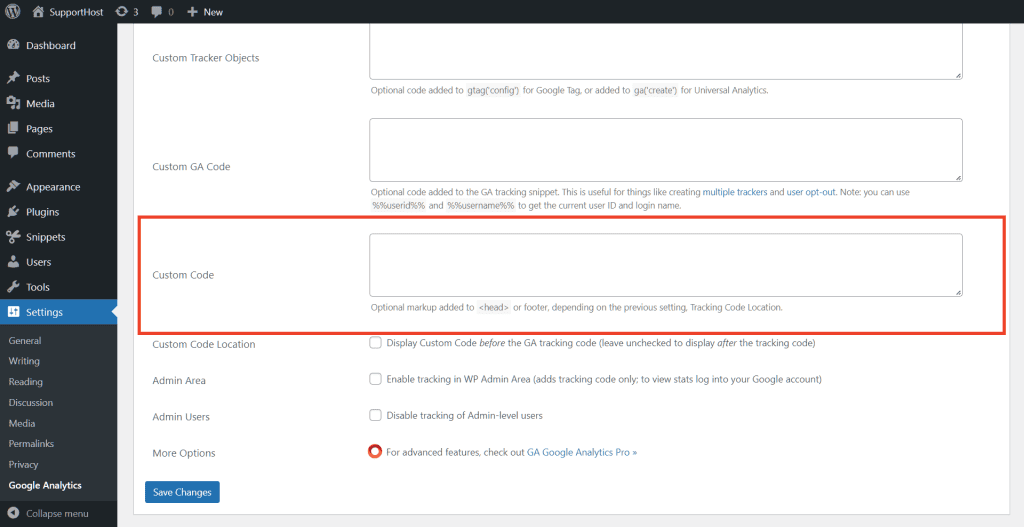
For the purposes of this guide, we used the GA Google Analytics plugin to link Analytics and Optimize to our WordPress site.

In this case we just need to insert the Optimize snippet in the Custom Code section as you see here:
Now let’s see how to create our split test with Google Optimize. In the next chapters we will also see how to make sure you have properly installed Optimize on the WordPress site.
Create an A/B test with Optimize
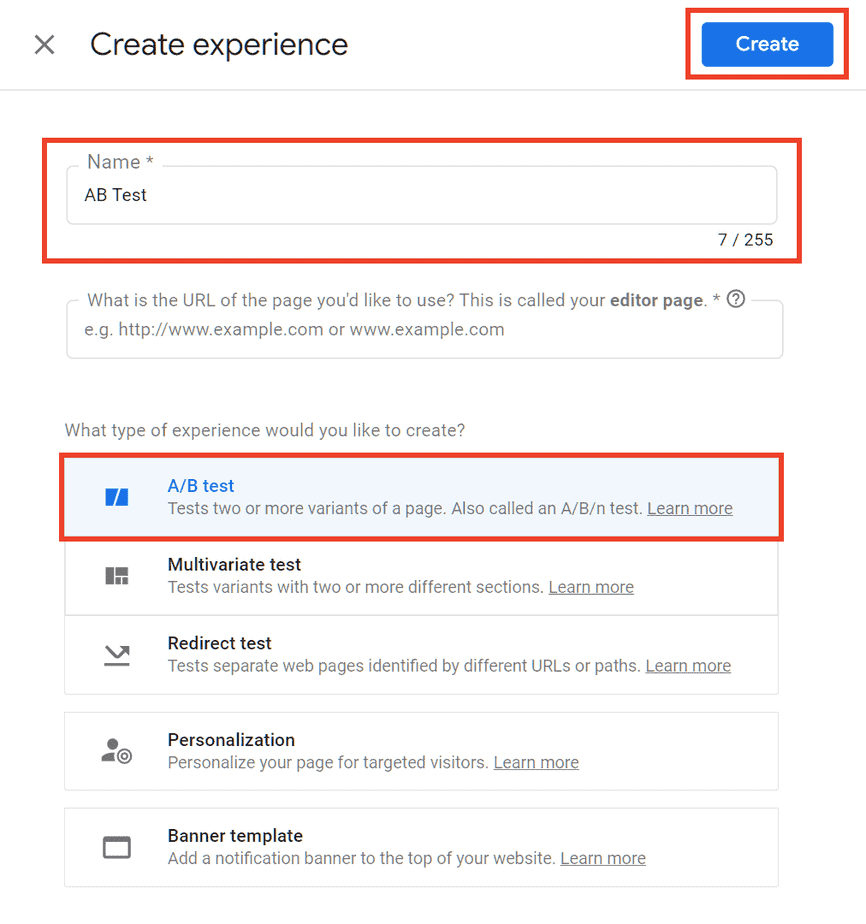
Let’s go back to the main Optimize page and click on the Let’s go button in the “Create your first experience” section.

We insert the required fields:
- Name: for example A/B test 1.
- URL: we enter the address of the page we want to test. Don’t use addresses that link to redirects.
- Type: we choose the type of test, in our case A/B test.
Click on the “Create” button to proceed.
Create variants for A/B testing
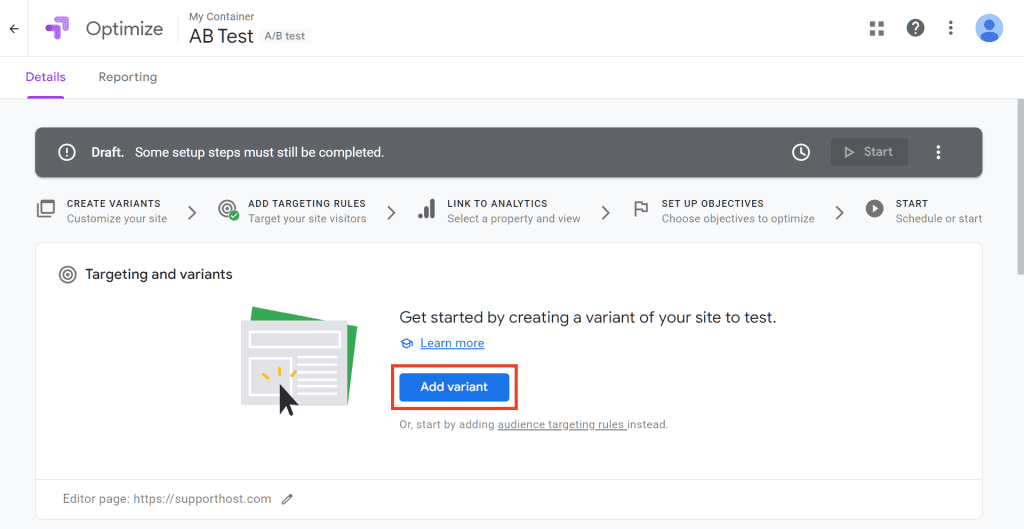
At this point we need to create the variants to be tested. Just click on Add variant to proceed, like this:
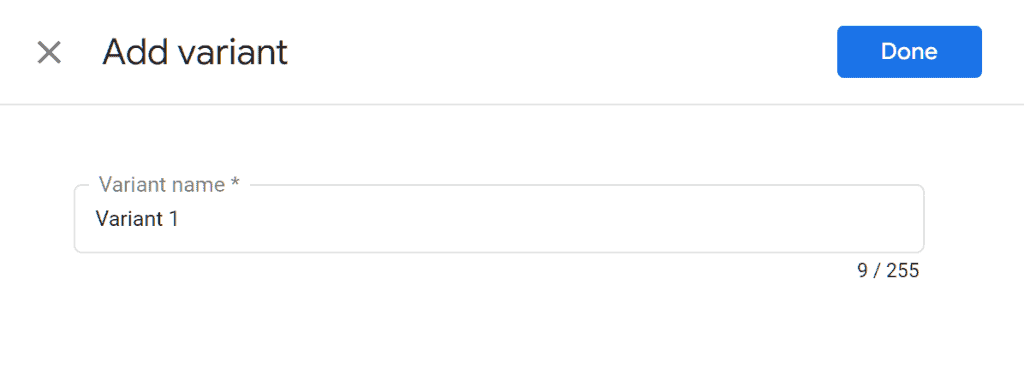
Let’s choose the name of the variant, for example “Variant B”:
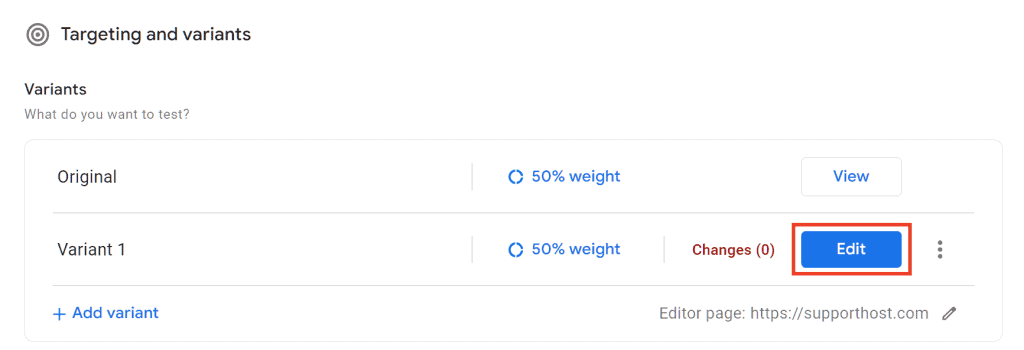
Optimize allows us to create the variant of the page in a simple way. After adding the variant we will see the list of variants and we can modify the one just added or add others (Add variant).
To do this, click on Edit, as you can see here:
Note that you need to have the Optimize browser extension installed to proceed.

We make the changes thanks to the Optimizer editor and click on Save, as you can see here:

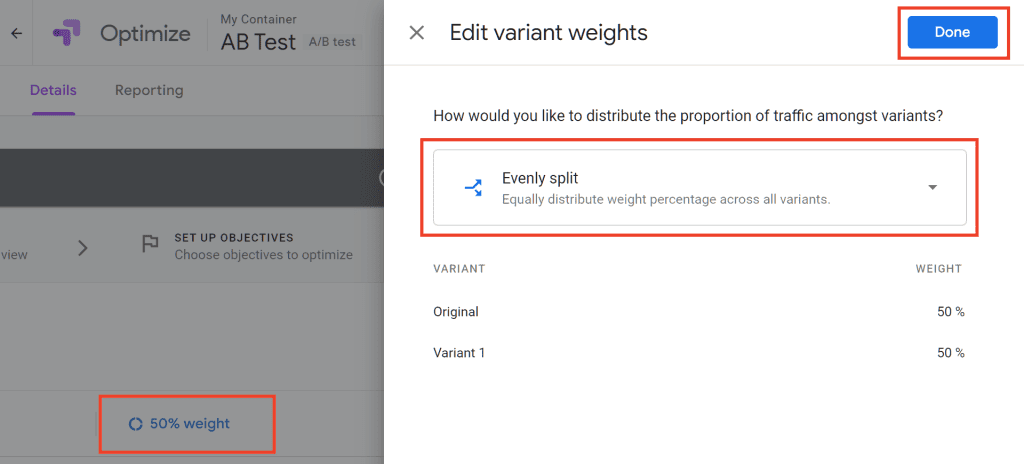
Now we need to set the weighting i.e., the percentage of traffic that will be directed to the two versions. Next to each variant we have created we will see the indication for the weighting, and we can choose whether to leave it as default or change it.
By default, if we have two variants, each will be attributed 50%, this means that the traffic will be divided equally between the two versions of the page.
Set a goal
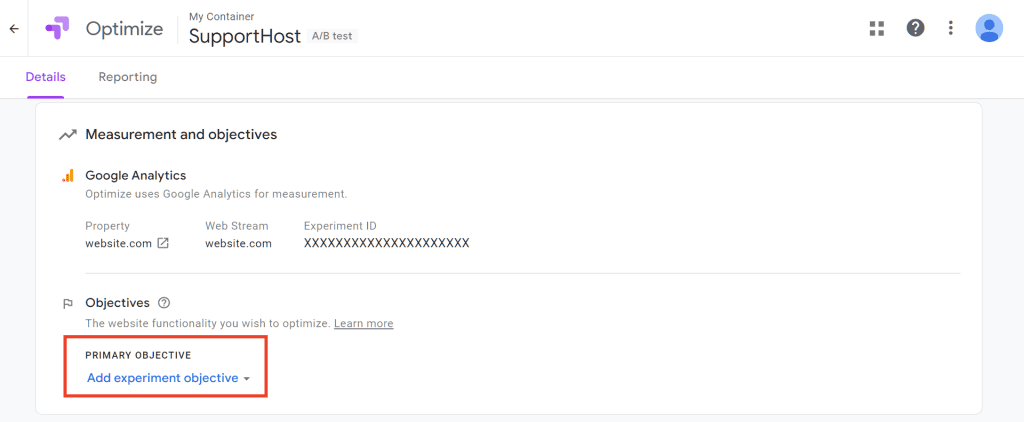
By scrolling to the Measurement and Goals section we can set a goal for our A/B test.
Let’s click on Add experiment objective, like this:
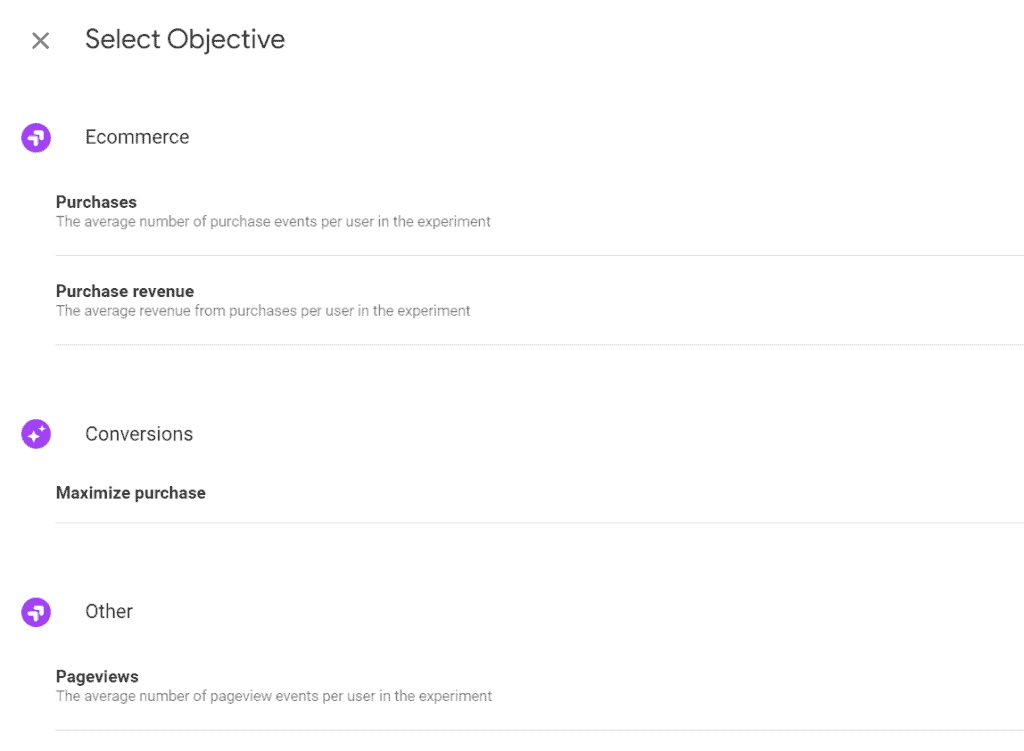
We can choose between the preset goals or create a custom one, here you can see the default ones:
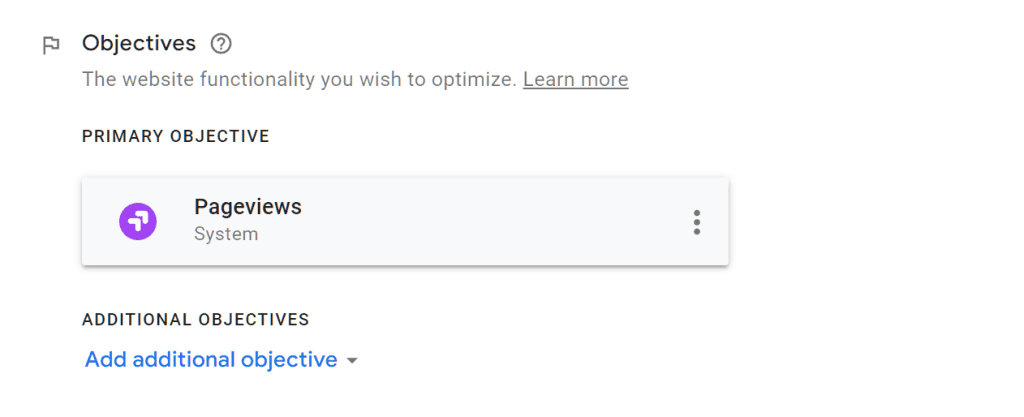
The objective will be set as the main one, we can also add additional objectives always following the same steps.
Additional settings
If we scroll down to the Settings section, we can change further parameters before starting our A/B test.
First, we can verify that Optmize has been installed correctly, just click on the Verify installation button.
After verifying the installation, we will see a green check as I show you here:

From here we can also activate email notifications for testing and change other traffic parameters.
By default, all the traffic that will arrive at the site will be involved in the test, but if we want to change the parameter, just click on the pencil icon corresponding to Traffic Assignment, as follows:
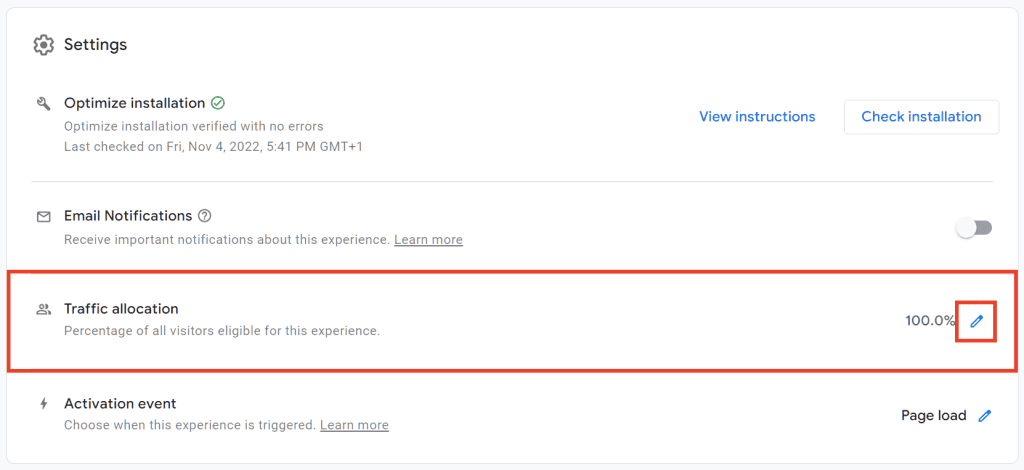
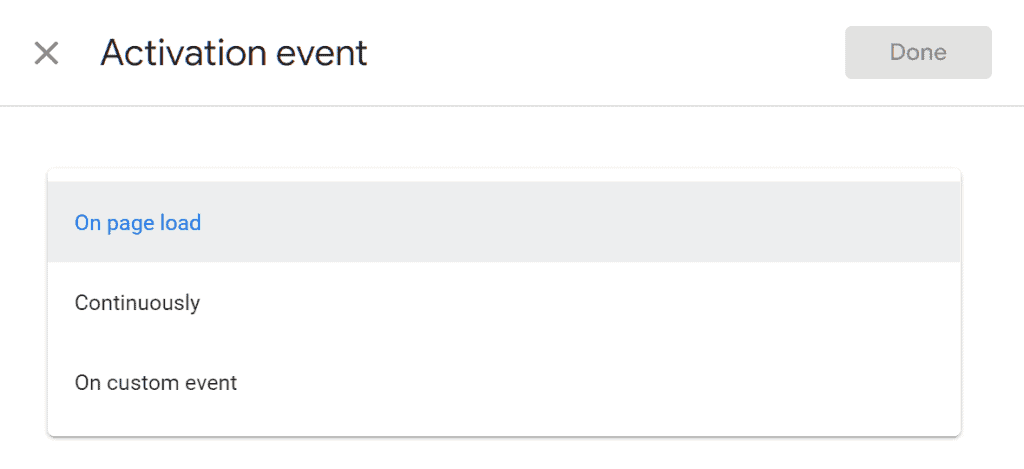
We can also modify the event that triggers the test: by default it is set to load the page, but we can decide to create a custom event.
Start the A/B test with Optimize
When we are satisfied with the settings we can start the A/B test with Optimize by clicking on the Start button like this:

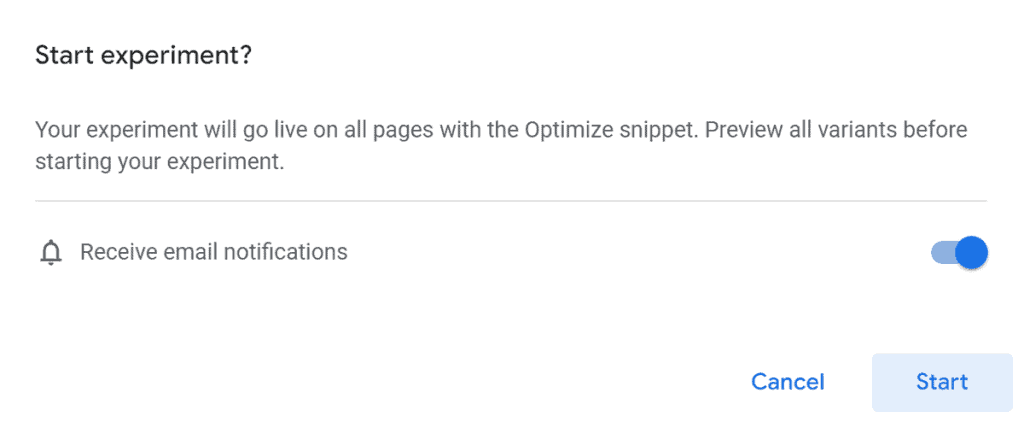
We will be prompted for a confirmation before starting the test, choose whether or not to activate the email notifications and click on Start:
After starting the test we will see a warning like this which tells us that the test is running. From here we can see the expected deadline, modify the test or stop it by clicking on Finish.

If the data is not enough, for example we do not have enough users visiting the site, during the test we will see a warning like this:

See test results with Optimize
If we want to follow the progress of our test we have to open the “Report” tab.
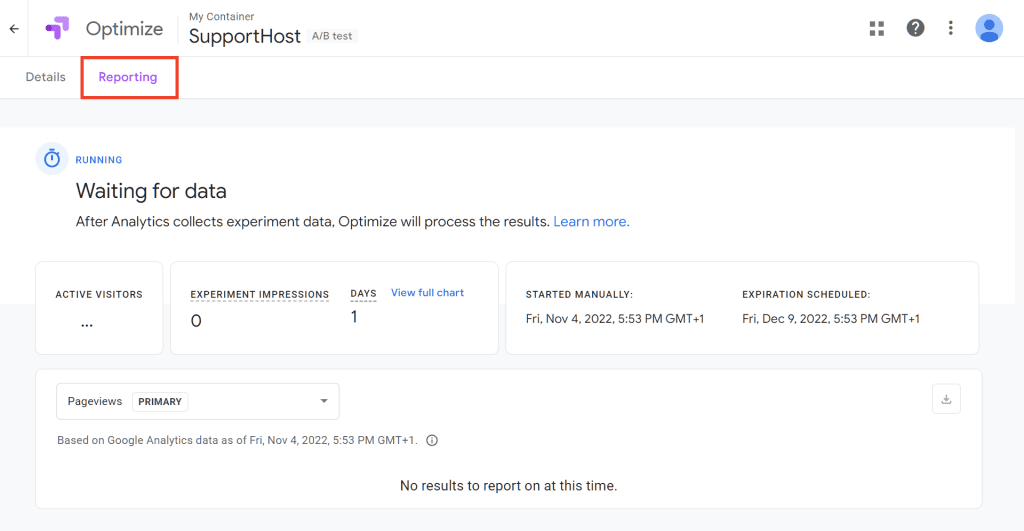
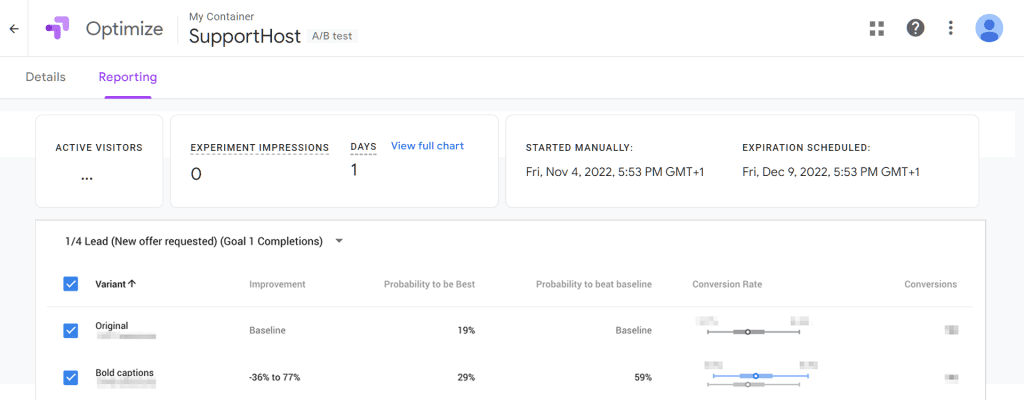
Here we will have more details on the number of visitors, the days from which we started the test and so on. At the end of the test we will be able to review the results from this same page, as in our example here:
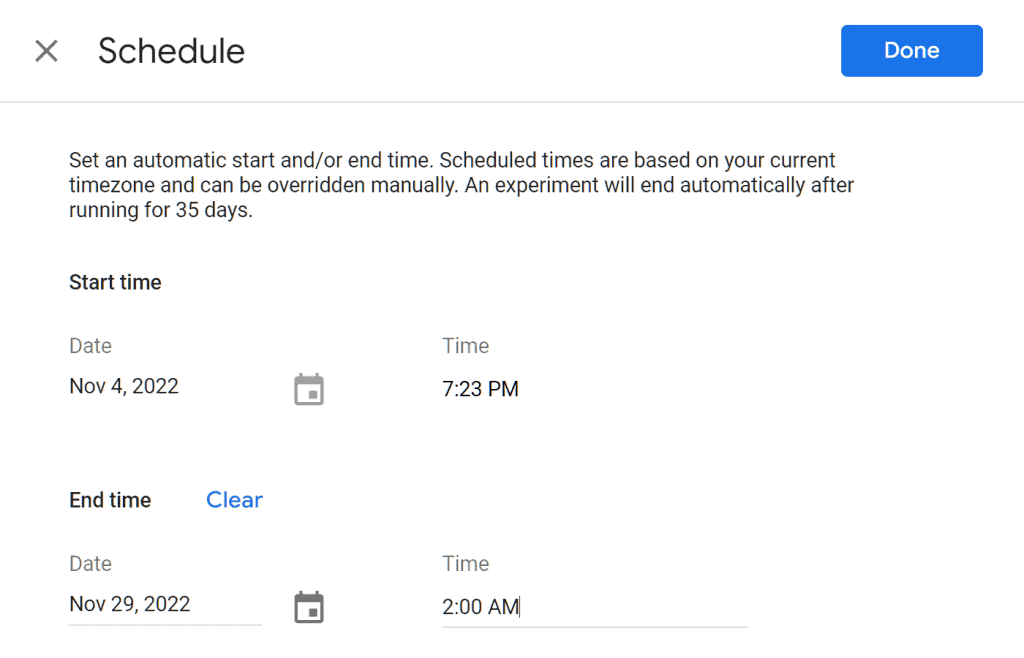
Note that the test will run for 35 days by default. To change the duration we do this:
1. Click on the icon with the three dots:

2. Click on Edit schedule;

3. We set the date and time for the end of the test as you see here:
Other tools to use to run an A/B test
In the previous chapter we saw a real tutorial on A/B testing web pages and learned how to do them using Google Optimize.
There are also other tools besides the one provided by Google that help us conduct split testing on the site and emails. In this section we will collect the best-known ones.
All-inclusive platforms for A/B testing and free tools
Another comprehensive platform for A/B testing is Visual Website Optimizer also known as VWO.
It is a paid tool that also offers the possibility to request a demo or create a free account for a 14-day trial.
Access to the platform allows us to create and run an A/B test as we have seen before in the case of Google Optimize.
It is also interesting to note the presence of free tools made available by VWO:
- calculator for significance;
- calculator for the duration of the A/B test;
- how to determine the sample size.
You can find all these free tools in this section of the VWO website. Let’s see how the tool to calculate the significance of an A/B test works.
Measuring the significance of the A/B test
VWO’s free tools include a calculator to measure the statistical significance of our A/B test. We can use it to understand if the results obtained are reliable or not.
At the end of the test we just enter the results in terms of visitors and conversions for our control page and for the variant we have created.
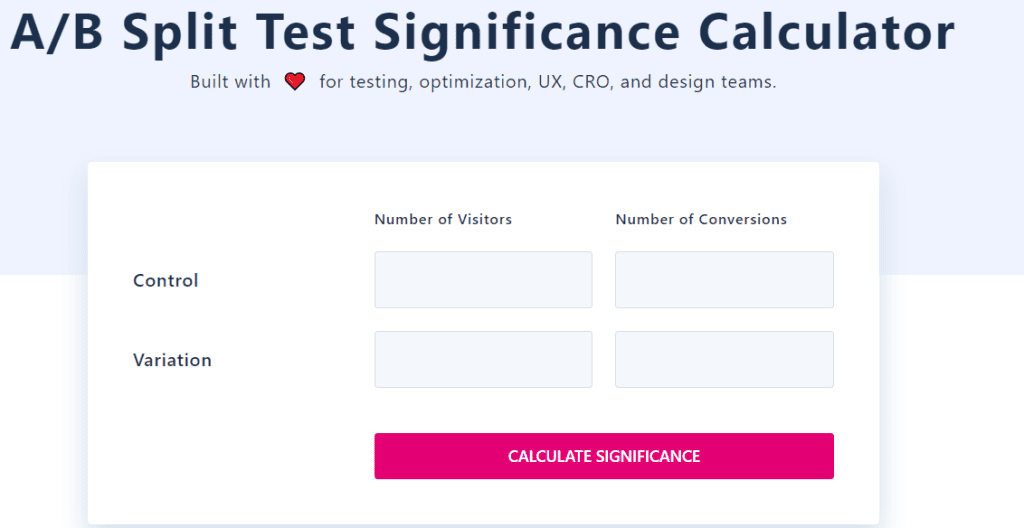
We will thus get the P-value and the explanation of the result (significant or not), as you can see here:

A/B testing tools for WordPress
Google Optimize isn’t the only tool we can use to conduct an A/B test on a WordPress site.
There are other WordPress plugins for A/B testing such as the freemium one developed by Nelio. Let’s briefly see its characteristics.
Nelio A/B Testing
In this case, therefore, unlike what we have seen with Optimize, the whole process of creating and starting the A/B test takes place directly on our site and we do not need to use external tools.
Using this plugin could therefore be the ideal solution for those approaching A/B testing for the first time.
Where to find the plugin:
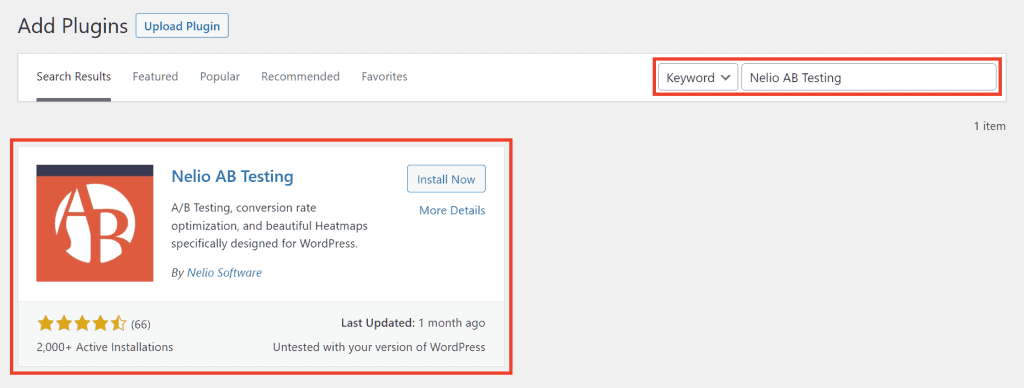
- you can find the plugin in the WordPress directory;
- you can install the plugin directly from the admin area, searching for “Nelio AB Testing”, like this:
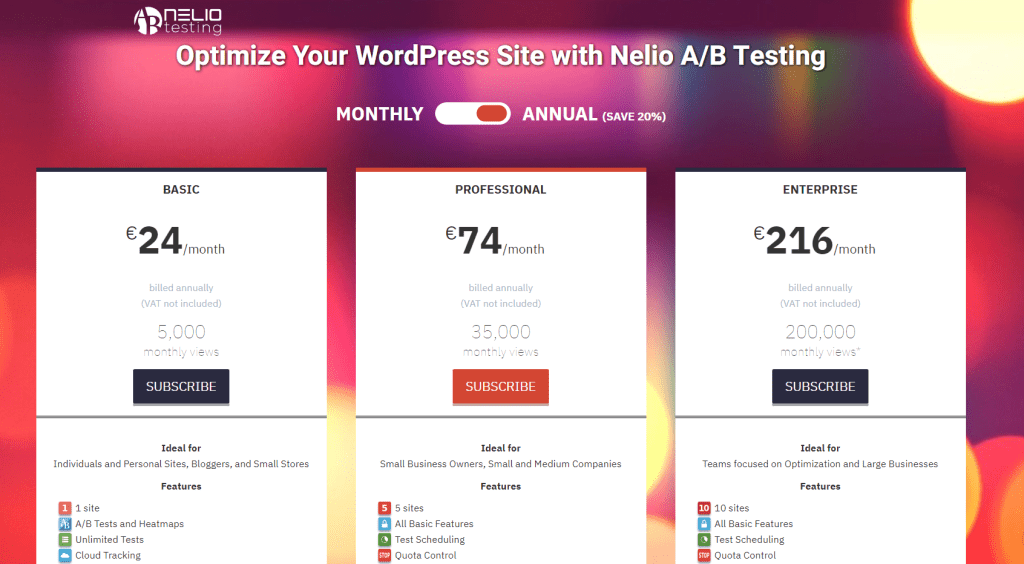
The plugin is available in the free version with limitations: there is a maximum quota on the number of page views set to 500 views.

There is therefore no real free version, but it would be appropriate to call it freemium. Once the fee is over, you can switch to one of the paid plans currently available starting from € 24 per month.
Tools for A/B email testing
The platforms and plugins we’ve seen so far are meant to test web pages.
For A/B testing of emails you can often refer to the built-in functions of the email campaign tools.
Here are some examples:
- Mailchimp, depending on the plan you are using, allows you to access the A/B test tool for your email campaigns.
- ActiveCampaign integrates a split testing tool with which you can also generate multiple subjects for your emails.
- SalesForce allows you to conduct A/B tests directly through the same platform you use to create campaigns: Marketing Cloud Email Studio.
- HubSpot with its Marketing Software allows you to do an A/B test of email campaigns.
Conclusion
A/B testing allows us to test the effectiveness of our landing pages, email campaigns and much more. Thanks to the tools (even free ones) that we have seen, doing A/B testing is very simple.
We have seen how these experiments work and all the steps to follow to design our tests. In addition to bringing several practical examples, we have included in this guide a tutorial on how to do an A/B test using Google Optimize.
You now have all the basics to get to work on your pages or email campaigns. Have you ever conducted a split test so far? Were the results you had satisfactory? Share your views with a comment.


Leave a Reply