
Whether you’re running a personal WordPress blog, a business website, or a large multisite network, you’ll often need to control who can access and perform specific tasks on your site.
By creating or editing user roles, you can ensure that each person has the right level of access—whether that’s contributing content, managing plugins, or simply reading posts.
This guide will walk you through everything you need to know about WordPress user roles and how to create and modify them.
Table of Contents
What are WordPress User Roles and Permissions?
WordPress user roles and permissions determine what different users can and cannot do on your website. These roles are predefined settings that control access to your site’s content and features. This way, users only have the capabilities they need.
WordPress includes six default user roles, each with its own capabilities:
1. Subscriber
The Subscriber role is the most basic. Users with this role can only log in to your site, manage their own profiles, and read content. They cannot create, edit, or publish posts.
This role is ideal for visitors who need access to restricted content or want to receive updates from your site but don’t require additional capabilities.
2. Contributor
Contributors can write and edit their own posts but they can’t publish them. Their posts remain in draft form until reviewed and published by an Editor or Administrator. Contributors cannot upload files like images or make changes to others’ work.
This role is perfect for guest writers or temporary contributors.
3. Author
Authors can create, edit, and publish their own posts without oversight—but not others’ posts. They also have capabilities to upload files, such as images and videos, to enhance their content. However, Authors cannot edit other users’ posts or make changes to site settings.
This role is a good fit for regular writers who only need access to their own work.
4. Editor
The Editor role grants complete control over all content on the website. Editors can create, edit, and publish any posts or pages, including those created by others. They cannot, however, manage site settings, themes, or plugins.
Editors are well-suited for team members who oversee content production and quality.
5. Administrator
Administrators have full control over the website. They can manage content, install and configure plugins and themes, add or remove users, and make site-wide changes.
Because of their extensive capabilities, this role is typically reserved for site owners or trusted team members.
6. Super Admin
The Super Admin role only exists on WordPress multisite networks. A Super Admin can manage all sites within the network, including controlling themes, plugins, and user accounts across multiple websites.
This role is designed for large organizations or businesses managing multiple WordPress sites.
How to Change a User’s Role in WordPress
Changing a user’s role in WordPress is simple. You can do it directly from the WordPress admin dashboard. You can change a user to any existing role at any time. Let’s walk through the process.
Step 1. Log in to Your WordPress Admin Dashboard
First, log into your WordPress site using an account with Administrator privileges. Only Administrators have permission to change user roles.
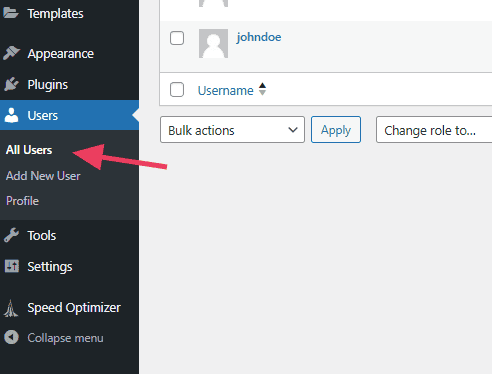
Step 2: Navigate to the Users Page
In the WordPress dashboard, visit Users > All Users. This page will show you a list of all registered users on your site.
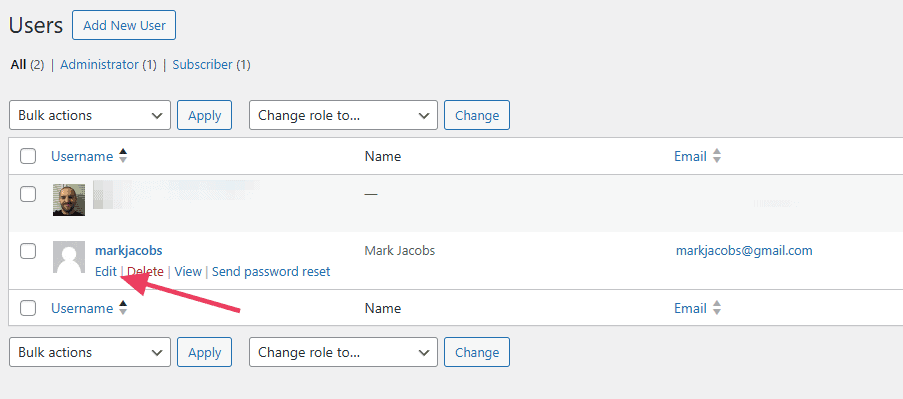
Step 3: Find the User You Want to Edit
Scroll through the user list or use the search bar to locate the user whose role you want to change. Hover over the user’s name, and click the Edit link that appears.
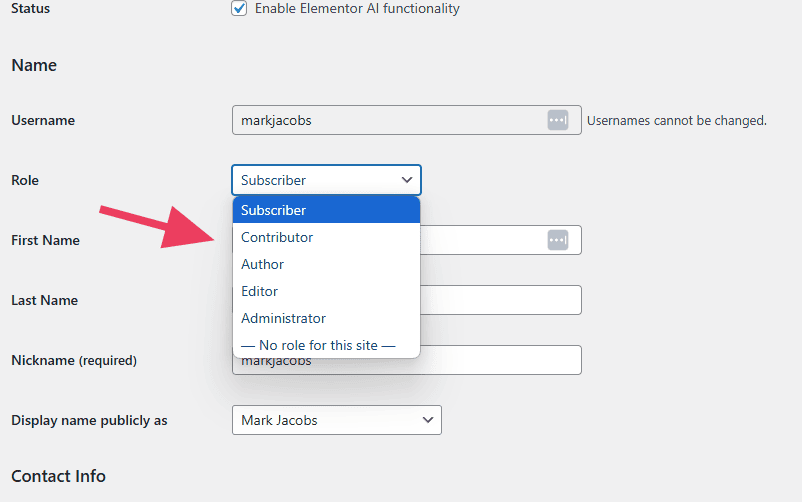
Step 4: Edit the User’s Role
On the user’s profile page, scroll down to the Role section. Open the dropdown menu that displays a list of WordPress user roles. Select the new role you want to assign to the user.
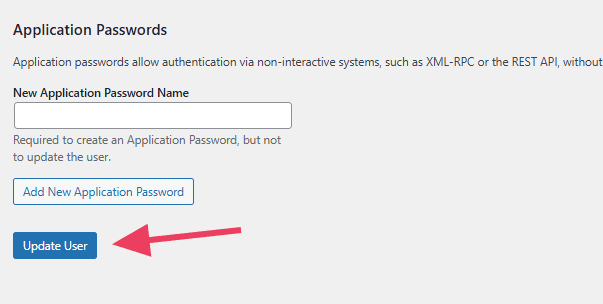
Step 5: Save the Changes
Once you’ve chosen the new role, scroll to the bottom of the page and click the Update User button to save your changes.
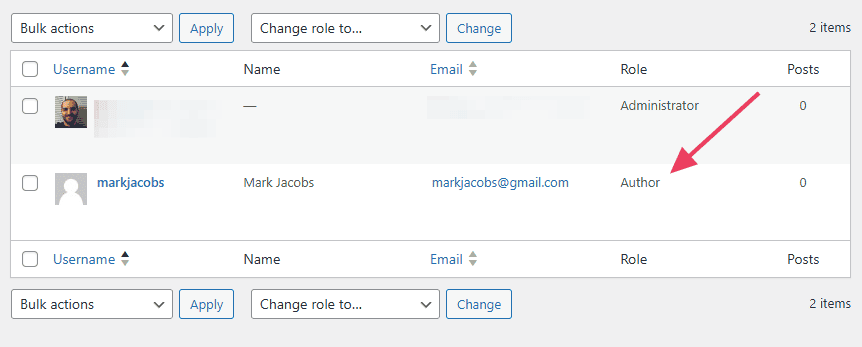
Step 6: Verify the Role Change
After updating, return to the All Users page to check that the user’s role has been updated. The new role will be displayed in the Role column next to the user’s name.
How to Create Custom WordPress User Roles with a Plugin
Sometimes the existing WordPress user roles aren’t enough. If you have specific needs, you can create custom roles and set your own capabilities.
The simplest way to make your own roles is with a WordPress plugin. Let’s look at three of the top WordPress user roles plugins.
1. Create and Edit WordPress User Roles with Members

Members is the simplest and most popular WordPress user roles plugin. Creating, deleting, and editing roles only takes a few seconds.
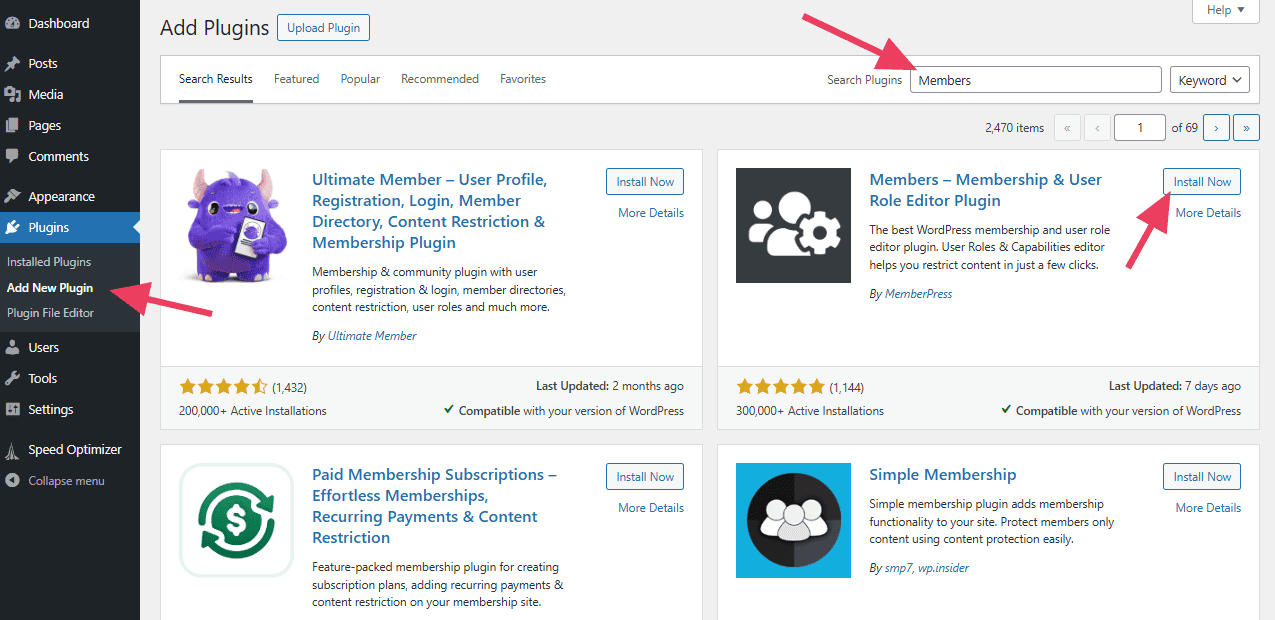
First, visit Plugins > Add New in your WordPress dashboard. Search for “Members” in the search bar. Click Install and then Activate.
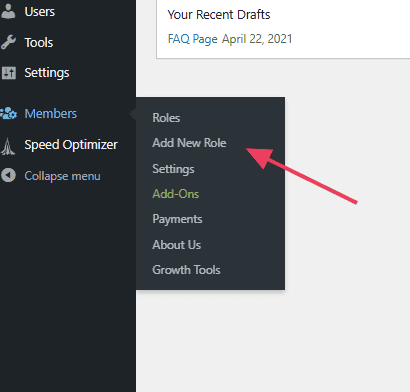
Navigate to Members > Add New Role.
Give your new role a name. In this example, we’ll call our new role “Manager.” This user will be able to adjust themes and plugins, but not post or page content.
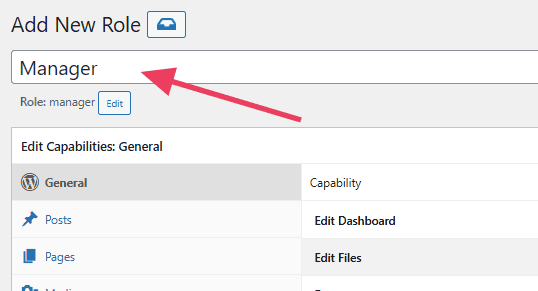
Below the role’s name, you’ll see the capabilities editor. The left column of tabs refer to categories of capabilities. Click through them to find the ones that are right for the role you’re creating.
In the case of our new Manager role, we’ll open the Appearance tab and check Grant All so Managers can edit the site’s theme. We’ll do the same in the Plugins tab.
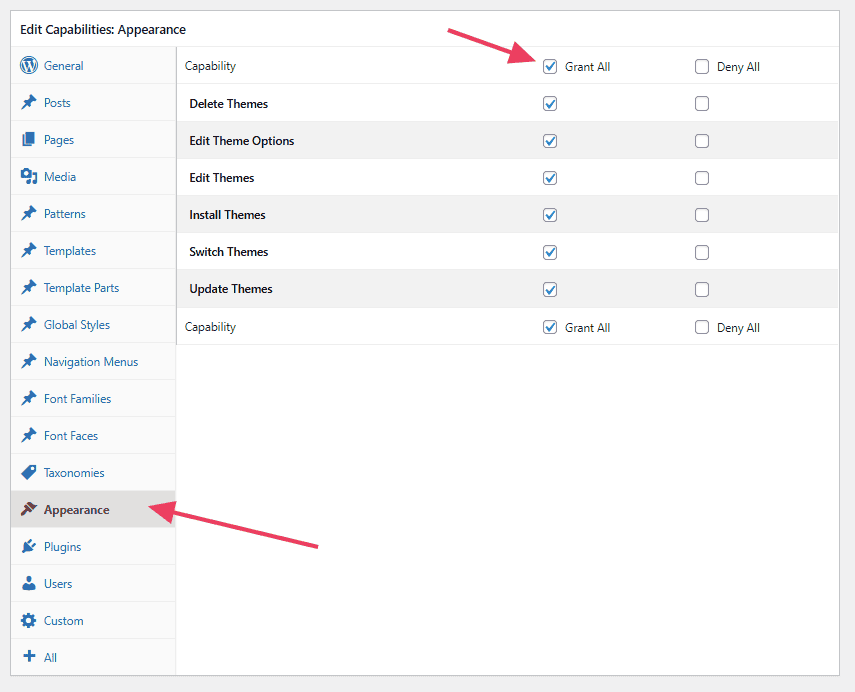
Finally, click the Add Role button to save the user role.
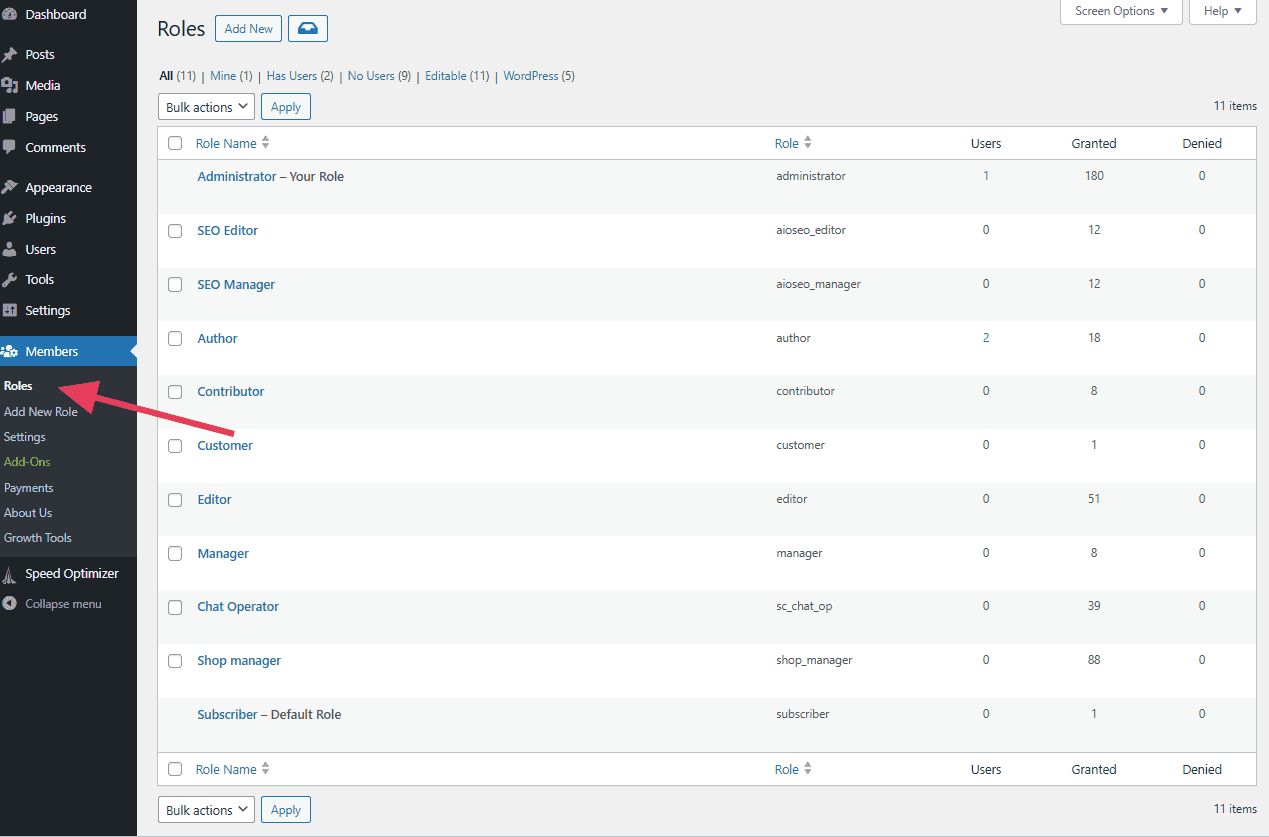
To edit an existing role, simply navigate to Members > Roles. Find the WordPress user roles you want to edit and adjust the capabilities in the same way as creating a new role.
2. Create and Edit WordPress User Roles with User Role Editor

User Role Editor is another simple and popular plugin. It gives you total control over your user roles in a single, easy-to-use interface.
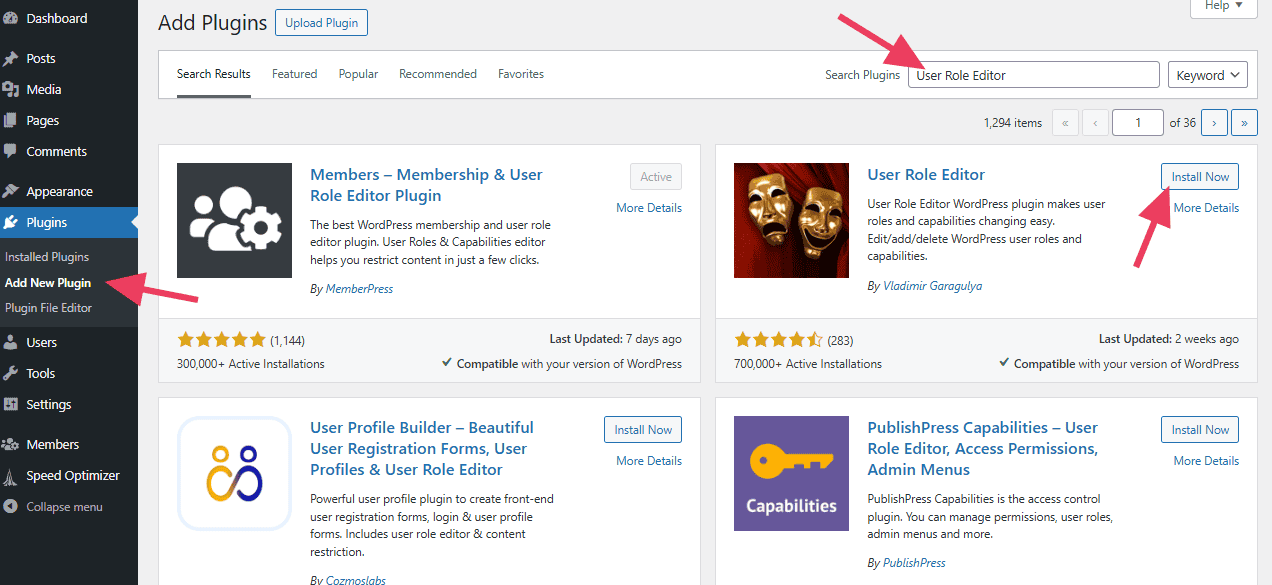
Visit Plugins > Add New in your WordPress dashboard. Search for “User Role Editor” in the search bar. Click Install and then Activate.
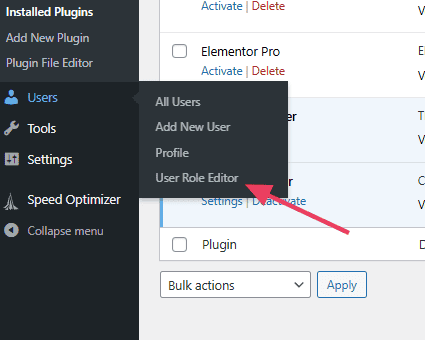
Once activated, navigate to Users > User Role Editor.
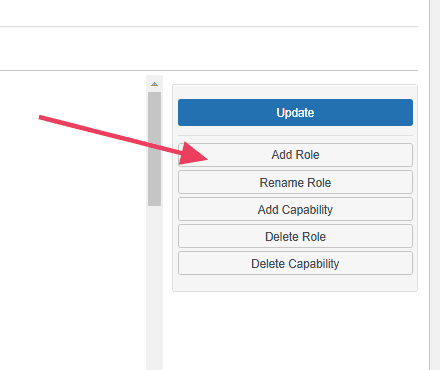
To add a new role, click the Add Role button on the left.
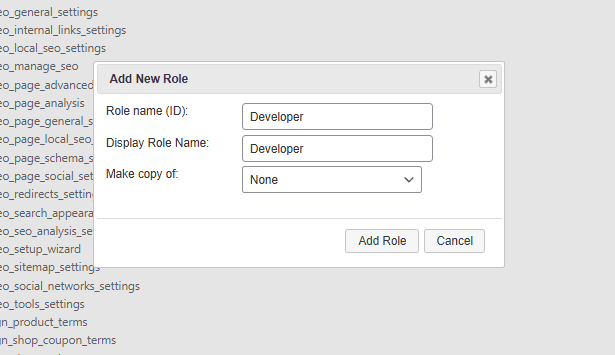
Give your new role a name and click Add Role.
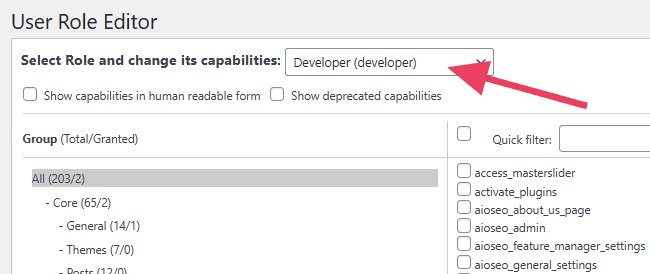
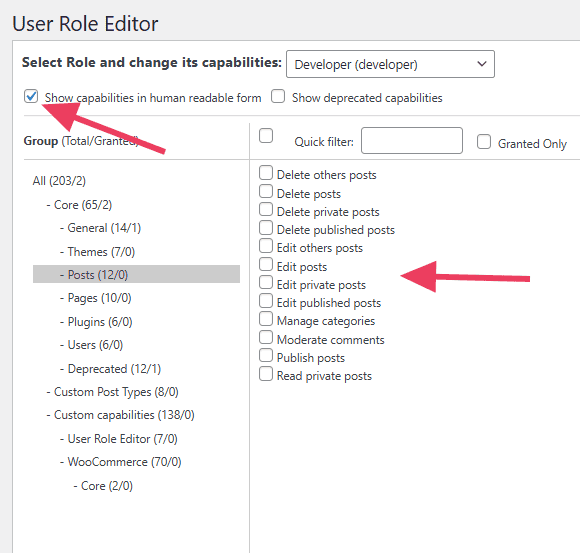
At the top of the role editor page, you’ll see a drop down selector. Use this to choose the role you want to edit. In this case, we’ll choose the new role we just made.
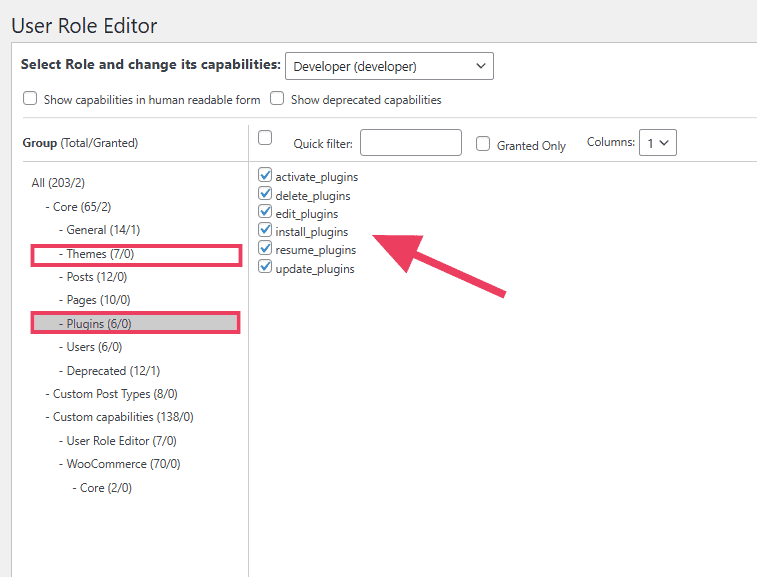
Below the role’s name, you’ll see two columns. The left column is a list of categories of capabilities. The middle column shows the capabilities for the selected category.
Explore the categories to find the capabilities that are right for the role you’re creating. In the case of this example, we’ll give our new Developer role all capabilities related to plugins and themes.
Once you’re finished, click the Update button.
Quick tip: If you aren’t sure what each capability means, check the “Show capabilities in human readable form” box. The plugin will alter the label of each capability to something that’s easier for non-experts to understand.
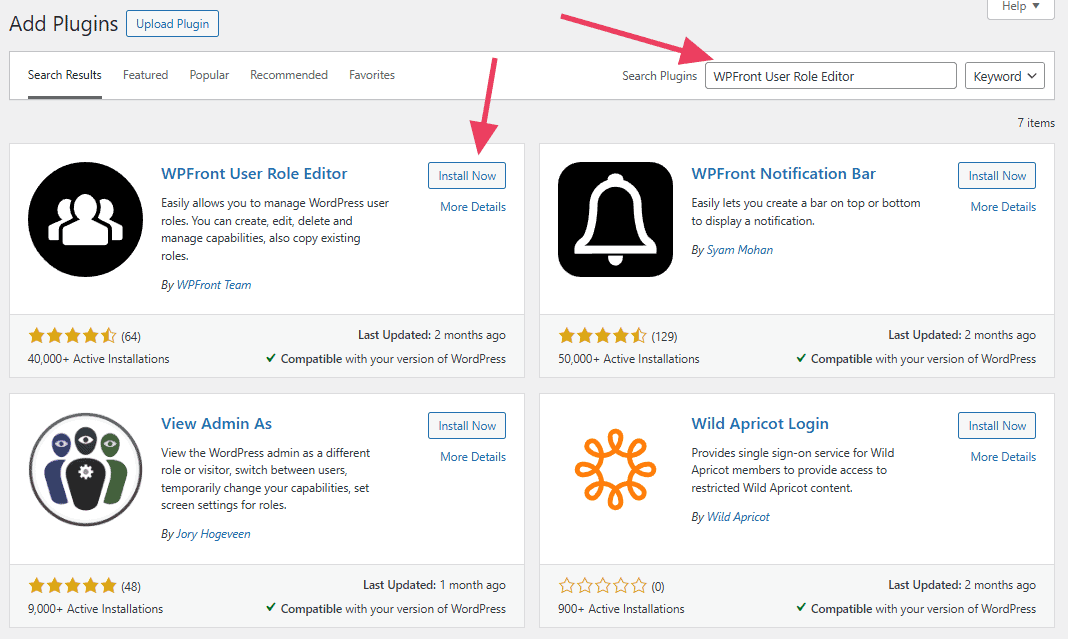
3. Create and Edit WordPress User Roles with WPFront User Role Editor

WPFront User Role Editor is another simple plugin that allows you to quickly create, editor, and remove roles.
Visit Plugins > Add New in your WordPress dashboard. Search for “WPFront User Role Editor” in the search bar. Click Install and then Activate.
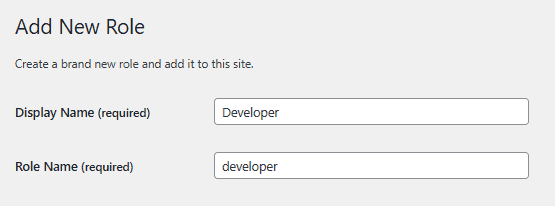
Navigate to Roles > Add New to add a new user role. Give your new role a name.
Next, search through the categories of capabilities to find the permissions that make sense for the new role. In this example, we will give our Developer role the ability to edit themes and plugins.
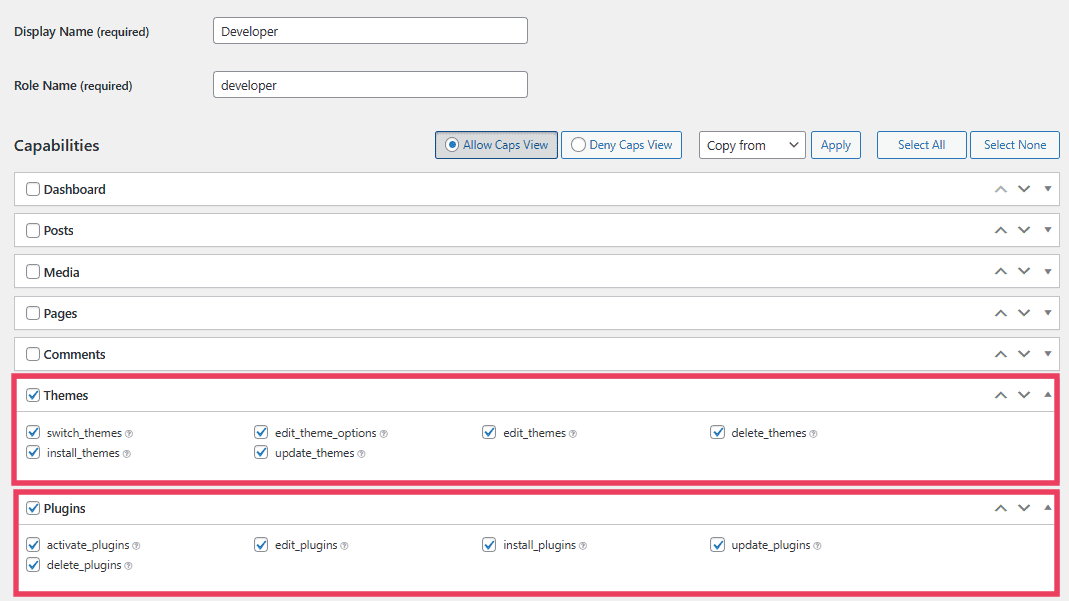
When you’re finished, click Add New Role.
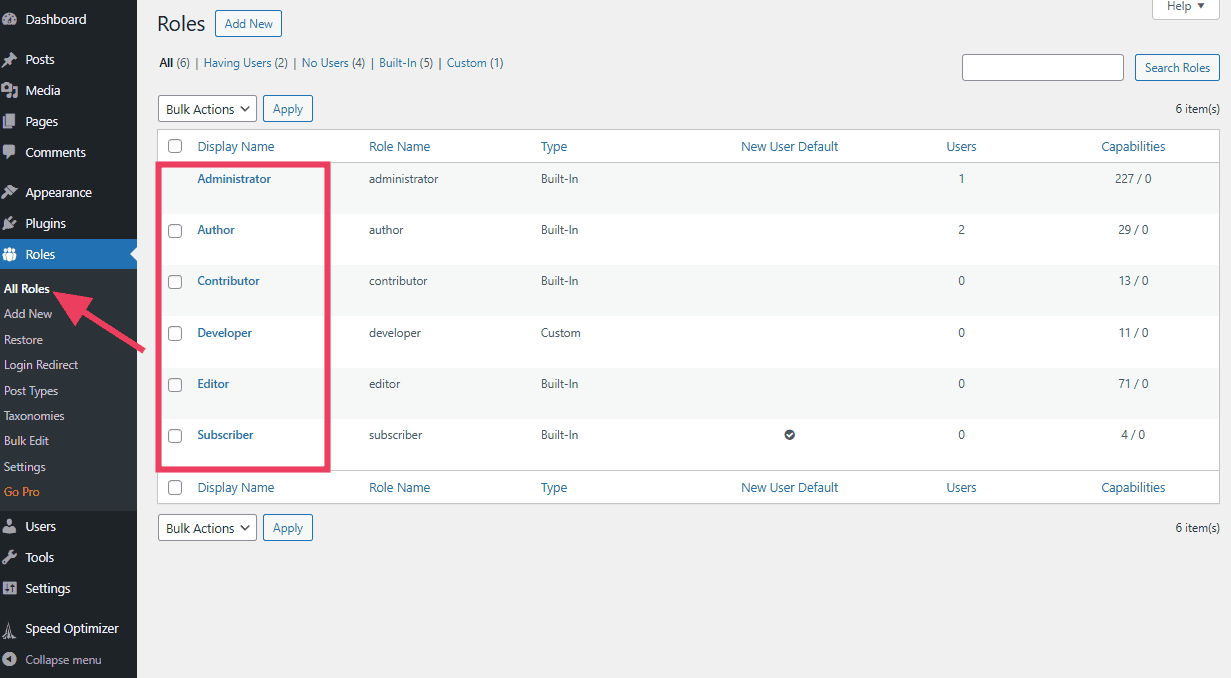
To edit an existing role, click Roles > All Roles. This opens a list of all the current user roles. Click a role to enter the capabilities editor and edit the role’s permissions in the same way as creating a new role.
How to Create Custom User Roles in WordPress without a Plugin
If you don’t want to install a WordPress user roles plugin, you can create custom user roles by pasting in some PHP code. We’ll use some built-in WordPress functions:
- add_role(): For adding a custom role.
- remove_role(): For removing a custom role.
- add_cap(): For adding a custom capability to a role.
- remove_cap(): For removing a custom capability from a role.
- get_role (): Gets information about the role and its capabilities.
Important tip: Any time you change the code of your WordPress website, we strongly recommend using the Code Snippets plugin. This useful tool sequesters the new code so it can’t break your website. But if you want to avoid extra plugins entirely, this tutorial will explain how to change user roles without Code Snippets.
Creating WordPress User Roles with Code
To add custom WordPress user roles without a plugin, you’ll need to add some code to the functions file. You’ll need to use the add_role(); function. This function has three important parameters:
- $role (string) (required): The unique name of the role.
- $display_name (string) (required): The name to be displayed.
- $capabilities (array) (optional): Capabilities for the user.
Before you start adding code, it’s important to create a child theme. A child theme is a theme that inherits the appearance and functions of your current theme (the parent theme). This allows you to update the parent theme without losing all of your changes.
Click on Appearance > Theme File Editor in your WordPress dashboard and then select the functions.php theme file on the right.

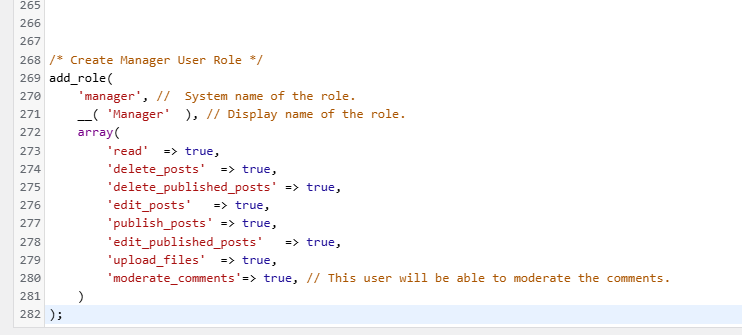
Scroll to the bottom of the file and paste in the following code. This will create a new user role called “Manager.” For now, let’s give them Editor-level capabilities.
/* Create Manager User Role */
add_role(
    'manager', //  System name of the role.
    __( 'Manager'  ), // Display name of the role.
    array(
        'read'  => true,
        'delete_posts'  => true,
        'delete_published_posts' => true,
        'edit_posts'   => true,
        'publish_posts' => true,
        'edit_published_posts'   => true,
        'upload_files'  => true,
        'moderate_comments'=> true, // This user will be able to moderate the comments.
    )
);
It should look like this:
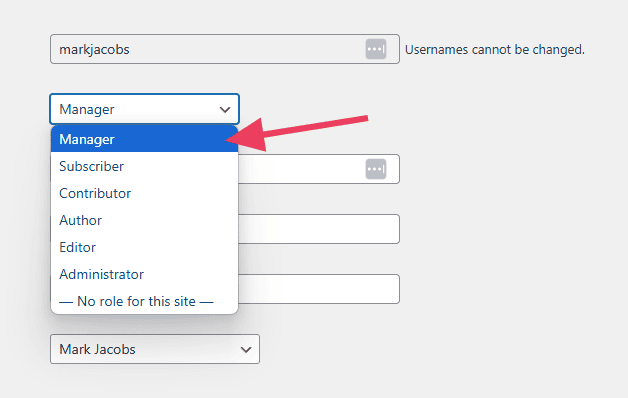
Navigate to Users > All Users and click into any user. You should see a new role in the drop down selector.
If you want to change any of the capabilities for this new user, simply change the true settings to false in the code. For instance, if you want to restrict the ability to edit other people’s posts, change…
'publish_posts' => true,to…
'publish_posts' => false,Click the Update File button to save your changes.
Removing WordPress User Roles with Code
If you want to remove WordPress user roles you previously created, you can simply delete the code you pasted into the functions.php file.
If you want to remove a default role, just use the remove_role() function. Add the following to your functions.php file. Change the word in quotes to the role you want removed.
remove_role( 'contributor' );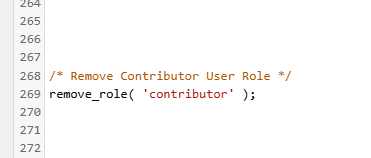
Click the Update File button to save your changes.
Editing a WordPress User Roles with Code
Rather than creating a new user role in WordPress, you might want to simply edit the capabilities of an existing role. You’ll need to use the add_cap() and remove_cap() functions.
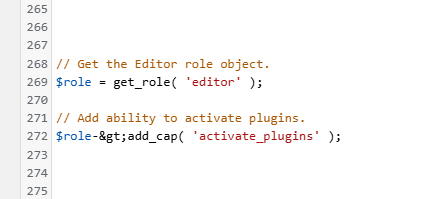
Suppose you want to give the Editor role the ability to activate plugins.
// Get the Editor role object.
$role = get_role( 'editor' );

// Add ability to activate plugins.
$role->add_cap( 'activate_plugins' );
That should look like this:
See below for a complete list of capabilities you can add and remove from user roles.
Editing a Specific User’s Capabilities
The add_cap() and remove_cap() can also be used at the user level. This allows you to add or remove capabilities from a specific user.
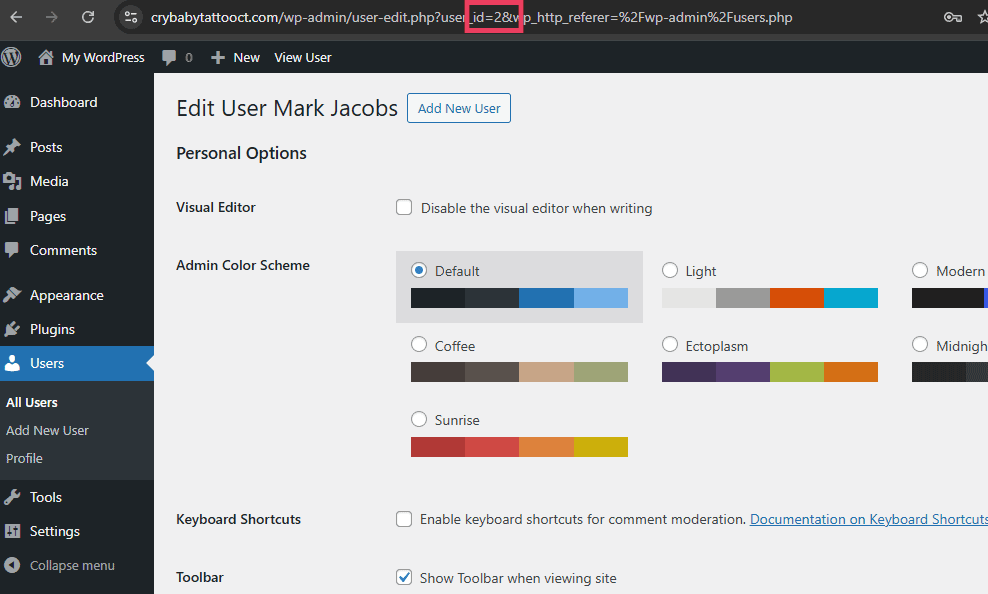
First, you’ll need the user ID number of the user you want to edit. Visit Users > All Users and click into the user you want to edit. You’ll find their ID number in the address bar in this format: ID=#
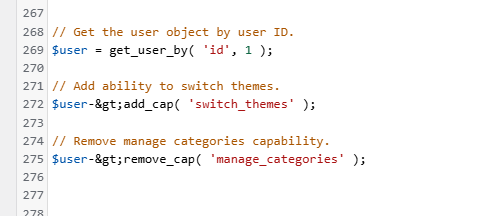
Head back to the functions.php file to add the code to adjust the user’s capabilities. For example, suppose you want to give a user the ability to switch themes and remove their ability to manage categories. Paste in the following code, but change the number after ‘id’ to the user ID number.
// Get the user object by user ID.
$user = get_user_by( 'id', 1 );

// Add ability to switch themes.
$user->add_cap( 'switch_themes' );

// Remove manage categories capability.
$user->remove_cap( 'manage_categories' );
That should look like this:
Full List of User Role Capabilities and Their Functions
When it comes to editing the capabilities of WordPress user roles, you have a lot of options. Here’s a full list of all of the possible capabilities and the roles they are attached to by default. Learn more about them in WordPress’ documentation.
| Capability | Super Admin | Administrator | Editor | Author | Contributor | Subscriber |
| create_sites | yes | x | x | x | x | x |
| delete_sites | yes | x | x | x | x | x |
| manage_network | yes | x | x | x | x | x |
| manage_sites | yes | x | x | x | x | x |
| manage_network_users | yes | x | x | x | x | x |
| manage_network_plugins | yes | x | x | x | x | x |
| manage_network_themes | yes | x | x | x | x | x |
| manage_network_options | yes | x | x | x | x | x |
| upload_plugins | yes | x | x | x | x | x |
| upload_themes | yes | x | x | x | x | x |
| upload_network | yes | x | x | x | x | x |
| upgrade_network | yes | x | x | x | x | x |
| setup_network | yes | x | x | x | x | x |
| activate_plugins | yes | yes (single site or enabled by network setting) | x | x | x | x |
| create_users | yes | yes (single site) | x | x | x | x |
| delete_plugins | yes | yes (single site) | x | x | x | x |
| delete_themes | yes | yes (single site) | x | x | x | x |
| delete_users | yes | yes (single site) | x | x | x | x |
| edit_files | yes | yes (single site) | x | x | x | x |
| edit_plugins | yes | yes (single site) | x | x | x | x |
| edit_theme_options | yes | yes | x | x | x | x |
| edit_themes | yes | yes (single site) | x | x | x | x |
| edit_users | yes | yes (single site) | x | x | x | x |
| export | yes | yes | x | x | x | x |
| import | yes | yes | x | x | x | x |
| install_plugins | yes | yes (single site) | x | x | x | x |
| install_themes | yes | yes (single site) | x | x | x | x |
| list_users | yes | yes | x | x | x | x |
| manage_options | yes | yes | x | x | x | x |
| promote_users | yes | yes | x | x | x | x |
| remove_users | yes | yes | x | x | x | x |
| switch_themes | yes | yes | x | x | x | x |
| update_core | yes | yes (single site) | x | x | x | x |
| update_plugins | yes | yes (single site) | x | x | x | x |
| update_themes | yes | yes (single site) | x | x | x | x |
| edit_dashboard | yes | yes | x | x | x | x |
| customize | yes | yes | x | x | x | x |
| delete_site | yes | yes | x | x | x | x |
| moderate_comments | yes | yes | yes | x | x | x |
| manage_categories | yes | yes | yes | x | x | x |
| manage_links | yes | yes | yes | x | x | x |
| edit_others_posts | yes | yes | yes | x | x | x |
| edit_pages | yes | yes | yes | x | x | x |
| edit_others_pages | yes | yes | yes | x | x | x |
| edit_published_pages | yes | yes | yes | x | x | x |
| publish_pages | yes | yes | yes | x | x | x |
| delete_pages | yes | yes | yes | x | x | x |
| delete_others_pages | yes | yes | yes | x | x | x |
| delete_published_pages | yes | yes | yes | x | x | x |
| delete_others_pos | yes | yes | yes | x | x | x |
| delete_private_posts | yes | yes | yes | x | x | x |
| edit_private_posts | yes | yes | yes | x | x | x |
| read_private_posts | yes | yes | yes | x | x | x |
| delete_private_pages | yes | yes | yes | x | x | x |
| edit_private_pages | yes | yes | yes | x | x | x |
| read_private_pages | yes | yes | yes | x | x | x |
| unfiltered_html | yes | yes (single site) | yes (single site) | x | x | x |
| unfiltered_html | yes | yes | yes | x | x | x |
| edit_published_posts | yes | yes | yes | yes | x | x |
| upload_files | yes | yes | yes | yes | x | x |
| publish_posts | yes | yes | yes | yes | x | x |
| delete_published_posts | yes | yes | yes | yes | x | x |
| edit_posts | yes | yes | yes | yes | yes | x |
| delete_posts | yes | yes | yes | yes | yes | x |
| read | yes | yes | yes | yes | yes | yes |
Managing WordPress User Roles
Managing user roles is an important part of maintaining control over your WordPress site. By understanding the default roles and learning how to modify or create custom roles, you can tailor permissions to meet your needs. With the tools and techniques in this guide, you’re well-equipped to take full control of your site’s user management.
Ready to build your WordPress site?
Try our service free for 14 days. No obligation, no credit card required.


