A sitemap is an essential part of your WordPress website. This simple tool improves your search engine visibility and creates a better experience for your users.
Whether you’re managing a small blog or a large ecommerce store, a well-constructed sitemap makes sure that none of your content gets lost.
This article covers everything you need to know about WordPress sitemaps, including what they are, why they matter, and how you can create, customize, and submit them to search engines.
Table of Contents
What is a WordPress Sitemap?
A WordPress sitemap is a file that lists all the important pages and content on your website. It helps search engines like Google understand your site structure and find your content quickly.
Think of a sitemap like a map for search engines. Instead of crawling your site page by page, they use the sitemap to locate everything efficiently. This improves the chances of your pages being indexed and showing up in search results.
As of WordPress version 5.5, WordPress automatically generates a basic sitemap for every WordPress site. However, you may decide to use a WordPress plugin to take full control over your sitemap.
XML Sitemap vs. HTML Sitemap
There are two main types of sitemaps:
XML Sitemap
An XML sitemap is designed for search engines. It lists your website’s URLs in a format that search engines can read and understand. This helps search engines crawl your site efficiently. XML sitemaps are not meant for humans to read.
Here’s what an XML sitemap looks like in your browser:
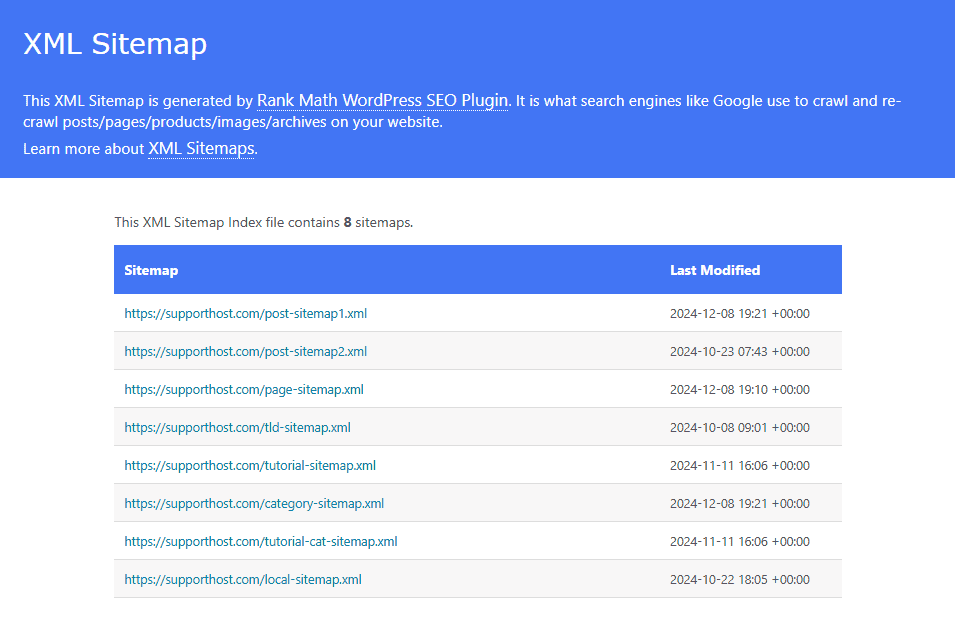
Here’s the code structure of an XML sitemap:
<?xml version="1.0" encoding="UTF-8"?><?xml-stylesheet type="text/xsl" href="//supporthost.com/main-sitemap.xsl"?>

<sitemapindex xmlns="http://www.sitemaps.org/schemas/sitemap/0.9">
   <sitemap>
      <loc>https://supporthost.com/post-sitemap1.xml</loc>
      <lastmod>2024-12-08T19:21:47+00:00</lastmod>
   </sitemap>
   <sitemap>
      <loc>https://supporthost.com/post-sitemap2.xml</loc>
      <lastmod>2024-10-23T07:43:28+00:00</lastmod>
   </sitemap>
   <sitemap>
      <loc>https://supporthost.com/page-sitemap.xml</loc>
      <lastmod>2024-12-08T19:10:52+00:00</lastmod>
   </sitemap>
   <sitemap>
      <loc>https://supporthost.com/tld-sitemap.xml</loc>
      <lastmod>2024-10-08T09:01:17+00:00</lastmod>
   </sitemap>
   <sitemap>
      <loc>https://supporthost.com/tutorial-sitemap.xml</loc>
      <lastmod>2024-11-11T16:06:44+00:00</lastmod>
   </sitemap>
   <sitemap>
      <loc>https://supporthost.com/category-sitemap.xml</loc>
      <lastmod>2024-12-08T19:21:47+00:00</lastmod>
   </sitemap>
   <sitemap>
      <loc>https://supporthost.com/tutorial-cat-sitemap.xml</loc>
      <lastmod>2024-11-11T16:06:44+00:00</lastmod>
   </sitemap>
   <sitemap>
      <loc>https://supporthost.com/local-sitemap.xml</loc>
      <lastmod>2024-10-22T18:05:14+00:00</lastmod>
   </sitemap>
</sitemapindex>

<!-- XML Sitemap generated by Rank Math SEO Plugin (c) Rank Math - rankmath.com -->
HTML Sitemap
An HTML sitemap is built for humans. It’s a page on your website that shows a list of links to your content, organized hierarchically for easy navigation. Visitors can use it to find pages or posts quickly.
Here’s an example of an HTML sitemap. Visit Apple’s site to see the full sitemap.

Generally speaking, humans don’t bother using sitemaps anymore, so having an HTML sitemap isn’t necessary. But if you want an HTML sitemap, we offer a tutorial for creating one down below.
Why You Need a Sitemap for a WordPress Website
A sitemap acts as a guide for search engine crawlers. It helps them find and index your pages quickly so that your content appears in search results.
While sitemaps aren’t technically required, they are considered an SEO best practice, especially for WordPress websites that often have dynamic content and complex structures. Sitemaps also show when pages were updated last so search engines know what to re-crawl.
We strongly recommend a sitemap if:
- Your site doesn’t have many internal links.
- Your site has a lot of pages.
- Your site is new and doesn’t have many backlinks.
Furthermore, creating a sitemap helps you organize your website’s structure. It encourages you to prioritize important pages, plan a logical flow for navigation, and build content in a way that supports the user experience.
How to Find a Sitemap on a WordPress Site
Most websites use the default WordPress sitemap, so the first place to check is the default location. Just add /sitemap_index.xml to the end of a WordPress website’s address. For example:
https://www.example.com/sitemap_index.xml
If that doesn’t work, check for sitemaps created by the popular SEO plugins. Here’s where you can usually find them:
- Yoast SEO: example.com/sitemap_index.xml
- All in One SEO (AIOSEO): example.com/sitemap.xml
- Rank Math: example.com/sitemap_index.xml
- SEOPress: example.com/sitemaps.xml
- Google XML Sitemaps: example.com/sitemap.xml
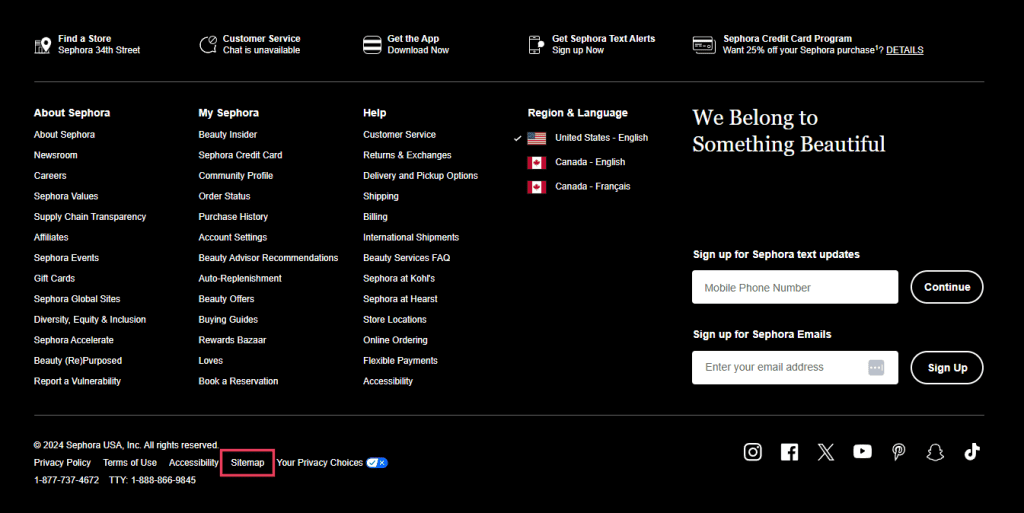
Alternatively, you can look for sitemap links in the site’s footer. Some websites include a link to their sitemap here.
How to Create a Sitemap for WordPress
Creating a sitemap XML file manually is tedious and time-consuming. Fortunately, that isn’t necessary. Here are six simple options to create a WordPress sitemap.
Option 1: Create a Sitemap Without Using a Plugin
This is the easiest method to create a WordPress sitemap. In fact, you don’t have to do anything at all!
WordPress 5.5 comes with a built-in sitemap feature. WordPress added this feature to make sure that new websites don’t miss out on the benefits of having a site map.
So if you’re using 5.5 or later, you already have a sitemap. To view it, add wp-sitemap.xml to the end of your domain name, like this:
https://www.example.com/wp-sitemap.xml
Here’s what the default sitemap looks like when you visit that URL.
Unfortunately, this feature is not very flexible. You don’t have any way to add or remove items from the sitemap. If you need more control, you’ll have to use an SEO plugin.
Option 2: Create a Sitemap with Yoast SEO
With more than 10,000 million installations, Yoast SEO is the most popular SEO plugin.

To install Yoast SEO, visit Plugins > Add New in the WordPress dashboard. Search for “Yoast SEO,” click Install Now, then click Activate.
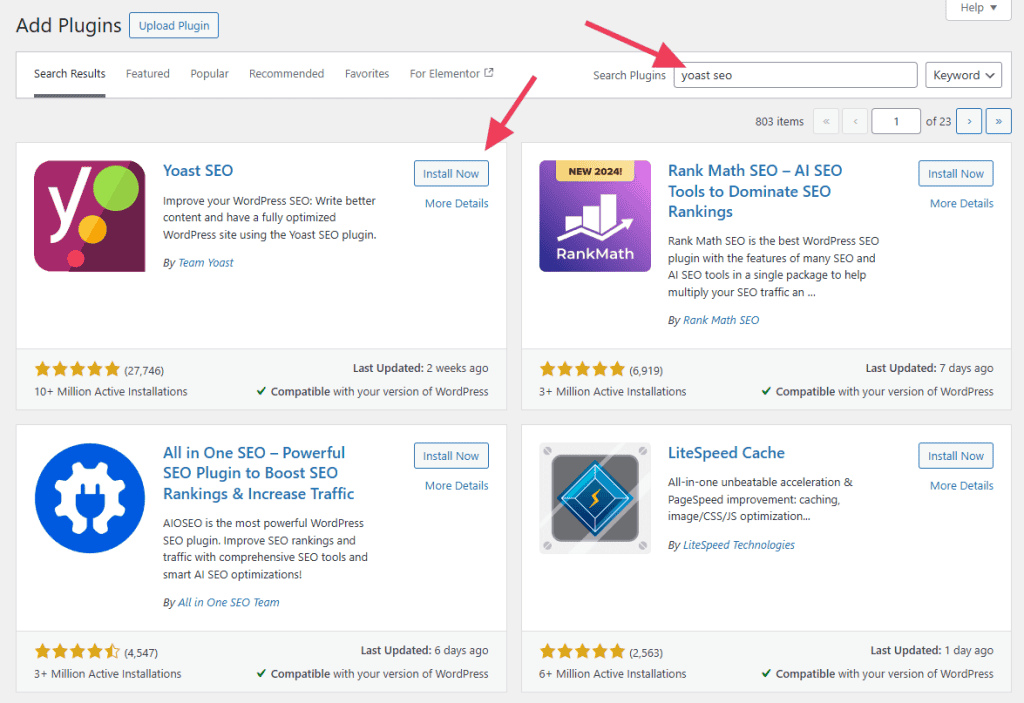
After installation, Yoast SEO automatically generates your WordPress sitemap. You can view it by visiting Yoast SEO > Settings. At the bottom, you’ll see the XML sitemaps card. Click the View the XML sitemap button.
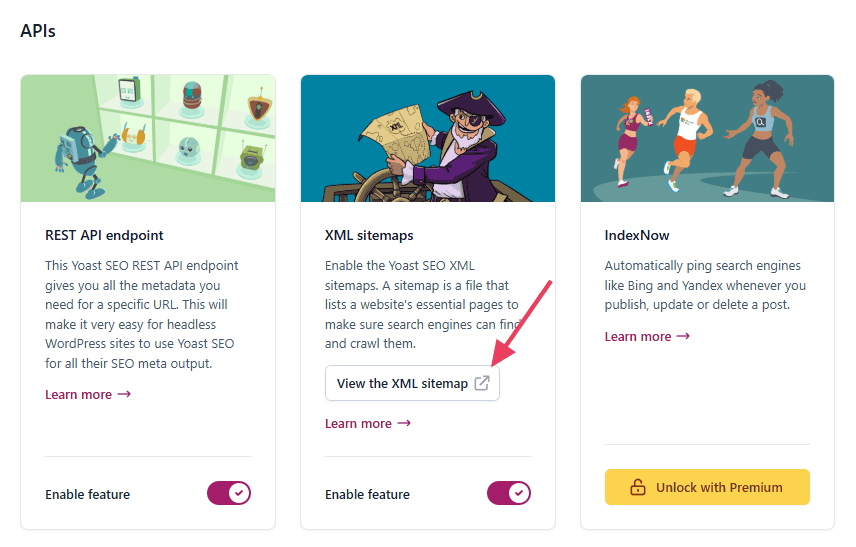
You can also view the sitemap by adding “sitemap_index.xml” to the end of your domain:
https://www.yourdomainname.com/sitemap_index.xml
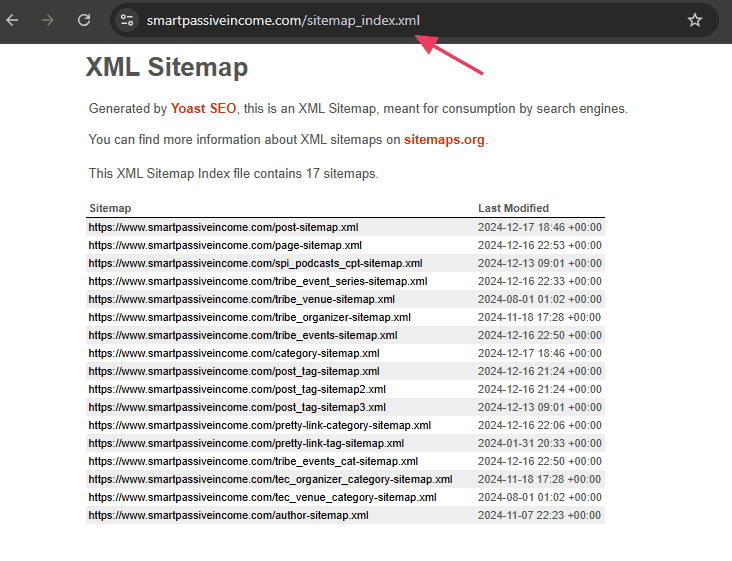
Here’s what a Yoast SEO sitemap looks like:
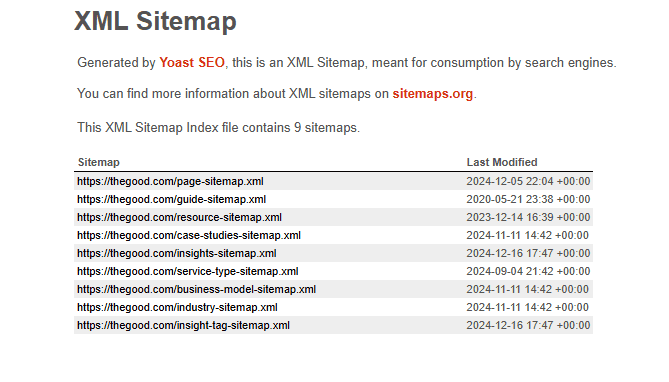
Yoast SEO actually creates multiple sitemaps for different content types, all linked together by an index. This is considered an established best practice to keep your sitemap organized.
This plugin also adds a link to the sitemap in the robots.txt file, includes image information, adds a “lastmod” date for each URL, and removes “noindex” pages.
If you want to edit what appears or doesn’t appear in your Yoast SEO sitemap, you’ll have to make some changes throughout the plugin’s settings. Check out Yoast SEO’s full guide on editing the sitemap for detailed instructions.
Option 3: Create a Sitemap with Rank Math
Rank Math is another SEO plugin with millions of installations. Like Yoast SEO, it comes with an easy-to-use sitemap feature.

To install Rank Math, visit Plugins > Add New in the WordPress dashboard. Search for “Rank Math,” click Install Now, then click Activate.
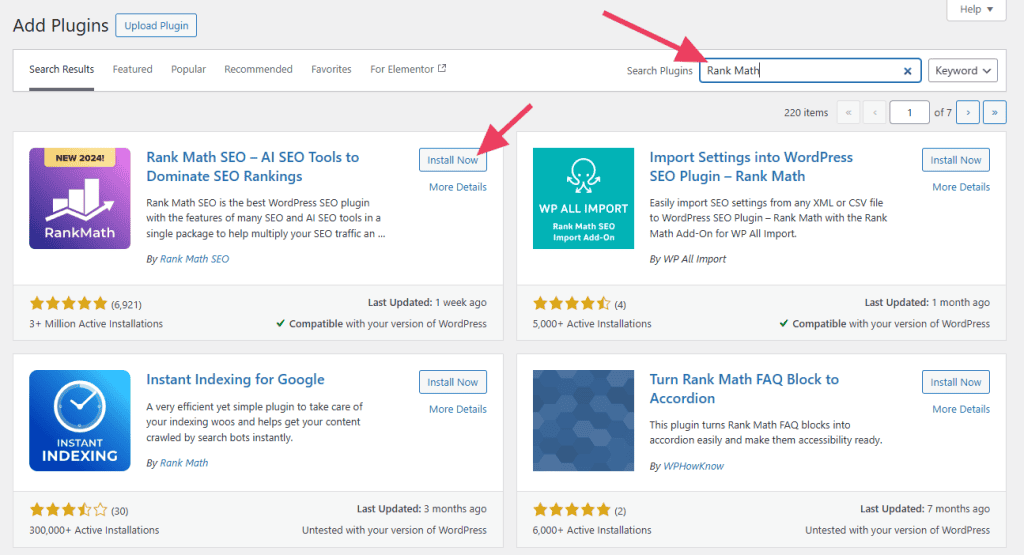
Once installed, visit Rank Math SEO > Sitemap Settings in your WordPress dashboard. This is where you’ll configure your sitemap.
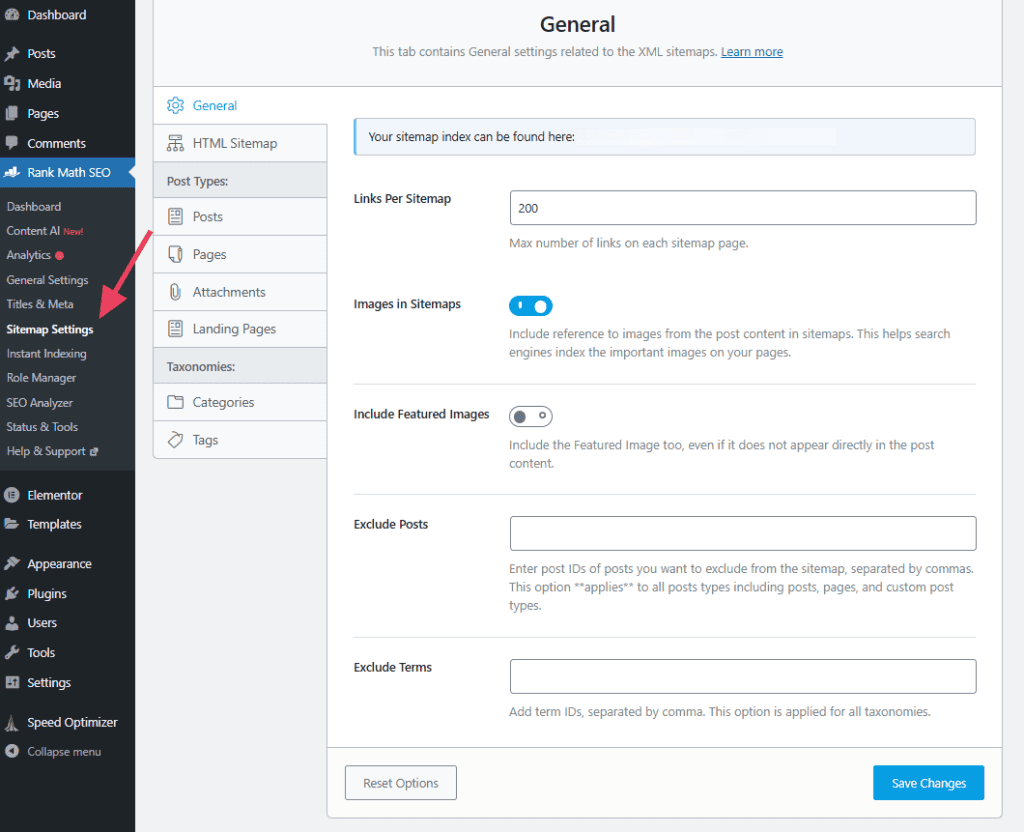
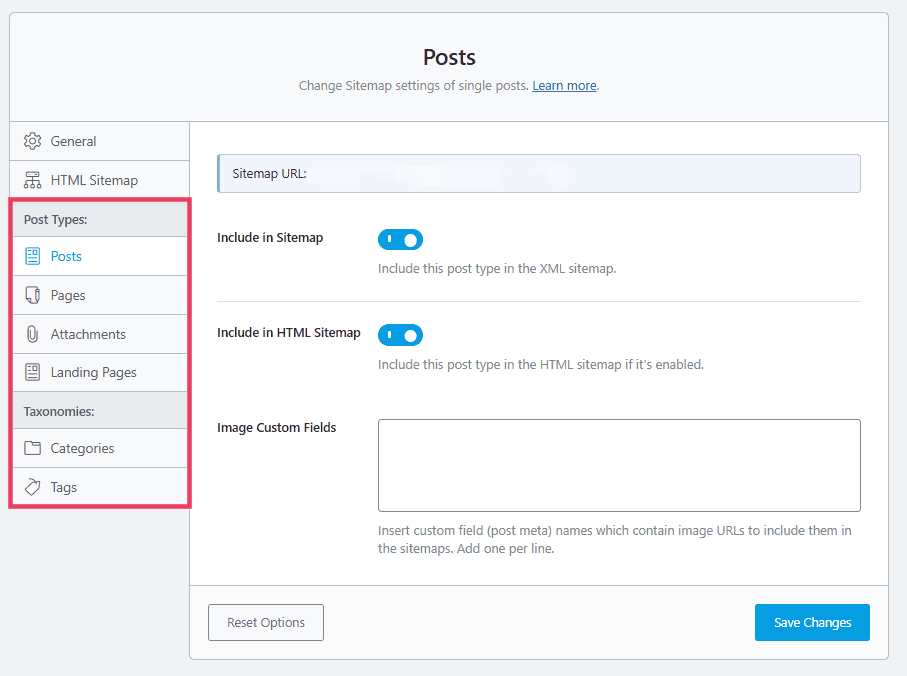
Each tab on this page offers several options for customizing your sitemap. Explore the tabs for different post types and taxonomies if you want to exclude those elements from your sitemap.
Visit the HTML Sitemap tab if you want Rank Math to provide an HTML sitemap. This is on by default, but you should decide whether to display the sitemap as a shortcode or a page.
If you choose shortcode, enter the shortcode text you’ll insert somewhere on your WordPress site.
[rank_math_html_sitemap] is the recommended shortcode, but you can choose anything you like.
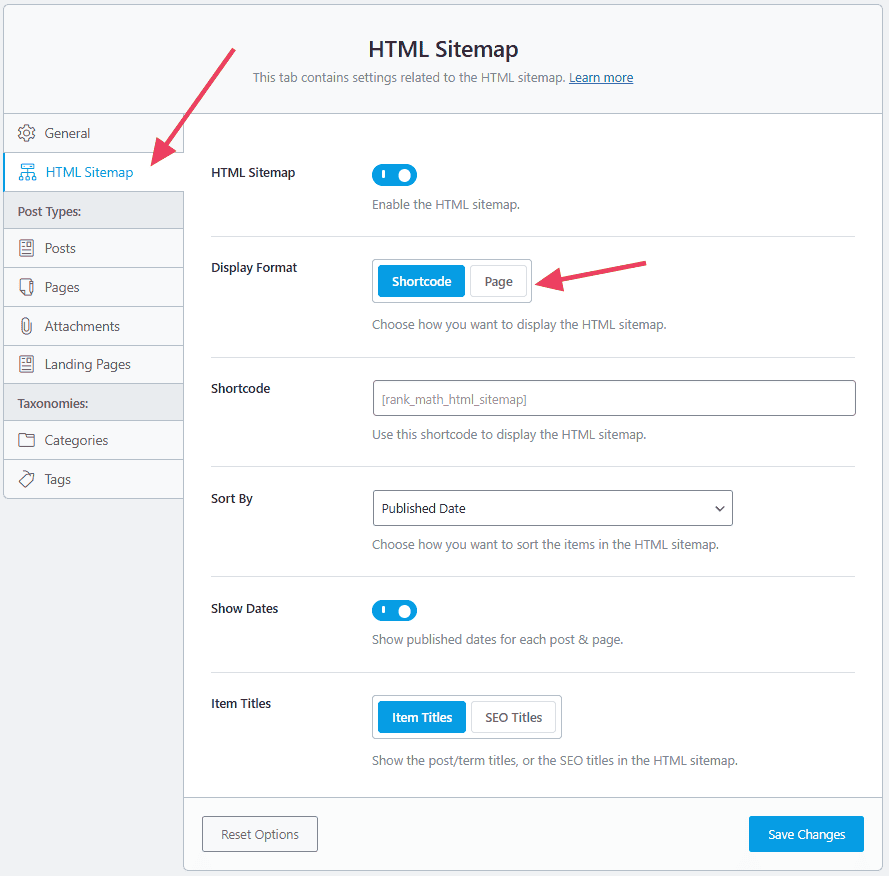
If you want Rank Math to put your HTML sitemap on a specific page, you’ll need to select that page from the drop down menu.
Be sure to hit Save Changes when you’re finished.
Option 4: Create a Sitemap with All in One SEO

All in One SEO is another popular SEO plugin that comes with sitemap functionality.
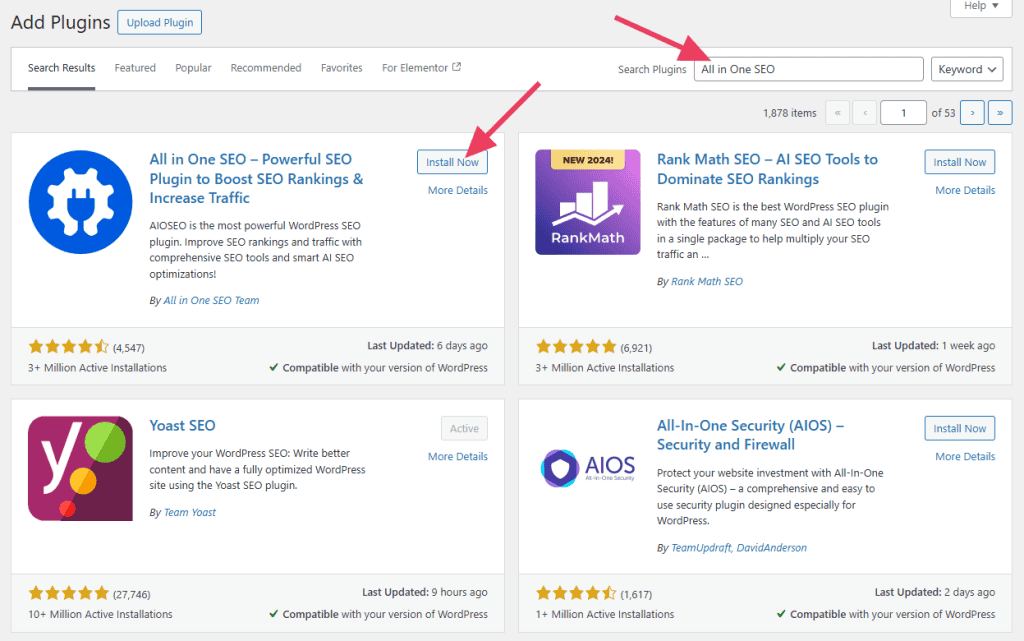
To install Yoast SEO, visit Plugins > Add New in the WordPress dashboard. Search for “All in One SEO,” click Install Now, then click Activate.
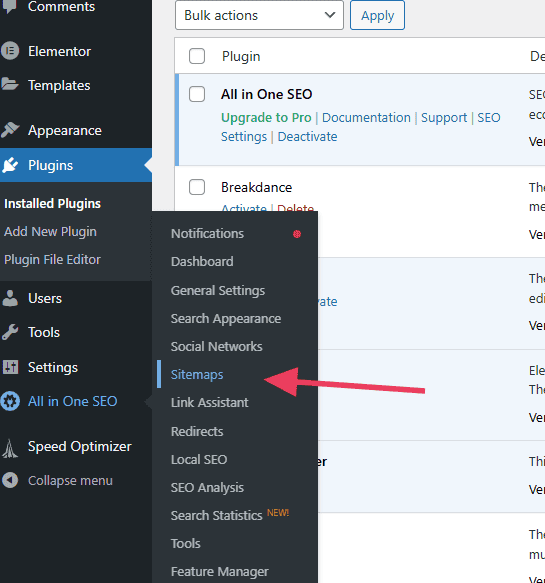
Click All in One SEO > Sitemaps in the WordPress dashboard.
The All in One SEO sitemap should be enabled by default. Click Open Sitemap to see what it looks like. You can also view your sitemap by adding sitemap.xml to the end of your website’s URL.
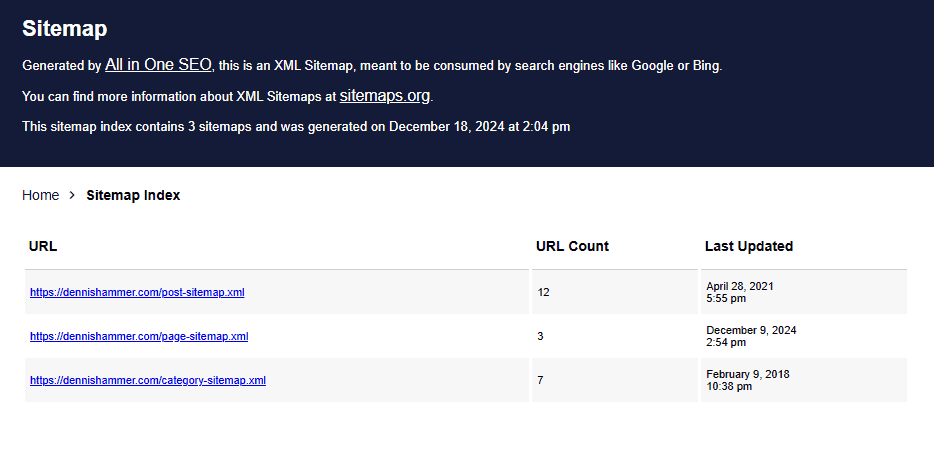
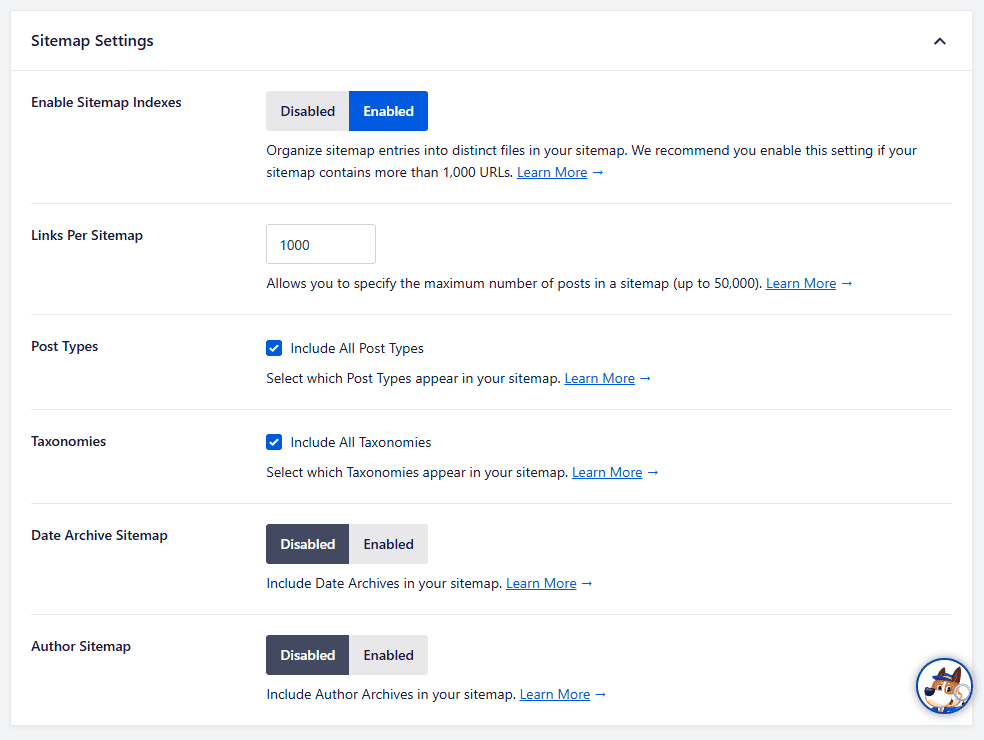
By default, All in One SEO will add all pages and posts to the sitemap. If that’s what you want, there’s nothing else to do. But if you want more control over your sitemap, scroll down the “Sitemap Settings” section.
This section gives you the ability to manage sitemap indexes and include or exclude post types and taxonomies, such as categories, tags, and author archives.
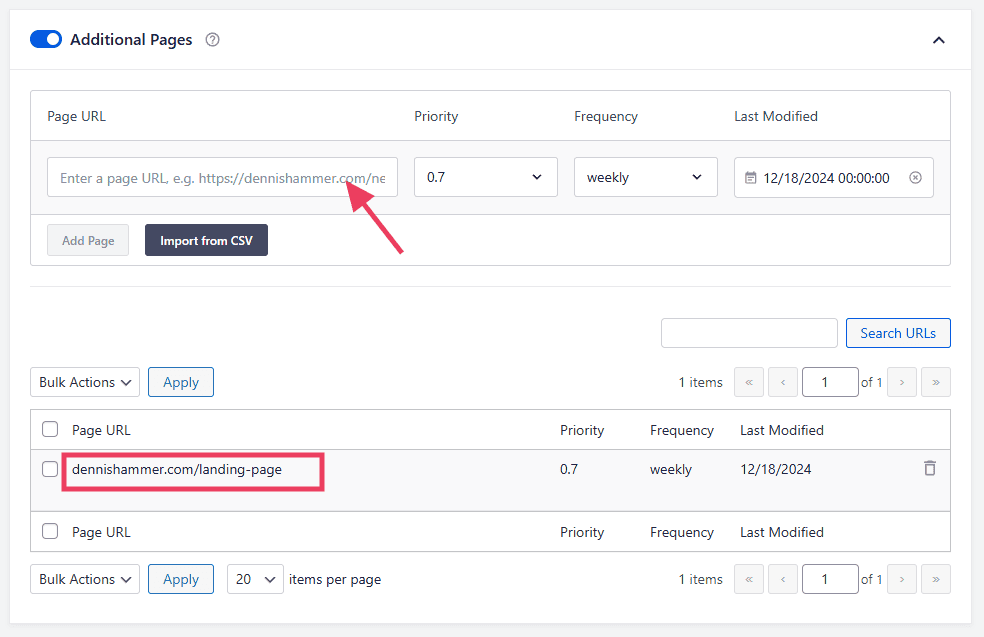
If you want to add additional pages that are not part of your WordPress site, add them in the “Additional Pages” section.
Option 5: Create a Sitemap with the XML Sitemap Generator for Google
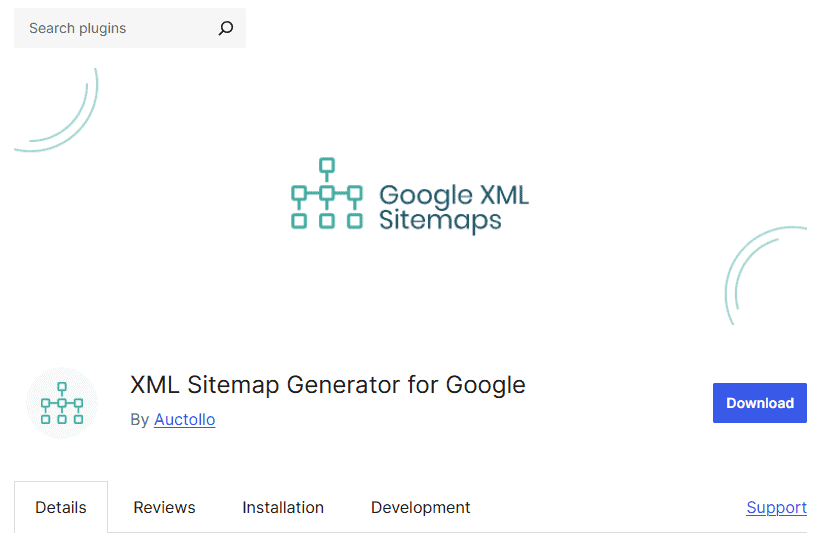
XML Sitemap Generator for Google plugin is a free and simple option for making a WordPress XML sitemap. Unlike other tools on this list, it’s not an all-in-one SEO plugin. It only makes sitemaps.
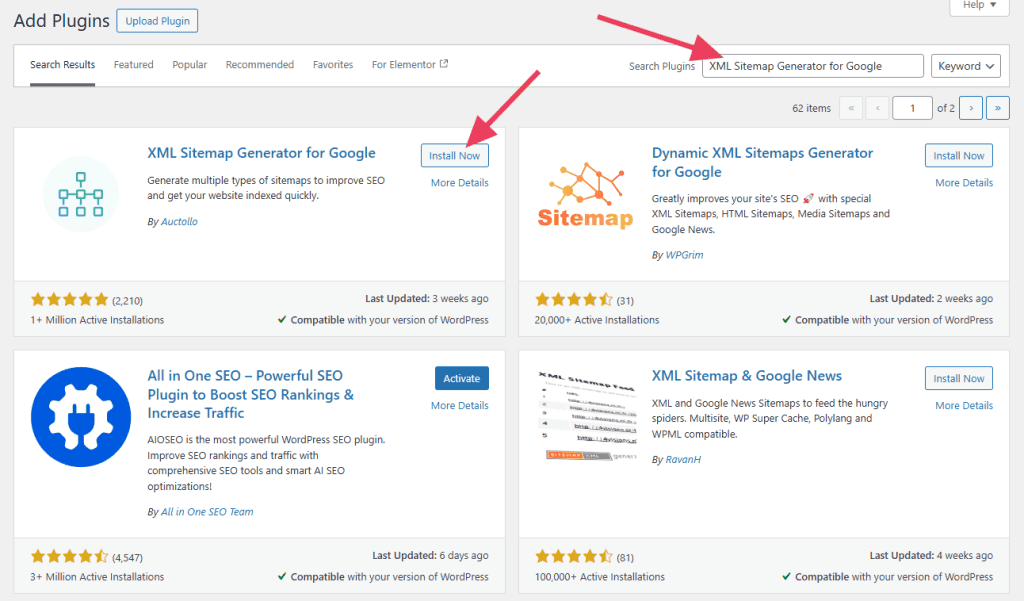
To install this plugin, visit Plugins > Add New in the WordPress dashboard. Search for “XML Sitemap Generator for Google,” click Install Now, then click Activate.
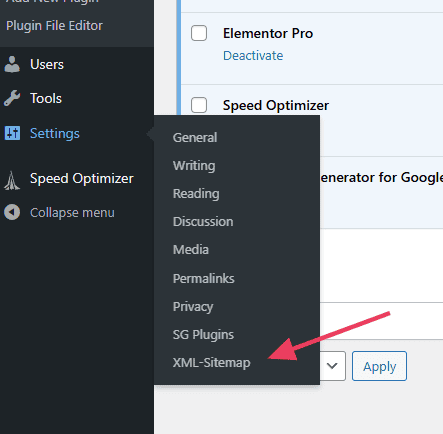
Click Settings > XML Sitemaps in your WordPress dashboard.
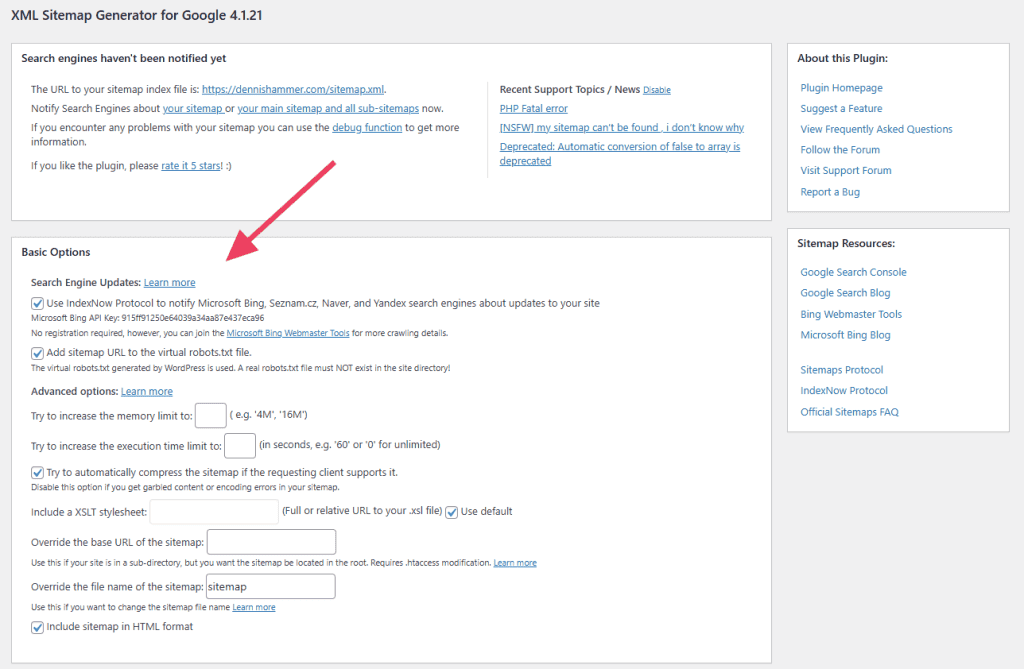
Like all of the other options in this article, this plugin creates a sitemap automatically, but it doesn’t notify search engines until you update the options at least once.
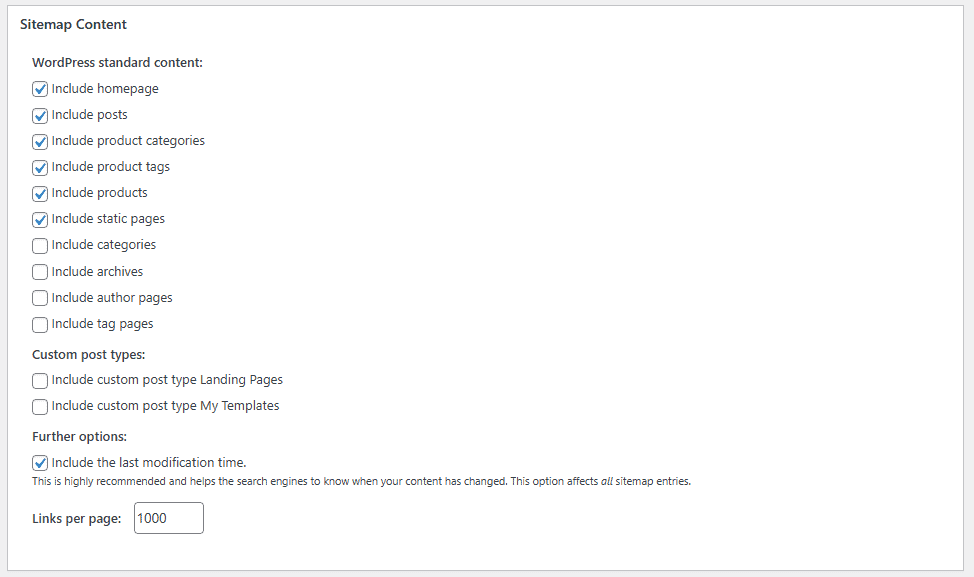
Review the basic options and adjust them to meet your needs.
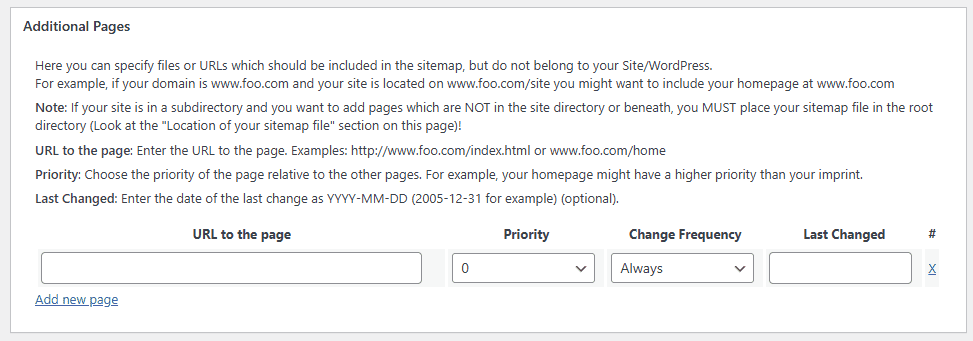
Under “Additional Pages,” you can include any non-WordPress pages in your sitemap.
Under “Sitemap Content,” decide which types of pages will appear in the sitemap.
You can also exclude categories or specific pages.
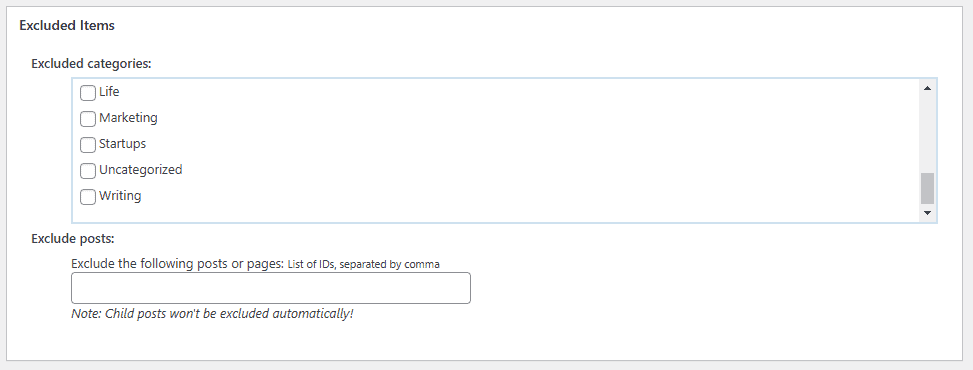
To save your settings, click Update Options at the bottom of the page.
Option 6: Create a Sitemap Using an Online Generator
If you don’t want to use a WordPress plugin to create a sitemap, you’ll want to use a free online sitemap generator to create the file. This is much faster than creating it manually.
Visit XML Sitemap Generator and click the Try It Now button.
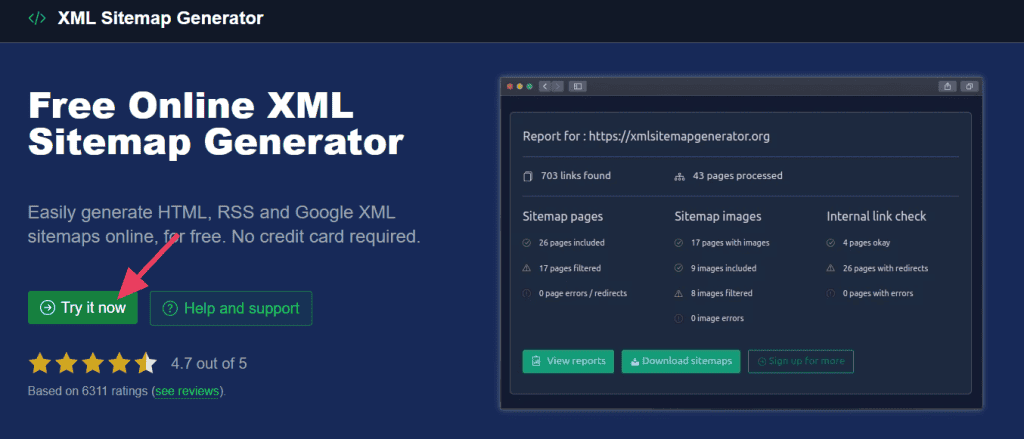
Next you’ll need to complete the form to give the generator the information it needs to create your sitemap.
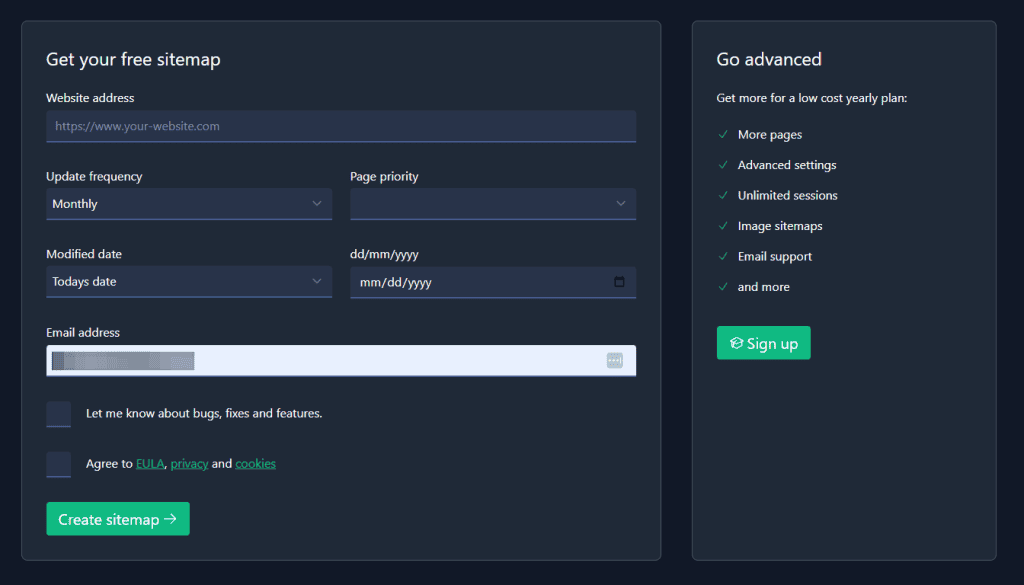
- Website address: Enter the URL of your website.
- Update frequency: Approximately how often your site receives new content.
- Page priority: The importance of a particular URL relative to other URLs on your site. If you aren’t sure, select none.
- Modified date: The date your website was last modified. You can leave this blank.
If you require more advanced settings, you’ll need to purchase a paid account.
When you’re finished with the form, click Create Sitemap. Processing time will depend on the size of your website. Small sites complete processing in just a few moments.
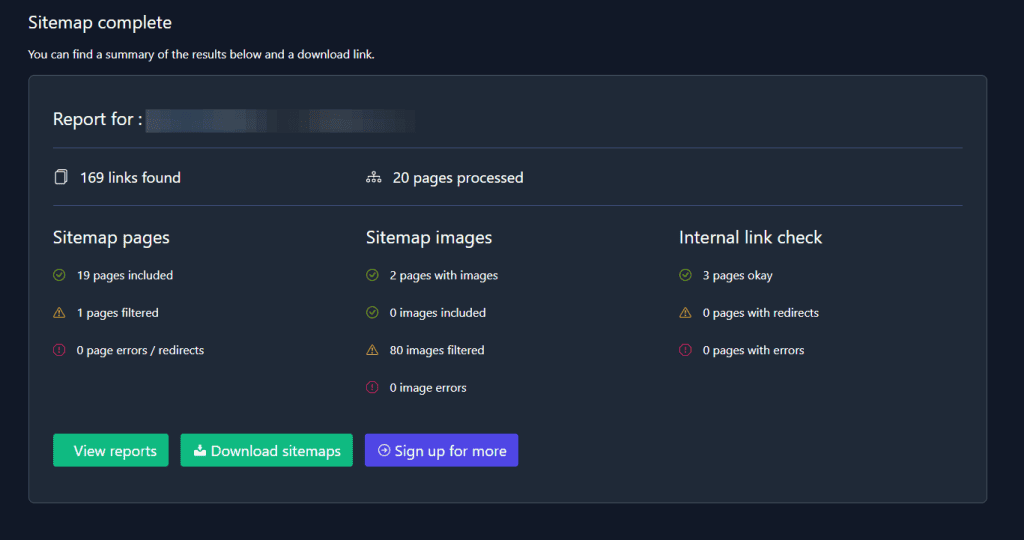
Finally, download the sitemap and upload it to the root folder of your website.
How to Validate WordPress Sitemap
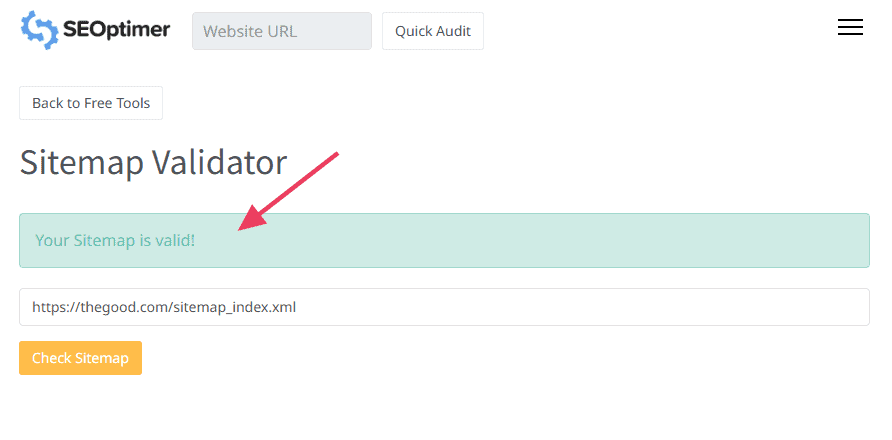
After creating your WordPress sitemap, it’s important to run it through a sitemap validation tool. This tool checks if your sitemap is optimized according to XML schema.
Visit Sitemap Validator by SEOptimer. Enter your website’s sitemap.xml URL and click Check Sitemap. The tool will show you any errors.
How to Submit a WordPress Sitemap to Search Engines
After creating your sitemap, you’ll want to submit it to Google and Bing. This step is optional as the search engines will eventually find it, but it can help them discover your site more quickly.
Submitting Your Sitemap to Google
Google Search Console is a free tool that helps you maintain and troubleshoot your site on Google’s platforms. Here’s how to submit your sitemap:
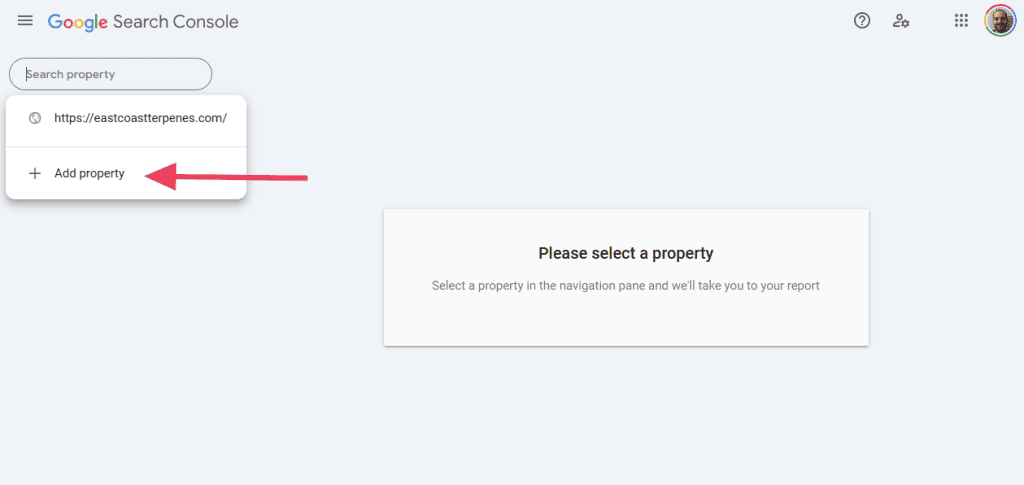
Visit Google Search Console and sign into your account. Click the Search Property selector and then click Add property.
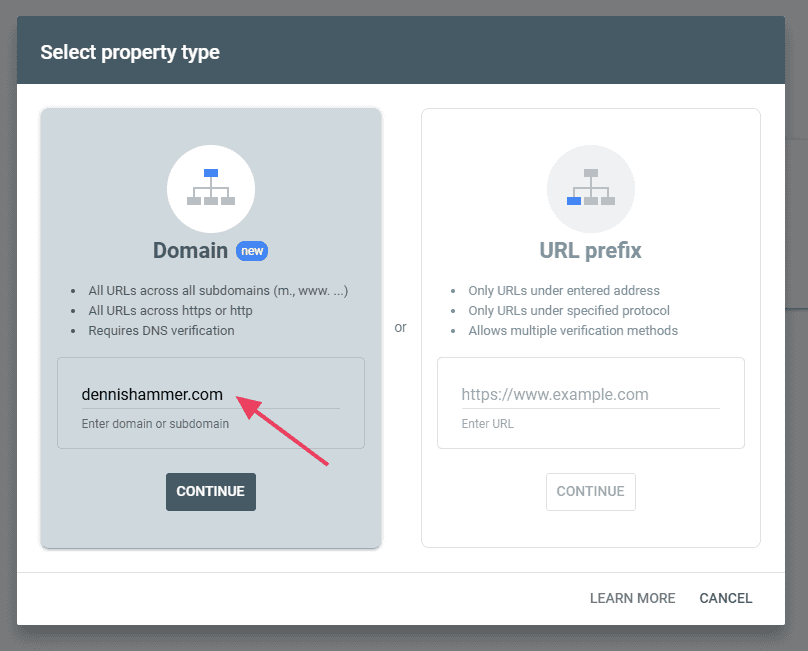
Enter your domain name and click Continue.
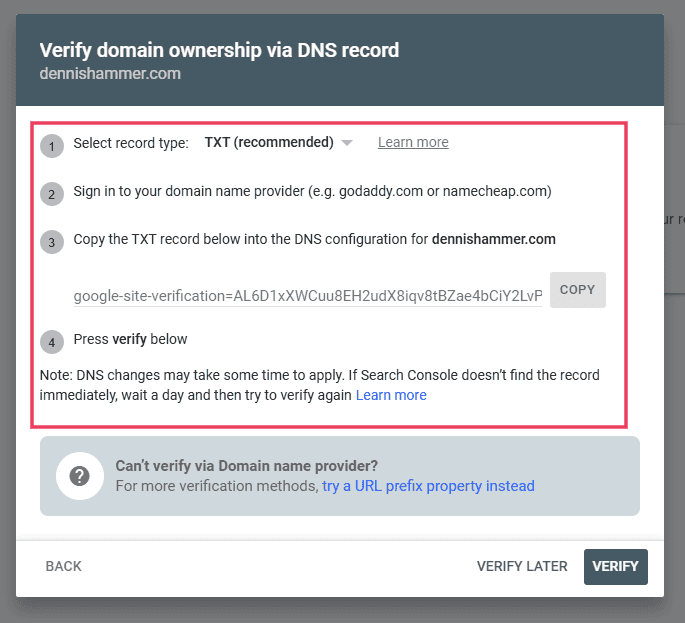
Next, Google Search Console needs you to verify that you’re the domain owner (otherwise people could submit sitemaps for any site). Follow the four-step instructions and click Verify.
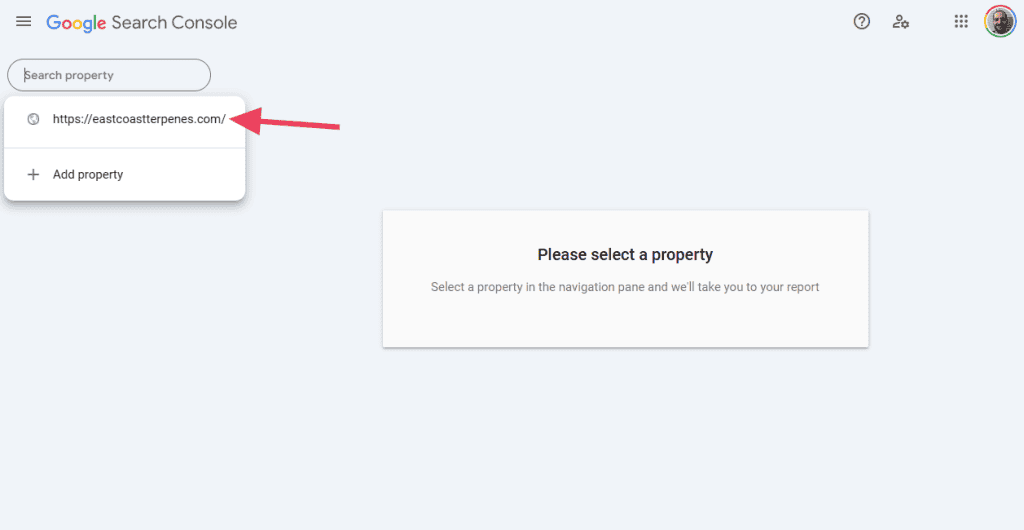
After verifying, return to the main screen and select the property from the Search Property selector. Select the domain you just verified.
On the Dashboard, navigate to the Sitemaps page.
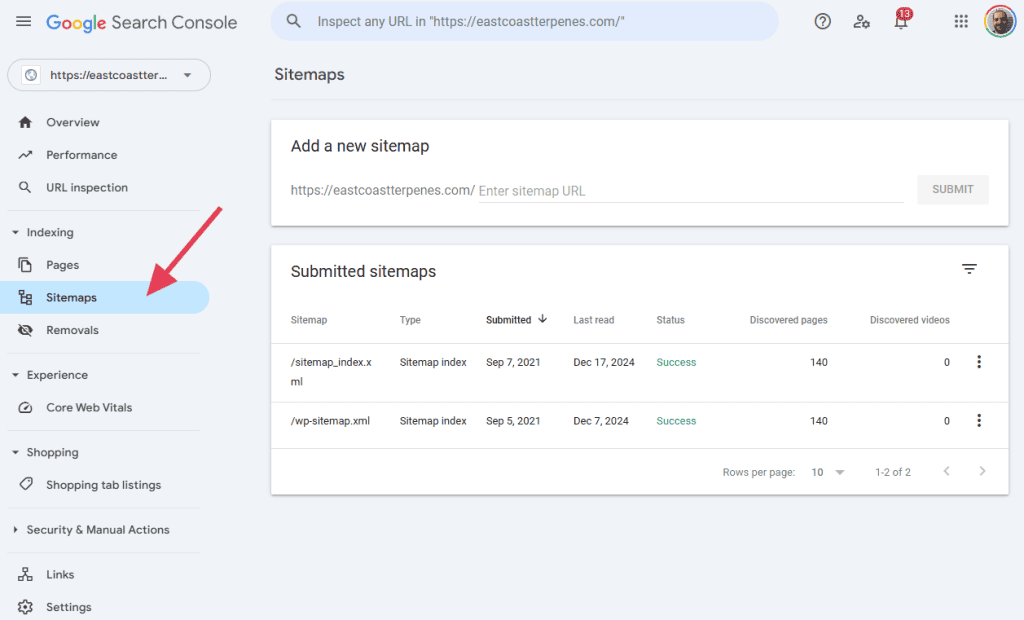
Enter the URL of your sitemap in the Add a new sitemap field, then click Submit.

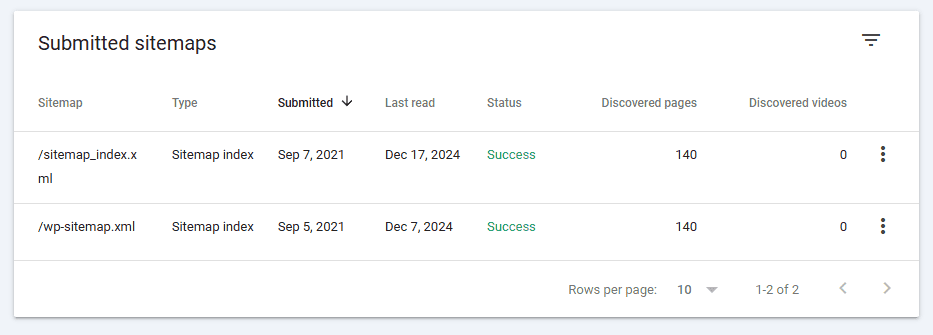
Once submitted, Google Search Console will check your sitemap and notify you if there are any errors.
Submitting Your Sitemap to Bing
Similar to Google Search Console, you can use Bing Webmaster Tools to submit your sitemap to Bing’s platform.
Visit the Bing Webmaster Tools website and click Get Started.

Login using whichever method makes sense for you.

Next, you have two options. You can import your site from Google Search Console or add it to Bing manually.
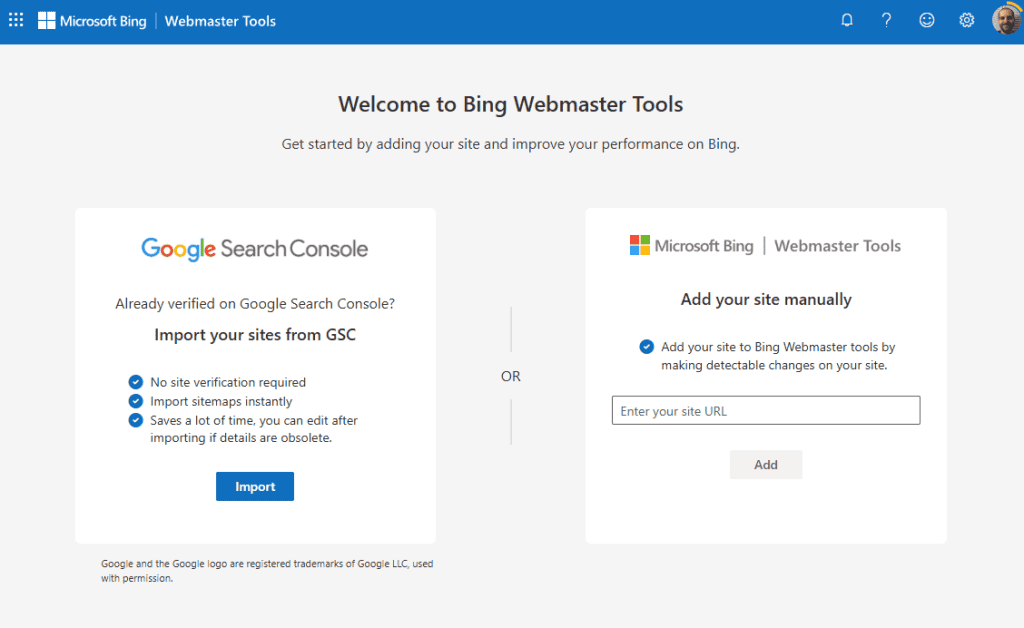
If you’ve already submitted your site to Google Search Console, importing your site to Bing is easiest because it lets you skip the verification step. Follow the simple prompts to connect to Google Search Console and choose the appropriate site.
If you decide to add your site manually, enter your site’s URL and click Add.
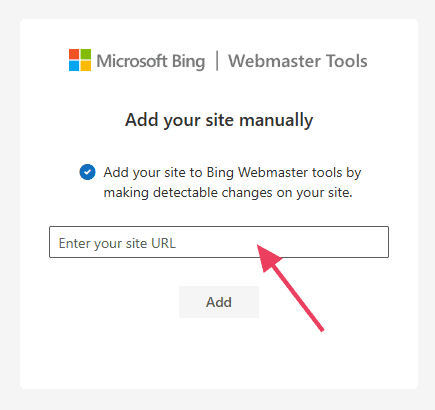
Bing will ask you to verify the ownership of your website. You can either upload a file to your web host, add a meta tag to your site’s HTML, or manually add CNAME record to the domain name server.
Since you’re using WordPress, the HTML meta tag method is usually easiest. Copy the meta tag code and add it to the <head> tag of your website.
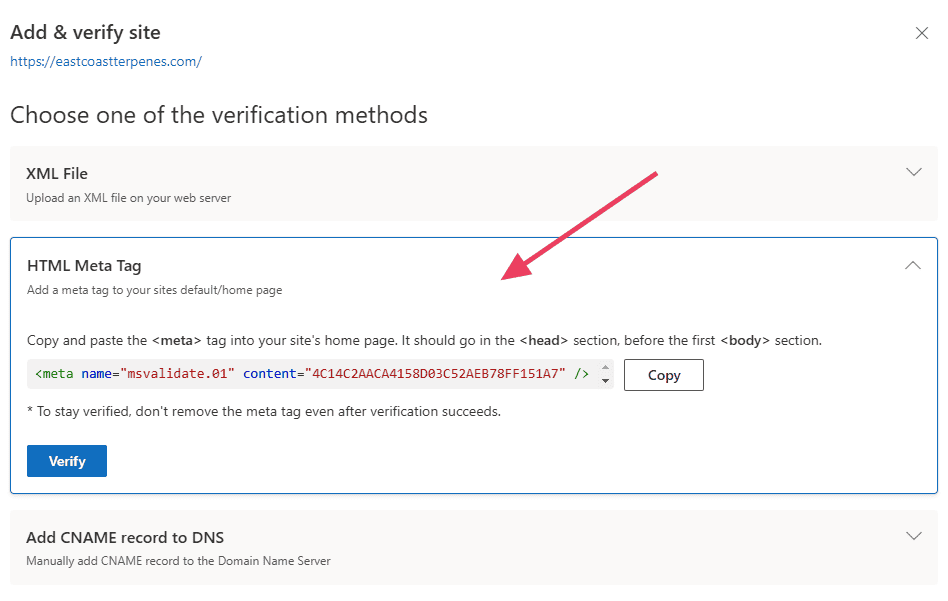
After inserting the code, click the Verify button.
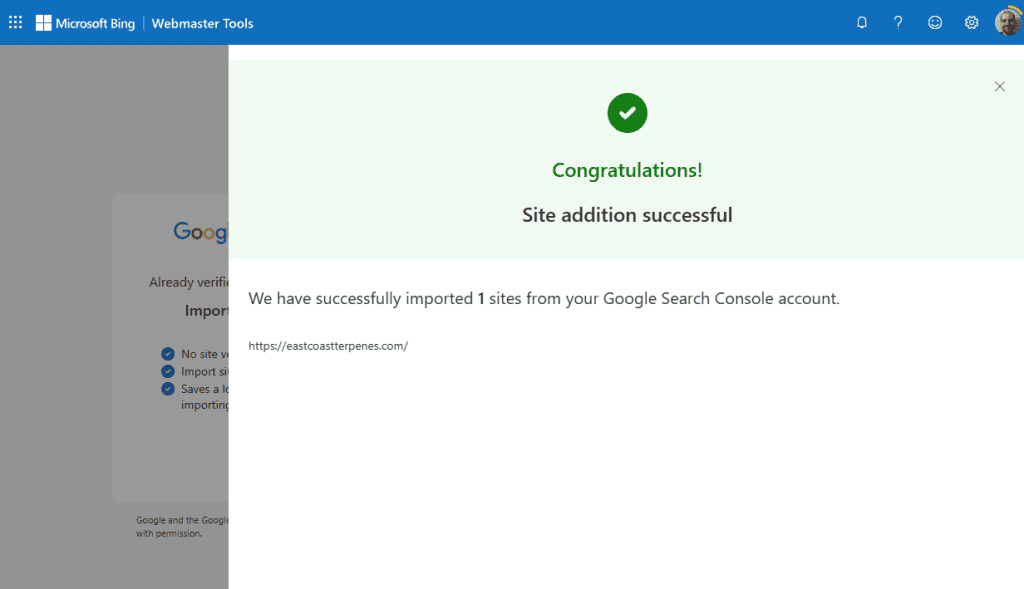
Click Done to return to the home screen. Then navigate to the Sitemaps page.
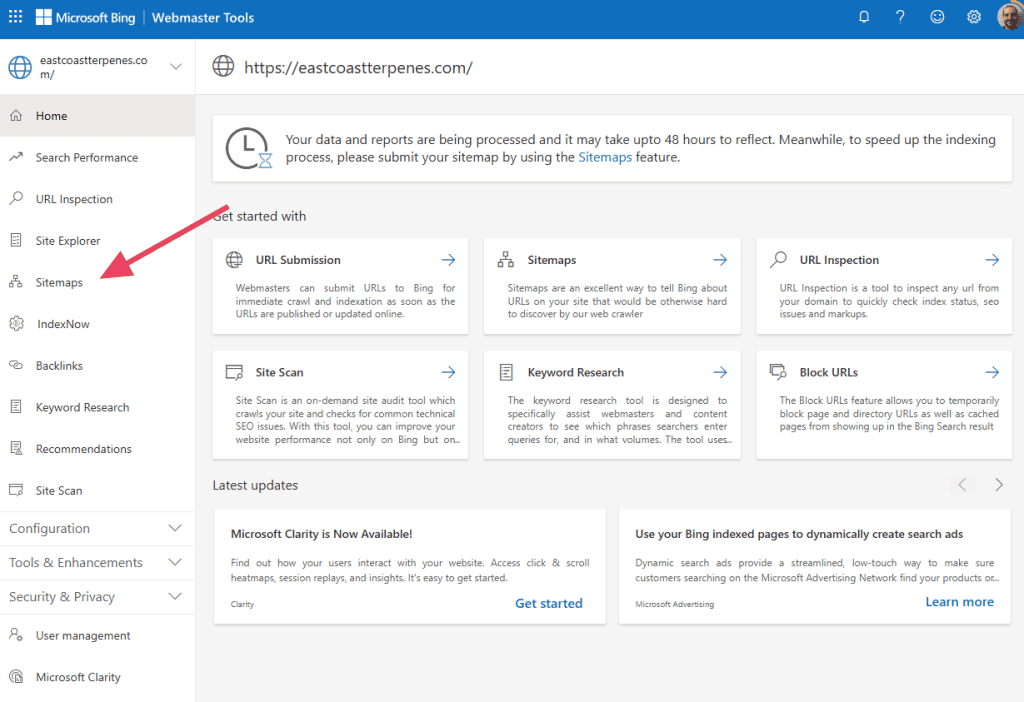
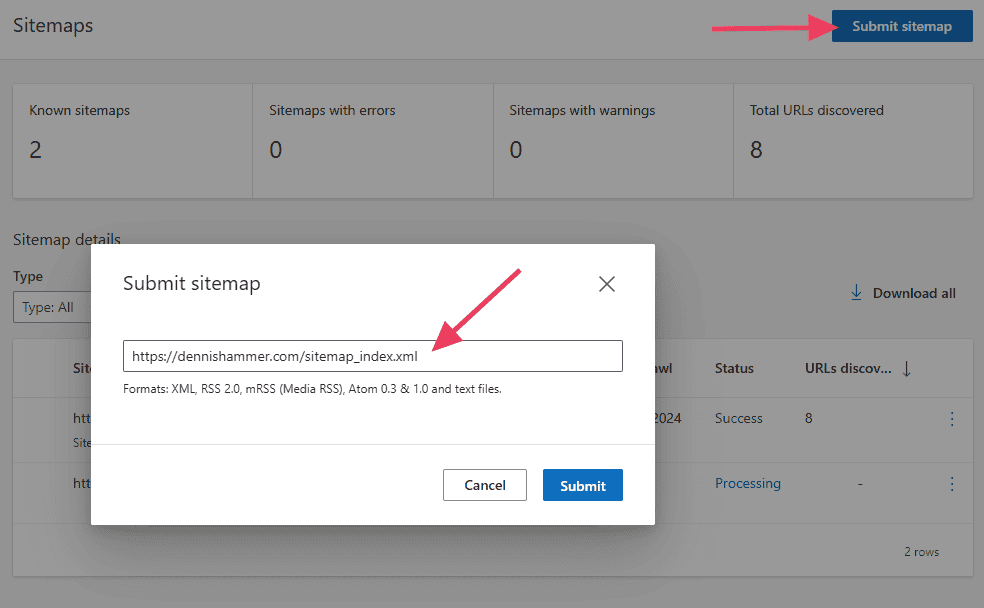
Click the Submit Sitemap button, enter your sitemap’s URL in the field, and click Submit.
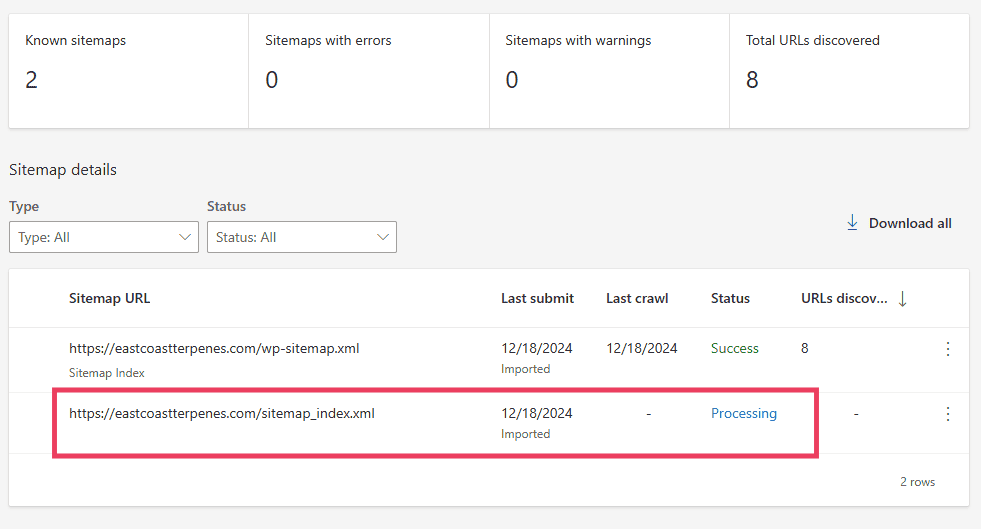
After submitting, your sitemap will be in the “processing” stage. Processing takes a few minutes up to several days, so revisit Bing Webmaster tools to verify that it worked.
How to Create an HTML Sitemap
Like we mentioned earlier, HTML sitemaps aren’t technically necessary, but they’re nice to have.
They offer some small benefits, like improving your navigation for users and creating internal links to all of your pages. And since search engines will crawl them, HTML sitemaps have some impact on SEO.
Like an XML sitemap, an HTML sitemap would need to be updated every time you add or remove a page on your site. This means making it manually would require a lot of work. It’s better to use a plugin that updates the HTML sitemap every time your site changes.
We recommend using the Simple Sitemap plugin. This is a basic plugin that adds a sitemap Gutenberg block to your WordPress website, which means you can add an HTML sitemap to any page or post.
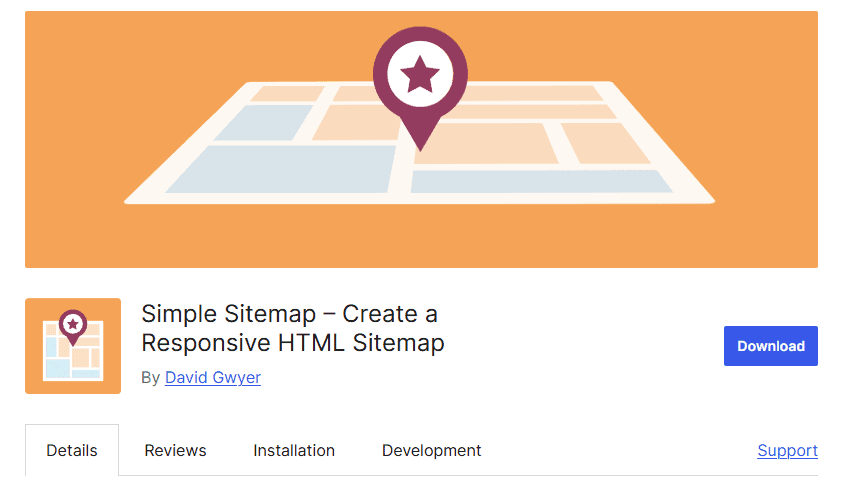
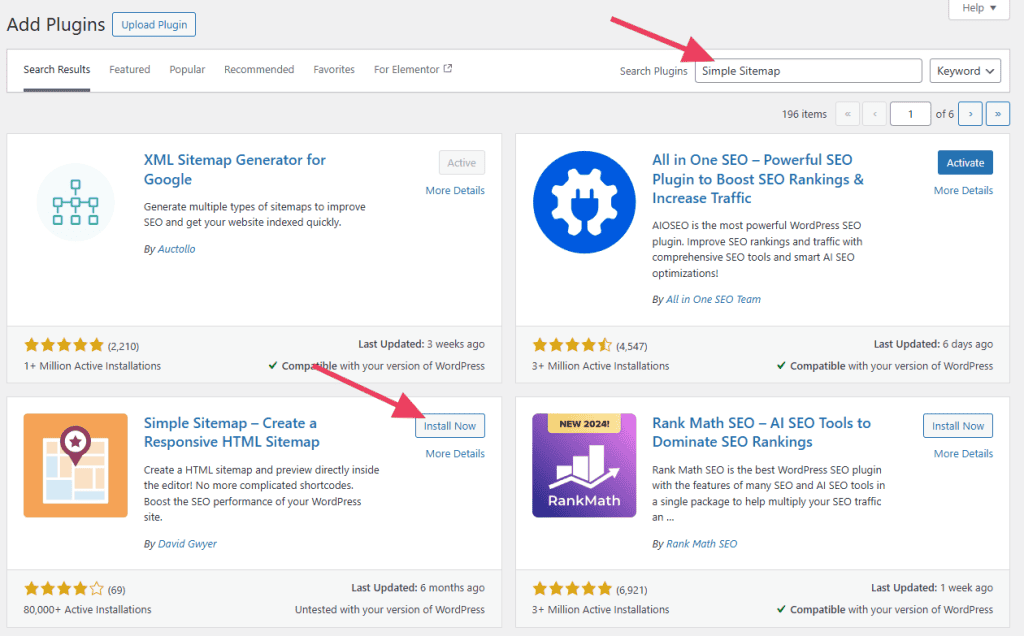
To install Simple Sitemap, visit Plugins > Add New in the WordPress dashboard. Search for “Simple Sitemap,” click Install Now, then click Activate.
Next, create a new page in your WordPress dashboard. Or if you want the sitemap to appear on an existing page, navigate to that page’s editor.
In the page editor, click the + icon to add a new block. Use the search bar or the Browse All button to find the Simple Sitemap block.
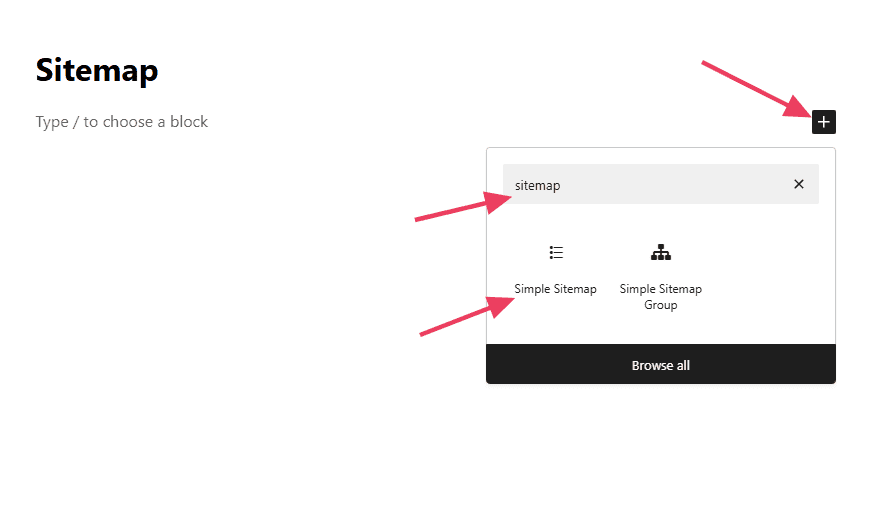
Inserting the Simple Sitemap block will create an HTML sitemap of the top level pages of your site.
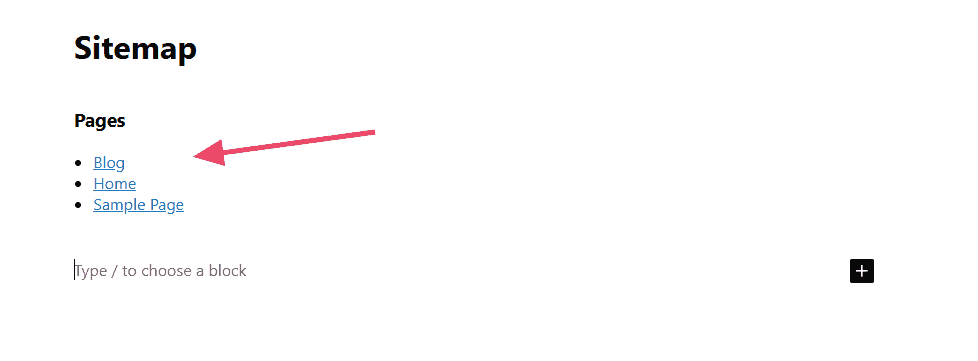
Inserting the Simple Sitemap Group block will create an HTML sitemap of ALL of the pages and posts of your website.
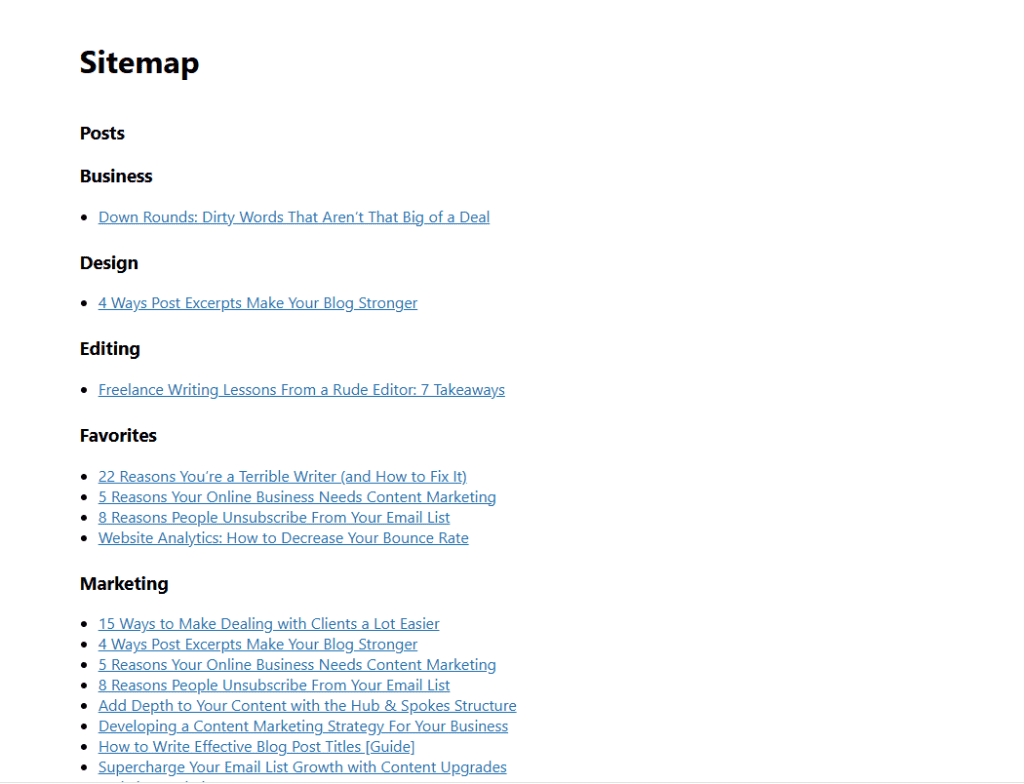
Make sure to hit Save Draft or Publish before leaving the page.
WordPress Sitemap FAQs
Here are some common questions people ask about WordPress sitemaps.
What is a WordPress Sitemap?
A WordPress sitemap is a file that lists your website’s pages to help search engines crawl and index your content.
Why is a sitemap important for my WordPress site?
A sitemap improves search engine visibility by ensuring all important pages are indexed and easy to find. An HTML version of a sitemap can be used by humans to explore websites.
How can I create a sitemap in WordPress?
You can create a sitemap using WordPress’s built-in feature or an SEO plugin like Yoast or Rank Math. After creating the sitemap, you can customize it to your needs.
Do I Really Need an HTML Sitemap?
An HTML sitemap isn’t strictly necessary, as most users rely on site navigation and search engines use XML sitemaps. However, it can be helpful for improving user experience on large or complex websites by providing an organized overview of your content.
How do I submit my WordPress sitemap to search engines?
Submit your sitemap by adding its URL to tools like Google Search Console or Bing Webmaster Tools. That said, search engine crawlers will find your sitemap eventually even if you don’t manually submit it to them.
How often should I update my WordPress sitemap?
Update it whenever you publish new content or make significant changes to your site. WordPress’ default sitemap feature and all of the popular SEO plugins will manage your sitemap whenever you add or remove content.
Can I customize my WordPress sitemap?
Yes, you can modify which content appears and adjust settings like priority and update frequency. For instance, you may want some content excluded from search engine crawling.
What should I do if search engines aren’t indexing pages from my sitemap?
Check for errors in your sitemap file, ensure it’s submitted correctly to search engines, and verify that your robots.txt file allows crawling.
Create Your WordPress Sitemap Today
A sitemap is a powerful tool for improving your WordPress site’s SEO and usability. Whether you use WordPress’s built-in feature or an SEO plugin, creating a sitemap makes your content easily discoverable by search engines and users. With the steps outlined here, you’re well-equipped to make your site more organized and visible.
Which method do you prefer to create a WordPress sitemap? Let us know in the comments!


Leave a Reply