In this guide, Staging site: How to create and mange a test environment, we will show you how to create a site staging environment and how to facilitate the “push” with just one click. The terminology “push” in this context refers to the process where you transfer the modifications from the site staging environment to the production website.
Let’s start by looking at when it’s useful to create a staging environment and then figure out how to create a site staging, protect it from unwanted access and transfer the changes to the live site.
Table of Contents
What is site staging and what is it used for?
By creating a site staging environment you create a real copy of your website on which you can work on. Staging allows you to make changes, add new features to the site or modify existing ones, without affecting and interfering with what happens on the site accessible to visitors.
The staging environment is used to recreate the site, modify it and test it before launching it live. By working on the staging environment of the site rather than the live site, you avoid jeopardizing the user experience of those who visit your site.
Therefore, when you’re done developing the site you can make sure everything is functioning properly, and only after you’ve done that will you be able to make the changes effective.
Working directly on the active site could cause problems to compromise its functioning.
In this guide, you”ll see how to create a site staging using Softaculous, but before we begin, let’s see what it’s all about.
What is Softaculous?
Our WordPress hosting, shared hosting, VPS cloud hosting and dedicated servers all come with Softaculous. It’s an easy-to-use interface that allows you to set up any script in just a few steps. You can use Softaculous to install WordPress with a single click or do the same with other CMSs like Joomla or PrestaShop.
In addition to installing CMSs from scratch, Softaculous also allows you to import existing installations, and of course, to create a staging of your site. Let’s see how it works.
Importing an installation to Softaculous
If you’ve already installed WordPress on your site, but haven’t used Softaculous to do so, you’ll need to import the installation before you can use the staging feature.
For example, perhaps you installed WordPress manually or used a different installer, in all these cases you just need to follow these simple steps to import the installation.
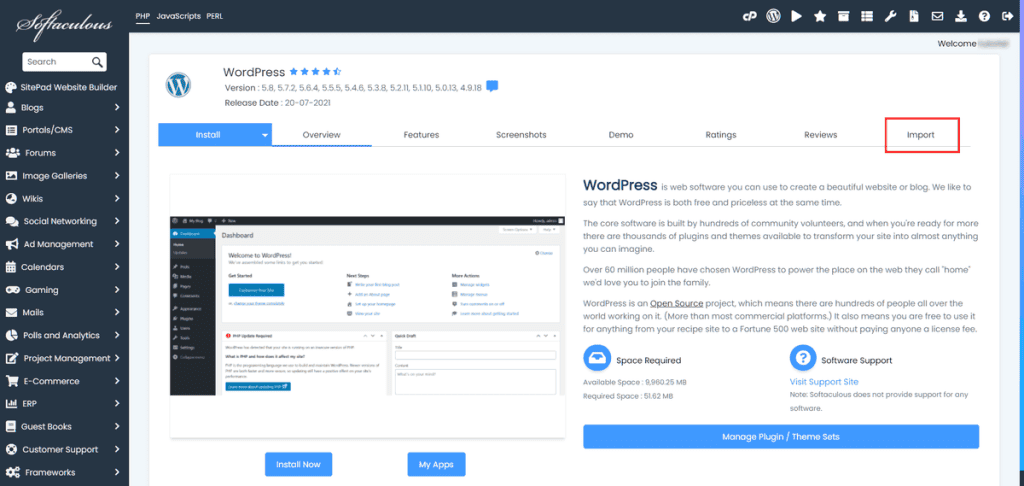
First, you just need to go to the cPanel and look for the Softaculous Apps Installer section and then click on WordPress.

A new window will then open where you will need to click on the Import heading.
To continue, you’ll have to enter the data that you’re asked for:
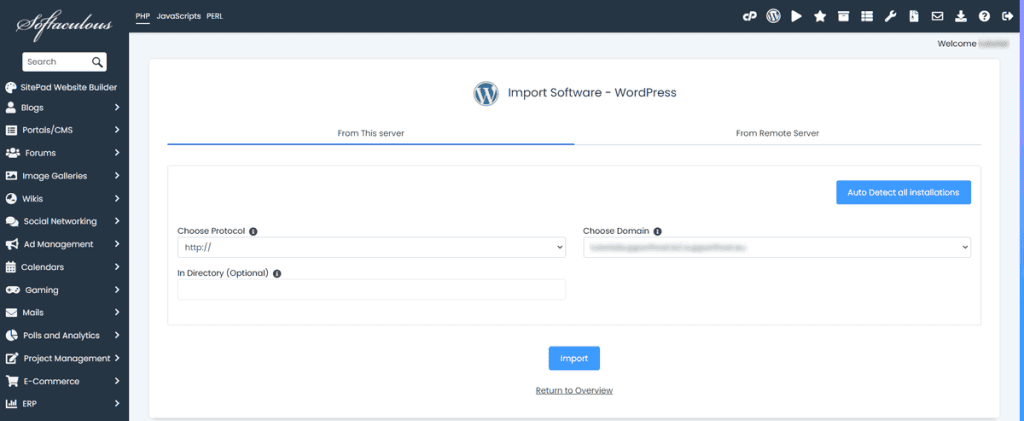
Choose protocol: just indicate the protocol used by your site (http or https)
Choose domain: if there is only one domain connected to your account, you will have only one option.
In the folder: here you must indicate the location where WordPress is installed. If it’s in the root directory you can leave it blank.
After filling in, click on Import and wait for the operation to complete. At this point, we can proceed with the next step, which is how to create a site staging.
How to create a site staging
By clicking on WordPress from the Softaculous Apps Installer section of cPanel and then on Installations you will be able to see all the installations present.
In this example, there’s only one, but if you have more than one you’ll need to choose which one you want to create a copy of and click on the icon you see in this screenshot to start creating the staging:

In the new window, you must fill in the necessary fields to proceed with the creation of the staging.
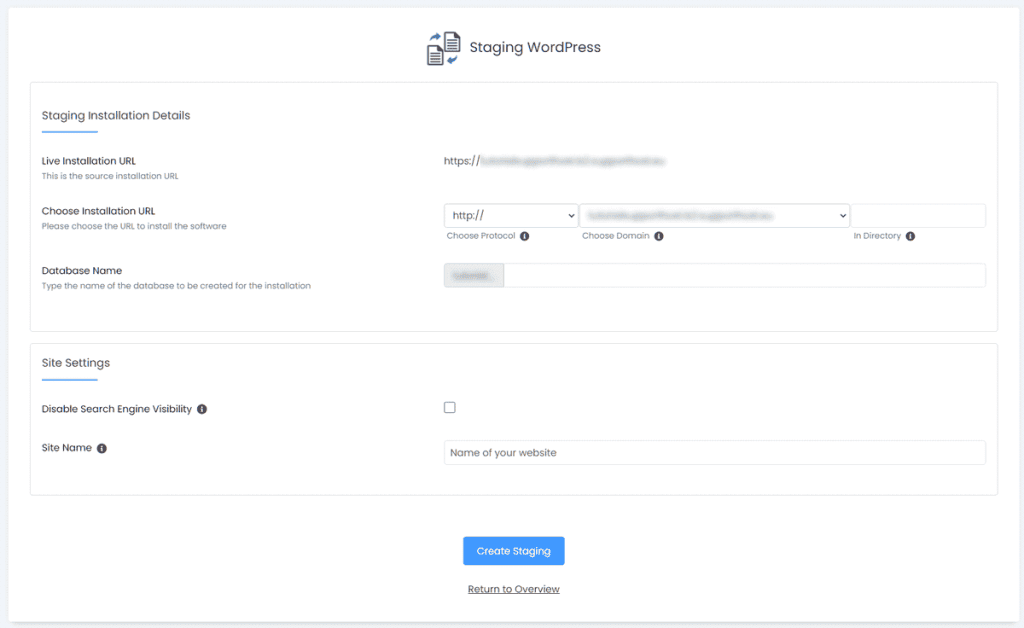
Live Installation URL: indicates the location of the current installation, namely the active version of your site. The position is automatically detected.
Choose Installation URL: in this field, you have to indicate the folder where you want to create the staging. In our case, we chose to create a folder simply called ‘staging’.
Database Name: to create the staging the current database of the site will be cloned. This will be the name of the new database. You can leave it as default or change it if you find it more convenient to remember.
In the Site Settings section we see these two options:
Disable Search Engine Visibility: by checking the box next to this item, you are indicating to the search engines that you do not want your site to be indexed.
Site Name: you can use a new name for staging the site or leave it blank if you want to use the same one as the active site.
When you are done click the Create Staging button to continue. At the end of the process, a message will appear telling you that the creation was successful. As you can see on this screen you are also shown the address from which to access the copy of the site you just created.

The first thing you can do is to open the address to check that the site has been copied correctly and that there are no errors. After that, you can start working on your site and make all the necessary changes.
Keep in mind that the changes you make on staging the site will not affect the main site and vice versa. This means that if you make changes to the active site, you won’t see those changes on the staging copy you created.
For this reason, to avoid discrepancies, while making changes it would be better to temporarily block new registrations and user comments.
As we have already seen, in order to create the staging, the database has also been copied. However, if you do not stop some activities on the site such as registrations or comments, only the database of the active site will store this information.
This means that the database of your staging copy will be different from that of the main site. In these cases when you go to make the changes effective, you will have to uncheck the Push full database option and, in this way, the databases will not be synchronized.
Synchronizing the databases means you will lose this data. We will come back to this point later when I explain how to push the changes.
To get a real-time idea of the changes you’re making, just visit the staging address. If you don’t protect your staging installation, the site will be visible to anyone who visits the address. Let’s see how to protect the environment you’ve created with a password.
How to protect a staging environment
To make sure that the staging environment of the site you have just created is visible only to you or to those who need to make changes, you can also protect access.
To do this, just use the Folder Privacy settings from the cPanel where you can protect the folder with a password. You will simply have to set a username and password for the folder where the staging installation is located.
Maintenance plugins allow you to show users a courtesy page while you are making changes to the site. If you activate a maintenance plugin in the staging environment you will need to disable maintenance mode before pushing the changes. After updating the site and launching it live you can then re-enable maintenance mode.
How to PUSH the changes
In order for the changes to your site to take effect, you must replace the current version of your site with the staging version you’ve been working on.
From the cPanel open Softaculous Apps Installer and then click on the highlighted icon in the screenshot below to access All Installations.

At this point, next to the staging installation you’ll see the Push to live button (shown in the screenshot below) that allows you to push the changes to the live version of your site.
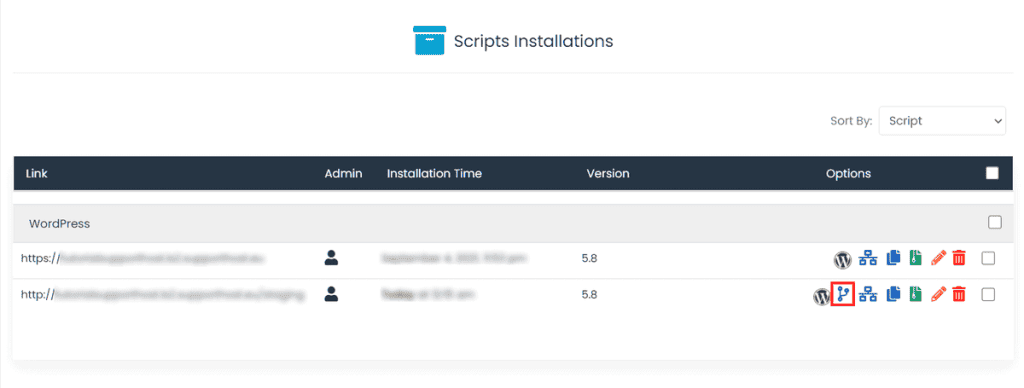
After clicking on it, you will be able to access the options section. You can leave the default options if you want all the staging installation files to be overwritten. In this case, the database of the active site will be replaced by the one of the staging version.
If, instead, you want to change some of these options click on Customize.
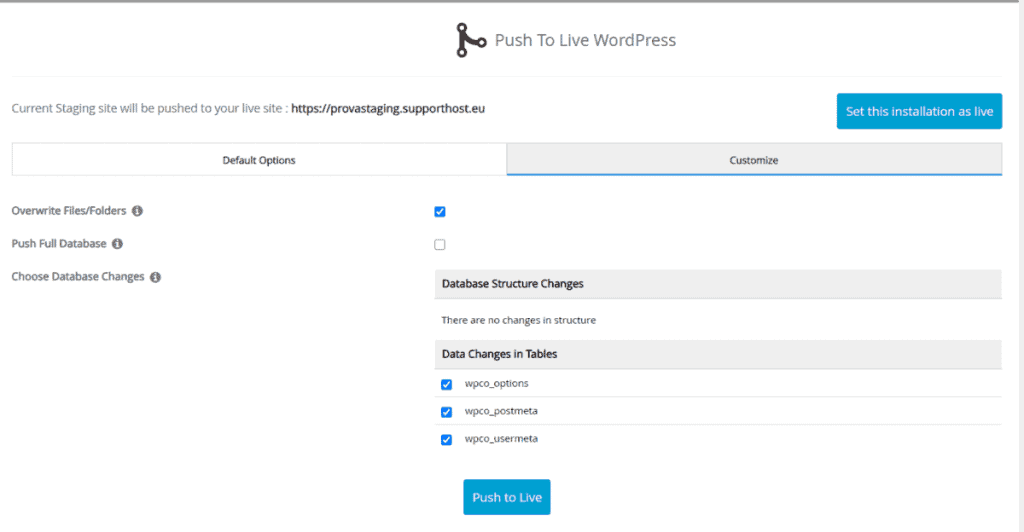
Overwrite Files/Folders: this option allows you to overwrite files and folders over those present in the current installation.
Push Full Database: as I have explained before this is the time to decide if you need to keep the database of the live site or replace it with the staging version. If you haven’t blocked new user registration activities or comments on your site you don’t need to overwrite the databases, or else you will lose the data. In other cases, you can check this box.
Choose Database Changes: here you will see the database tables that will be overwritten, you can also choose to select only some of them.
When you are done, just click on Push to live to proceed and then wait for the procedure to be completed. When finished, you will be notified with a message that your site has been updated.
The first thing to do now is to visit your site and check that the changes have been made and, most importantly, that they have not caused any unexpected errors. If you find something wrong you can check the error log to find the cause.
Delete a staging
If you’re happy with your changes after updating the site, it’s best to delete the staging environment you’ve created. It wouldn’t make sense to keep a staging that you’re not using on the server plus, it may even put your WordPress security at risk.
In addition, changes done in the active versions will not be included in the staging environment. So if you need to make subsequent changes you will need to create another staging of the site first.
Go back to the page with All installations and click on the red trash icon next to the staging installation you want to delete.
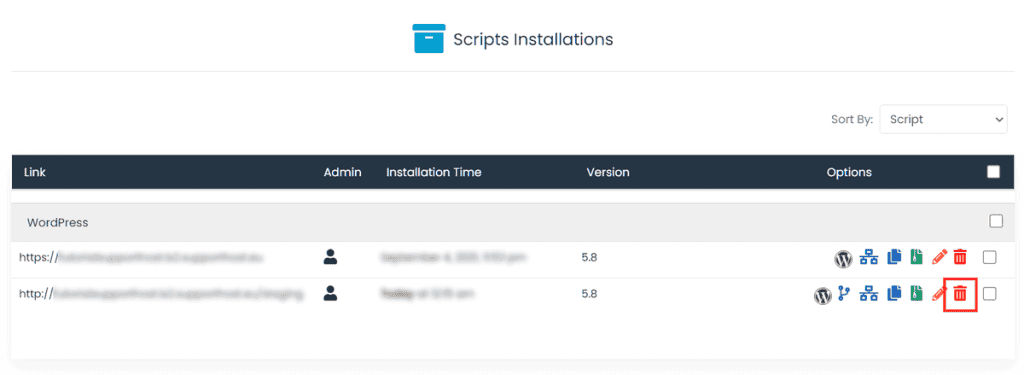
Before proceeding make sure you are deleting the staging installation and not the active site installation.
A new window will open asking you to confirm the operation. Clicking on Remove Installation will delete all the data and the database you’ve created for the staging environment of the site.
Conclusion
As you may have guessed, creating a staging copy of your site gives you peace of mind to work on the changes you want to bring in, before making the modifications effective.
Were you able to create your staging environment by following this guide Staging site: How to create and mange a test environment? Let me know in the comments below.


Leave a Reply