
Finding your image on someone else’s website is frustrating! You poured time, creativity, or money into capturing or designing them only to watch someone else claim the credit.
The truth is, protecting images in WordPress isn’t something most site owners think about until it’s too late. And when they do, many settle for quick fixes that don’t really get the job done.
In this guide, we’ll show you several ways to protect images on WordPress so you can keep control of your work and maintain your brand.
Table of Contents
Why You Should Protect Your Website Images
There are several reasons why you may want to protect images on WordPress and stop people from downloading or reusing your images without your permission.
- Selling images for revenue: If you offer your own photos or digital artwork, you’ll want to display previews while keeping the full-resolution versions secure.
- Restricting access to members: If your site has a members-only area, protecting your images prevents them from being shared freely outside your community.
- Hosting exclusive or original visuals: If you’ve created custom graphics, screenshots, or unique photos, it’s important to stop others from using your work without approval.
Those are just some examples, but you may have other reasons to secure your media. No matter the reason, here’s the reality.
No method can guarantee 100% protection. Determined users will still find ways to access your files.
However, there are tools and techniques that can make it significantly harder for most people to download or misuse your images.
How to Tell If Your Images are Being Used by Others
Ideally, anyone who uses your images will thank you with a link back to your website. You can monitor for backlinks using an SEO tool like Ahrefs to spot these links. You can also set up a Google Alert for mentions of your name, website, or URL.

But what if other sites use your content without your consent and/or don’t notify you?
The quickest way to figure it out is with a reverse image search. Go to Google.com, click on the camera icon to search by image. Here you can upload the image or insert the link.

Click Search to start the search and Google will show you matches of your image from around the web.
If you find images that have been used in violation of the license, you can protect images on WordPress by contacting the site owners to request their removal. If that doesn’t work, you may have to submit a DMCA takedown notice to the website’s hosting provider or speak with an attorney.
6 Common Ways to Protect Images on WordPress
Now that you understand how copyrights work, let’s look at six ways to protect images on WordPress.
1. Add a Copyright Notice
Your first step is to add a copyright notice to your website. Technically, this isn’t required because everything you create and publish is copyrighted automatically, but it gives you something to point to if someone uses one of your images.
Typically, copyright notices are placed in your website’s footer so they appear on every page of your site and they are easy to find. They’re simple and look like this:
Copyright © 2025 Site Title. All Rights Reserved.

Many WordPress themes come with this notice by default, though you may have to edit the content to include your site’s or business’ name.
If you don’t want to change your copyright notice every year, add the following PHP code to your footer.php file.
Copyright ©
<?php $the_year = date("Y"); echo $the_year; ?>
<?php bloginfo('name'); ?>
All Rights Reserved.
You will still see the images if you are logged into the WordPress dashboard. These protections are only for visitors who aren’t logged in and visitors who don’t have file upload permissions. If you’re unsure how it works, you can learn more about the different WordPress user roles.
If visitors try to print the page or save as a PDF, the protected images will be blurred.
Protected images also become blurry if the user tries to take a screenshot using common keyboard shortcut combinations.
2. Install an Image Protection Plugin
An easy way to protect images on WordPress is by installing a plugin that does most of the work for you. Selective Image Guard by Jose Mortellaro is a simple and quick way to protect images on WordPress. There is a free version and pro version of the plugin.

Free Version
- Applies a blur filter to images when users try to use keyboard shortcuts to make a screenshot.
- Blurs protected images when a user attempts to print the page.
- You control which images are protected.
- Stops users from opening browser developer tools to inspect and steal images.
- Detects when JavaScript is disabled so your protection features aren’t disabled.
Pro Version
- Apply protection to all images across your website with a single setting.
- Protects your WordPress featured images and WooCommerce images.
- Apply image protection by post type.
- Add a customizable watermark to your images for extra security.
- Get priority support from the plugin author.
Using Selective Image Guard (Free Version)
It’s important to point out again that there is no 100% effective method to prevent users from stealing your images. They will always find a way because the images have to be accessed by the browser somehow.
But a plugin like Selective Image Guard serves as a deterrent. Many people will try to download your image, run into an obstacle, and give up.
How does it work? First, you’ll need to install and activate the plugin.
Visit Plugins > Add Plugin and search for “Selective Image Guard.”

Click the Install Now button, and then Activate.

Next, visit Media > Library and select the image you want to protect.

Click the Protect this image option to activate it.

From here, the plugin works automatically. (If you care how the plugin works in the background, explore the creator’s documentation.)
Once the plugin is running, visitors on your website won’t be able to see the image’s URL, even if they open their browser’s developer tools. The image and URL are replaced by a placeholder.

3. Add a DMCA Badge
The Digital Millennium Copyright Act (DMCA) is a United States copyright law that protects digital work. It offers a process to get stolen content removed quickly by putting the burden of removal on Internet Service Providers (ISP), web hosting providers, and search engines.
Placing a DMCA badge on your website doesn’t achieve anything on its own to protect images on WordPress, but it notifies visitors that you’re aware of the law and how to protect yourself.
Visit the DMCA badge page and copy the code for the badge you want to display on your website. Then paste the code wherever you want the badge to appear. Most website owners put it in their footer.
4. Disable Right-Click
A simple way to protect images on WordPress is to make it harder for visitors to download them by disabling the right-click feature on your website. Since most users simply right-click the image to save it to their device, this can deter a lot of people.
This method isn’t perfect, of course, since an advanced user can open the browser’s Developer Tools and find the image’s URL. There are also browser extensions that will re-enable right-clicking. Nevertheless, this will stop most people from taking your images.
Disable Right-Click with a Plugin
Install and activate WP Content Copy Protection & No Right Click. This plugin prevents users from copying your content through multiple CSS and JavaScript techniques. It also disables text selection and keyboard shortcuts.

Once installed, visit Copy Protection > Settings. Make sure to select Enable next to Posts protection by JavaScript and Homepage protection by JavaScript.

If you like, you can also customize the messages users see when they try to copy your content.
Disable Right-Click Manually
If you don’t want to install a WordPress plugin, you can disable right-clicking manually by adding some code to your theme file.
Before changing your theme files, you should also use a child theme. This protects your changes, otherwise you’ll lose your work the next time you update your theme.
In your WordPress dashboard, go to Appearance > Theme File Editor. Scroll down to find your footer.php file on the right side of your screen. Open this file and add the following code just before the </body> tag.
<script type="text/javascript">
jQuery(document).ready(function () {
//Disable cut copy paste
jQuery('body').bind('cut copy paste', function (e) {
e.preventDefault();
});
//Disable mouse right click
jQuery("body").on("contextmenu",function(e){
return false;
});
});
</script>
5. Disable Hotlinking of Images in WordPress
Some people will use your images on their site by simply loading them from the original source (your site) using a link. Not only does this display your images without your permission, it also puts additional load on your web hosting server and bandwidth usage.
Fortunately, you can protect images on WordPress by disabling this while still allowing images to be viewed on your website and in search results by editing your .htaccess file.
Enable Hotlink Protection in .htaccess
First, access the .htaccess file in your WordPress site’s root directory.
Then add the following code to the file. Make sure to replace “yourwebsite” with your domain name.
#disable hotlinking of images with forbidden or custom image option
RewriteEngine on
RewriteCond %{HTTP_REFERER} !^$
RewriteCond %{HTTP_REFERER} !^http(s)?://(www\.)?yourwebsite.com [NC]
RewriteCond %{HTTP_REFERER} !^http(s)?://(www\.)?google.com [NC]
RewriteRule \.(jpg|jpeg|png|gif)$ – [NC,F,L]
Enable Hotlink Protection in cPanel
If you don’t want to edit the htaccess file, you can enable hotlink protection from cPanel if your WordPress hosting provider (like SupportHost) offers this feature.
Log into cPanel through your hosting account.

Find the “Hotlink Protection” tool.

Click the Enable button.

6. Use a Watermark on Your WordPress Images
Another option is to protect images on WordPress is to add watermarks to your images. Watermarks are text, logos, or other markings on top of your images that make it obvious that you’re the owner. This deters people from downloading them because the image is less useful to them with the mark across its face.

But if someone does use one of your watermarked images, at least you get free publicity because everyone will see your name or logo. In fact, many creators hope people share their watermarked artwork.
To manually watermark an image, open it in your preferred photo editor. If you don’t have an editor on your device, Canva has a free plan.
Add content across the face of your image that clearly shows your ownership. You could use your name, website URL, or company logo. Use something that’s transparent enough so people can see the image, but opaque enough so it’s easy to see. Here’s an example.
If you don’t want to edit your images manually, use the Image Watermark plugin to automatically watermark images in your WordPress Media Library. It can also bulk watermark previously uploaded images.
After installing the plugin, enable watermarking in the settings. You can upload your own design, choose where the watermark will appear, and set the scale and transparency.
How to Handle Stolen Images
If you believe someone is using your image inappropriately, you’ll want to take action right away to protect images on WordPress. It’s important to defend your copyrights so the theft doesn’t keep happening. Follow these three steps to handle your stolen images and videos.
Step 1: Identify if the Image was Actually Stolen
Before taking action, confirm that your image has been used without permission. Sometimes people use stock photos that look similar or assume an image is free to use. Make sure it’s truly your work before moving forward.
Step 2: Send a Takedown Request Email
It’s important to remember that not all image theft is intentional. Someone may believe they have the rights to your image or simply not understand copyright laws. Instead of jumping straight to legal action, start with a polite but firm email.
Clearly state that you own the rights, explain where the image is being misused, and request that they remove it or provide proper attribution. In many cases, this resolves the problem quickly.
Here’s some sample copy you could use for your email:
Subject: Request to Remove Unauthorized Use of My Image
Hello [Name or Website Owner],
I noticed that one of my images is being used on your website at [URL of the page]. This image is my original work, and I have not given permission for its use.
I kindly ask that you either:
- Remove the image from your website, or
- Contact me to discuss licensing options if you’d like to continue using it.
I appreciate your prompt attention to this matter. Please confirm once the image has been removed.
Thank you,
[Your Name]
[Your Contact Information]
Keep a record or documentation of the email you sent. If you later need to protect images on WordPress by defending your intellectual property in court, you’ll need to show that you made a good faith effort to resolve the situation.
Step 3: Send a DMCA Takedown Notice
If your request is ignored, the next step is to protect images on WordPress is to issue a DMCA takedown notice. This formal complaint, submitted to the website host or platform, requires them to remove your copyrighted work from their site.
Most hosting providers and platforms comply with DMCA requests promptly to avoid liability, so this is a powerful tool to protect images on WordPress.
First, identify the platform that’s hosting the content. This is not the person or company that runs the website. You’re looking for the hosting platform that stores the website files.
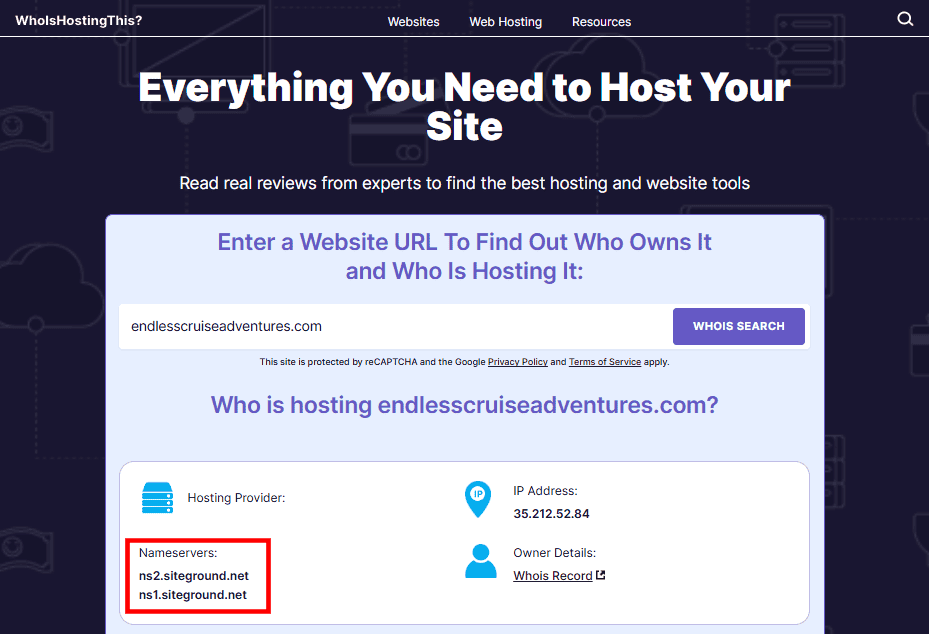
Next, look on the host’s website for instructions to submit a DMCA takedown request. Some sites offer a form while others simply give you an email address. You can find the host by searching the site’s URL in WhoIsHostingThis? In this example, the host is Siteground.
In some cases, a host will use a third-party agent to manage their DMCA requests. So you may need to identify the DMCA agent by searching the online DMCA Designated Agent Directory.
Your takedown request must include the following information, according to 17 U.S.C. § 512(c)(3)(A):
- A physical or electronic signature of a person authorized to act on behalf of the copyright owner.
- Identification of the copyrighted work (or multiple works) claimed to have been infringed.
- Identification of the material that is to be removed or disabled, and any information the host needs to locate the material.
- Your contact information (address, telephone number, and email).
- A statement that you have a good faith belief that use of the material is not authorized.
- A statement that the information in the notice is accurate.
Sample DMCA Takedown Request
Here is some sample copy to send a DMCA takedown request. Alternatively, you can also use a takedown notice generator to create the email for you.
Dear [REGISTERED AGENT FROM THE DIRECTORY]:
This letter is to serve as official notification of copyright infringement pursuant to the Digital Millennium Copyright Act (”DMCA”) 17 U.S.C. § 512(c) (3) for materials on [NAME/URL OF WEBSITE].
I, [YOUR NAME], am the exclusive rights holder of the following copyrighted material that is posted without authorization on your website:
- [DESCRIPTION OF MATERIAL & URL]
- [DESCRIPTION OF MATERIAL & URL]
- [DESCRIPTION OF MATERIAL & URL]
Upon receipt of this notice, I request that you remove or disable access to the materials identified above as being the subject of infringement.
I am providing this notice in good faith and with the reasonable belief that my rights as the exclusive rights holder are being infringed.
Under penalty of perjury, I certify that the information contained in this notification is both true and accurate and that I am the owner of the copyrighted material identified above.
If you wish to discuss this with me please contact me directly using the information below:
Name:
E-mail:
Mailing address:
Phone:[YOUR SIGNATURE]
FAQs: How to Protect Images on WordPress
Is it legal to copy images from other websites?
No, unless the image is licensed for reuse or you have explicit permission. Most online images are protected by copyright. Don’t use any image unless you see that it has a Creative Commons license.
Can I completely prevent image theft on my site?
No method is foolproof to protect images on WordPress. You can make theft harder with plugins, watermarks, and hotlink protection, but determined users can still find ways around it.
How effective are watermarks in preventing image theft?
Watermarks don’t stop theft entirely, but they discourage misuse by making images harder to repurpose and clearly marking them as yours. The watermark stays with the image even if someone takes a screenshot.
What should I do if I find my images being used without permission?
Your first step to protect images on WordPress is to start with a polite takedown request. If that doesn’t work, file a DMCA notice or consult a lawyer for further action.
Do I need to register my images with the copyright office?
No, your work is protected by copyright the moment you create it, but registration provides stronger legal standing if you need to enforce your rights.
Is disabling right-click enough to protect images on WordPress?
Not really. It stops casual users, but screenshots and source code access still make copying possible, so it’s best used with other protections.
Can I track where my images are being used online?
Yes, tools like Google Images’ reverse search or services like Pixsy can help you find unauthorized uses of your work. Once you find the image, you can follow the steps above to protect images on WordPress.
Protect Images on WordPress Final Thoughts
Protecting your images on WordPress is all about balance. You can’t stop theft entirely, but you can make it far more difficult for others to misuse your work.
By combining tools like plugins, watermarks, hotlink protection, and disabling right-click, you protect your brand, save bandwidth, and keep control over your content. The key is to stay proactive so your images continue working for you, not someone else.
Ready to build your WordPress site?
Try our service free for 14 days. No obligation, no credit card required.


