

Are you running Facebook or Instagram ads but unsure what happens after someone clicks? You’re tracking ad clicks, but did those users buy, add to the cart, or just leave your homepage?
Without the right tracking in place, you’re spending money and guessing. Which is the most expensive way to run ads.
The good news is that this is an easy fix. With the Facebook pixel (now called the Meta pixel), you can track exactly what visitors do on your site after they see or click your ads. Once it’s set up, you’ll know which ads drive sales, you can retarget people who showed interest, and you can stop wasting budget on ads that don’t convert.
Below, you’ll learn how to create your pixel, add it to your WordPress site, confirm it’s working, and track specific actions like purchases and sign-ups.
Table of Contents
What Is the Facebook Pixel (Now Meta Pixel)?
The Facebook pixel is a small snippet of JavaScript code you add to your WordPress site. When a visitor takes actions such as viewing a page, adding a product to their cart, or completing a purchase, the pixel records those actions and reports them back to Meta. It’s now officially called the Meta pixel, though many still use the old name.
Here’s what it lets you do:
- Track conversions. See how many people bought, signed up, or filled out a form after interacting with your ad.
- Retarget visitors. Show ads to people who viewed a product or abandoned their cart.
- Build lookalike audiences. Let Meta find new people who resemble your best customers.
- Improve ad delivery. The more data the pixel collects, the better Meta gets at showing your ads to the right people.
Retargeting is where a lot of the value in Facebook ads comes from. Someone who already viewed a product or left items in their cart is far more likely to come back and buy than a stranger who’s never heard of you. The pixel lets you put a gentle reminder in front of those people, which is usually some of the cheapest, highest-converting traffic you can get.
Conversion tracking matters just as much. Once you know how many sales each campaign produced, you can calculate your return on ad spend and see which ads are performing the best.
What You Need Before You Start
Before you can create a pixel, you’ll need a Meta Business account with an ad account linked to a Facebook page. The pixel lives inside your ad account, so a personal Facebook profile won’t work here.
If you’ve run ads before, you likely have this set up already. If not, you’ll need to create a business account through Meta Business Suite first. It’s worth checking now, because the manual setup option only appears when you’re working inside a proper business account. If you only see a partner integration option and most other choices are greyed out, that’s the sign your account still needs setting up.
How to Create Your Meta Pixel
Creating the pixel takes a few minutes, and it all happens inside Meta’s tools.
To get started, head into your Meta Business Suite, then click All Tools and select Events Manager.

Once you’re inside Events Manager, click the Connect Data button. When the prompt appears, choose Web as your data source and click Next. This tells Meta you want to track activity on a website rather than an app.

Next, select Create new dataset and give it a name you’ll recognize, like your site or store name. Don’t worry if it asks for a “dataset” rather than a pixel. Meta now stores pixels inside datasets, but it works the same way for tracking.

When Meta asks how you want to connect your site, choose Install code manually. After that, it will display your pixel-based code. Copy the full code and save it somewhere safe, since you’ll need it for most of the methods below.

Meta also usually offers automatic advanced matching, which lets the pixel send extra customer details like email addresses in hashed form to improve event matching. It’s optional, and you control which data to share, but turning it on usually improves tracking quality.

That’s it. Your pixel now exists, so the next step is getting it onto your site.
How to Add the Meta Pixel to WordPress
There are a few ways to install the pixel, from beginner-friendly plugins to editing your theme files by hand. Let’s go through them.
Use a Plugin Like Pixel Cat
Pixel Cat – Conversion Pixel Manager is a plugin built specifically for the Meta pixel, with around 40,000 active installations. It’s beginner-friendly, still actively maintained, and it now supports the Conversions API too.
To set it up, go to Plugins > Add Plugin, search for Pixel Cat, then install and activate it. On the plugin’s main settings page, click the Add Pixel button.

In the popup that appears, choose Facebook Pixel as the type and paste in your Pixel ID (you’ll find this in Events Manager under your Dataset ID, listed as a string of numbers). Then, you also need to enter your Conversions API token. You can find this inside Events Manager, then clicking Settings and scrolling down to the Conversions API section. Then, click Generate access token, and copy that.

Once you’re finished, save your changes and the pixel is live.

Even the free version lets you connect the pixel to WooCommerce (more on this later), a feature many plugins restrict to paid plans. You can also set up events from inside WordPress, like firing the pixel on a specific page or button click. The premium version adds the product feed for dynamic product ads, custom audiences, and advanced matching, but many small stores do well on the free tier.
Use a Code Snippet Plugin Like WPCode
If you’d rather not use a dedicated pixel plugin, WPCode is a free code snippet plugin that lets you add tracking code to your header without editing theme files. It’s a good fit if you already use it for other scripts, since it keeps everything in one place.
Go to Plugins > Add New, search for WPCode, then install and activate it. Once it’s active, head to Code Snippets > Header & Footer, paste your Meta pixel base code into the Header box, and click Save Changes.

The free version handles the base pixel fine. If you run an online store and want it to track eCommerce events like purchases and add-to-cart actions, you’ll need WPCode’s premium Conversion Pixels addon available on the Pro plan and higher.
The Official Meta Pixel Plugin
You might come across a plugin called Meta pixel for WordPress. This is the official plugin from Meta. It seems like the obvious pick since it comes straight from the source, however it’s probably not the best option.
The plugin has a long history of poor reviews, and the recent feedback hasn’t improved. Users report connection errors, a “Connection Pending” status that never resolves, and performance problems. There’s also a known issue where it can deactivate itself after an update, which silently stops your tracking.
Add the Pixel Manually
If you’re comfortable with code, you can add the pixel by hand. Meta recommends placing the base code in your site’s header, right before the closing </head> tag.
The safest way to do this without a plugin is through your child theme’s functions.php file, so a theme update doesn’t wipe it. You’d hook the pixel into the page head with a function tied to wp_head, then paste your copied Meta base code inside that function.
If you’re on a block theme, you can also drop the code into a Custom HTML block in the header template part under Appearance > Editor. It won’t show up when your site is live since it’s just tracking code.

Unless you need to avoid plugins, this method is the least recommended. Editing theme files has risks and even a small error can break your site. Back up your files and check the pixel loads after saving.
How to Check if Your Facebook Pixel Is Working
Don’t skip this step. A pixel that looks installed but isn’t working is worse than no pixel, because you’ll trust numbers that aren’t real.
The easiest check is the Meta Pixel Helper, a free Chrome extension. Add it to your browser, visit your site, and click the icon. If the pixel is firing, you’ll see your Pixel ID and the events it’s detecting. Green check marks mean you’re good.

If it doesn’t detect anything right away, clear your browser cache, disable any ad blockers, or open your site in an incognito window. That fixes it most of the time.
How to Track Events and Conversions
The base code you installed tracks page views across your whole site. That’s useful, but the real power comes from tracking specific actions, which Meta calls events.
Standard and Custom Events
Meta provides 17 standard events that cover the actions most businesses care about. A few of the most common ones include:
- ViewContent when someone views a product or key page
- AddToCart when a product goes into the cart
- InitiateCheckout when someone starts checking out
- Purchase when an order is completed
- Lead when someone submits a form or signs up
Each standard event has its own short piece of code, like fbq('track', 'AddToCart'), which sits inside your base pixel code on the page where that action happens. If none of the standard events match what you want to measure, you can build a custom event instead using fbq('trackCustom', ...), for example tracking downloads of a specific PDF guide.
You don’t have to write any of this by hand though. The two easier routes are Meta’s Event Setup Tool and a plugin like Pixel Cat, both covered below.
Adding Events With the Event Setup Tool
The Event Setup Tool lets you add events by clicking elements on your live site instead of editing code, which is by far the friendliest option.
Go to Events Manager > Datasets > Settings and click Open event setup tool.

Then, enter your site URL and click Add events.

Meta loads your site with a small overlay on top. From here, you can either track a button (for click actions like “Buy Now”) or track a URL (for page loads like a thank-you page). Select the element you want, then choose the matching event from the list.

If it helps, you can attach a value and currency to an event, which gives Meta what it needs to work out your return on ad spend. Once you confirm, the event is live, and you’ll see it listed without ever touching the code yourself.
Creating Custom Conversions
Custom conversions let you measure more specific actions by adding rules to an existing event. They’re handy when a standard event is too broad. For example, instead of tracking every purchase, you could track only purchases from a particular product page.
To create one, go to Events Manager > Custom Conversions and click the button to add a new one.

You’ll give it a name, choose the dataset and the event it’s based on, then set the rules, which can key off a URL, a domain, or specific event parameters. You can also add an optional value for ROI tracking. Save it, and Meta starts measuring that conversion separately.

Setting Up Events With Pixel Cat
If you installed Pixel Cat, you can set up events right from your WordPress dashboard instead of going through Meta. Open the plugin settings and click Add Facebook Event, then choose what triggers the event.
Pixel Cat gives you a handful of trigger types:
- Page Visit runs on a single page or across your whole site
- Click on Element tracks a click on something, which you can tie to a CSS class like a button
- Hover over Element picks up when someone moves their mouse over an element
- URL Click records a click on a link to a specific address
- Exact URL Visit triggers when someone lands on a page that matches a URL you enter
Once your events are set, they show up on the Pixel Cat home screen so you can see everything at a glance.

Testing Your Events
Before you rely on any of this, test it. In Events Manager > Datasets, open the Test Events tool and enter your site URL. It opens your site in a new tab, and as you click around, the events fire in real time so you can watch them land.

While you’re there, check the Event Match Quality score for each event. Aim for 6.0 or higher. A low score means Meta is struggling to match the event to a real person, which weakens how well it can deliver your ads. Turning on advanced matching or the Conversions API usually helps that number climb.
Tracking WooCommerce Events
If you run a store, the events tied to money matter most: ViewContent, AddToCart, InitiateCheckout, and Purchase. The Purchase event is the one I’d never leave off, since it’s how you connect ad spend to actual sales.
Pixel Cat makes this simple, and you don’t need the premium version (although this packs more WooCommerce features). In the plugin’s eCommerce section, you can switch on automatic sending of the main WooCommerce events, including Add to Cart, Add Payment Info, Purchase, View Content, Search, and Add to Wishlist.
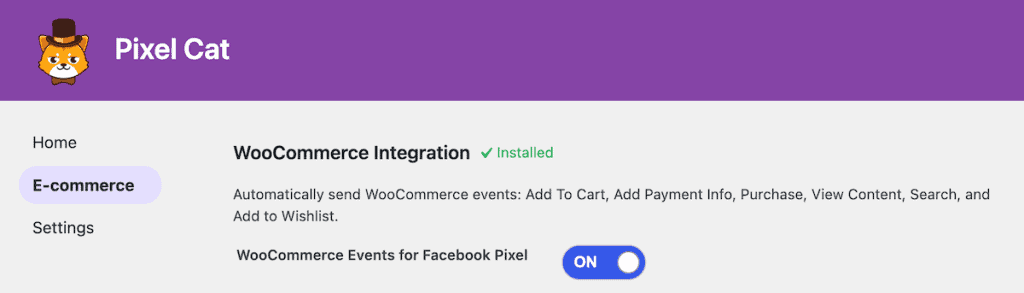
Once you’re finished, place a test order and confirm the Purchase event shows up in Test Events. A store that tracks everything except purchases is more common than you’d think, and it quietly wastes budget every day.
A Note on the Conversions API
The standard pixel runs in the visitor’s browser, which means ad blockers and privacy settings can stop events from ever reaching Meta. You lose data, and Meta gets a fuzzier picture of who’s converting.
The Conversions API (CAPI) fixes this by sending events directly from your server to Meta, where the browser can’t interfere. Running the pixel and CAPI together is the recommended setup because the two sources cover each other’s gaps, which means better attribution and stronger audiences.
Check your dataset’s settings in Events Manager for a CAPI or server-side toggle. If it’s there, enabling it takes seconds, with no server work and no extra cost. Both Pixel Cat (shown above) and WPCode can also connect CAPI through an access token if you’d rather handle it at the plugin level.

Facebook Pixel WordPress Plugins Compared
Plugin | free version | woocommerce | capi support | best for |
|---|---|---|---|---|
Pixel Cat | Yes | Yes | Yes | Easiest dedicated pixel plugin |
WPCode | Yes | No (premium addon) | Yes (premium addon) | Managing multiple scripts |
Meta pixel for WordPress | Yes | Yes | Yes | Not recommended (reliability issues) |
Manual (functions.php) | Free | No | Manual | Developers avoiding plugins |
Facebook Pixel WordPress FAQs
Is the Meta pixel free?
Yes. The pixel and its installation cost nothing. You only pay when you run ads on Facebook or Instagram.
Do I need a plugin to add the Facebook pixel?
No, but it’s the safer choice for most people. You can add the code manually, but it can get overwritten when you update or change themes. A plugin keeps the pixel in place without editing files.
Does the Facebook pixel slow down my site?
Not noticeably. The base code is small and loads asynchronously. Performance only becomes a concern if you stack a lot of custom events or several tracking scripts at once.
Do I need a Facebook business account?
Yes. You need a Meta Business account to create a pixel. Personal profiles can’t create one, and that’s often why people only see the limited partner integration option during setup.
How long does Facebook pixel data last?
That 180-day number you’ll often see is the longest someone can stay in a custom audience built from your pixel activity. Your event and reporting data lasts well beyond that, so your dashboards stay populated even after people age out of those audiences.
Closing Thoughts on Setting Up Facebook Pixel WordPress
Adding the Meta pixel to WordPress really comes down to copying a piece of code into the right place, confirming it works, then setting up the events that match your goals. Create the pixel in Events Manager, add it with Pixel Cat or WPCode, check it with the Meta Pixel Helper, and use the Event Setup Tool to track the actions that matter.
If you’re serious about your ad results, turn on the Conversions API. Browser tracking alone leaves data on the table, and that data is what helps your campaigns convert better.
Now over to you. Have you added the Meta pixel to your WordPress site, and which method did you use? Share your experience in the comments below.
Ready to build your WordPress site?
Try our service free for 14 days. No obligation, no credit card required.


